light JEEP GRAND CHEROKEE LIMITED 2019 Owners Manual
[x] Cancel search | Manufacturer: JEEP, Model Year: 2019, Model line: GRAND CHEROKEE LIMITED, Model: JEEP GRAND CHEROKEE LIMITED 2019Pages: 626, PDF Size: 3.77 MB
Page 363 of 626

WARNING!
•Never have any smoking materials lit in or near the
vehicle when the fuel door is open or the tank is
being filled.
• Never add fuel when the engine is running. This is
in violation of most state and federal fire regulations
and may cause the “Malfunction Indicator Light” to
turn on.
• A fire may result if fuel is pumped into a portable
container that is inside of a vehicle. You could be
burned. Always place fuel containers on the ground
while filling.
CAUTION!
To avoid fuel spillage and overfilling, do not “top off”
the fuel tank after filling.
Emergency Fuel Filler Door Release
If you are unable to open the fuel filler door, use the fuel
filler door emergency release.
1. Open the liftgate. 2. Push the inboard edge of the left storage bin to the
center, this will pop up the outboard edge.
3. Grab popped up outboard edge with other hand to disengage snaps.
4. Remove the storage bin.
5. Pull the release cable to open the fuel door, push the release cable back to the home position to re-seat the fuel
door latch to the closed position.
Page 369 of 626

Trailer Hitch Classification Definitions
Class Max. Trailer Hitch Industry Standards
Class I - Light Duty 2,000 lbs (907 kg)
Class II - Medium Duty 3,500 lbs (1,587 kg)
Class III - Heavy Duty 5,000 lbs (2,267 kg)
Class IV - Extra Heavy Duty 10,000 lbs (4,535 kg)
Refer to the “Trailer Towing Weights (Maximum Trailer Weight Ratings)” chart for the Maximum Gross Trailer Weight
(GTW) towable for your given drivetrain.
All trailer hitches should be professionally installed on your vehicle.
Trailer Towing Weights (Maximum Trailer Weight Ratings)
The following chart provides the maximum trailer weight ratings towable for your given drivetrain:
Page 375 of 626

Towing Requirements — Trailer Lights And Wiring
Whenever you pull a trailer, regardless of the trailer size,
stoplights and turn signals on the trailer are required for
motoring safety.
The Trailer Tow Package may include a four- and seven-pin
wiring harness. Use a factory approved trailer harness and
connector.
NOTE:Do not cut or splice wiring into the vehicle’s wiring
harness.
The electrical connections are all complete to the vehicle
but you must mate the harness to a trailer connector. Refer
to the following illustrations.
NOTE:
• Disconnect trailer wiring connector from the vehicle
before launching a boat (or any other device plugged
into vehicle’s electrical connect) into water.
• Be sure to reconnect once clear from water area.
Page 377 of 626
Speed Control — If Equipped
•Do not use on hilly terrain or with heavy loads.
• When using the speed control, if you experience speed
drops greater than 10 mph (16 km/h), disengage until
you can get back to cruising speed.
• Use speed control in flat terrain and with light loads to
maximize fuel efficiency.
Cooling System
To reduce potential for engine and transmission overheat-
ing, take the following actions:
City Driving
•In city traffic — while stopped, place the transmission in
NEUTRAL, but do not increase engine idle speed. Highway Driving
•
Reduce speed.
• Temporarily turn off air conditioning.
SNOW PLOW
Snow plows, winches, and other aftermarket equipment
should notbe added to the front end of your vehicle. The
airbag crash sensors may be affected by the change in the
front end structure. The airbags could deploy unexpectedly
or could fail to deploy during a collision.
Page 382 of 626
6. After the shift is completed and the NEUTRAL (N) lightstays on, release the NEUTRAL (N) button.
7. Shift the transmission into REVERSE.
8. Release the brake pedal for five seconds and ensure that there is no vehicle movement.
9. Press and hold the brake pedal. Shift the transmission back into NEUTRAL.
10. Firmly apply the parking brake.
11. With the transmission and transfer case in NEUTRAL, push and hold the ENGINE START/STOP button until
the engine turns off.
12. Place the transmission gear selector in PARK. Release the brake pedal.
13. Push the ENGINE STOP/START button twice (without pressing the brake pedal), to turn the ignition to the
OFF mode.
14. Attach the vehicle to the tow vehicle using a suitable tow bar.
15. Release the parking brake. NOTE:
•
Steps 1 through 4 are requirements that must be met
before pushing the NEUTRAL (N) button, and must
continue to be met until the shift has been completed. If
any of these requirements are not met before pushing
the NEUTRAL (N) button or are no longer met during
the shift, then the NEUTRAL (N) indicator light will
flash continuously until all requirements are met or until
the NEUTRAL (N) button is released.
• The ignition must be in the ON/RUN mode for a shift to
take place and for the position indicator lights to be
operable. If the ignition is not in the ON/RUN mode, the
shift will not take place and no position indicator lights
will be on or flashing.
• A flashing NEUTRAL (N) position indicator light indi-
cates that shift requirements have not been met.
• If the vehicle is equipped with Quadra-Lift air suspen-
sion, the engine should be started and left running for a
minimum of 60 seconds (with all the doors closed) at
least once every 24 hours. This process allows the air
suspension to adjust the vehicle’s ride height to compen-
sate for temperature effects.
380 STARTING AND OPERATING
Page 383 of 626
Shifting Out Of NEUTRAL (N)
Use the following procedure to prepare your vehicle for
normal usage.
1. Bring the vehicle to a complete stop, leaving it con-nected to the tow vehicle.
2. Firmly apply the parking brake.
3. Start the engine.
4. Press and hold the brake pedal.
5. Shift the transmission into NEUTRAL.
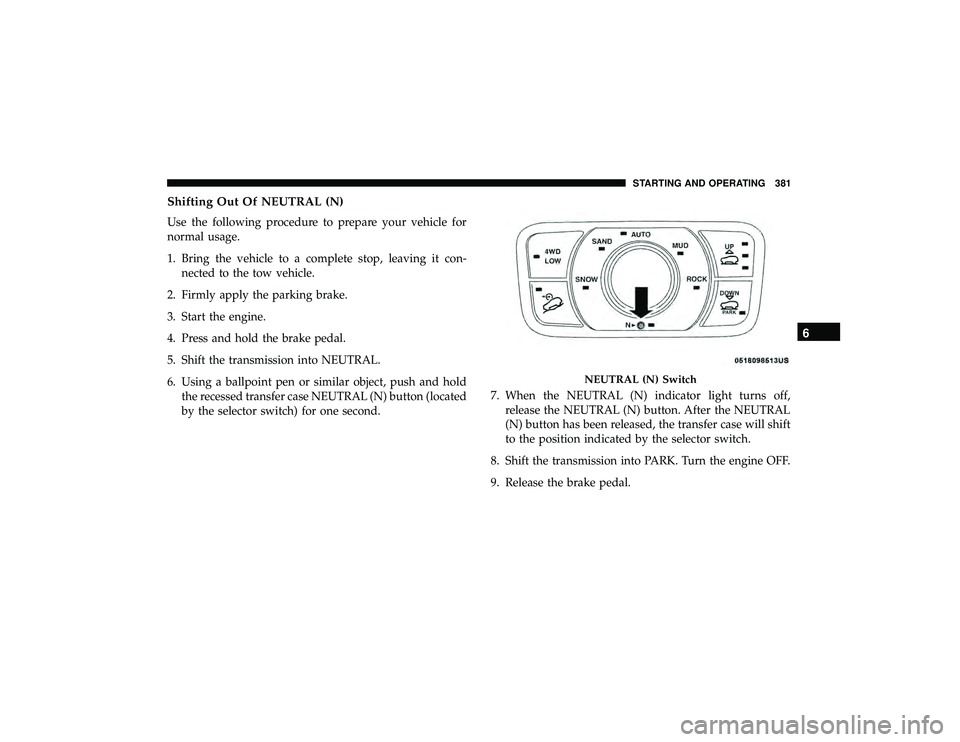
6. Using a ballpoint pen or similar object, push and hold the recessed transfer case NEUTRAL (N) button (located
by the selector switch) for one second. 7. When the NEUTRAL (N) indicator light turns off,
release the NEUTRAL (N) button. After the NEUTRAL
(N) button has been released, the transfer case will shift
to the position indicated by the selector switch.
8. Shift the transmission into PARK. Turn the engine OFF.
9. Release the brake pedal.
Page 384 of 626

10. Disconnect vehicle from the tow vehicle.
11. Start the engine.
12. Press and hold the brake pedal.
13. Release the parking brake.
14. Shift the transmission into DRIVE, release the brakepedal, and check that the vehicle operates normally.
NOTE:
• Steps 1 through 5 are requirements that must be met
before pushing the NEUTRAL (N) button, and must
continue to be met until the shift has been completed. If
any of these requirements are not met before pushing
the NEUTRAL (N) button or are no longer met during
the shift, the NEUTRAL (N) indicator light will flash
continuously until all requirements are met or until the
NEUTRAL (N) button is released.
• The ignition must be in the ON/RUN mode for a shift to
take place and for the position indicator lights to be
operable. If the ignition is not in the ON/RUN mode, the
shift will not take place and no position indicator lights
will be on or flashing. •
A flashing NEUTRAL (N) position indicator light indi-
cates that shift requirements have not been met.
DRIVING TIPS
On-Road Driving Tips
Utility vehicles have higher ground clearance and a nar-
rower track to make them capable of performing in a wide
variety of off-road applications. Specific design character-
istics give them a higher center of gravity than conven-
tional passenger cars.
An advantage of the higher ground clearance is a better
view of the road, allowing you to anticipate problems.
They are not designed for cornering at the same speeds as
conventional passenger cars any more than low-slung
sports cars are designed to perform satisfactorily in off-
road conditions. Avoid sharp turns or abrupt maneuvers.
As with other vehicles of this type, failure to operate this
vehicle correctly may result in loss of control or vehicle
rollover.
382 STARTING AND OPERATING
Page 390 of 626
If you stall or begin to lose forward motionwhile
climbing a steep hill, allow your vehicle to come to a stop
and immediately apply the brakes. Restart the engine, and
shift into REVERSE. Back slowly down the hill, allowing
the compression braking of the engine to help regulate
your speed. If the brakes are required to control vehicle
speed, apply them lightly and avoid locking or skidding
the tires.
Page 395 of 626

WARNING!
ALWAYS obey traffic laws and pay attention to the
road. ALWAYS drive safely with your hands on the
steering wheel. You have full responsibility and as-
sume all risks related to the use of the features and
applications in this vehicle. Only use the features and
applications when it is safe to do so. Failure to do so
may result in an accident involving serious injury or
death.
NOTE:
• Your vehicle may be transmitting data as authorized by
the subscriber.
• The SOS and ASSIST buttons will only function if you
are connected to an operable LTE (voice/data) or 4G
(data) network. Other Uconnect services will only be
operable if your SiriusXM Guardian service is active and
you are connected to an operable LTE (voice/data) or 4G
(data) network.
ASSIST Call
The ASSIST Button is used to automatically connect you to
any one of the following support centers: •
Roadside Assistance – If you get a flat tire, or need a tow,
just push the ASSIST button and you will be connected
to a representative for assistance. Roadside Assistance
will know what vehicle you’re driving and its location.
Additional fees may apply for roadside assistance.
• SiriusXM Guardian Customer Care – In-vehicle support
for SiriusXM Guardian.
• Vehicle Customer Care – Total support for all other
vehicle issues.
SOS Call
1. Push the SOS Call button on the Rearview Mirror.
NOTE: In case the SOS Call button is pushed in error, there
will be a ten second delay before the SOS Call system
initiates a call to a SOS operator. To cancel the SOS Call
connection, push the SOS call button on the Rearview
Mirror or press the cancellation button on the Device
Screen. Termination of the SOS Call will turn off the green
LED light on the Rearview Mirror.
2. The LED light located between the ASSIST and SOS buttons on the Rearview Mirror will turn green once a
connection to a SOS operator has been made.
7
IN CASE OF EMERGENCY 393
Page 406 of 626
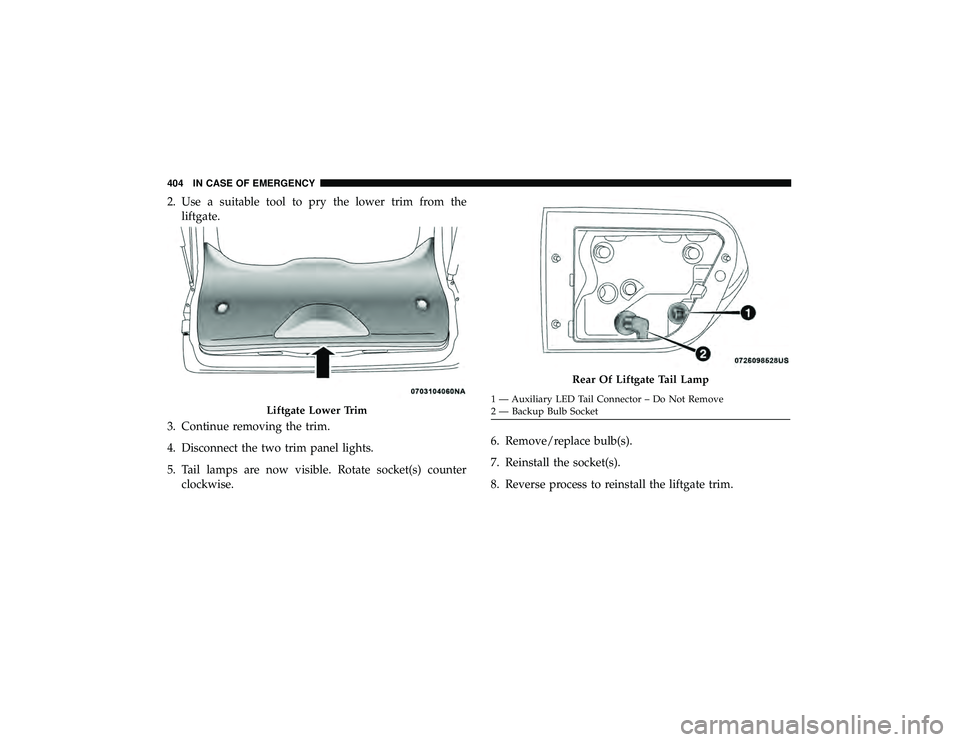
2. Use a suitable tool to pry the lower trim from theliftgate.
3. Continue removing the trim.
4. Disconnect the two trim panel lights.
5. Tail lamps are now visible. Rotate socket(s) counter clockwise. 6. Remove/replace bulb(s).
7. Reinstall the socket(s).
8. Reverse process to reinstall the liftgate trim.
Rear Of Liftgate Tail Lamp