traction control JEEP GRAND CHEROKEE LIMITED 2019 Owners Manual
[x] Cancel search | Manufacturer: JEEP, Model Year: 2019, Model line: GRAND CHEROKEE LIMITED, Model: JEEP GRAND CHEROKEE LIMITED 2019Pages: 626, PDF Size: 3.77 MB
Page 141 of 626
Secondary Method For Oil Change Reset Procedure
1. Without pushing the brake pedal, place the ignition inthe ON/RUN position (do not start the engine).
2. Fully press the accelerator pedal, slowly, three times within ten seconds.
3. Without pushing the brake pedal, place the ignition in the OFF/LOCK position.
NOTE: If the indicator message illuminates when you
start the vehicle, the oil change indicator system did not
reset. If necessary, repeat this procedure.
Instrument Cluster Display Messages
Includes the following, but not limited to:
• Front Seatbelts Unbuckled
• Driver Seat Belt Unbuckled
• Passenger Seat Belt Unbuckled
• Traction Control Off
• Washer Fluid Low
• Oil Pressure Low
• Oil Change Due •
Fuel Low
• Service Anti-lock Brake System
• Service Electronic Throttle Control
• Service Power Steering
• Cruise Control Off
• Cruise Control Ready
• ACC Driver Override
• Cruise Control Set To XXX MPH
• Tire Pressure Screen With Low Tire(s) “Inflate Tire to
XX”
• Service Tire Pressure System
• Speed Warning Set To XXX MPH
• Speed Warning Exceeded
• Parking Brake Engaged
• Brake Fluid Low
• Service Electronic Braking System
• Engine Temperature Hot
• Lights On
4
GETTING TO KNOW YOUR INSTRUMENT PANEL 139
Page 169 of 626
WARNING!(Continued)
•The capabilities of an ABS equipped vehicle must
never be exploited in a reckless or dangerous manner
that could jeopardize the user ’s safety or the safety of
others.
ABS is designed to function with the OEM tires. Modifica-
tion may result in degraded ABS performance.
Anti-Lock Brake Warning Light
The yellow “Anti-Lock Brake Warning Light” will turn on
when the ignition is turned to the ON/RUN mode and
may stay on for as long as four seconds.
If the “Anti-Lock Brake Warning Light” remains on or
comes on while driving, it indicates that the anti-lock
portion of the brake system is not functioning and that
service is required. However, the conventional brake sys-
tem will continue to operate normally if the “Anti-Lock
Brake Warning Light” is on.
If the “Anti-Lock Brake Warning Light” is on, the brake
system should be serviced as soon as possible to restore the
benefits of anti-lock brakes. If the “Anti-Lock Brake Warn-
ing Light” does not come on when the ignition is turned to
the ON/RUN mode, have the light repaired as soon as
possible.
Electronic Brake Control System
Your vehicle is equipped with an advanced Electronic
Brake Control system (EBC). This system includes Elec-
tronic Brake Force Distribution (EBD), Anti-Lock Brake
System (ABS), Brake Assist System (BAS), Hill Start Assist
(HSA), Traction Control System (TCS), Electronic Stability
Control (ESC), and Electronic Roll Mitigation (ERM). These
systems work together to enhance both vehicle stability
and control in various driving conditions.
Your vehicle may also be equipped with Trailer Sway
Control (TSC), Ready Alert Braking (RAB), Rain Brake
Support (RBS), Dynamic Steering Torque (DST), Hill De-
scent Control (HDC), and Selec-Speed Control (SSC).
Electronic Brake Force Distribution (EBD)
This function manages the distribution of the braking
torque between the front and rear axles by limiting braking
pressure to the rear axle. This is done to prevent overslip of
the rear wheels to avoid vehicle instability, and to prevent
the rear axle from entering ABS before the front axle.
Brake System Warning Light
The red “Brake System Warning Light” will turn on when
the ignition is turned to the ON/RUN mode and may stay
on for as long as four seconds.
5
SAFETY 167
Page 173 of 626
Traction Control System (TCS)
This system monitors the amount of wheel spin of each of
the driven wheels. If wheel spin is detected, the TCS may
apply brake pressure to the spinning wheel(s) and/or
reduce engine power to provide enhanced acceleration and
stability. A feature of the TCS, Brake Limited Differential
(BLD), functions similar to a limited slip differential and
controls the wheel spin across a driven axle. If one wheel
on a driven axle is spinning faster than the other, the
system will apply the brake of the spinning wheel. This
will allow more engine power to be applied to the wheel
that is not spinning. BLD may remain enabled even if TCS
and ESC are in a reduced mode.
Electronic Stability Control (ESC)
This system enhances directional control and stability of
the vehicle under various driving conditions. ESC corrects
for oversteering or understeering of the vehicle by apply-
ing the brake of the appropriate wheel(s) to assist in
counteracting the oversteer or understeer condition. En-
gine power may also be reduced to help the vehicle
maintain the desired path.ESC uses sensors in the vehicle to determine the vehicle
path intended by the driver and compares it to the actual
path of the vehicle. When the actual path does not match
the intended path, ESC applies the brake of the appropriate
wheel to assist in counteracting the oversteer or understeer
condition.
•
Oversteer — when the vehicle is turning more than
appropriate for the steering wheel position.
• Understeer — when the vehicle is turning less than
appropriate for the steering wheel position.
The “ESC Activation/Malfunction Indicator Light” located
in the instrument cluster will start to flash as soon as the
ESC system becomes active. The “ESC Activation/
Malfunction Indicator Light” also flashes when the TCS is
active. If the “ESC Activation/Malfunction Indicator
Light” begins to flash during acceleration, ease up on the
accelerator and apply as little throttle as possible. Be sure to
adapt your speed and driving to the prevailing road
conditions.
5
SAFETY 171
Page 174 of 626
WARNING!
•Electronic Stability Control (ESC) cannot prevent the
natural laws of physics from acting on the vehicle,
nor can it increase the traction afforded by prevailing
road conditions. ESC cannot prevent accidents, in-
cluding those resulting from excessive speed in
turns, driving on very slippery surfaces, or hydro-
planing. ESC also cannot prevent accidents resulting
from loss of vehicle control due to inappropriate
driver input for the conditions. Only a safe, attentive,
and skillful driver can prevent accidents. The capa-
bilities of an ESC equipped vehicle must never be
exploited in a reckless or dangerous manner which
could jeopardize the user ’s safety or the safety of
others.
• Vehicle modifications, or failure to properly main-
tain your vehicle, may change the handling charac-
teristics of your vehicle, and may negatively affect
the performance of the ESC system. Changes to the
steering system, suspension, braking system, tire
type and size or wheel size may adversely affect ESC
performance. Improperly inflated and unevenly
worn tires may also degrade ESC performance. Any
(Continued)
Page 275 of 626
FOUR WHEEL DRIVE OPERATION
Quadra-Trac I Operating Instructions/Precautions
— If Equipped
The Quadra-Trac I is a single-speed (HI range only) trans-
fer case, which provides convenient full-time four-wheel
drive. No driver interaction is required. The Brake Traction
Control (BTC) System, which combines standard ABS and
Traction Control, provides resistance to any wheel that is
slipping to allow additional torque transfer to wheels with
traction.
NOTE:The Quadra-Trac I system is not appropriate for
conditions where 4WD LOW range is recommended. Refer
to “Off-Road Driving Tips” in “Starting And Operating”
Quadra-Trac II Operating Instructions/Precautions
— If Equipped
The Quadra-Trac II transfer case is fully automatic in the
normal driving 4WD AUTO mode. The Quadra-Trac II
transfer case provides three mode positions:
• 4WD HI
• NEUTRAL
• 4WD LOW This transfer case is fully automatic in the 4WD HI mode.
When additional traction is required, the 4WD LOW
position can be used to lock the front and rear driveshafts
together and force the front and rear wheels to rotate at the
same speed. The 4WD LOW position is intended for loose,
slippery road surfaces only. Driving in the 4WD LOW
position on dry, hard-surfaced roads may cause increased
tire wear and damage to driveline components.
When operating your vehicle in 4WD LOW, the engine
speed is approximately three times that of the 4WD HI
position at a given road speed. Take care not to overspeed
the engine and do not exceed 25 mph (40 km/h).
Proper operation of four-wheel drive vehicles depends on
tires of equal size, type, and circumference on each wheel.
Any difference will adversely affect shifting and cause
damage to the transfer case.
Because four-wheel drive provides improved traction,
there is a tendency to exceed safe turning and stopping
speeds. Do not go faster than road conditions permit.
6
STARTING AND OPERATING 273
Page 287 of 626
SELEC-TERRAIN — IF EQUIPPED
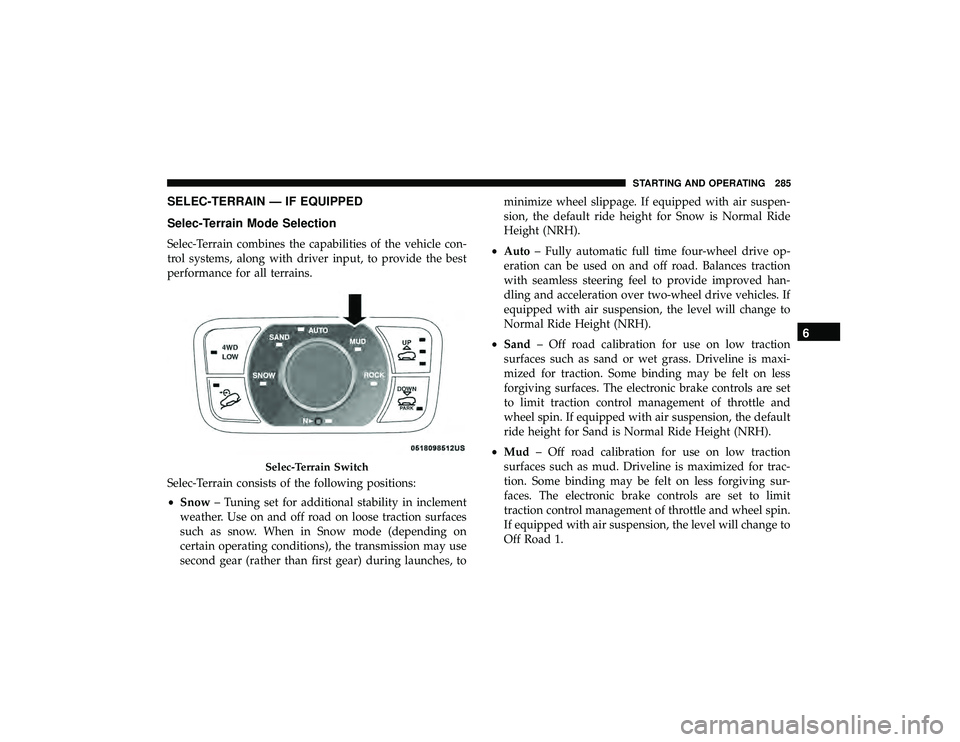
Selec-Terrain Mode Selection
Selec-Terrain combines the capabilities of the vehicle con-
trol systems, along with driver input, to provide the best
performance for all terrains.
Selec-Terrain consists of the following positions:
•Snow – Tuning set for additional stability in inclement
weather. Use on and off road on loose traction surfaces
such as snow. When in Snow mode (depending on
certain operating conditions), the transmission may use
second gear (rather than first gear) during launches, to minimize wheel slippage. If equipped with air suspen-
sion, the default ride height for Snow is Normal Ride
Height (NRH).
• Auto – Fully automatic full time four-wheel drive op-
eration can be used on and off road. Balances traction
with seamless steering feel to provide improved han-
dling and acceleration over two-wheel drive vehicles. If
equipped with air suspension, the level will change to
Normal Ride Height (NRH).
• Sand – Off road calibration for use on low traction
surfaces such as sand or wet grass. Driveline is maxi-
mized for traction. Some binding may be felt on less
forgiving surfaces. The electronic brake controls are set
to limit traction control management of throttle and
wheel spin. If equipped with air suspension, the default
ride height for Sand is Normal Ride Height (NRH).
• Mud – Off road calibration for use on low traction
surfaces such as mud. Driveline is maximized for trac-
tion. Some binding may be felt on less forgiving sur-
faces. The electronic brake controls are set to limit
traction control management of throttle and wheel spin.
If equipped with air suspension, the level will change to
Off Road 1.
Page 288 of 626
•Rock – Off road calibration only available in 4WD Low
range. The vehicle is raised (if equipped with Air
Suspension) for improved ground clearance. Traction
based tuning with improved steer-ability for use on high
traction off-road surfaces. Use for low speed obstacles
such as large rocks, deep ruts, etc. If equipped with air
suspension, the vehicle level will change to Off-Road 2.
If the Selec-Terrain switch is in ROCK mode, and the
transfer case is switched from 4WD Low to 4WD High,
the Selec-Terrain system will return to AUTO.
NOTE: Activate the Hill Descent Control or Selec Speed
Control for steep downhill control. See “Electronic Brake
Control System” in this section for further information.
Instrument Cluster Display Messages
When the appropriate conditions exist, a message will
appear in the instrument cluster. Refer to “Instrument
Cluster Display” in “Getting To Know Your Instrument
Panel” for further information.
FUEL SAVER TECHNOLOGY 5.7L ONLY — IF
EQUIPPED
This feature offers improved fuel economy by shutting off
four of the engine’s eight cylinders during light load and
cruise conditions. The system is automatic with no driver
inputs or additional driving skills required.
NOTE: This system may take some time to return to full
functionality after a battery disconnect.
POWER STEERING
The electric power steering system will give you good
vehicle response and increased ease of maneuverability in
tight spaces. The system will vary its assist to provide light
efforts while parking and good feel while driving. If the
electric steering system experiences a fault that prevents it
from providing assist, you will still have the ability to steer
the vehicle manually.
Page 300 of 626
•The gear selector is removed from the DRIVE position.
• The Electronic Stability Control/Traction Control Sys-
tem (ESC/TCS) activates.
• The vehicle parking brake is applied.
• Driver seatbelt is unbuckled at low speeds.
• Driver door is opened at low speeds.
• The braking temperature exceeds normal range (over-
heated).
• A Trailer Sway Control (TSC) event occurs.
To Turn Off
The system will turn off and clear the set speed in memory
if:
•The Adaptive Cruise Control (ACC) on/off button is
pushed.
• The Normal (Fixed Speed) Cruise Control on/off button
is pushed.
• The ignition is turned OFF.
• You switch to Four-Wheel Drive Low.
To Resume
If there is a set speed in memory push the RES (resume)
button and then remove your foot from the accelerator
pedal. The instrument cluster display will display the last
set speed.
NOTE:
•If your vehicle stays at standstill for longer than two
seconds, then the system will cancel and the brake force
will be ramped-out. The driver will have to apply the
brakes to keep the vehicle at a standstill.
• ACC cannot be resumed if there is a stationary vehicle
in-front of your vehicle in close proximity.
Page 315 of 626
Metric Speed (km/h)
•Pushing the SET (-)button once will result in a 1 km/h
decrease in set speed. Each subsequent tap of the button
results in a decrease of 1 km/h.
• If the button is continually pushed, the set speed will
continue to decrease in 10 km/h decrements until the
button is released. The decrease in set speed is reflected
in the instrument cluster display.
To Cancel
The following conditions will cancel the Normal (Fixed
Speed) Cruise Control without clearing the memory:
•The brake pedal is applied.
• The CANC button is pushed.
• The Electronic Stability Control/Traction Control Sys-
tem (ESC/TCS) activates.
• The vehicle parking brake is applied.
• The braking temperature exceeds normal range (over-
heated).
• The gear selector is removed from the DRIVE position.
• The driver switches ESC to full-off mode.
To Resume Speed
To resume a previously set speed, push the RES button and
release. Resume can be used at any speed above 20 mph
(32 km/h).
To Turn Off
The system will turn off and erase the set speed in memory if:
•The Normal (Fixed Speed) Cruise Control on/off button
is pushed.
• The ignition is turned OFF.
• You engage Four-Wheel Drive Low.
• The Adaptive Cruise Control (ACC) on/off button is
pushed.
PARKSENSE REAR PARK ASSIST — IF EQUIPPED
The ParkSense Rear Park Assist system provides visual and
audible indications of the distance between the rear fascia
and a detected obstacle when backing up, e.g. during a
parking maneuver. If your vehicle is equipped with an
automatic transmission, the vehicle brakes may be auto-
matically applied and released when performing a reverse
parking maneuver if the system detects a possible collision
with an obstacle.
6
STARTING AND OPERATING 313
Page 359 of 626
Changing LaneSense Status
The LaneSense system has settings to adjust the intensity of
the torque warning and the warning zone sensitivity
(early/late) that you can configure through the Uconnect
system screen. Refer to “Uconnect Settings” in “Multime-
dia” for further information.
NOTE:
•When enabled the system operates above 37 mph
(60 km/h) and below 112 mph (180 km/h).
• Use of the turn signal suppresses the warnings.
• The system will not apply torque to the steering wheel
whenever a safety system engages (anti-lock brakes,
traction control system, electronic stability control, for-
ward collision warning, etc.).
PARKVIEW REAR BACK UP CAMERA
The ParkView Rear Back Up Camera allows you to see an
on-screen image of the rear surroundings of your vehicle
whenever the gear selector is put into REVERSE. The
image will be displayed on the Navigation/Multimedia
radio display screen along with a caution note to “check
entire surroundings” across the top of the screen. After five seconds this note will disappear. The ParkView camera is
located on the rear of the vehicle above the rear license
plate.
When the vehicle is shifted out of REVERSE (with camera
delay turned off), the rear camera mode is exited and the
navigation or audio screen appears again.
Manual Activation Of The Rear View Camera
1. Press the “Controls” button located on the bottom of the
Uconnect display.
2. Press the “Backup Camera” button to turn the Rear View Camera system on.
NOTE: The ParkView Rear Back Up Camera has program-
mable modes of operation that may be selected through the
Uconnect System.
Refer to “Uconnect Settings” in “Multimedia” for further
information.
When the vehicle is shifted out of REVERSE (with camera
delay turned off), the rear camera mode is exited and the
previous screen appears again. When the vehicle is shifted
out of REVERSE (with camera delay turned on), the camera
image will continue to be displayed for up to ten seconds
after shifting out of REVERSE unless the vehicle speed
6
STARTING AND OPERATING 357