rear differential JEEP LIBERTY 2002 KJ / 1.G Workshop Manual
[x] Cancel search | Manufacturer: JEEP, Model Year: 2002, Model line: LIBERTY, Model: JEEP LIBERTY 2002 KJ / 1.GPages: 1803, PDF Size: 62.3 MB
Page 40 of 1803
UPPER BALL JOINT
REMOVAL
(1) Raise and support the vehicle.
(2) Support the rear axle with a hydraulic jack.
(3) Remove the ball joint pinch bolt from the top of
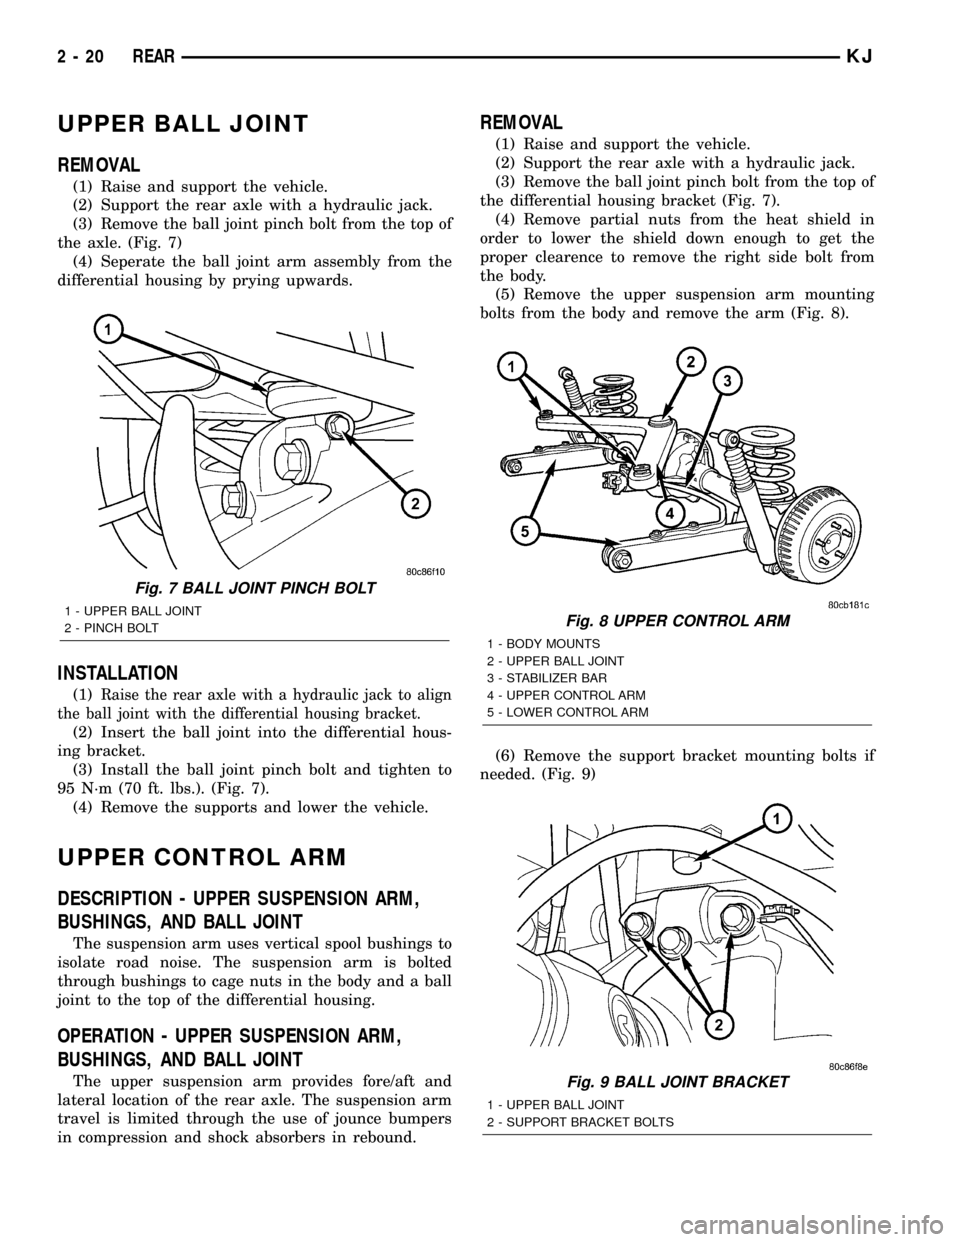
the axle. (Fig. 7)
(4) Seperate the ball joint arm assembly from the
differential housing by prying upwards.
INSTALLATION
(1)Raise the rear axle with a hydraulic jack to align
the ball joint with the differential housing bracket.
(2) Insert the ball joint into the differential hous-
ing bracket.
(3) Install the ball joint pinch bolt and tighten to
95 N´m (70 ft. lbs.). (Fig. 7).
(4) Remove the supports and lower the vehicle.
UPPER CONTROL ARM
DESCRIPTION - UPPER SUSPENSION ARM,
BUSHINGS, AND BALL JOINT
The suspension arm uses vertical spool bushings to
isolate road noise. The suspension arm is bolted
through bushings to cage nuts in the body and a ball
joint to the top of the differential housing.
OPERATION - UPPER SUSPENSION ARM,
BUSHINGS, AND BALL JOINT
The upper suspension arm provides fore/aft and
lateral location of the rear axle. The suspension arm
travel is limited through the use of jounce bumpers
in compression and shock absorbers in rebound.
REMOVAL
(1) Raise and support the vehicle.
(2) Support the rear axle with a hydraulic jack.
(3) Remove the ball joint pinch bolt from the top of
the differential housing bracket (Fig. 7).
(4) Remove partial nuts from the heat shield in
order to lower the shield down enough to get the
proper clearence to remove the right side bolt from
the body.
(5) Remove the upper suspension arm mounting
bolts from the body and remove the arm (Fig. 8).
(6) Remove the support bracket mounting bolts if
needed. (Fig. 9)
Fig. 7 BALL JOINT PINCH BOLT
1 - UPPER BALL JOINT
2 - PINCH BOLTFig. 8 UPPER CONTROL ARM
1 - BODY MOUNTS
2 - UPPER BALL JOINT
3 - STABILIZER BAR
4 - UPPER CONTROL ARM
5 - LOWER CONTROL ARM
Fig. 9 BALL JOINT BRACKET
1 - UPPER BALL JOINT
2 - SUPPORT BRACKET BOLTS
2 - 20 REARKJ
Page 41 of 1803
INSTALLATION
(1) Position the upper suspension arm in the
frame rail brackets (Fig. 8).
(2) Install the mounting bolts and tighten to 100
N´m (74 ft. lbs.).
(3) Retighten the heat shield back into place.
(4) Pull the arm down on the differential housing
bracket and install the pinch bolt and nut. Tighten
the nut to 95 N´m (70 ft. lbs.) (Fig. 7).
(5) Remove the supports and lower the vehicle.
LOWER CONTROL ARM
DESCRIPTION
The lower suspension arms are stamped steel and
welded and use voided round bushings at the axle
end and solid rubber at the body end of the arm.
OPERATION
The bushings provide isolation from the axle. The
arms mount to the unibody frame rail bracket and
the axle brackets. The arm and bushings provide
location and react to loads.
REMOVAL
(1) Raise the vehicle and support the rear axle.
(2) Remove the stabilizer bar retaining bolts from
the suspension arm.
(3) Remove the lower suspension arm nut and bolt
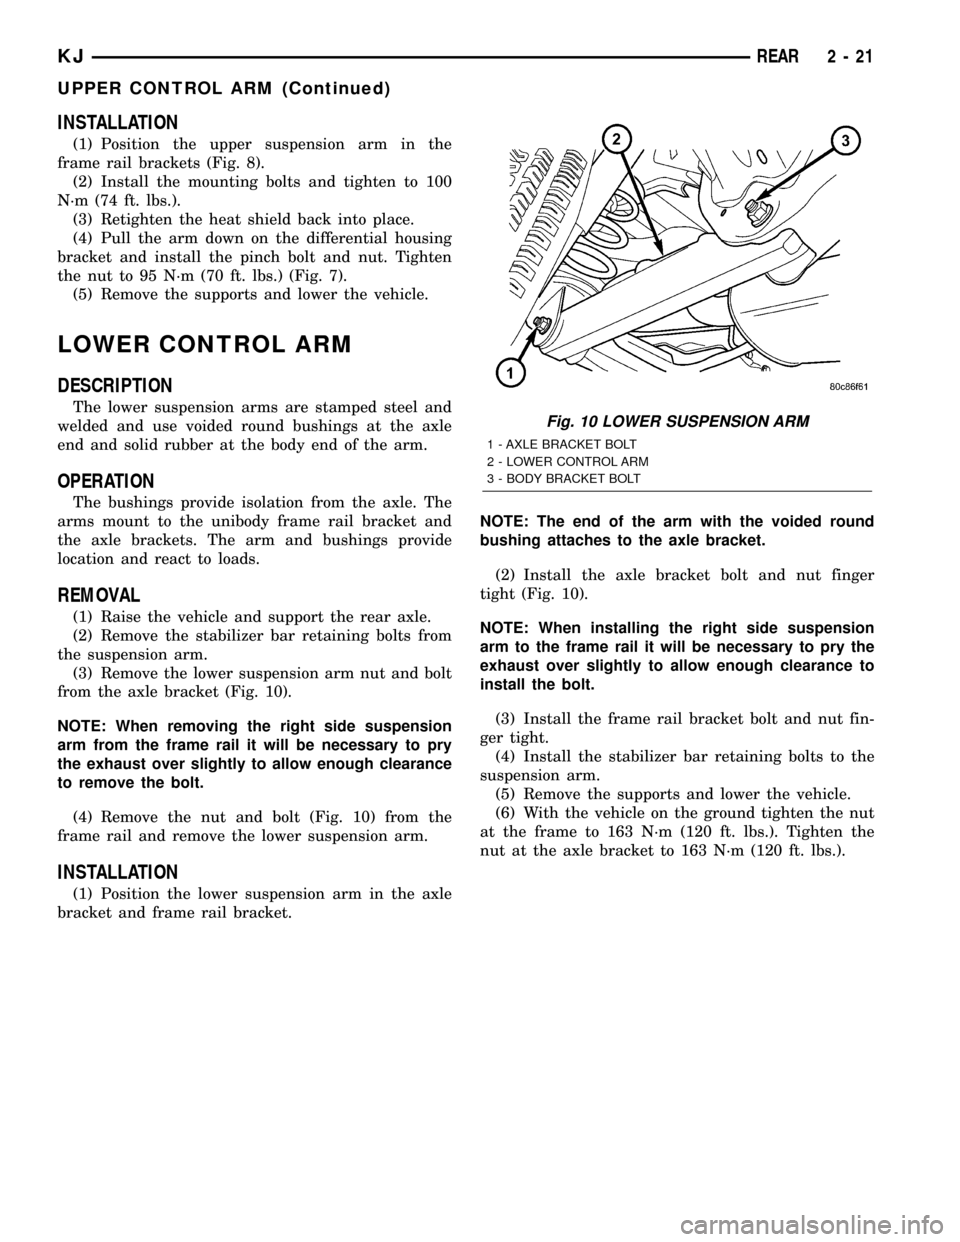
from the axle bracket (Fig. 10).
NOTE: When removing the right side suspension
arm from the frame rail it will be necessary to pry
the exhaust over slightly to allow enough clearance
to remove the bolt.
(4) Remove the nut and bolt (Fig. 10) from the
frame rail and remove the lower suspension arm.
INSTALLATION
(1) Position the lower suspension arm in the axle
bracket and frame rail bracket.NOTE: The end of the arm with the voided round
bushing attaches to the axle bracket.
(2) Install the axle bracket bolt and nut finger
tight (Fig. 10).
NOTE: When installing the right side suspension
arm to the frame rail it will be necessary to pry the
exhaust over slightly to allow enough clearance to
install the bolt.
(3) Install the frame rail bracket bolt and nut fin-
ger tight.
(4) Install the stabilizer bar retaining bolts to the
suspension arm.
(5) Remove the supports and lower the vehicle.
(6) With the vehicle on the ground tighten the nut
at the frame to 163 N´m (120 ft. lbs.). Tighten the
nut at the axle bracket to 163 N´m (120 ft. lbs.).
Fig. 10 LOWER SUSPENSION ARM
1 - AXLE BRACKET BOLT
2 - LOWER CONTROL ARM
3 - BODY BRACKET BOLT
KJREAR 2 - 21
UPPER CONTROL ARM (Continued)
Page 47 of 1803
REAR
SPECIAL TOOLS
REAR SUSPENSION
UPPER BALL JOINT
REMOVAL
(1) Raise and support the vehicle.
(2) Support the rear axle with a hydraulic jack.
(3) Remove the ball joint pinch bolt from the top of
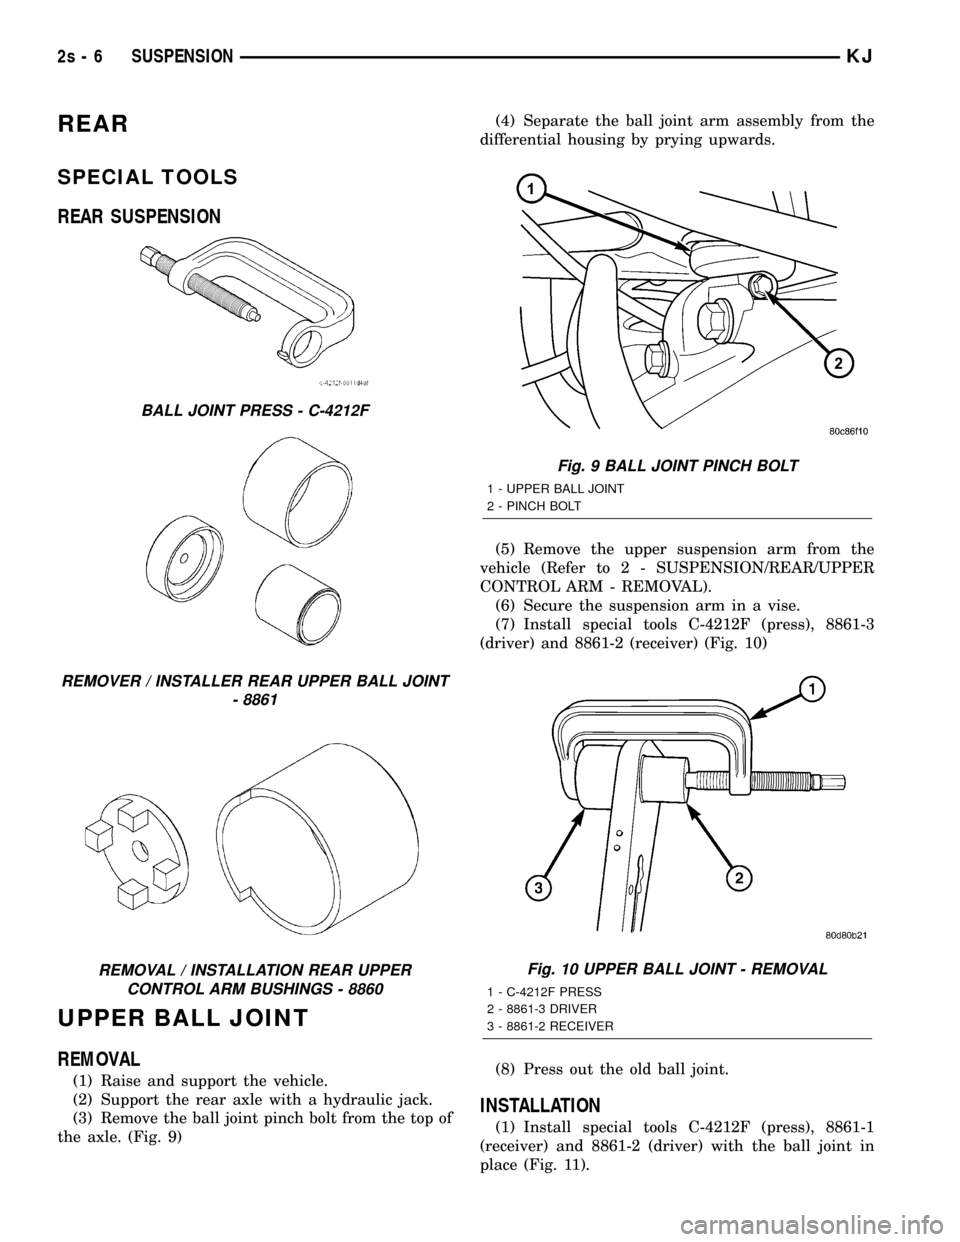
the axle. (Fig. 9)(4) Separate the ball joint arm assembly from the
differential housing by prying upwards.
(5) Remove the upper suspension arm from the
vehicle (Refer to 2 - SUSPENSION/REAR/UPPER
CONTROL ARM - REMOVAL).
(6) Secure the suspension arm in a vise.
(7) Install special tools C-4212F (press), 8861-3
(driver) and 8861-2 (receiver) (Fig. 10)
(8) Press out the old ball joint.
INSTALLATION
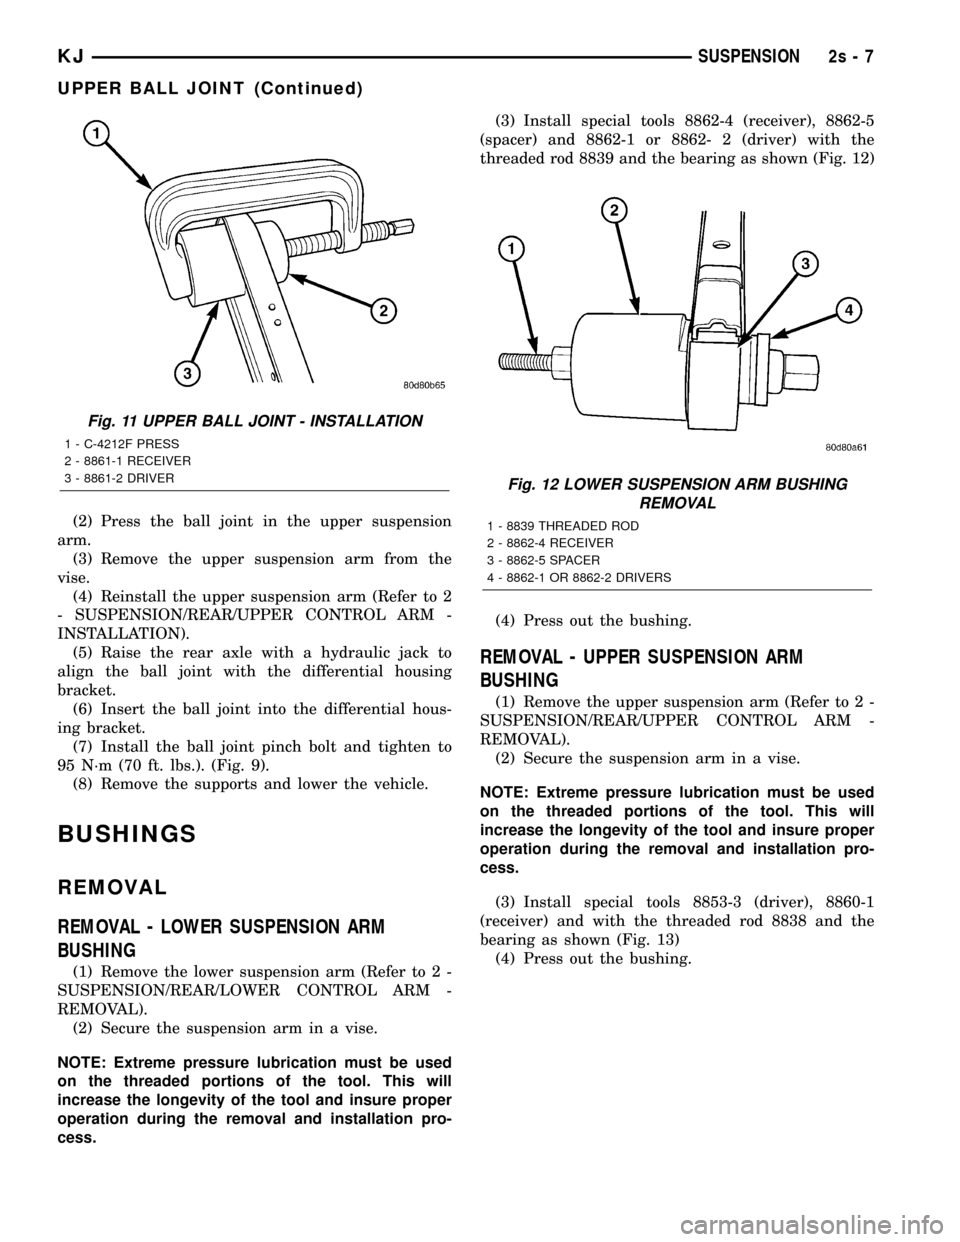
(1) Install special tools C-4212F (press), 8861-1
(receiver) and 8861-2 (driver) with the ball joint in
place (Fig. 11).
BALL JOINT PRESS - C-4212F
REMOVER / INSTALLER REAR UPPER BALL JOINT
- 8861
REMOVAL / INSTALLATION REAR UPPER
CONTROL ARM BUSHINGS - 8860
Fig. 9 BALL JOINT PINCH BOLT
1 - UPPER BALL JOINT
2 - PINCH BOLT
Fig. 10 UPPER BALL JOINT - REMOVAL
1 - C-4212F PRESS
2 - 8861-3 DRIVER
3 - 8861-2 RECEIVER
2s - 6 SUSPENSIONKJ
Page 48 of 1803
(2) Press the ball joint in the upper suspension
arm.
(3) Remove the upper suspension arm from the
vise.
(4) Reinstall the upper suspension arm (Refer to 2
- SUSPENSION/REAR/UPPER CONTROL ARM -
INSTALLATION).
(5) Raise the rear axle with a hydraulic jack to
align the ball joint with the differential housing
bracket.
(6) Insert the ball joint into the differential hous-
ing bracket.
(7) Install the ball joint pinch bolt and tighten to
95 N´m (70 ft. lbs.). (Fig. 9).
(8) Remove the supports and lower the vehicle.
BUSHINGS
REMOVAL
REMOVAL - LOWER SUSPENSION ARM
BUSHING
(1) Remove the lower suspension arm (Refer to 2 -
SUSPENSION/REAR/LOWER CONTROL ARM -
REMOVAL).
(2) Secure the suspension arm in a vise.
NOTE: Extreme pressure lubrication must be used
on the threaded portions of the tool. This will
increase the longevity of the tool and insure proper
operation during the removal and installation pro-
cess.(3) Install special tools 8862-4 (receiver), 8862-5
(spacer) and 8862-1 or 8862- 2 (driver) with the
threaded rod 8839 and the bearing as shown (Fig. 12)
(4) Press out the bushing.
REMOVAL - UPPER SUSPENSION ARM
BUSHING
(1) Remove the upper suspension arm (Refer to 2 -
SUSPENSION/REAR/UPPER CONTROL ARM -
REMOVAL).
(2) Secure the suspension arm in a vise.
NOTE: Extreme pressure lubrication must be used
on the threaded portions of the tool. This will
increase the longevity of the tool and insure proper
operation during the removal and installation pro-
cess.
(3) Install special tools 8853-3 (driver), 8860-1
(receiver) and with the threaded rod 8838 and the
bearing as shown (Fig. 13)
(4) Press out the bushing.
Fig. 11 UPPER BALL JOINT - INSTALLATION
1 - C-4212F PRESS
2 - 8861-1 RECEIVER
3 - 8861-2 DRIVER
Fig. 12 LOWER SUSPENSION ARM BUSHING
REMOVAL
1 - 8839 THREADED ROD
2 - 8862-4 RECEIVER
3 - 8862-5 SPACER
4 - 8862-1 OR 8862-2 DRIVERS
KJSUSPENSION 2s - 7
UPPER BALL JOINT (Continued)
Page 50 of 1803
DIFFERENTIAL & DRIVELINE
TABLE OF CONTENTS
page page
PROPELLER SHAFT......................1
HALF SHAFT...........................10
FRONT AXLE - 186FIA....................19REAR AXLE - 198RBI.....................49
REAR AXLE-81/4.......................86
PROPELLER SHAFT
TABLE OF CONTENTS
page page
PROPELLER SHAFT
DIAGNOSIS AND TESTING - PROPELLER
SHAFT...............................1
STANDARD PROCEDURES - PROPELLER
SHAFT ANGLE........................3
SPECIFICATIONS
PROPELLER SHAFT....................6
SPECIAL TOOLS........................6
PROPELLER SHAFT - FRONT
REMOVAL.............................6INSTALLATION..........................6
PROPELLER SHAFT - REAR
REMOVAL.............................7
INSTALLATION..........................7
SINGLE CARDAN UNIVERSAL JOINTS
DISASSEMBLY..........................8
ASSEMBLY.............................9
PROPELLER SHAFT
DIAGNOSIS AND TESTING - PROPELLER
SHAFT
VIBRATION
Tires that are out-of-round, or wheels that are
unbalanced, will cause a low frequency vibration.
Brake rotors that are unbalanced will cause a
harsh, low frequency vibration.Driveline vibration can also result from loose or
damaged engine mounts.
Propeller shaft vibration increases as the vehicle
speed is increased. A vibration that occurs within a
specific speed range is not usually caused by a pro-
peller shaft being unbalanced. Defective joints or an
incorrect propeller shaft angle, are usually the cause
of such a vibration.
KJDIFFERENTIAL & DRIVELINE 3 - 1
Page 69 of 1803
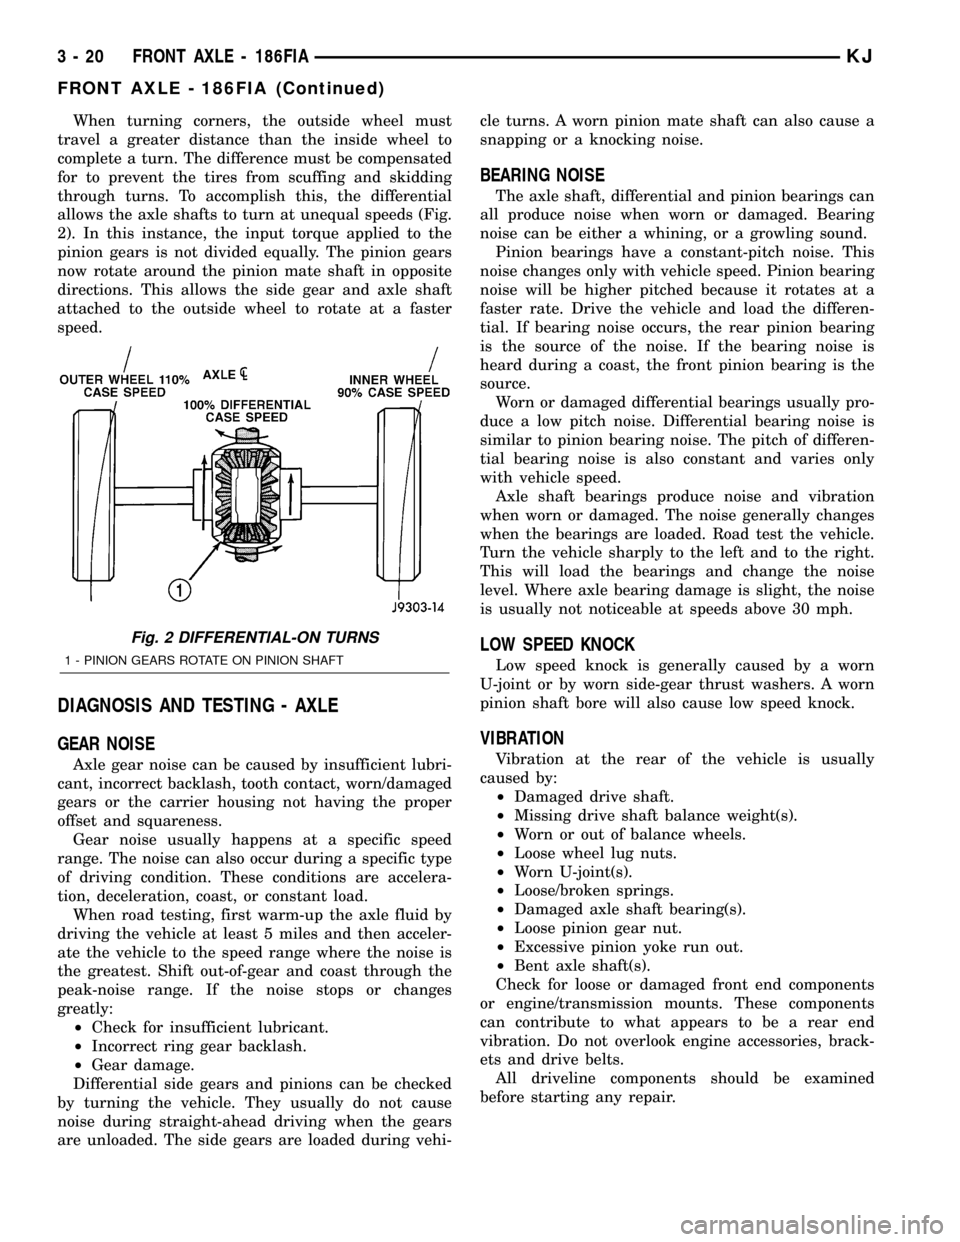
When turning corners, the outside wheel must
travel a greater distance than the inside wheel to
complete a turn. The difference must be compensated
for to prevent the tires from scuffing and skidding
through turns. To accomplish this, the differential
allows the axle shafts to turn at unequal speeds (Fig.
2). In this instance, the input torque applied to the
pinion gears is not divided equally. The pinion gears
now rotate around the pinion mate shaft in opposite
directions. This allows the side gear and axle shaft
attached to the outside wheel to rotate at a faster
speed.
DIAGNOSIS AND TESTING - AXLE
GEAR NOISE
Axle gear noise can be caused by insufficient lubri-
cant, incorrect backlash, tooth contact, worn/damaged
gears or the carrier housing not having the proper
offset and squareness.
Gear noise usually happens at a specific speed
range. The noise can also occur during a specific type
of driving condition. These conditions are accelera-
tion, deceleration, coast, or constant load.
When road testing, first warm-up the axle fluid by
driving the vehicle at least 5 miles and then acceler-
ate the vehicle to the speed range where the noise is
the greatest. Shift out-of-gear and coast through the
peak-noise range. If the noise stops or changes
greatly:
²Check for insufficient lubricant.
²Incorrect ring gear backlash.
²Gear damage.
Differential side gears and pinions can be checked
by turning the vehicle. They usually do not cause
noise during straight-ahead driving when the gears
are unloaded. The side gears are loaded during vehi-cle turns. A worn pinion mate shaft can also cause a
snapping or a knocking noise.
BEARING NOISE
The axle shaft, differential and pinion bearings can
all produce noise when worn or damaged. Bearing
noise can be either a whining, or a growling sound.
Pinion bearings have a constant-pitch noise. This
noise changes only with vehicle speed. Pinion bearing
noise will be higher pitched because it rotates at a
faster rate. Drive the vehicle and load the differen-
tial. If bearing noise occurs, the rear pinion bearing
is the source of the noise. If the bearing noise is
heard during a coast, the front pinion bearing is the
source.
Worn or damaged differential bearings usually pro-
duce a low pitch noise. Differential bearing noise is
similar to pinion bearing noise. The pitch of differen-
tial bearing noise is also constant and varies only
with vehicle speed.
Axle shaft bearings produce noise and vibration
when worn or damaged. The noise generally changes
when the bearings are loaded. Road test the vehicle.
Turn the vehicle sharply to the left and to the right.
This will load the bearings and change the noise
level. Where axle bearing damage is slight, the noise
is usually not noticeable at speeds above 30 mph.
LOW SPEED KNOCK
Low speed knock is generally caused by a worn
U-joint or by worn side-gear thrust washers. A worn
pinion shaft bore will also cause low speed knock.
VIBRATION
Vibration at the rear of the vehicle is usually
caused by:
²Damaged drive shaft.
²Missing drive shaft balance weight(s).
²Worn or out of balance wheels.
²Loose wheel lug nuts.
²Worn U-joint(s).
²Loose/broken springs.
²Damaged axle shaft bearing(s).
²Loose pinion gear nut.
²Excessive pinion yoke run out.
²Bent axle shaft(s).
Check for loose or damaged front end components
or engine/transmission mounts. These components
can contribute to what appears to be a rear end
vibration. Do not overlook engine accessories, brack-
ets and drive belts.
All driveline components should be examined
before starting any repair.
Fig. 2 DIFFERENTIAL-ON TURNS
1 - PINION GEARS ROTATE ON PINION SHAFT
3 - 20 FRONT AXLE - 186FIAKJ
FRONT AXLE - 186FIA (Continued)
Page 73 of 1803
REMOVAL
(1) Raise and support vehicle.
(2) Remove wheel and tire assemblies.
(3) Remove half shaft hub nuts.
(4) Remove lower control arms. Refer to 2 suspen-
sion for procedure.
(5) Remove half shafts.
(6) Remove skid plate.
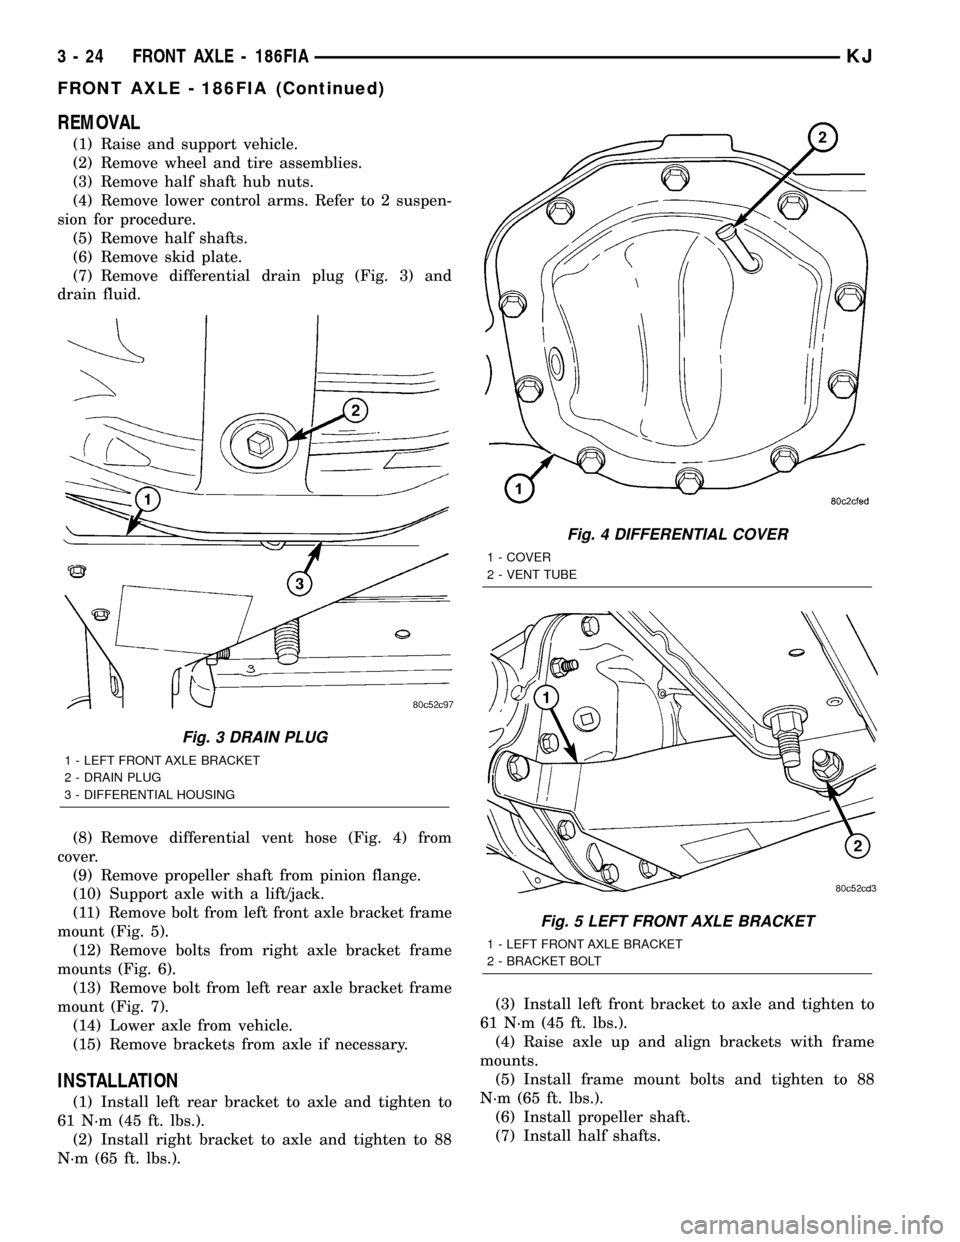
(7) Remove differential drain plug (Fig. 3) and
drain fluid.
(8) Remove differential vent hose (Fig. 4) from
cover.
(9) Remove propeller shaft from pinion flange.
(10) Support axle with a lift/jack.
(11) Remove bolt from left front axle bracket frame
mount (Fig. 5).
(12) Remove bolts from right axle bracket frame
mounts (Fig. 6).
(13) Remove bolt from left rear axle bracket frame
mount (Fig. 7).
(14) Lower axle from vehicle.
(15) Remove brackets from axle if necessary.
INSTALLATION
(1) Install left rear bracket to axle and tighten to
61 N´m (45 ft. lbs.).
(2) Install right bracket to axle and tighten to 88
N´m (65 ft. lbs.).(3) Install left front bracket to axle and tighten to
61 N´m (45 ft. lbs.).
(4) Raise axle up and align brackets with frame
mounts.
(5) Install frame mount bolts and tighten to 88
N´m (65 ft. lbs.).
(6) Install propeller shaft.
(7) Install half shafts.
Fig. 3 DRAIN PLUG
1 - LEFT FRONT AXLE BRACKET
2 - DRAIN PLUG
3 - DIFFERENTIAL HOUSING
Fig. 4 DIFFERENTIAL COVER
1 - COVER
2 - VENT TUBE
Fig. 5 LEFT FRONT AXLE BRACKET
1 - LEFT FRONT AXLE BRACKET
2 - BRACKET BOLT
3 - 24 FRONT AXLE - 186FIAKJ
FRONT AXLE - 186FIA (Continued)
Page 74 of 1803
(8) Install lower control arms, refer to 2 Suspen-
sion for procedures.
(9) Install new half shaft hub nuts and tighten to
136 N´m (100 ft. lbs.).
(10) Install axle vent hose.
(11) Fill differential with gear lubricant.
(12) Install skid plate.
(13) Install wheel and tire assemblies.
(14) Remove support and lower vehicle.
(15) Check vehicle alignment.
ADJUSTMENTS
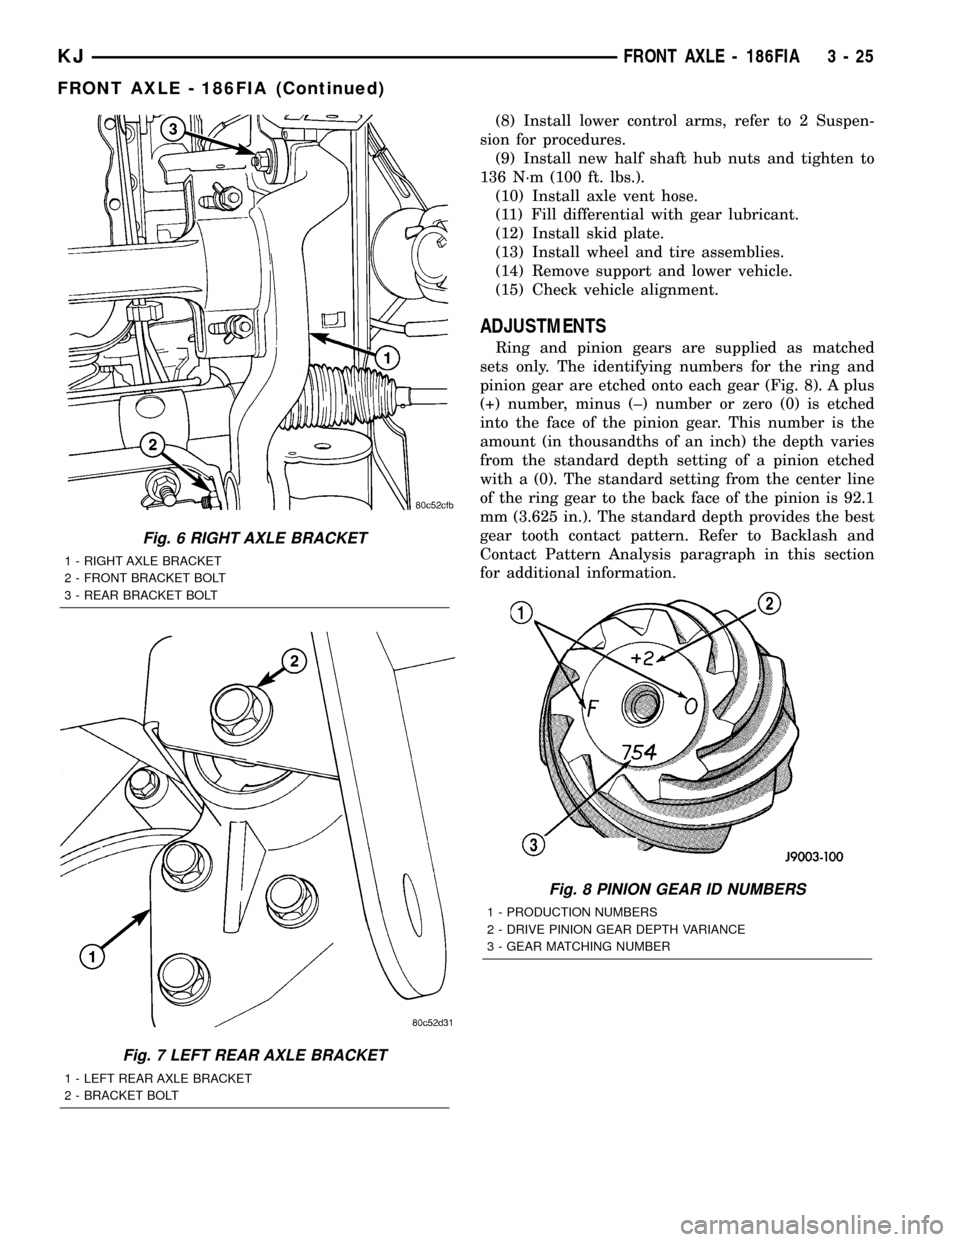
Ring and pinion gears are supplied as matched
sets only. The identifying numbers for the ring and
pinion gear are etched onto each gear (Fig. 8). A plus
(+) number, minus (±) number or zero (0) is etched
into the face of the pinion gear. This number is the
amount (in thousandths of an inch) the depth varies
from the standard depth setting of a pinion etched
with a (0). The standard setting from the center line
of the ring gear to the back face of the pinion is 92.1
mm (3.625 in.). The standard depth provides the best
gear tooth contact pattern. Refer to Backlash and
Contact Pattern Analysis paragraph in this section
for additional information.
Fig. 6 RIGHT AXLE BRACKET
1 - RIGHT AXLE BRACKET
2 - FRONT BRACKET BOLT
3 - REAR BRACKET BOLT
Fig. 7 LEFT REAR AXLE BRACKET
1 - LEFT REAR AXLE BRACKET
2 - BRACKET BOLT
Fig. 8 PINION GEAR ID NUMBERS
1 - PRODUCTION NUMBERS
2 - DRIVE PINION GEAR DEPTH VARIANCE
3 - GEAR MATCHING NUMBER
KJFRONT AXLE - 186FIA 3 - 25
FRONT AXLE - 186FIA (Continued)
Page 75 of 1803
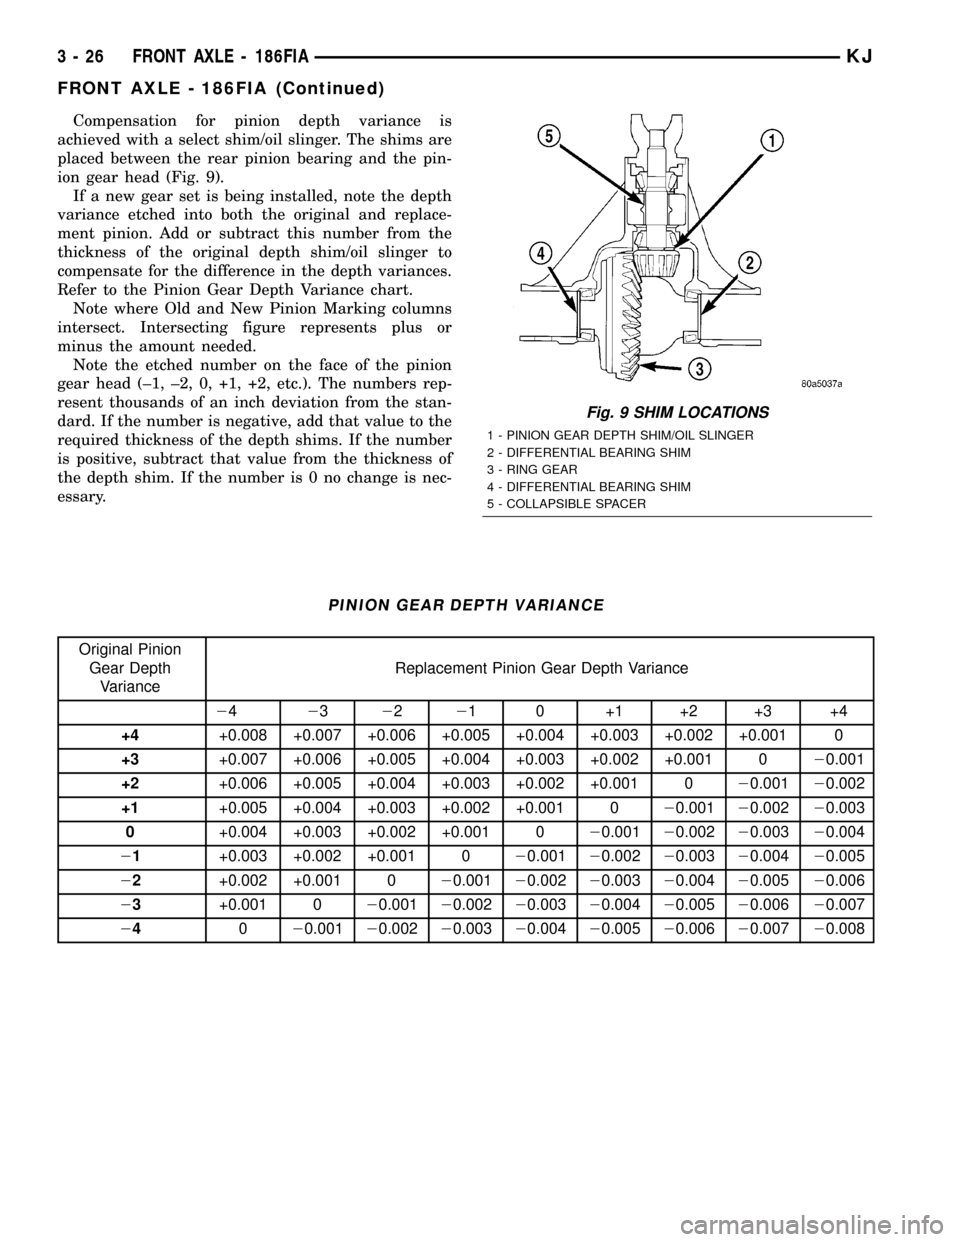
Compensation for pinion depth variance is
achieved with a select shim/oil slinger. The shims are
placed between the rear pinion bearing and the pin-
ion gear head (Fig. 9).
If a new gear set is being installed, note the depth
variance etched into both the original and replace-
ment pinion. Add or subtract this number from the
thickness of the original depth shim/oil slinger to
compensate for the difference in the depth variances.
Refer to the Pinion Gear Depth Variance chart.
Note where Old and New Pinion Marking columns
intersect. Intersecting figure represents plus or
minus the amount needed.
Note the etched number on the face of the pinion
gear head (±1, ±2, 0, +1, +2, etc.). The numbers rep-
resent thousands of an inch deviation from the stan-
dard. If the number is negative, add that value to the
required thickness of the depth shims. If the number
is positive, subtract that value from the thickness of
the depth shim. If the number is 0 no change is nec-
essary.
PINION GEAR DEPTH VARIANCE
Original Pinion
Gear Depth
VarianceReplacement Pinion Gear Depth Variance
24232221 0 +1 +2 +3 +4
+4+0.008 +0.007 +0.006 +0.005 +0.004 +0.003 +0.002 +0.001 0
+3+0.007 +0.006 +0.005 +0.004 +0.003 +0.002 +0.001 020.001
+2+0.006 +0.005 +0.004 +0.003 +0.002 +0.001 020.00120.002
+1+0.005 +0.004 +0.003 +0.002 +0.001 020.00120.00220.003
0+0.004 +0.003 +0.002 +0.001 020.00120.00220.00320.004
21+0.003 +0.002 +0.001 020.00120.00220.00320.00420.005
22+0.002 +0.001 020.00120.00220.00320.00420.00520.006
23+0.001 020.00120.00220.00320.00420.00520.00620.007
24020.00120.00220.00320.00420.00520.00620.00720.008
Fig. 9 SHIM LOCATIONS
1 - PINION GEAR DEPTH SHIM/OIL SLINGER
2 - DIFFERENTIAL BEARING SHIM
3 - RING GEAR
4 - DIFFERENTIAL BEARING SHIM
5 - COLLAPSIBLE SPACER
3 - 26 FRONT AXLE - 186FIAKJ
FRONT AXLE - 186FIA (Continued)
Page 76 of 1803
PINION DEPTH MEASUREMENT
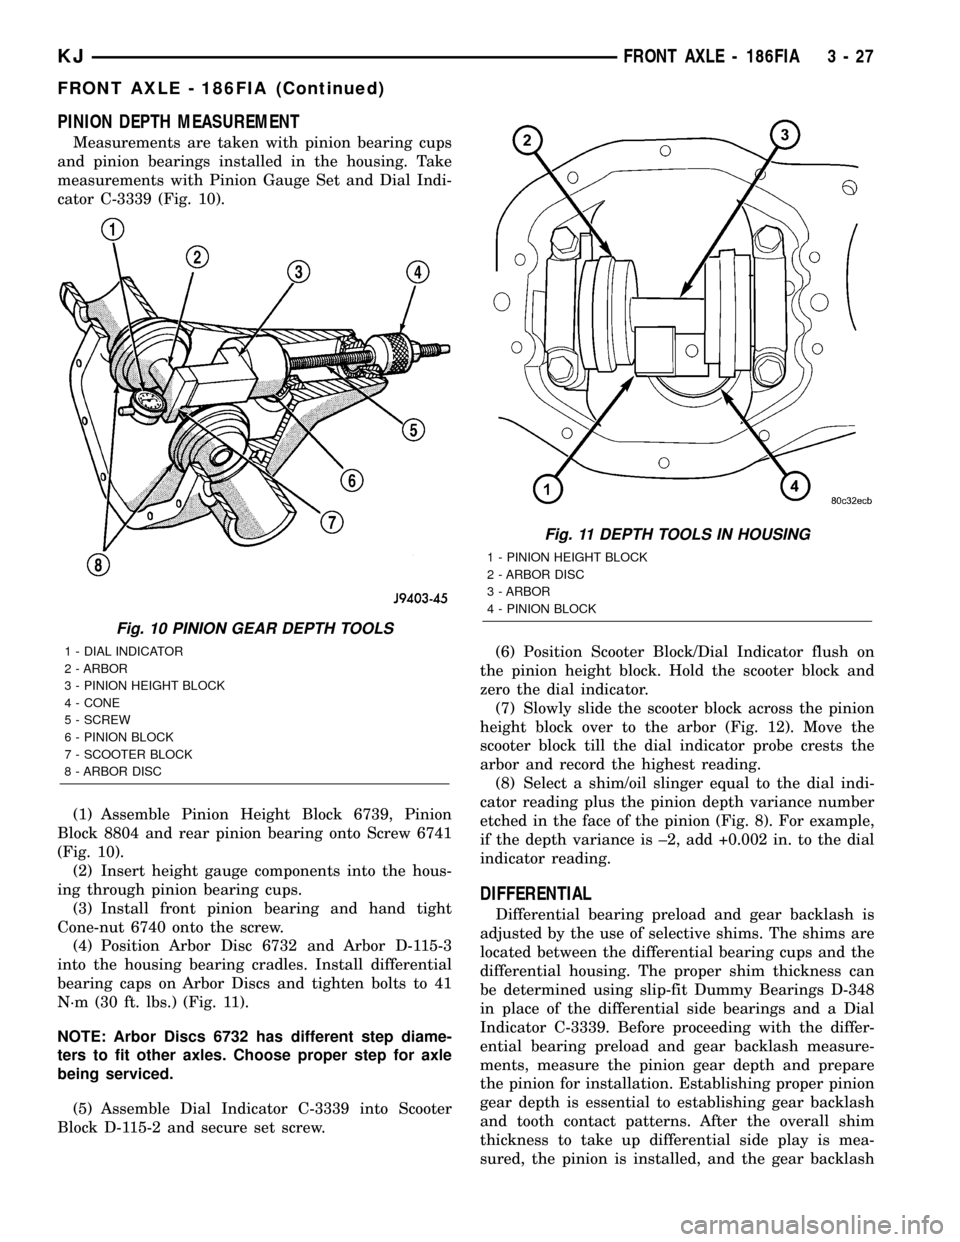
Measurements are taken with pinion bearing cups
and pinion bearings installed in the housing. Take
measurements with Pinion Gauge Set and Dial Indi-
cator C-3339 (Fig. 10).
(1) Assemble Pinion Height Block 6739, Pinion
Block 8804 and rear pinion bearing onto Screw 6741
(Fig. 10).
(2) Insert height gauge components into the hous-
ing through pinion bearing cups.
(3) Install front pinion bearing and hand tight
Cone-nut 6740 onto the screw.
(4) Position Arbor Disc 6732 and Arbor D-115-3
into the housing bearing cradles. Install differential
bearing caps on Arbor Discs and tighten bolts to 41
N´m (30 ft. lbs.) (Fig. 11).
NOTE: Arbor Discs 6732 has different step diame-
ters to fit other axles. Choose proper step for axle
being serviced.
(5) Assemble Dial Indicator C-3339 into Scooter
Block D-115-2 and secure set screw.(6) Position Scooter Block/Dial Indicator flush on
the pinion height block. Hold the scooter block and
zero the dial indicator.
(7) Slowly slide the scooter block across the pinion
height block over to the arbor (Fig. 12). Move the
scooter block till the dial indicator probe crests the
arbor and record the highest reading.
(8) Select a shim/oil slinger equal to the dial indi-
cator reading plus the pinion depth variance number
etched in the face of the pinion (Fig. 8). For example,
if the depth variance is ±2, add +0.002 in. to the dial
indicator reading.
DIFFERENTIAL
Differential bearing preload and gear backlash is
adjusted by the use of selective shims. The shims are
located between the differential bearing cups and the
differential housing. The proper shim thickness can
be determined using slip-fit Dummy Bearings D-348
in place of the differential side bearings and a Dial
Indicator C-3339. Before proceeding with the differ-
ential bearing preload and gear backlash measure-
ments, measure the pinion gear depth and prepare
the pinion for installation. Establishing proper pinion
gear depth is essential to establishing gear backlash
and tooth contact patterns. After the overall shim
thickness to take up differential side play is mea-
sured, the pinion is installed, and the gear backlash
Fig. 10 PINION GEAR DEPTH TOOLS
1 - DIAL INDICATOR
2 - ARBOR
3 - PINION HEIGHT BLOCK
4 - CONE
5 - SCREW
6 - PINION BLOCK
7 - SCOOTER BLOCK
8 - ARBOR DISC
Fig. 11 DEPTH TOOLS IN HOUSING
1 - PINION HEIGHT BLOCK
2 - ARBOR DISC
3 - ARBOR
4 - PINION BLOCK
KJFRONT AXLE - 186FIA 3 - 27
FRONT AXLE - 186FIA (Continued)