mirror JEEP LIBERTY 2004 KJ / 1.G Owners Manual
[x] Cancel search | Manufacturer: JEEP, Model Year: 2004, Model line: LIBERTY, Model: JEEP LIBERTY 2004 KJ / 1.GPages: 374, PDF Size: 5.71 MB
Page 71 of 374

UNDERSTANDING THE FEATURES OF YOUR VEHICLE
CONTENTS
mMirrors...............................75
NInside Day/Night Mirror.................75
NInside Automatic Dimming Mirror
If Equipped..........................76
NOutside Mirrors.......................76
NPower Remote Control Outside Mirrors Ð If
Equipped............................77
NHeated Remote Control Mirrors
Ð If Equipped........................78
NIlluminated Vanity Mirrors Ð If Equipped....78mHands±Free Communication (UConnectŸ)
Ð If Equipped..........................78
NOperation............................80
NPhone Call Features....................84
NAdvanced Phone Connectivity.............86
NUConnectŸ System Features..............87
mSeats.................................90
NFront Seat (Manual) Adjustment............90
NFront Seat Adjustment Ð Recline...........91
3
Page 75 of 374

MIRRORS
Inside Day/Night Mirror
The mirror should be adjusted to center on the view
through the rear window. A two-point pivot system
allows for horizontal and vertical adjustment of the
mirror. The mirror should be adjusted while set in the
day position (toward windshield).
Annoying headlight glare from vehicles behind you can
be reduced by moving the small control under the mirror
to the night position (toward rear of vehicle).
UNDERSTANDING THE FEATURES OF YOUR VEHICLE 75
3
Page 76 of 374
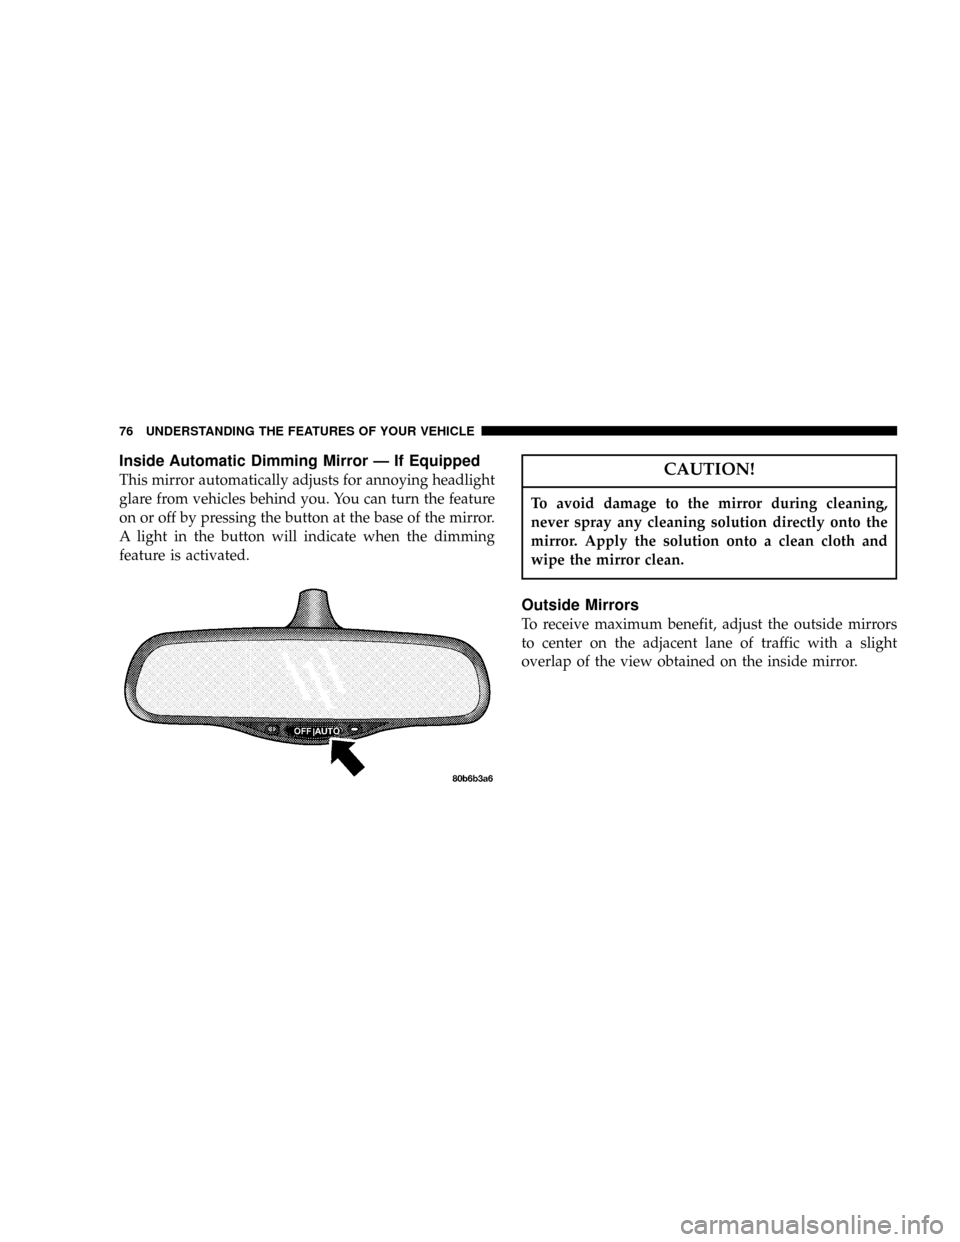
Inside Automatic Dimming Mirror Ð If Equipped
This mirror automatically adjusts for annoying headlight
glare from vehicles behind you. You can turn the feature
on or off by pressing the button at the base of the mirror.
A light in the button will indicate when the dimming
feature is activated.CAUTION!
To avoid damage to the mirror during cleaning,
never spray any cleaning solution directly onto the
mirror. Apply the solution onto a clean cloth and
wipe the mirror clean.
Outside Mirrors
To receive maximum benefit, adjust the outside mirrors
to center on the adjacent lane of traffic with a slight
overlap of the view obtained on the inside mirror.
76 UNDERSTANDING THE FEATURES OF YOUR VEHICLE
Page 77 of 374
WARNING!
Vehicles and other objects seen in the right side
convex mirror will look smaller and farther away
than they really are. Relying too much on your right
side mirror could cause you to collide with another
vehicle or other objects. Use your inside mirror when
judging the size or distance of a vehicle seen in the
right side mirror.
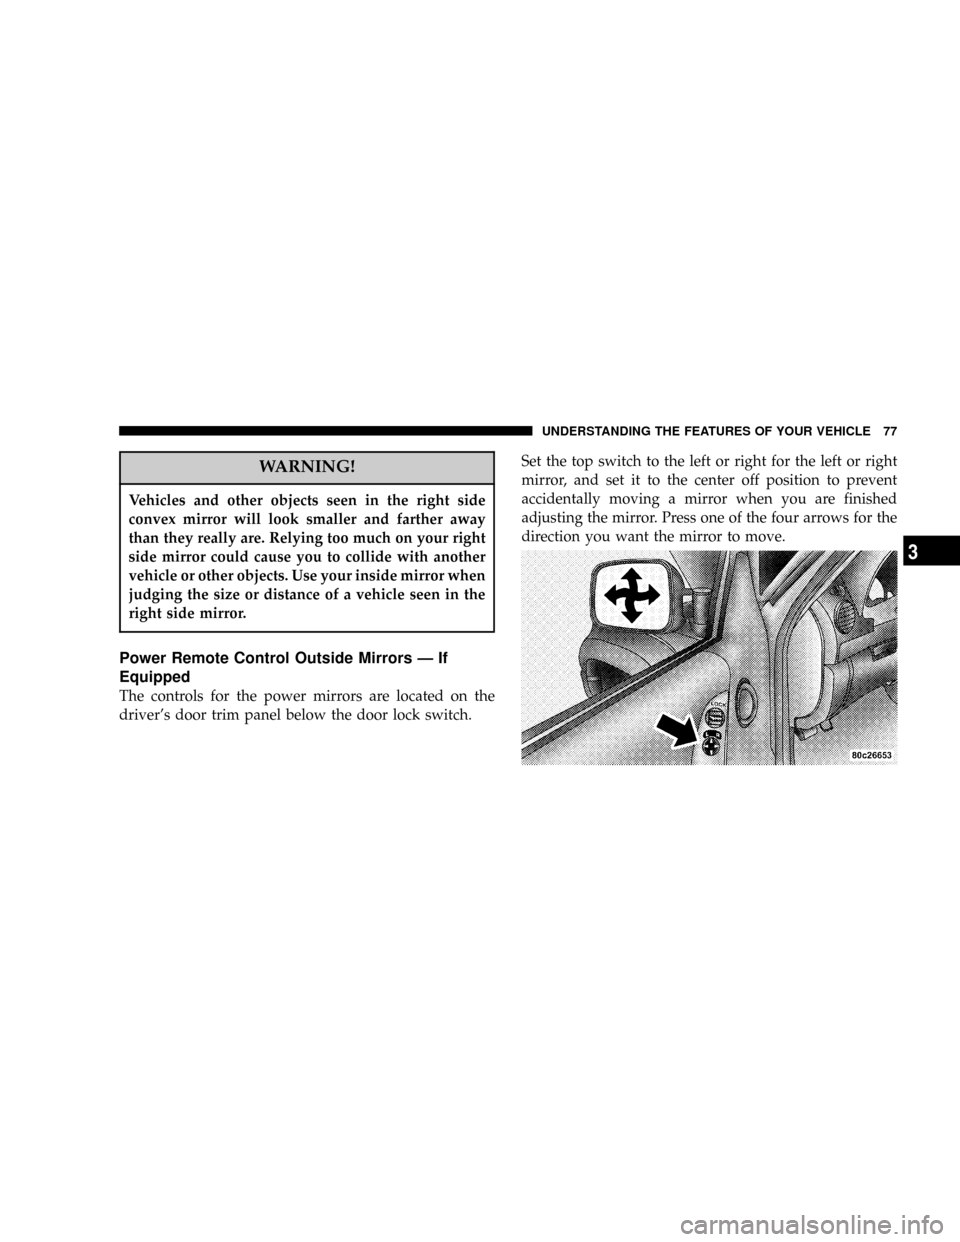
Power Remote Control Outside Mirrors Ð If
Equipped
The controls for the power mirrors are located on the
driver's door trim panel below the door lock switch.Set the top switch to the left or right for the left or right
mirror, and set it to the center off position to prevent
accidentally moving a mirror when you are finished
adjusting the mirror. Press one of the four arrows for the
direction you want the mirror to move.
UNDERSTANDING THE FEATURES OF YOUR VEHICLE 77
3
Page 78 of 374

Heated Remote Control Mirrors Ð If Equipped
These mirrors are heated to melt frost or ice. This
feature is activated whenever you turn on the rear
window defrost.
Illuminated Vanity Mirrors Ð If Equipped
An illuminated vanity mirror is on the sun visor. To use
the mirror, rotate the sun visor down and swing the
mirror cover upward. The lights turn on automatically.
Closing the mirror cover turns off the lights.
When the ignition is turned off, the light will turn off
automatically (after approximately 8 minutes).
HANDS±FREE COMMUNICATION (UConnectŸ) Ð
IF EQUIPPED
UConnectŸ is a voice-activated, hands-free, in-vehicle
communications system. UConnectŸ; allows you to dial
your cellular phone using simple voice commands (e.g.,
ªCall Mike Workº or ªDial 248-555-1212º). Your cellular
78 UNDERSTANDING THE FEATURES OF YOUR VEHICLE
Page 79 of 374

phone's audio is transmitted through your vehicle's
stereo system; the system will automatically mute your
radio before receiving or sending a call.
UConnectŸ allows you to transfer calls between the
system and your cellular phone as you enter or exit your
vehicle, and enables you to mute the system's micro-
phone for private conversations.
The UConnectŸ; phone book enables you to store up to
32 names and four numbers per name. This system is
driven through your BluetoothŸ Hands-Free Profile
cellular phone. UConnectŸ features BluetoothŸ technol-
ogy - the global standard that enables different electronic
devices to connect to each other without wires or a
docking station, so UConnectŸ works no matter where
you stow your cellular phone (be it your purse, pocket, or
briefcase). UConnectŸ allows up to seven cellular
phones to be linked to the system, and it is available in
English, French, or Spanish formats (as equipped).The rearview mirror contains the microphone for the
system and the control buttons that will enable you to
access the system. The diagram below shows the mirror
with the appropriate buttons. Individual button behavior
is discussed in the ªOperationº Section.
The UConnectŸ system can be used with any Hands
Free Profile certified BluetoothŸ cellular phone. If your
UNDERSTANDING THE FEATURES OF YOUR VEHICLE 79
3
Page 205 of 374
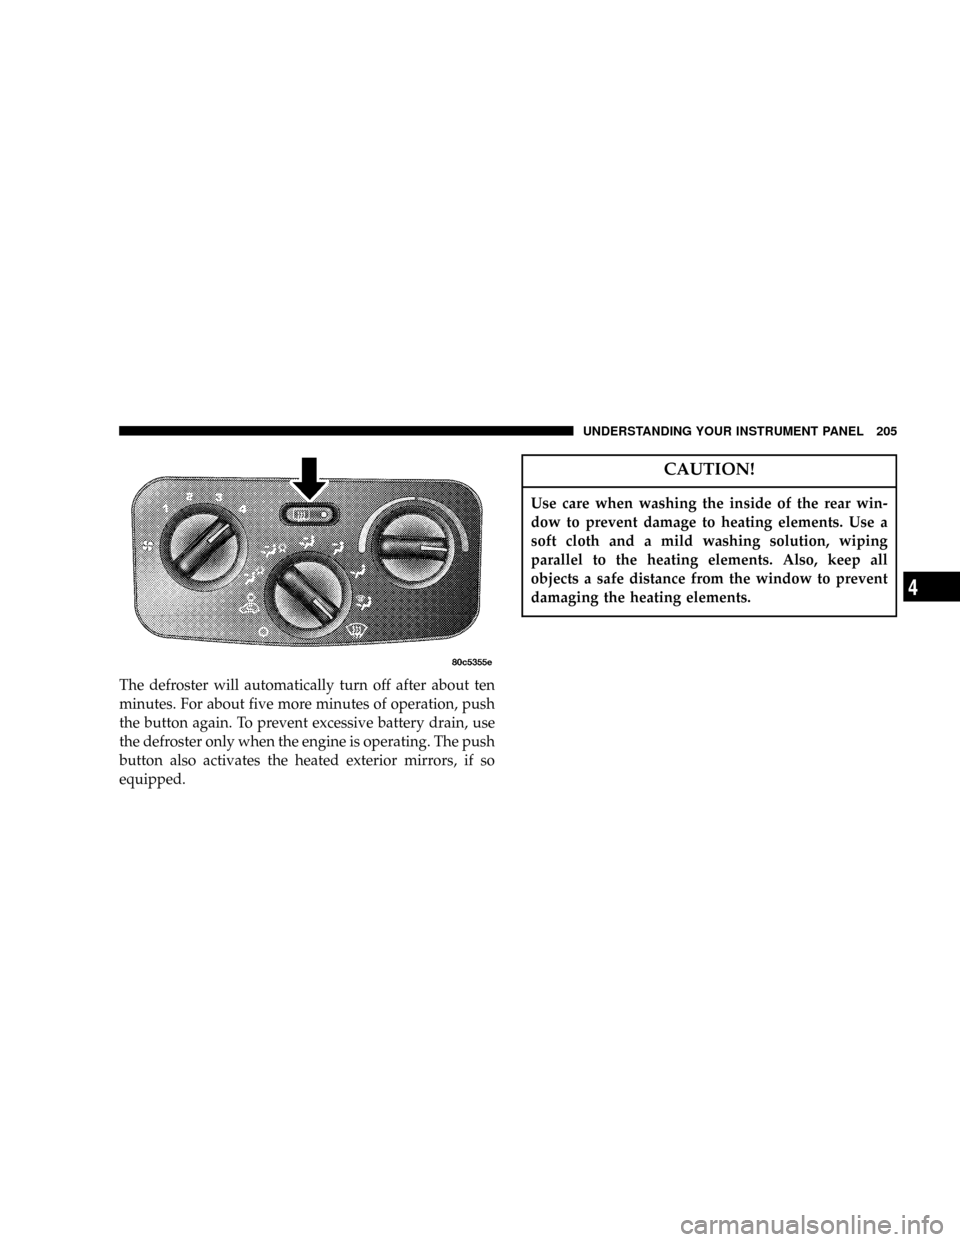
The defroster will automatically turn off after about ten
minutes. For about five more minutes of operation, push
the button again. To prevent excessive battery drain, use
the defroster only when the engine is operating. The push
button also activates the heated exterior mirrors, if so
equipped.
CAUTION!
Use care when washing the inside of the rear win-
dow to prevent damage to heating elements. Use a
soft cloth and a mild washing solution, wiping
parallel to the heating elements. Also, keep all
objects a safe distance from the window to prevent
damaging the heating elements.
UNDERSTANDING YOUR INSTRUMENT PANEL 205
4
Page 210 of 374
STARTING PROCEDURES
Before starting your vehicle, adjust your seat, adjust both
inside and outside mirrors, and fasten your seat belts.
WARNING!
Do not leave children or animals inside parked
vehicles in hot weather. Interior heat build up may
cause serious injury or death.
Manual Transmission
Apply the parking brake, place the gearshift control lever
in N (Neutral) and depress the clutch pedal before
starting vehicle. This vehicle is equipped with a clutch
interlocking ignition system.4WD Models Only
In 4L mode, this vehicle will start regardless of whether
or not the clutch pedal is pressed to the floor. This feature
enhances off-road performance by allowing the vehicle to
start when in 4L without having to depress the clutch
pedal. The 4 LO MODE indicator light will illuminate
when the transfer case has been shifted into this mode.
Automatic Transmission
Start the engine with the selector lever in the N (Neutral)
or P (Park) position. Apply the brake before shifting to
any driving range.
Normal Starting
Normal starting of either a cold or a warm engine is
obtained without pumping or depressing the accelerator
pedal. Turn the key to the START position and release
when the engine starts. If the engine fails to start within
10 seconds, turn the key to the OFF position, wait 5
seconds, then repeat the normal starting procedure.
210 STARTING AND OPERATING
Page 318 of 374
Leather Seat Care & Cleaning
Leather is best preserved by regular cleaning with a
damp soft cloth. Small particles of dirt can act as an
abrasive and damage the leather surface and should be
removed promptly with a damp cloth. Stubborn soils can
be removed easily with a soft cloth and MopartTotal
Clean. Care should be taken to avoid soaking the leather
with any liquid. Please do not use polishes, oils, cleaning
fluids, solvents, detergents, or ammonia based cleaners
to clean the leather. Application of a leather conditioner is
not required to maintain the original condition.
WARNING!
Do not use volatile solvents for cleaning purposes.
Many are potentially flammable, and if used in
closed areas they may cause respiratory harm.
Glass Surfaces
All glass surfaces should be cleaned on a regular basis
with any commercial household-type glass cleaner.
Never use an abrasive type cleaner. Use caution when
cleaning inside rear windows equipped with electric
defrosters. Do not use scrapers or other sharp instru-
ments which may scratch the elements.
When cleaning the rear view mirror, spray cleaner on the
towel or rag that you are using. Do not spray cleaner
directly on the mirror.
Carpet
Vacuum your carpet regularly to prevent a soil build-up.
Shampoo soiled carpet with a reliable upholstery cleaner,
using a natural sponge or soft bristle brush. After carpet
dries, vacuum it thoroughly.
318 MAINTAINING YOUR VEHICLE
Page 321 of 374
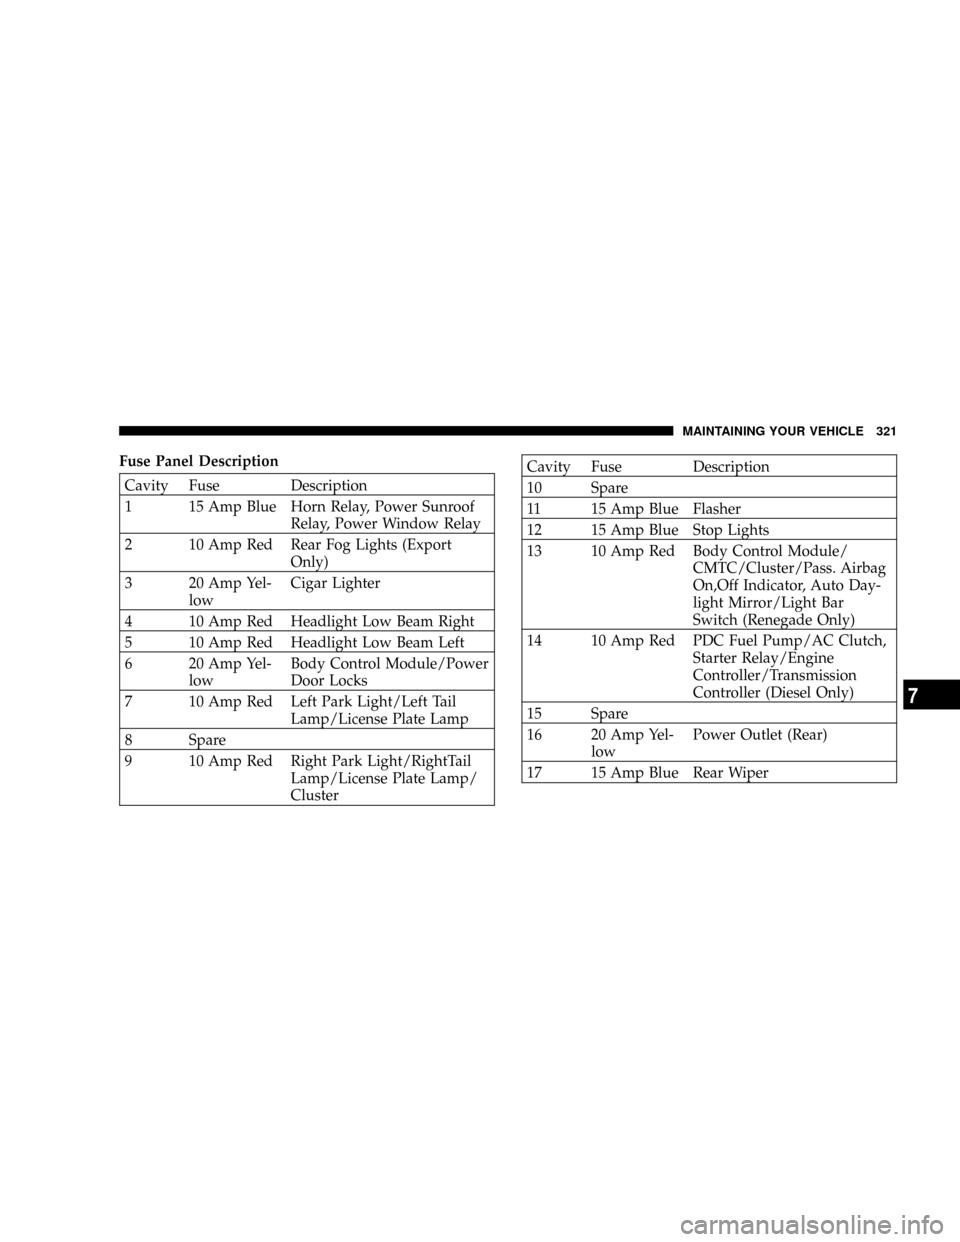
Fuse Panel Description
Cavity Fuse Description
1 15 Amp Blue Horn Relay, Power Sunroof
Relay, Power Window Relay
2 10 Amp Red Rear Fog Lights (Export
Only)
3 20 Amp Yel-
lowCigar Lighter
4 10 Amp Red Headlight Low Beam Right
5 10 Amp Red Headlight Low Beam Left
6 20 Amp Yel-
lowBody Control Module/Power
Door Locks
7 10 Amp Red Left Park Light/Left Tail
Lamp/License Plate Lamp
8 Spare
9 10 Amp Red Right Park Light/RightTail
Lamp/License Plate Lamp/
Cluster
Cavity Fuse Description
10 Spare
11 15 Amp Blue Flasher
12 15 Amp Blue Stop Lights
13 10 Amp Red Body Control Module/
CMTC/Cluster/Pass. Airbag
On,Off Indicator, Auto Day-
light Mirror/Light Bar
Switch (Renegade Only)
14 10 Amp Red PDC Fuel Pump/AC Clutch,
Starter Relay/Engine
Controller/Transmission
Controller (Diesel Only)
15 Spare
16 20 Amp Yel-
lowPower Outlet (Rear)
17 15 Amp Blue Rear Wiper
MAINTAINING YOUR VEHICLE 321
7