check oil JEEP LIBERTY 2008 KK / 2.G Owners Manual
[x] Cancel search | Manufacturer: JEEP, Model Year: 2008, Model line: LIBERTY, Model: JEEP LIBERTY 2008 KK / 2.GPages: 493
Page 81 of 493
inspect the exhaust system each time the vehicle is raised
for lubrication or oil change. Replace as required.
WARNING!
²Exhaust gases can injure or kill. They contain
carbon monoxide (CO) which is colorless and
odorless. Breathing it can make you unconscious
and can eventually poison you. To avoid breathing
(CO) follow the safety tips below.
²If you are required to drive with the trunk open,
make sure that all windows are closed, and the
climate control blower switch is set at high speed.
DO NOT use the recirculation mode.
Safety Checks You Should Make Inside The
Vehicle
Seat Belts
Inspect the belt system periodically, checking for cuts,
frays, and loose parts. Damaged parts must be replaced
immediately. Do not disassemble or modify the system.
Front seat belt assemblies must be replaced after a
collision. Rear seat belt assemblies must be replaced after
a collision if they have been damaged (bent retractor, torn
webbing, etc. If there is any question regarding belt or
retractor condition, replace the belt.
Airbag Warning Light
The light should come on and remain on for 6 to 8
seconds as a bulb check when the ignition switch is first
turned ON. If the light is not lit during starting, see you
authorized dealer. If the light stays on, flickers, or comes
on while driving, have the system checked by an autho-
rized dealer.
THINGS TO KNOW BEFORE STARTING YOUR VEHICLE 81
2
Page 82 of 493

Defroster
Check operation by selecting the defrost mode and place
the blower control on high speed. You should be able to
feel the air directed against the windshield. See your
authorized dealer for service if your defroster is inoper-
able.
Periodic Safety Checks You Should Make Outside
The Vehicle
Tires
Examine tires for excessive tread wear and uneven wear
patterns. Check for stones, nails, glass, or other objects
lodged in the tread. Inspect the tread and sidewall for
cuts and cracks. Check the wheel nuts for tightness.
Check the tires (including spare) for proper pressure.
Lights
Have someone observe the operation of exterior lights
while you work the controls. Check turn signal and high
beam indicator lights on the instrument panel.
Door Latches
Check for positive closing, latching, and locking.
Fluid Leaks
Check area under vehicle after overnight parking for fuel,
engine coolant, oil, or other fluid leaks. Also, if gasoline
fumes are detected or if fuel, power steering fluid, or
brake fluid leaks are suspected, the cause should be
located and corrected immediately.
82 THINGS TO KNOW BEFORE STARTING YOUR VEHICLE
Page 195 of 493

13. Oil Pressure Warning Light
This light shows low engine oil pressure. The light
will turn on and remain on when the ignition
switch is turned from the LOCK or ACC position to the
ON position. The light will turn off after the engine is
started. If the light does not turn on during starting, have
the system checked by an authorized dealer.
If the light turns on and remains on while driving, safely
bring the vehicle to a stop and shut off the engine. DO
NOT OPERATE THE VEHICLE UNTIL THE CAUSE IS
CORRECTED.
This light does not show the quantity of oil in the engine.
The engine oil level must be checked using the proper
procedure. (See page 403 for more information.)
14. Anti-Lock Brake Warning Light
This light monitors the Anti-Lock Brake Sys-
tem. This light will turn on when the ignition
switch is turned to the ON position and it may
stay on for approximately 3 seconds.If the light remains on or turns on during driving, it
indicates that the Anti-Lock portion of the brake system
is not functioning and that service is required. However,
the conventional brake system will continue to operate
normally, provided the BRAKE warning light is not on.
If the ABS light is on, the brake system should be serviced as
soon as possible to restore the benefit of Anti-Lock Brakes.
The ABS Warning light should be checked frequently to
assure that it is operating properly. Turn the ignition
switch to the ON position, but do not start the vehicle.
The light should turn on. If the light does not turn on,
have the system checked by an authorized dealer. (See
page 310 for more information.)
15. Tachometer
This gauge measures engine revolutions-per-minute
(rpm x 1000). Before the pointer reaches the red area, ease
up on the accelerator to prevent engine damage.
INSTRUMENT PANEL AND CONTROLS 195
4
Page 209 of 493

²Door(s) Ajar (with a single chime if vehicle is in
motion)
²Liftgate Ajar (with a single chime)
²Left Front Low Pressure (with a single chime). Refer to
ªTire Pressure Monitoring Systemº in Section 5 of this
manual.
²Left Rear Low Pressure (with a single chime). Refer to
ªTire Pressure Monitoring Systemº in Section 5 of this
manual.
²Right Front Low Pressure (with a single chime). Refer
to ªTire Pressure Monitoring Systemº in Section 5 of
this manual.
²Right Rear Low Pressure (with a single chime). Refer
to ªTire Pressure Monitoring Systemº in Section 5 of
this manual.
²Check TPM System (with a single chime). Refer to
ªTire Pressure Monitoring Systemº in Section 5 of this
manual.
²Check Gascap (refer to ªAdding Fuelº in Section 5 of
this manual for more details)
²Service Park Assist System (with a single chime)
²Oil Change Required (with a single chime)
Oil Change Required
Your vehicle is equipped with an engine oil change
indicator system. The ªOil Change Requiredº message
will flash in the EVIC display for approximately 10
seconds after a single chime has sounded to indicate the
next scheduled oil change interval. The engine oil change
indicator system is duty cycle based, which means the
engine oil change interval may fluctuate dependent upon
your personal driving style.
INSTRUMENT PANEL AND CONTROLS 209
4
Page 395 of 493
MAINTAINING YOUR VEHICLE
CONTENTS
m3.7L Engine Compartment................398
mOnboard Diagnostic System Ð OBD II........399
NLoose Fuel Filler Cap Message............400
mEmissions Inspection And Maintenance
Programs............................400
mReplacement Parts......................402
mDealer Service.........................402
mMaintenance Procedures..................402
NEngine Oil..........................403NEngine Oil Filter......................405
NDrive Belts Ð Check Condition And Tension . . 406
NSpark Plugs.........................406
NEngine Air Cleaner Filter................406
NFuel Filter..........................407
NCatalytic Converter....................407
NCrankcase Emission Control System........409
NMaintenance-Free Battery................409
NAir Conditioner Maintenance.............411
7
Page 403 of 493
These items should be inspected if a malfunction is
observed or suspected.
Engine Oil
Checking Oil Level
To assure proper engine lubrication, the engine oil must
be maintained at the correct level.
The best time to check the engine oil level is about 5
minutes after a fully warmed up engine is shut off or
before starting the engine after it has sat overnight.
Checking the oil while the vehicle is on level ground will
improve the accuracy of the oil level readings. Always
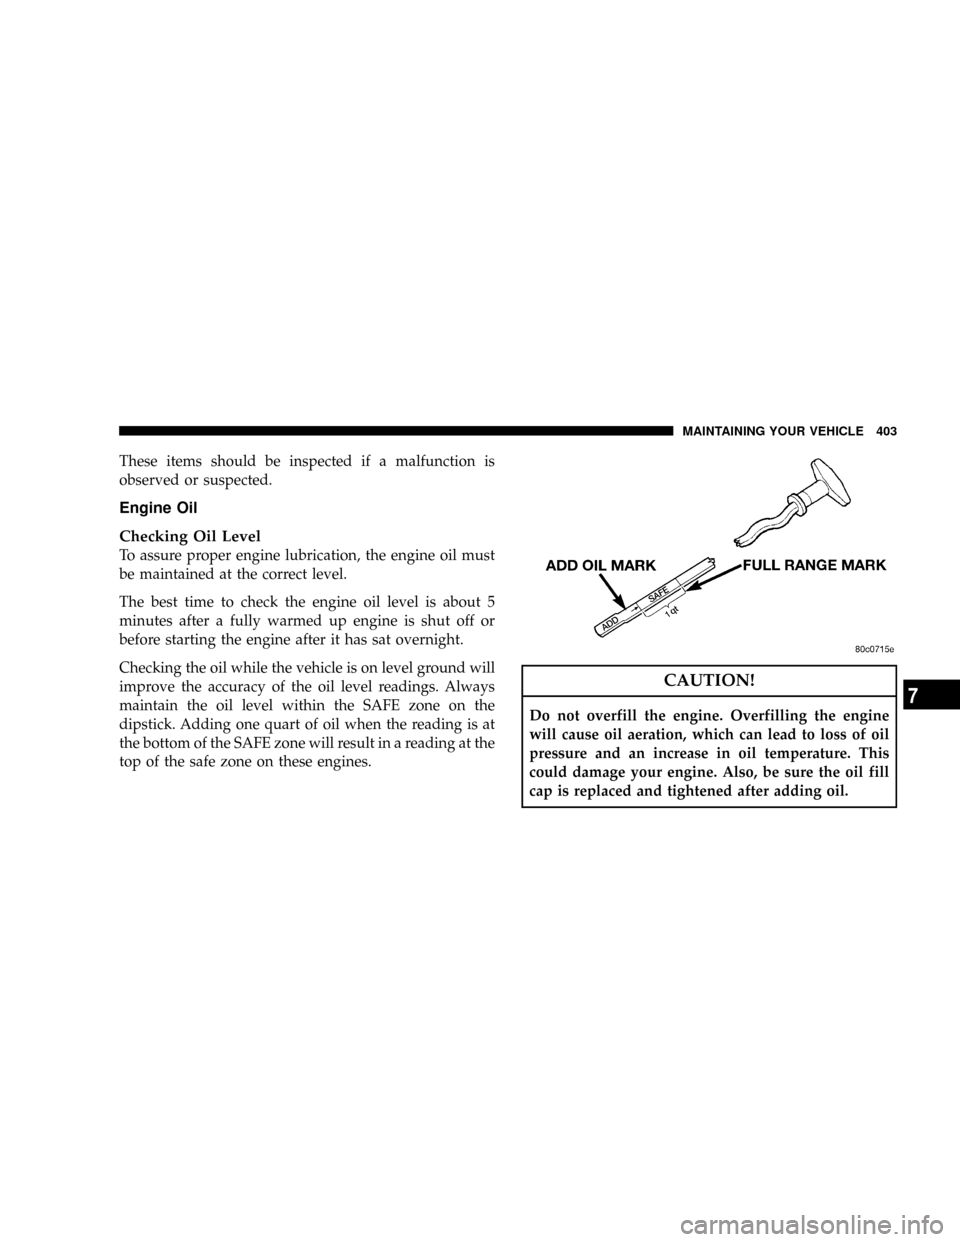
maintain the oil level within the SAFE zone on the
dipstick. Adding one quart of oil when the reading is at
the bottom of the SAFE zone will result in a reading at the
top of the safe zone on these engines.
CAUTION!
Do not overfill the engine. Overfilling the engine
will cause oil aeration, which can lead to loss of oil
pressure and an increase in oil temperature. This
could damage your engine. Also, be sure the oil fill
cap is replaced and tightened after adding oil.
MAINTAINING YOUR VEHICLE 403
7
Page 409 of 493

To minimize the possibility of catalytic converter dam-
age:
²Do not shut off the engine or interrupt the ignition
when the transmission is in gear and the vehicle is in
motion.
²Do not try to start the engine by pushing or towing the
vehicle.
²Do not idle the engine with any ignition coil connec-
tors disconnected for prolonged periods.
²Do not idle the engine for prolonged periods during
very rough idle or malfunctioning operating condi-
tions.
²Do not allow vehicle to run out of fuel.
Crankcase Emission Control System
Proper operation of this system depends on freedom
from sticking or plugging due to deposits. As vehicle
mileage builds up, the PCV valve and passages may
accumulate deposits. If a valve is not working properly,
replace it with a new valve. DO NOT ATTEMPT TO
CLEAN THE OLD PCV VALVE!
Check ventilation hose for indication of damage or
plugging deposits. Replace if necessary.
Maintenance-Free Battery
Your vehicle is equipped with a maintenance-free battery.
You will never have to add water, nor is periodic main-
tenance required.
MAINTAINING YOUR VEHICLE 409
7
Page 412 of 493
Refrigerant Recovery and Recycling
R-134a Air Conditioning Refrigerant is a hydrofluorocar-
bon (HFC) that is endorsed by the Environmental Pro-
tection Agency and is an ozone-saving product. How-
ever, the manufacturer recommends that air conditioning
service be performed by dealers or other service facilities
using recovery and recycling equipment.
NOTE:Use only manufacturer approved A/C System
Sealers, Stop Leak Products, Seal Conditioners, Compres-
sor Oil, and Refrigerants.
A/C Air Filter Ð If Equipped
Refer to the ªMaintenance Scheduleº in Section 8 of this
manual for A/C Air Filter service intervals.
WARNING!
Do not remove the A/C Air Filter while the blower is
operating or personal injury may result.
Power Steering Ð Fluid Check
Checking the power steering fluid level at a defined
service interval is not required. The fluid should only be
checked if a leak is suspected, abnormal noises are
apparent, and/or the system is not functioning as antici-
pated. Coordinate inspection efforts through a certified
DaimlerChrysler Dealership.
WARNING!
Fluid level should be checked on a level surface and
with the engine off to prevent injury from moving
parts and to insure accurate fluid level reading. Do
not overfill. Use only manufacturer's recommended
power steering fluid.
412 MAINTAINING YOUR VEHICLE
Page 414 of 493

Operation of the wipers on dry glass for long periods
may cause deterioration of the wiper blades. Always use
washer fluid when using the wipers to remove salt or dirt
from a dry windshield.
Avoid using the wiper blades to remove frost or ice from
the windshield. Make sure that they are not frozen to the
glass before turning them on to avoid damaging the
blade.
Keep the blade rubber out of contact with petroleum
products such as engine oil, gasoline, etc.
NOTE:Always refer to the wiper blade packaging for
specific installation instructions. Many wiper blade re-
placements fit multiple vehicles.Windshield & Rear Window Washers
The windshield and rear window washers share the same
fluid reservoir. The fluid reservoir is located in the front
of the engine compartment. Be sure to check the fluid
level in the reservoir at regular intervals. Fill the reservoir
with windshield washer solvent (not radiator antifreeze)
and operate the system for a few seconds to flush out the
residual water.
When refilling the washer fluid reservoir, take some
washer fluid and apply it to a cloth or towel and wipe
clean the wiper blades, this will help blade performance.
To prevent freeze-up of your windshield washer system
in cold weather, select a solution or mixture that meets or
exceeds the temperature range of your climate. This
rating information can be found on most washer fluid
containers.
414 MAINTAINING YOUR VEHICLE
Page 423 of 493
²Inspect the brake hoses whenever the brake system is
serviced and at every engine oil change. Inspect hy-
draulic brake hoses for surface cracking, scuffing, or
worn spots. If there is any evidence of cracking,
scuffing, or worn spots, the hose should be replaced
immediately! Eventual deterioration of the hose can
take place resulting in a possibility of a burst failure.
WARNING!
Worn brake hoses can burst and cause brake failure.
You could have an accident. If you see any signs of
cracking, scuffing, or worn spots, have the brake
hoses replaced immediately.
Master Cylinder - Brake Fluid Level Check
Check the fluid level in the master cylinder immediately
if the brake system warning light indicates system fail-
ure.Check the fluid level in the master cylinder when per-
forming underhood services.
Clean the top of the master cylinder area before removing
the cap. If necessary, add fluid to bring the fluid level up
to the requirements described on the brake fluid reser-
voir.
Overfilling of fluid is not recommended because it may
cause leaking in the system.
Fluid level can be expected to fall as the brake pads wear.
Brake fluid level should be checked when pads are
replaced. However, low fluid level may be caused by a
leak and a checkup may be needed.
Use only manufacturer's recommended brake fluid. Re-
fer to ªFluids, Lubricants, and Genuine Partsº in this
section for the correct fluid type.
MAINTAINING YOUR VEHICLE 423
7