change wheel JEEP LIBERTY 2010 KK / 2.G User Guide
[x] Cancel search | Manufacturer: JEEP, Model Year: 2010, Model line: LIBERTY, Model: JEEP LIBERTY 2010 KK / 2.GPages: 80
Page 19 of 80
TILT STEERING COLUMN
• The tilt lever is located on the steeringcolumn, below the turn signal lever.
• Push down on the lever to unlock the steering column.
• With one hand firmly on the steering wheel, move the steering column up or down as
desired.
• Pull upward on the lever to lock the column firmly in place.
WARNING!
Do not adjust the steering column while driving. Adjusting the steering column while
driving, or driving with the steering column unlocked, could cause the driver to lose
control of the vehicle. Be sure the steering column is locked before driving your
vehicle. Failure to follow this warning may result in severe injury or death.
PROGRAMMABLE FEATURES
Electronic Vehicle Information Center (EVIC) – If Equipped
• The EVIC can be used to program the following Personal Settings. Press and release theMENU button
until Personal Settings displays, then press the SCROLL buttonto
scroll through the settings. Press the FUNCTION SELECT button
to change the setting.
• Language • Headlamp Off Delay
• Auto Door Locks • Easy Exit Seat
• Auto UNLK On Exit • Key-Off Power Delay
• RKE Unlock • ILLUMIN. Approach
• RKE Linked To Memory • Park ASST. System
• Sound Horn With Key Fob Lock • Hill Start Assist
• Flash Lamp Lock • Rain Sensing Intermittent Wipers
• Display ECO • Turn Headlamps On With Wipers
• Turn Headlamps On With Remote Key Unlock
17
GETTING STARTED
Page 34 of 80
Guide Me Home
• Press the NAV hard-key to access the Navigation Main Menu.
• Touch the GUIDE ME HOME soft-key to route you back to your home destination fromyour current location. Touch the GO soft-key to start your trip.
Map
• Press the NAV hard-key to access the Navigation Main Menu.
• Touch the MAP soft-key to display a map of your current position.
REMOTE AUDIO CONTROLS
• The remote audio controls are located on therear surface of the steering wheel.
Right Switch
• Press the switch up or down to increase ordecrease the volume.
• Press the button in the center to change modes AM/FM/CD/SAT.
Left Switch
• Press the switch up or down to search for thenext listenable station or select the next or
previous CD track.
• Press the button in the center to select the next preset station (radio) or to change CDs if equipped with a CD Changer.
ELECTRONIC VEHICLE INFORMATION CENTER (EVIC)
• The EVIC features a driver interactive displaythat is located in the instrument cluster.
Pressing the controls on the steering wheel
allows the driver to select vehicle information
and Personal Settings. For additional
information, refer to Programmable Features
in this guide.
• Press and release the MENU
button and
the mode displayed will change between
Compass/Temperature, Trip, System Status,
and Personal settings.
• Press the STEP
button to scroll through sub menus (i.e., Trip Functions, Avg. Fuel
Economy, DTE, Elapsed Time, and Units).
• Press and release the Compass/Temperature
button for instant access to the
Compass/Temperature screens.
• Press the RESET
button to RESET Trip Functions and change Personal Settings.
ELECTRONICS
32
Page 51 of 80
CAUTION!
Driving with a hot cooling system could damage your vehicle. If the temperature
gauge reads HOT (H), pull over and stop the vehicle. Idle the vehicle with the air
conditioner turned off until the pointer drops back into the normal range. If the
pointer remains on HOT (H), and you hear continuous chimes, turn the engine off
immediately and call for service.
WARNING!
You or others can be badly burned by hot engine coolant (antifreeze) or steam from
your radiator. If you see or hear steam coming from under the hood, do not open the
hood until the radiator has had time to cool. Never try to open a cooling system
pressure cap when the radiator or coolant bottle is hot.
JACKING AND TIRE CHANGING
WARNING!
• Do not attempt to change a tire on the side of the vehicle close to moving traffic.Pull far enough off the road to avoid the danger of being hit when operating the
jack or changing the wheel.
• Getting under a jacked-up vehicle is dangerous. The vehicle could slip off the jack and fall on you. You could be crushed. Never get any part of your body under a
vehicle that is on a jack. If you need to get under a raised vehicle, take it to a
service center where it can be raised on a lift.
• The jack is designed to use as a tool for changing tires only. The jack should not be used to lift the vehicle for service purposes. The vehicle should be jacked on a
firm, level surface only. Avoid ice or slippery areas.
• If it is necessary to retrieve the spare tire from under the vehicle on the side of the vehicle close to moving traffic, pull far enough off the road to avoid the danger of
being hit.
49
WHAT TO DO IN EMERGENCIES
Page 53 of 80
Jacking And Tire Changing Instructions
WARNING!
Carefully follow these tire changing procedures to help prevent personal injury or
damage to your vehicle: Always park on a firm, level surface as far from the edge of
the roadway as possible before raising the vehicle.
• Remove the spare tire, jack and tools from the stored location.
• Loosen (but do not remove) the wheel lug nuts by turning them counterclockwise one turn while the wheel is still on the ground.
• Assemble the jack and jacking tools. Connect the jack handle driver to the extension, then to the lug wrench.
• Locate the jack: • For the front tires, place it (rearward) of the notch on the body weld seam behind thewheel to be changed.
• For the rear tires, place it under the axle by the wheel to be changed.
• Raise the vehicle by turning the jack screw clockwise. Raise the vehicle only until the tire just clears the surface and enough clearance is obtained to install the spare tire.
51
WHAT TO DO IN EMERGENCIES
Page 64 of 80
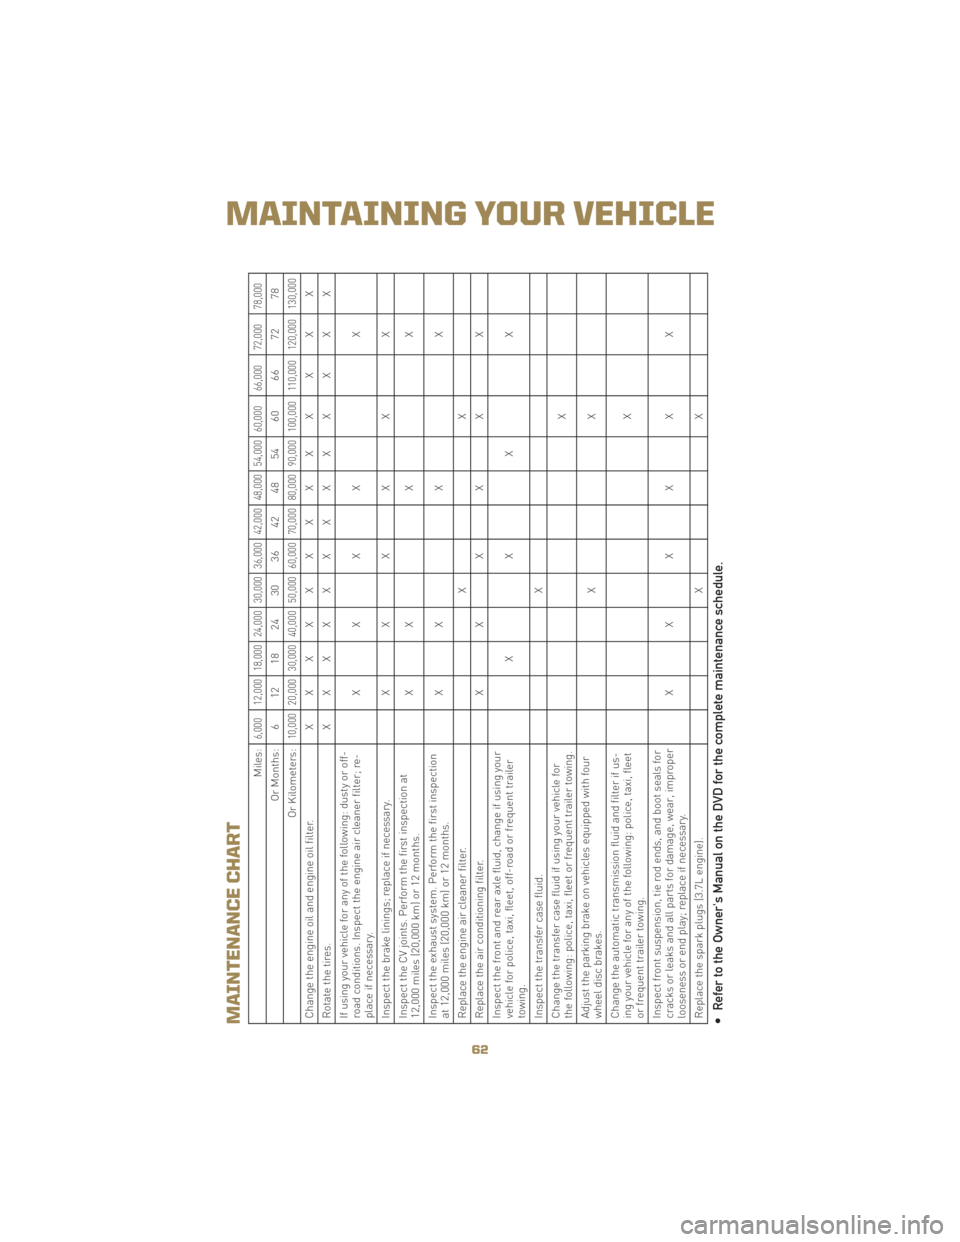
MAINTENANCE CHART
Miles:
6,000 12,000 18,000 24,000 30,000 36,000 42,000 48,000 54,000 60,000 66,000 72,000 78,000
Or Months: 6 12 18 24 30 36 42 48 54 60 66 72 78
Or Kilometers:
10,000 20,000 30,000 40,000 50,000 60,000 70,000 80,000 90,000 100,000 110,000 120,000 130,000
Change the engine oil and engine oil filter. XXXXXXXXX X X X X
Rotatethetires. XXXXXXXXX X X X X
If using your vehicle for any of the following: dusty or off-
road conditions. Inspect the engine air cleaner filter; re-
place if necessary. XXXX X
Inspect the brake linings; replace if necessary. XXXX X X
Inspect the CV joints. Perform the first inspection at
12,000 miles (20,000 km) or 12 months. XX X X
Inspect the exhaust system. Perform the first inspection
at 12,000 miles (20,000 km) or 12 months. XX X X
Replace the engine air cleaner filter. X X
Replace the air conditioning filter. XXXX X X
Inspect the front and rear axle fluid, change if using your
vehicle for police, taxi, fleet, off-road or frequent trailer
towing. XXX X
Inspect the transfer case fluid. X
Change the transfer case fluid if using your vehicle for
the following: police, taxi, fleet or frequent trailer towing. X
Adjust the parking brake on vehicles equipped with four
wheel disc brakes. XX
Change the automatic transmission fluid and filter if us-
ing your vehicle for any of the following: police, taxi, fleet
or frequent trailer towing. X
Inspect front suspension, tie rod ends, and boot seals for
cracks or leaks and all parts for damage, wear, improper
looseness or end play; replace if necessary. XXXX X X
Replace the spark plugs (3.7L engine). X X• Refer to the Owner's Manual on the DVD for the complete maintenance schedule.
62
MAINTAINING YOUR VEHICLE