ESP JEEP LIBERTY 2011 KK / 2.G User Guide
[x] Cancel search | Manufacturer: JEEP, Model Year: 2011, Model line: LIBERTY, Model: JEEP LIBERTY 2011 KK / 2.GPages: 88, PDF Size: 3.24 MB
Page 4 of 88
WELCOME FROM CHRYSLER GROUP LLC
Congratulations on selecting your new Chrysler Group LLC vehicle. Be assured that it
represents precision workmanship, distinctive styling, and high quality - all essentials that
are traditional to our vehicles.
Your new Chrysler Group LLC vehicle has characteristics to enhance the driver's control
under some driving conditions. These are to assist the driver and are never a substitute
for attentive driving. They can never take the driver's place. Always drive carefully.
Your new vehicle has many features for the comfort and convenience of you and your
passengers. Some of these should not be used when driving because they take your
eyes from the road or your attention from driving. Never text while driving or take your
eyes more than momentarily off the road.
This guide illustrates and describes the operation of features and equipment that are
either standard or optional on this vehicle. This guide may also include a description of
features and equipment that are no longer available or were not ordered on this vehicle.
Please disregard any features and equipment described in this guide that are not
available on this vehicle. Chrysler Group LLC reserves the right to make changes in
design and specifications and/or make additions to or improvements to its products
without imposing any obligation upon itself to install them on products previously
manufactured.
This User Guide has been prepared to help you quickly become acquainted with the
important features of your vehicle. It contains most things you will need to operate and
maintain the vehicle, including emergency information.
The DVD includes a computer application containing detailed owner's information which
can be viewed on a personal computer or MAC computer. The multimedia DVD also
includes videos which can be played on any standard DVD player (including the Media
Center Touch-Screen Radios). Additional DVD operational information is located on the
back of the DVD sleeve.
For complete owner information, refer to your Owner's Manual on the DVD in the owner’s
kit provided at the time of new vehicle purchase. For your convenience, the information
contained on the DVD may also be printed and saved for future reference.
Chrysler Group LLC is committed to protecting our environment and natural resources.
By converting from paper to electronic delivery for the majority of the user information for
your vehicle, together we greatly reduce the demand for tree-based products and lessen
the stress on our environment.
Vehicles Sold In Canada
With respect to any vehicles sold in Canada, the name Chrysler Group LLC shall be
deemed to be deleted and the name Chrysler Canada Inc. used in substitution therefore.
INTRODUCTION/WELCOME
2
Page 18 of 88
WARNING!
Be certain that the seatback is securely locked into position. If the seatback is
not securely locked into position, the seat will not provide the proper stability for
child seats and/or passengers. An improperly latched seat could cause serious
injury.
HEATED SEATS
Front Heated Seats
• The controls for front heated seats arelocated near the bottom center of the
instrument panel (below the heater/air
conditioning controls).
• Press the switch once to select High-level heating. Press the switch a
second time to select Low-level
heating. Press the switch a third time to
shut the heating elements Off.
• If the High-level setting is selected, the system will automatically switch to Low-level after approximately 30 minutes. The Low-level setting will turn Off automatically after
approximately 30 minutes.
WARNING!
• Persons who are unable to feel pain to the skin because of advanced age,chronic illness, diabetes, spinal cord injury, medication, alcohol use, exhaustion
or other physical conditions must exercise care when using the seat heater. It
may cause burns even at low temperatures, especially if used for long periods
of time.
• Do not place anything on the seat that insulates against heat, such as a blanket or cushion. This may cause the seat heater to overheat. Sitting in a
seat that has been overheated could cause serious burns due to the increased
surface temperature of the seat.
GETTING STARTED
16
Page 22 of 88
SPEED CONTROL
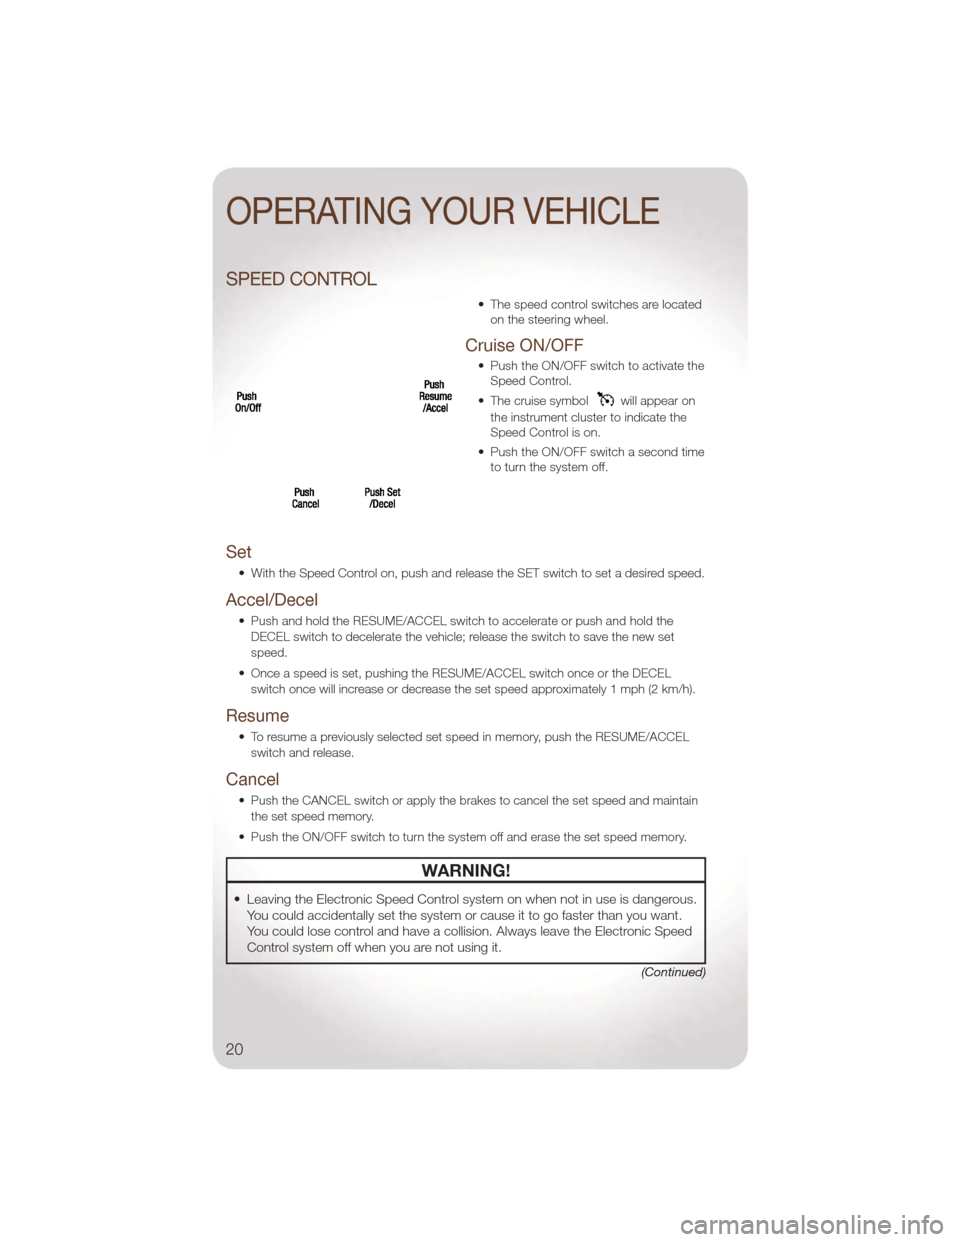
• The speed control switches are locatedon the steering wheel.
Cruise ON/OFF
• Push the ON/OFF switch to activate theSpeed Control.
• The cruise symbol
will appear on
the instrument cluster to indicate the
Speed Control is on.
• Push the ON/OFF switch a second time to turn the system off.
Set
• With the Speed Control on, push and release the SET switch to set a desired speed.
Accel/Decel
• Push and hold the RESUME/ACCEL switch to accelerate or push and hold the
DECEL switch to decelerate the vehicle; release the switch to save the new set
speed.
• Once a speed is set, pushing the RESUME/ACCEL switch once or the DECEL switch once will increase or decrease the set speed approximately 1 mph (2 km/h).
Resume
• To resume a previously selected set speed in memory, push the RESUME/ACCELswitch and release.
Cancel
• Push the CANCEL switch or apply the brakes to cancel the set speed and maintainthe set speed memory.
• Push the ON/OFF switch to turn the system off and erase the set speed memory.
WARNING!
• Leaving the Electronic Speed Control system on when not in use is dangerous. You could accidentally set the system or cause it to go faster than you want.
You could lose control and have a collision. Always leave the Electronic Speed
Control system off when you are not using it.
(Continued)
OPERATING YOUR VEHICLE
20
Page 32 of 88
Audio Jack
• The Audio Jack allows a portable device, such as an MP3 player or a cassetteplayer, to be plugged into the radio and utilize the vehicle’s audio system, using a
3.5 mm audio cable, to amplify the source and play through the vehicle speakers.
• Pressing the AUX button will change the mode to auxiliary device if the Audio Jack is connected, allowing the music from your portable device to play through the
vehicle's speakers.
• The functions of the portable device are controlled using the device buttons. The volume may be controlled using the radio or portable device.
Clock Setting
• Press and hold the TIME button until the hours blink; turn the TUNE/SCROLL controlknob to set the hours.
• Press the TUNE/SCROLL control knob until the minutes begin to blink; turn the TUNE/SCROLL control knob to set the minutes.
• Press the TUNE/SCROLL control knob to save the time change.
• To exit, press any button/knob or wait five seconds.
Store Radio Presets
• Press the SET/RND button once and SET 1 will show in the display. Then select button (1–6).
• A second station may be added to each push button. Press the SET/RND button twice and SET 2 will show in the display, then select button (1–6).
How To Load Multiple CDs/DVDs
Media Center 230 (Sales Code REQ) Only
• Press the LOAD button and then press the button with the corresponding number (1–6) where the CD is being loaded. The radio will display PLEASE WAIT and prompt
when to INSERT DISC.
• After the radio displays INSERT DISC, insert the CD into the player. The radio display will show LOADING DISC when the disc is loading and “READING DISC” when the
radio is reading the disc.
• Press the eject button and then the corresponding number (1–6) to eject the desired disc.
ELECTRONICS
30
Page 42 of 88
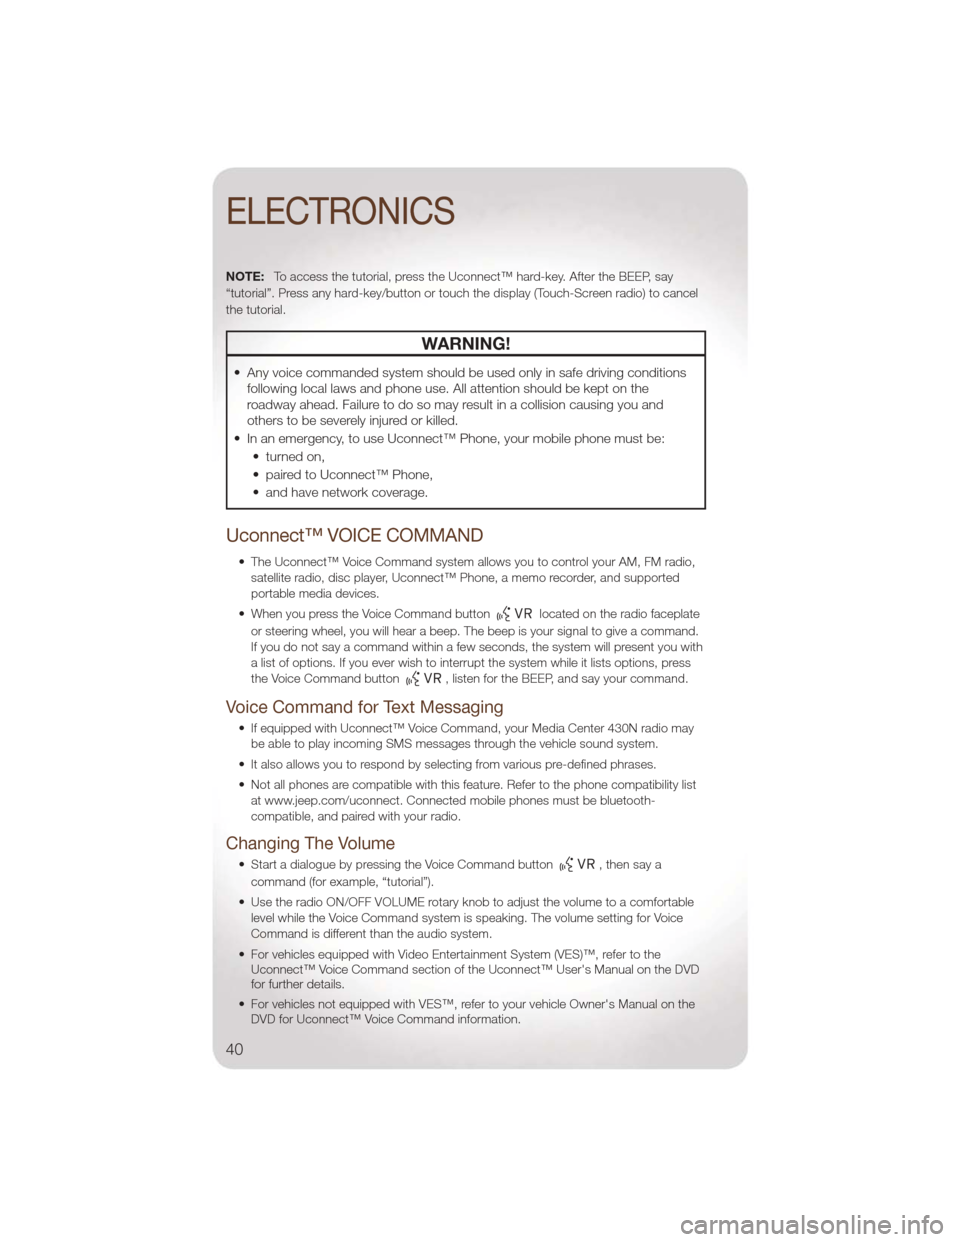
NOTE:To access the tutorial, press the Uconnect™ hard-key. After the BEEP, say
“tutorial”. Press any hard-key/button or touch the display (Touch-Screen radio) to cancel
the tutorial.
WARNING!
• Any voice commanded system should be used only in safe driving conditions following local laws and phone use. All attention should be kept on the
roadway ahead. Failure to do so may result in a collision causing you and
others to be severely injured or killed.
• In an emergency, to use Uconnect™ Phone, your mobile phone must be: • turned on,
• paired to Uconnect™ Phone,
• and have network coverage.
Uconnect™ VOICE COMMAND
• The Uconnect™ Voice Command system allows you to control your AM, FM radio,satellite radio, disc player, Uconnect™ Phone, a memo recorder, and supported
portable media devices.
• When you press the Voice Command button
located on the radio faceplate
or steering wheel, you will hear a beep. The beep is your signal to give a command.
If you do not say a command within a few seconds, the system will present you with
a list of options. If you ever wish to interrupt the system while it lists options, press
the Voice Command button
, listen for the BEEP, and say your command.
Voice Command for Text Messaging
• If equipped with Uconnect™ Voice Command, your Media Center 430N radio may be able to play incoming SMS messages through the vehicle sound system.
• It also allows you to respond by selecting from various pre-defined phrases.
• Not all phones are compatible with this feature. Refer to the phone compatibility list at www.jeep.com/uconnect. Connected mobile phones must be bluetooth-
compatible, and paired with your radio.
Changing The Volume
• Start a dialogue by pressing the Voice Command button,thensaya
command (for example, “tutorial”).
• Use the radio ON/OFF VOLUME rotary knob to adjust the volume to a comfortable level while the Voice Command system is speaking. The volume setting for Voice
Command is different than the audio system.
• For vehicles equipped with Video Entertainment System (VES)™, refer to the Uconnect™ Voice Command section of the Uconnect™ User's Manual on the DVD
for further details.
• For vehicles not equipped with VES™, refer to your vehicle Owner's Manual on the DVD for Uconnect™ Voice Command information.
ELECTRONICS
40
Page 54 of 88
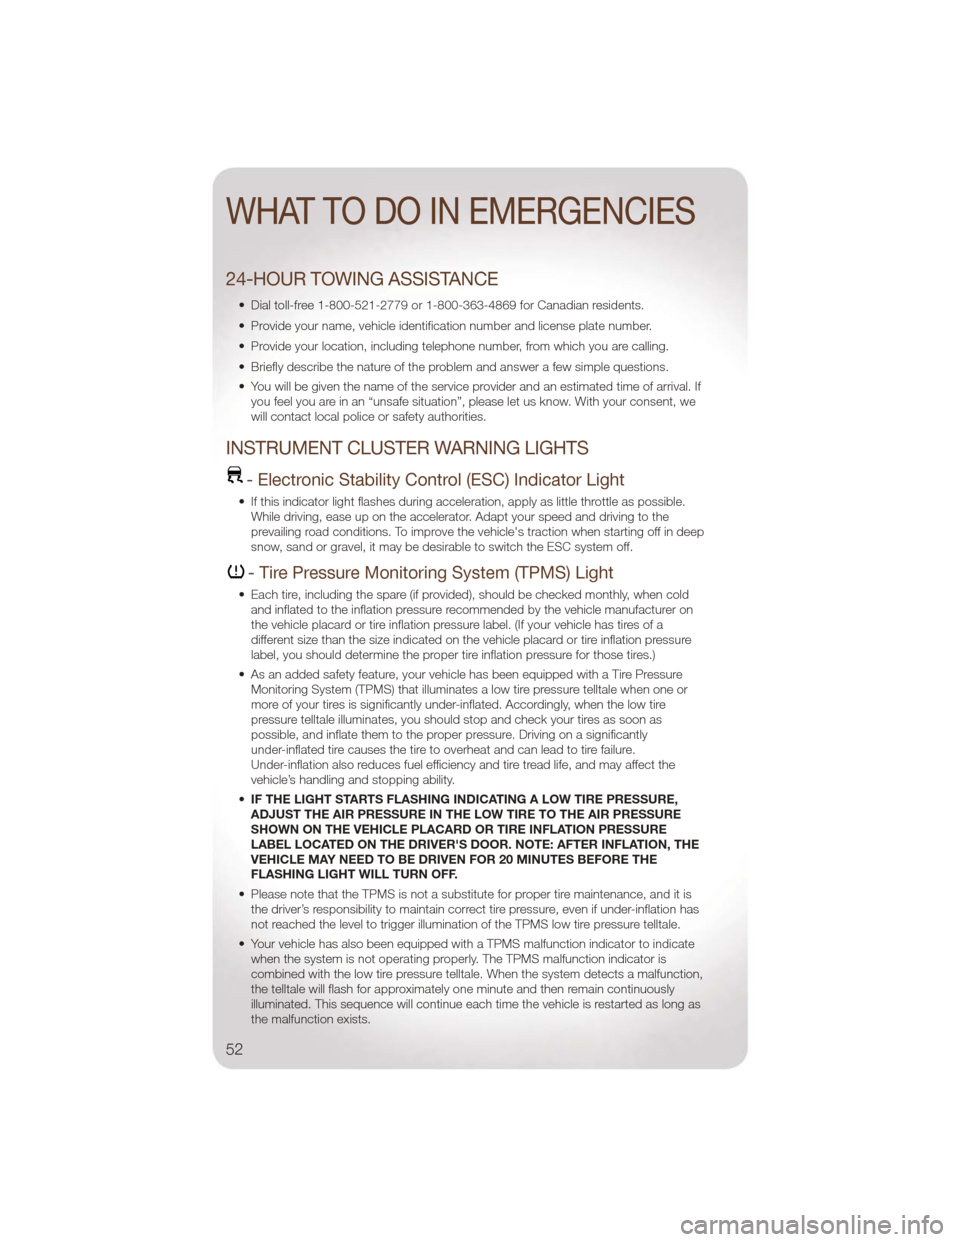
24-HOUR TOWING ASSISTANCE
• Dial toll-free 1-800-521-2779 or 1-800-363-4869 for Canadian residents.
• Provide your name, vehicle identification number and license plate number.
• Provide your location, including telephone number, from which you are calling.
• Briefly describe the nature of the problem and answer a few simple questions.
• You will be given the name of the service provider and an estimated time of arrival. Ifyou feel you are in an “unsafe situation”, please let us know. With your consent, we
will contact local police or safety authorities.
INSTRUMENT CLUSTER WARNING LIGHTS
- Electronic Stability Control (ESC) Indicator Light
• If this indicator light flashes during acceleration, apply as little throttle as possible.While driving, ease up on the accelerator. Adapt your speed and driving to the
prevailing road conditions. To improve the vehicle's traction when starting off in deep
snow, sand or gravel, it may be desirable to switch the ESC system off.
- Tire Pressure Monitoring System (TPMS) Light
• Each tire, including the spare (if provided), should be checked monthly, when coldand inflated to the inflation pressure recommended by the vehicle manufacturer on
the vehicle placard or tire inflation pressure label. (If your vehicle has tires of a
different size than the size indicated on the vehicle placard or tire inflation pressure
label, you should determine the proper tire inflation pressure for those tires.)
• As an added safety feature, your vehicle has been equipped with a Tire Pressure Monitoring System (TPMS) that illuminates a low tire pressure telltale when one or
more of your tires is significantly under-inflated. Accordingly, when the low tire
pressure telltale illuminates, you should stop and check your tires as soon as
possible, and inflate them to the proper pressure. Driving on a significantly
under-inflated tire causes the tire to overheat and can lead to tire failure.
Under-inflation also reduces fuel efficiency and tire tread life, and may affect the
vehicle’s handling and stopping ability.
• IF THE LIGHT STARTS FLASHING INDICATING A LOW TIRE PRESSURE,
ADJUST THE AIR PRESSURE IN THE LOW TIRE TO THE AIR PRESSURE
SHOWN ON THE VEHICLE PLACARD OR TIRE INFLATION PRESSURE
LABEL LOCATED ON THE DRIVER'S DOOR. NOTE: AFTER INFLATION, THE
VEHICLE MAY NEED TO BE DRIVEN FOR 20 MINUTES BEFORE THE
FLASHING LIGHT WILL TURN OFF.
• Please note that the TPMS is not a substitute for proper tire maintenance, and it is the driver’s responsibility to maintain correct tire pressure, even if under-inflation has
not reached the level to trigger illumination of the TPMS low tire pressure telltale.
• Your vehicle has also been equipped with a TPMS malfunction indicator to indicate when the system is not operating properly. The TPMS malfunction indicator is
combined with the low tire pressure telltale. When the system detects a malfunction,
the telltale will flash for approximately one minute and then remain continuously
illuminated. This sequence will continue each time the vehicle is restarted as long as
the malfunction exists.
WHAT TO DO IN EMERGENCIES
52
Page 75 of 88
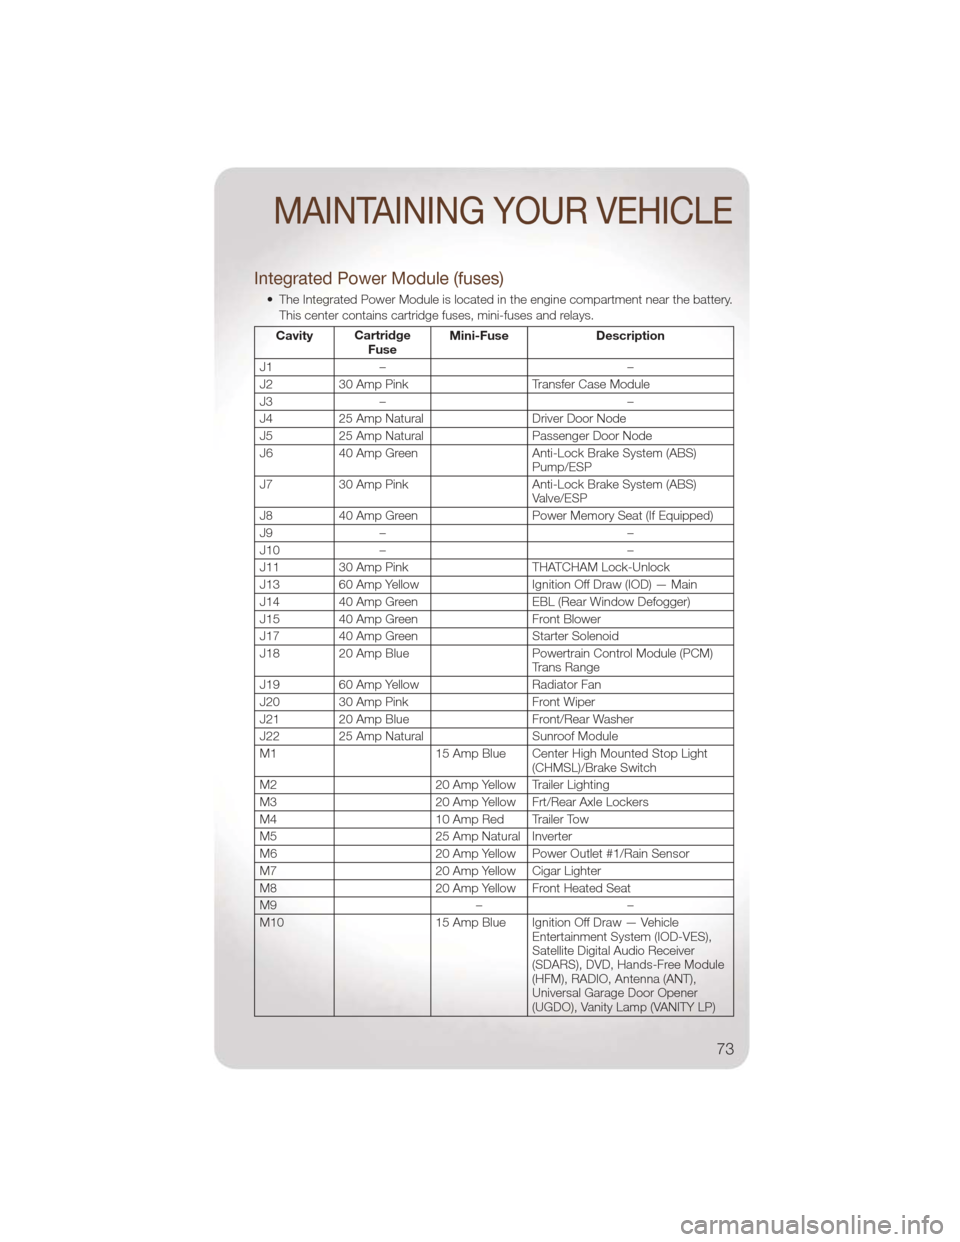
Integrated Power Module (fuses)
• The Integrated Power Module is located in the engine compartment near the battery.This center contains cartridge fuses, mini-fuses and relays.
Cavity Cartridge
Fuse Mini-Fuse Description
J1 – –
J2 30 Amp Pink Transfer Case Module
J3 – –
J4 25 Amp Natural Driver Door Node
J5 25 Amp Natural Passenger Door Node
J6 40 Amp Green Anti-Lock Brake System (ABS) Pump/ESP
J7 30 Amp Pink Anti-Lock Brake System (ABS)
Valve/ESP
J8 40 Amp Green Power Memory Seat (If Equipped)
J9 – –
J10 – –
J11 30 Amp Pink THATCHAM Lock-Unlock
J13 60 Amp Yellow Ignition Off Draw (IOD) — Main
J14 40 Amp Green EBL (Rear Window Defogger)
J15 40 Amp Green Front Blower
J17 40 Amp Green Starter Solenoid
J18 20 Amp Blue Powertrain Control Module (PCM)
Trans Range
J19 60 Amp Yellow Radiator Fan
J20 30 Amp Pink Front Wiper
J21 20 Amp Blue Front/Rear Washer
J22 25 Amp Natural Sunroof Module
M1 15 Amp Blue Center High Mounted Stop Light
(CHMSL)/Brake Switch
M2 20 Amp Yellow Trailer Lighting
M3 20 Amp Yellow Frt/Rear Axle Lockers
M4 10 Amp Red Trailer Tow
M5 25 Amp Natural Inverter
M6 20 Amp Yellow Power Outlet #1/Rain Sensor
M7 20 Amp Yellow Cigar Lighter
M8 20 Amp Yellow Front Heated Seat
M9 ––
M10 15 Amp Blue Ignition Off Draw — Vehicle
Entertainment System (IOD-VES),
Satellite Digital Audio Receiver
(SDARS), DVD, Hands-Free Module
(HFM), RADIO, Antenna (ANT),
Universal Garage Door Opener
(UGDO), Vanity Lamp (VANITY LP)
MAINTAINING YOUR VEHICLE
73
Page 78 of 88
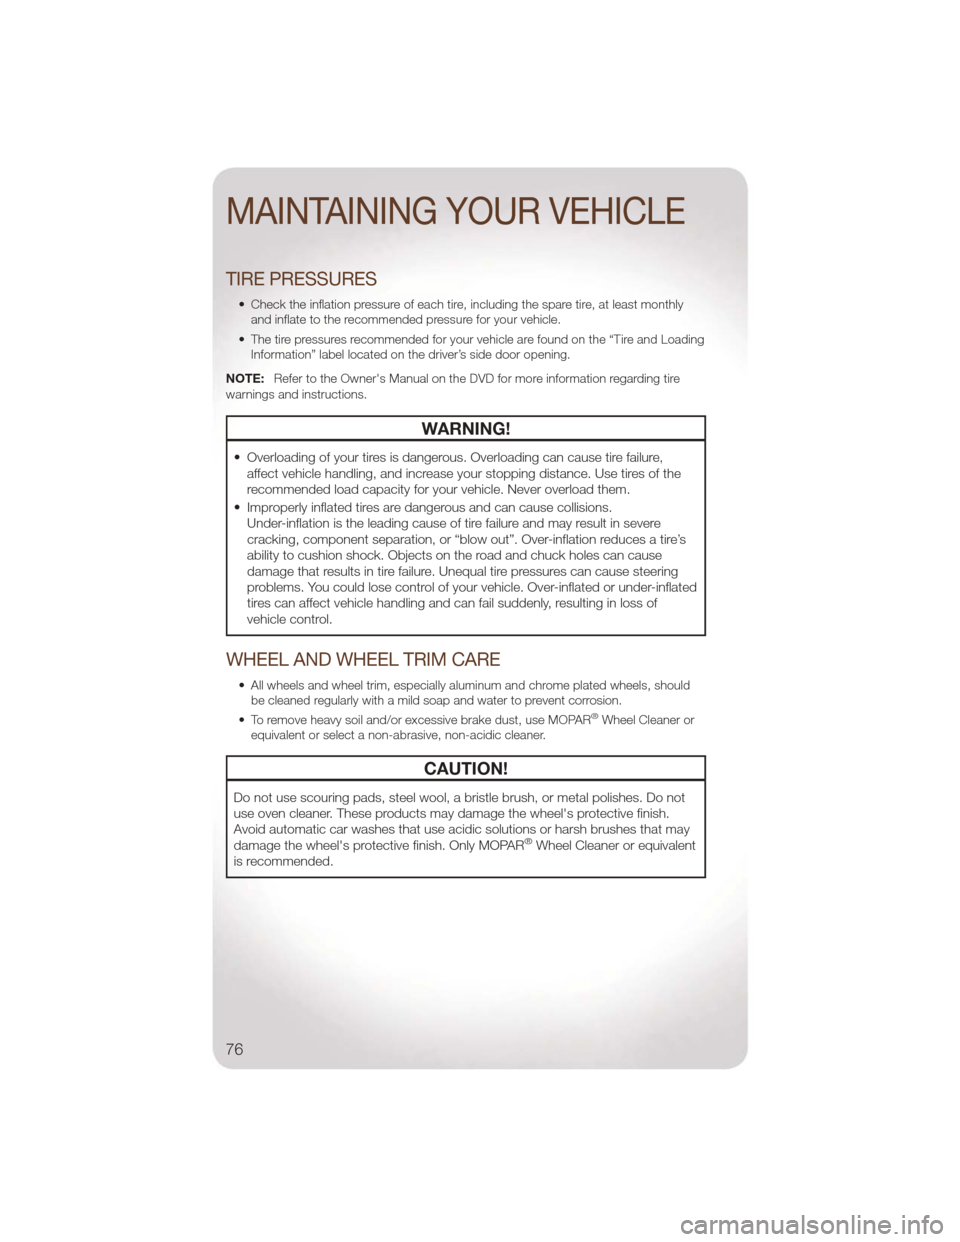
TIRE PRESSURES
• Check the inflation pressure of each tire, including the spare tire, at least monthlyand inflate to the recommended pressure for your vehicle.
• The tire pressures recommended for your vehicle are found on the “Tire and Loading Information” label located on the driver’s side door opening.
NOTE: Refer to the Owner's Manual on the DVD for more information regarding tire
warnings and instructions.
WARNING!
• Overloading of your tires is dangerous. Overloading can cause tire failure, affect vehicle handling, and increase your stopping distance. Use tires of the
recommended load capacity for your vehicle. Never overload them.
• Improperly inflated tires are dangerous and can cause collisions. Under-inflation is the leading cause of tire failure and may result in severe
cracking, component separation, or “blow out”. Over-inflation reduces a tire’s
ability to cushion shock. Objects on the road and chuck holes can cause
damage that results in tire failure. Unequal tire pressures can cause steering
problems. You could lose control of your vehicle. Over-inflated or under-inflated
tires can affect vehicle handling and can fail suddenly, resulting in loss of
vehicle control.
WHEEL AND WHEEL TRIM CARE
• All wheels and wheel trim, especially aluminum and chrome plated wheels, shouldbe cleaned regularly with a mild soap and water to prevent corrosion.
• To remove heavy soil and/or excessive brake dust, use MOPAR
®Wheel Cleaner or
equivalent or select a non-abrasive, non-acidic cleaner.
CAUTION!
Do not use scouring pads, steel wool, a bristle brush, or metal polishes. Do not
use oven cleaner. These products may damage the wheel's protective finish.
Avoid automatic car washes that use acidic solutions or harsh brushes that may
damage the wheel's protective finish. Only MOPAR
®Wheel Cleaner or equivalent
is recommended.
MAINTAINING YOUR VEHICLE
76
Page 83 of 88
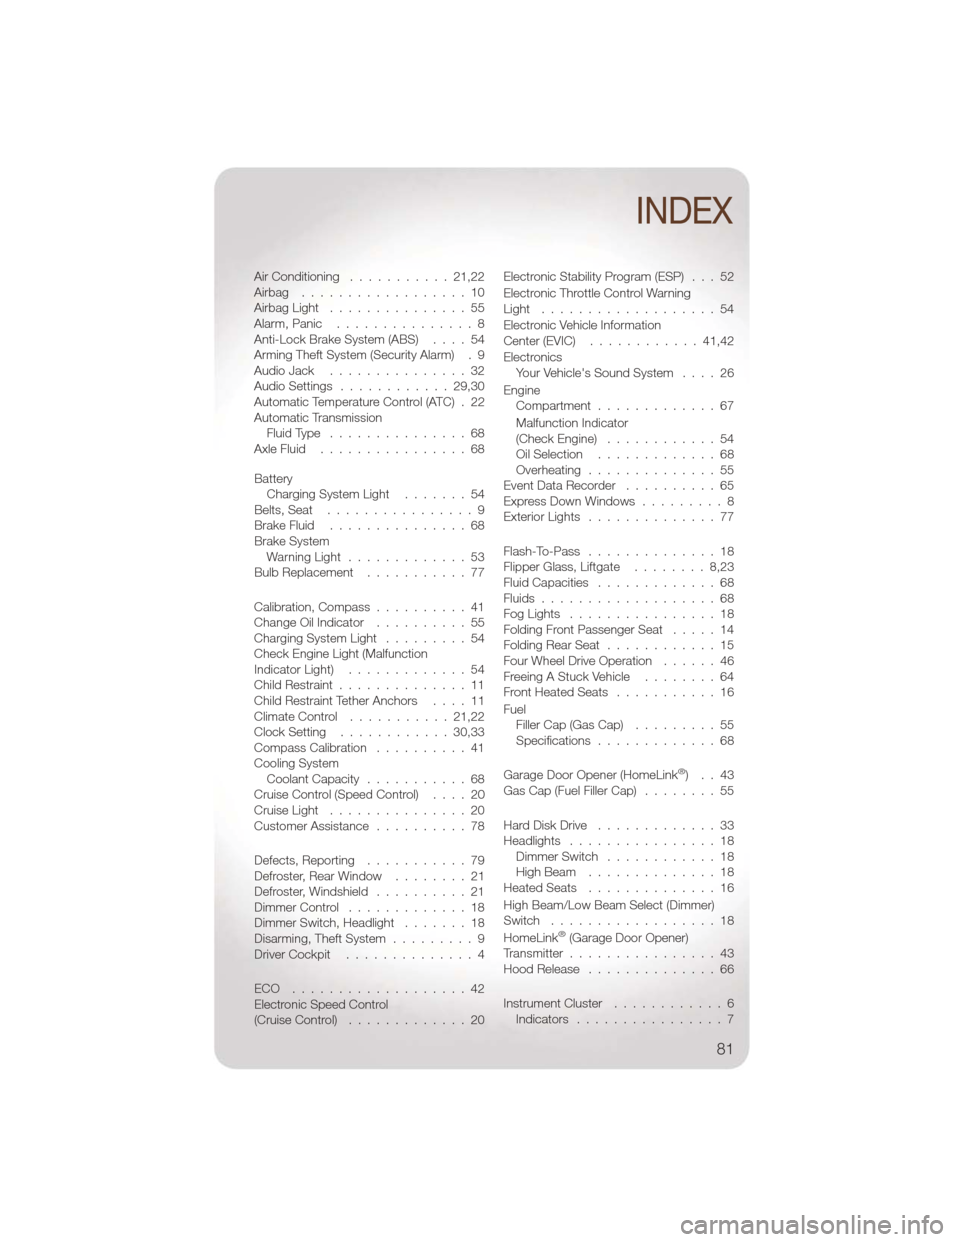
Air Conditioning...........21,22
Airbag ..................10
AirbagLight ...............55
Alarm,Panic ...............8
Anti-Lock Brake System (ABS) ....54
Arming Theft System (Security Alarm) . 9
Audio Jack ...............32
Audio Settings ............29,30
Automatic Temperature Control (ATC) . 22
Automatic Transmission FluidType ...............68
AxleFluid ................68
Battery Charging System Light .......54
Belts, Seat ................9
BrakeFluid ...............68
Brake System WarningLight .............53
Bulb Replacement ...........77
Calibration, Compass ..........41
Change Oil Indicator ..........55
Charging System Light .........54
Check Engine Light (Malfunction
IndicatorLight) .............54
Child Restraint ..............11
Child Restraint Tether Anchors ....11
Climate Control ...........21,22
Clock Setting ............30,33
Compass Calibration ..........41
Cooling System Coolant Capacity ...........68
Cruise Control (Speed Control) ....20
CruiseLight ...............20
Customer Assistance ..........78
Defects, Reporting ...........79
Defroster, Rear Window ........21
Defroster,Windshield ..........21
Dimmer Control .............18
Dimmer Switch, Headlight .......18
Disarming, Theft System .........9
Driver Cockpit ..............4
ECO ...................42
Electronic Speed Control
(Cruise Control) .............20 Electronic Stability Program (ESP) . . . 52
Electronic Throttle Control Warning
Light ...................54
Electronic Vehicle Information
Center (EVIC)
............41,42
Electronics Your Vehicle's Sound System ....26
Engine Compartment .............67
Malfunction Indicator
(Check Engine) ............54
Oil Selection .............68
Overheating ..............55
Event Data Recorder ..........65
Express Down Windows .........8
Exterior Lights ..............77
Flash-To-Pass ..............18
Flipper Glass, Liftgate ........8,23
Fluid Capacities .............68
Fluids ...................68
FogLights ................18
Folding Front Passenger Seat .....14
Folding Rear Seat ............15
Four Wheel Drive Operation ......46
Freeing A Stuck Vehicle ........64
Front Heated Seats ...........16
Fuel Filler Cap (Gas Cap) .........55
Specifications .............
68
Garage Door Opener (HomeLink
®)..43
Gas Cap (Fuel Filler Cap) ........55
Hard Disk Drive .............33
Headlights ................18
Dimmer Switch ............18
High Beam ..............18
HeatedSeats ..............16
High Beam/Low Beam Select (Dimmer)
Switch ..................18
HomeLink
®(Garage Door Opener)
Transmitter ................43
Hood Release ..............66
Instrument Cluster ............6
Indicators ................7
INDEX
81