audio JEEP LIBERTY 2011 KK / 2.G User Guide
[x] Cancel search | Manufacturer: JEEP, Model Year: 2011, Model line: LIBERTY, Model: JEEP LIBERTY 2011 KK / 2.GPages: 88, PDF Size: 3.24 MB
Page 3 of 88
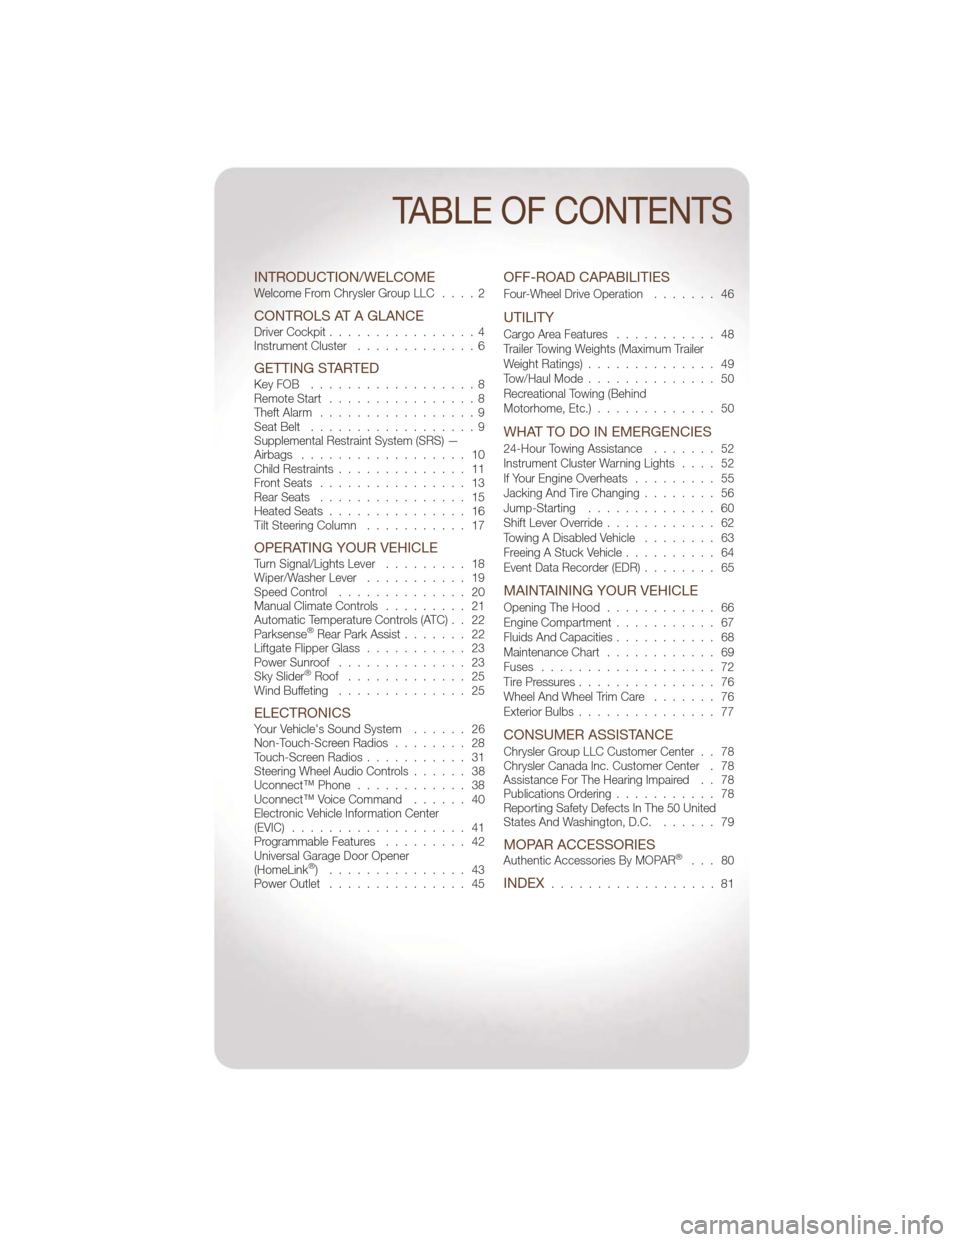
INTRODUCTION/WELCOMEWelcome From Chrysler Group LLC....2
CONTROLS AT A GLANCEDriver Cockpit................4
Instrument Cluster .............6
GETTING STARTEDKeyFOB ..................8
Remote Start................8
Theft Alarm .................9
Seat Belt ..................9
Supplemental Restraint System (SRS) —
Airbags .................. 10
Child Restraints .............. 11
Front Seats ................ 13
Rear Seats ................ 15
Heated Seats ............... 16
Tilt Steering Column ........... 17
OPERATING YOUR VEHICLETurn Signal/Lights Lever ......... 18
Wiper/Washer Lever ........... 19
Speed Control .............. 20
Manual Climate Controls ......... 21
Automatic Temperature Controls (ATC) . . 22
Parksense
®Rear Park Assist ....... 22
Liftgate Flipper Glass ........... 23
Power Sunroof .............. 23
Sky Slider
®Roof ............. 25
Wind Buffeting .............. 25
ELECTRONICSYour Vehicle's Sound System ...... 26
Non-Touch-Screen Radios ........ 28
Touch-Screen Radios ........... 31
Steering Wheel Audio Controls ...... 38
Uconnect™ Phone ............ 38
Uconnect™ Voice Command ...... 40
Electronic Vehicle Information Center
(EVIC) ................... 41
Programmable Features ......... 42
Universal Garage Door Opener
(HomeLink
®) ............... 43
Power Outlet ............... 45
OFF-ROAD CAPABILITIES
Four-Wheel Drive Operation ....... 46
UTILITY
Cargo Area Features........... 48
Trailer Towing Weights (Maximum Trailer
Weight Ratings) .............. 49
Tow/Haul Mode .............. 50
Recreational Towing (Behind
Motorhome, Etc.) ............. 50
WHAT TO DO IN EMERGENCIES
24-Hour Towing Assistance ....... 52
Instrument Cluster Warning Lights .... 52
If Your Engine Overheats ......... 55
Jacking And Tire Changing ........ 56
Jump-Starting .............. 60
Shift Lever Override ............ 62
Towing A Disabled Vehicle ........ 63
Freeing A Stuck Vehicle .......... 64
Event Data Recorder (EDR) ........ 65
MAINTAINING YOUR VEHICLE
Opening The Hood............ 66
Engine Compartment ........... 67
Fluids And Capacities ........... 68
Maintenance Chart ............ 69
Fuses ................... 72
Tire Pressures ............... 76
Wheel And Wheel Trim Care ....... 76
Exterior Bulbs ............... 77
CONSUMER ASSISTANCE
Chrysler Group LLC Customer Center . . 78
Chrysler Canada Inc. Customer Center . 78
Assistance For The Hearing Impaired . . 78
Publications Ordering ........... 78
Reporting Safety Defects In The 50 United
States And Washington, D.C. ...... 79
MOPAR ACCESSORIESAuthentic Accessories By MOPAR®... 80
INDEX.................. 81
TABLE OF CONTENTS
Page 31 of 88
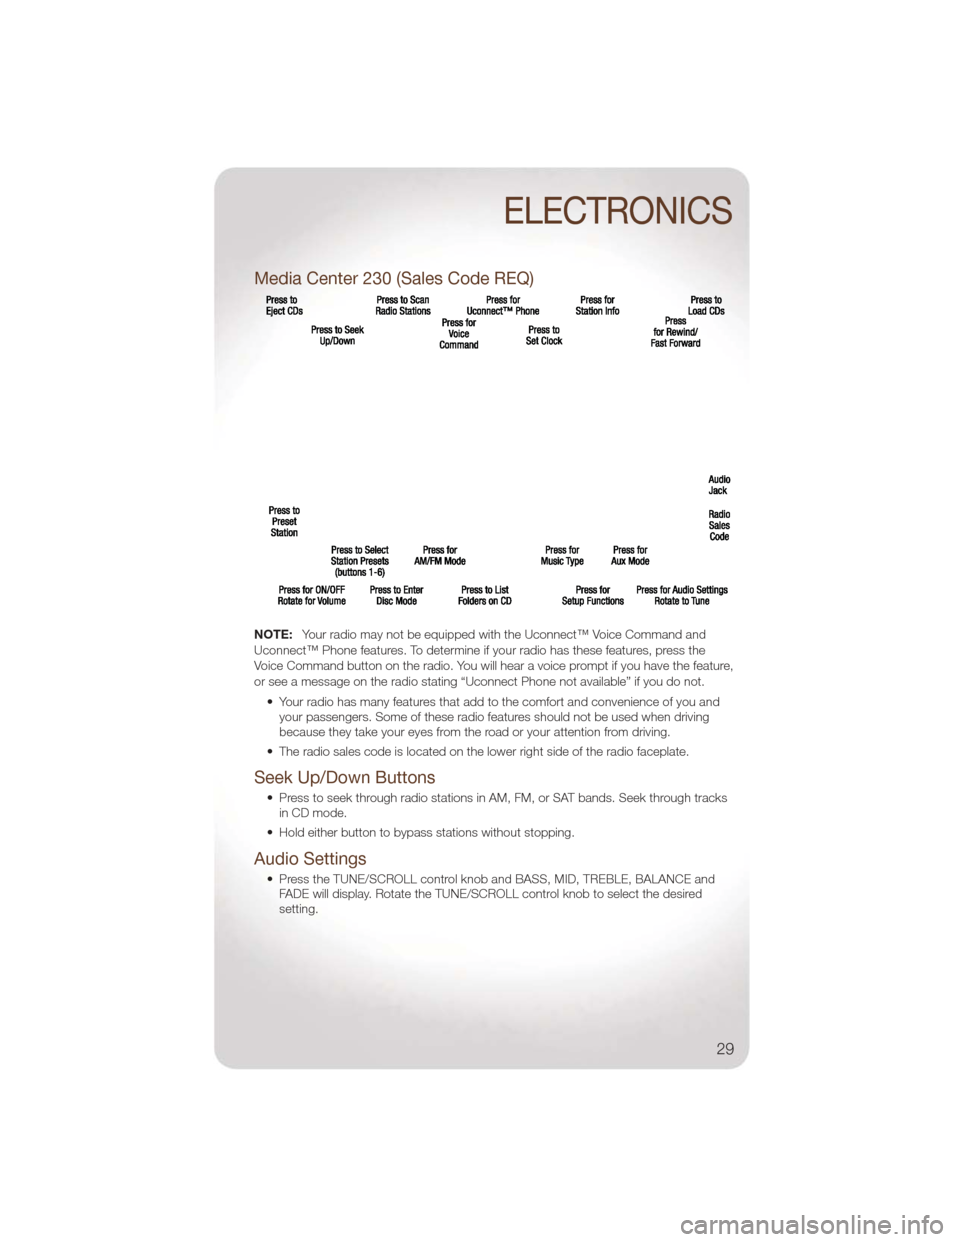
Media Center 230 (Sales Code REQ)
NOTE:Your radio may not be equipped with the Uconnect™ Voice Command and
Uconnect™ Phone features. To determine if your radio has these features, press the
Voice Command button on the radio. You will hear a voice prompt if you have the feature,
or see a message on the radio stating “Uconnect Phone not available” if you do not.
• Your radio has many features that add to the comfort and convenience of you andyour passengers. Some of these radio features should not be used when driving
because they take your eyes from the road or your attention from driving.
• The radio sales code is located on the lower right side of the radio faceplate.
Seek Up/Down Buttons
• Press to seek through radio stations in AM, FM, or SAT bands. Seek through tracks in CD mode.
• Hold either button to bypass stations without stopping.
Audio Settings
• Press the TUNE/SCROLL control knob and BASS, MID, TREBLE, BALANCE and FADE will display. Rotate the TUNE/SCROLL control knob to select the desired
setting.
ELECTRONICS
29
Page 32 of 88
Audio Jack
• The Audio Jack allows a portable device, such as an MP3 player or a cassetteplayer, to be plugged into the radio and utilize the vehicle’s audio system, using a
3.5 mm audio cable, to amplify the source and play through the vehicle speakers.
• Pressing the AUX button will change the mode to auxiliary device if the Audio Jack is connected, allowing the music from your portable device to play through the
vehicle's speakers.
• The functions of the portable device are controlled using the device buttons. The volume may be controlled using the radio or portable device.
Clock Setting
• Press and hold the TIME button until the hours blink; turn the TUNE/SCROLL controlknob to set the hours.
• Press the TUNE/SCROLL control knob until the minutes begin to blink; turn the TUNE/SCROLL control knob to set the minutes.
• Press the TUNE/SCROLL control knob to save the time change.
• To exit, press any button/knob or wait five seconds.
Store Radio Presets
• Press the SET/RND button once and SET 1 will show in the display. Then select button (1–6).
• A second station may be added to each push button. Press the SET/RND button twice and SET 2 will show in the display, then select button (1–6).
How To Load Multiple CDs/DVDs
Media Center 230 (Sales Code REQ) Only
• Press the LOAD button and then press the button with the corresponding number (1–6) where the CD is being loaded. The radio will display PLEASE WAIT and prompt
when to INSERT DISC.
• After the radio displays INSERT DISC, insert the CD into the player. The radio display will show LOADING DISC when the disc is loading and “READING DISC” when the
radio is reading the disc.
• Press the eject button and then the corresponding number (1–6) to eject the desired disc.
ELECTRONICS
30
Page 34 of 88
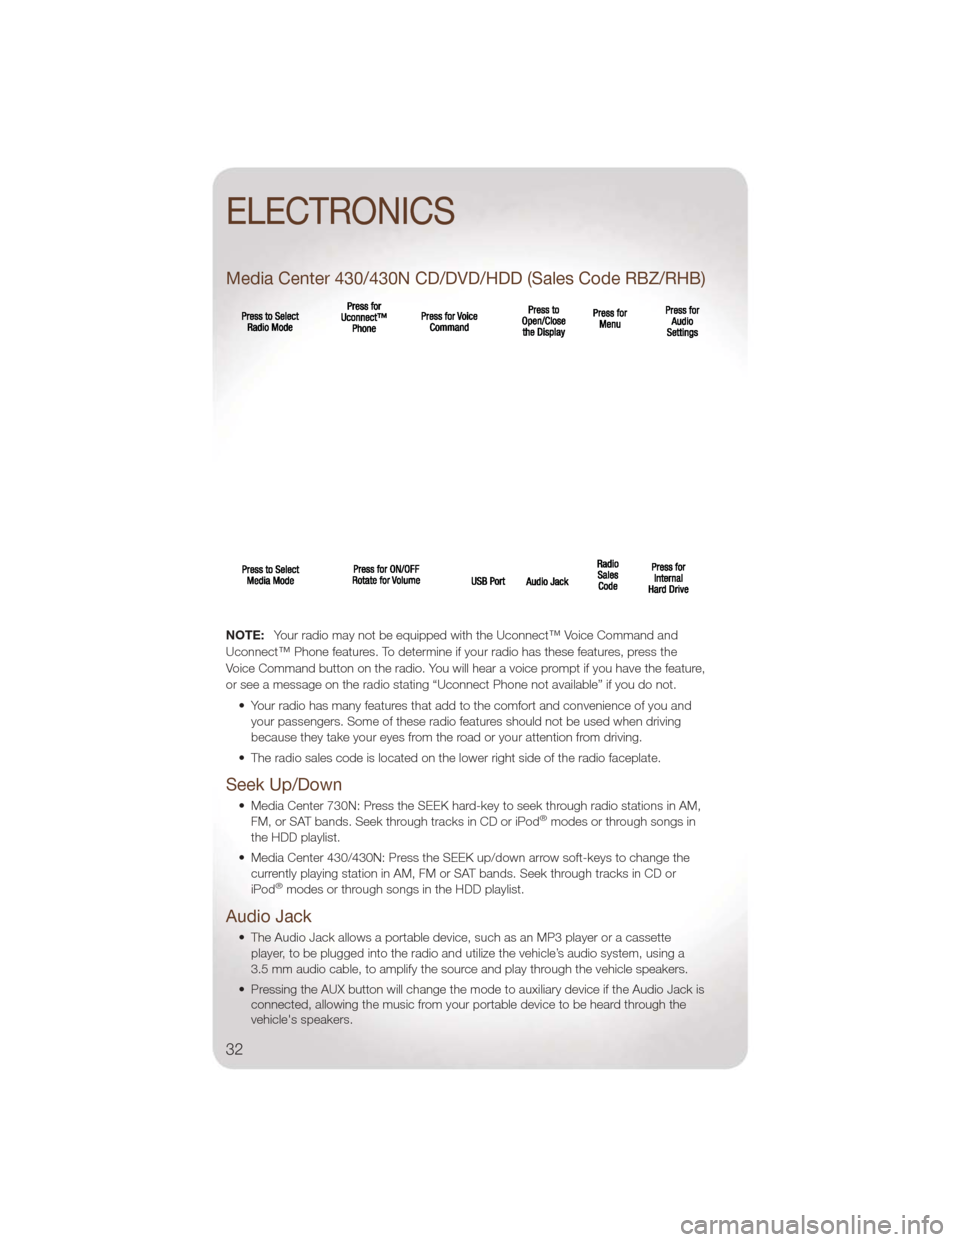
Media Center 430/430N CD/DVD/HDD (Sales Code RBZ/RHB)
NOTE:Your radio may not be equipped with the Uconnect™ Voice Command and
Uconnect™ Phone features. To determine if your radio has these features, press the
Voice Command button on the radio. You will hear a voice prompt if you have the feature,
or see a message on the radio stating “Uconnect Phone not available” if you do not.
• Your radio has many features that add to the comfort and convenience of you andyour passengers. Some of these radio features should not be used when driving
because they take your eyes from the road or your attention from driving.
• The radio sales code is located on the lower right side of the radio faceplate.
Seek Up/Down
• Media Center 730N: Press the SEEK hard-key to seek through radio stations in AM, FM, or SAT bands. Seek through tracks in CD or iPod®modes or through songs in
the HDD playlist.
• Media Center 430/430N: Press the SEEK up/down arrow soft-keys to change the currently playing station in AM, FM or SAT bands. Seek through tracks in CD or
iPod
®modes or through songs in the HDD playlist.
Audio Jack
• The Audio Jack allows a portable device, such as an MP3 player or a cassetteplayer, to be plugged into the radio and utilize the vehicle’s audio system, using a
3.5 mm audio cable, to amplify the source and play through the vehicle speakers.
• Pressing the AUX button will change the mode to auxiliary device if the Audio Jack is connected, allowing the music from your portable device to be heard through the
vehicle's speakers.
ELECTRONICS
32
Page 35 of 88
• The functions of the portable device are controlled using the device buttons. Thevolume may be controlled using the radio or portable device.
Clock Setting
• Turn the radio on, then touch the screen where the time is displayed.
• Touch the USER CLOCK soft-key (Navigation radio only).
• To adjust the hours, touch either the HOUR FORWARD or HOUR BACKWARDsoft-key.
• To adjust the minutes, touch either the MINUTE FORWARD or MINUTE BACKWARD soft-key.
• To save the new time setting, touch the screen where the word “Save” is displayed.
Store Radio Presets
• Media Center 730N: Press the RADIO/MEDIA hard-key until AM FM SAT is displayed in the upper left corner of the screen.
• Media Center 430/430N: Press the RADIO hard-key to display AM FM SAT in the upper left corner of the screen.
• Select the radio band by touching either the AM, FM, or SAT soft-key.
• Find the station to store by either pressing the SEEK UP/DOWN hard-keys (Media Center 730N), touching the right and left arrow soft-keys (Media Center 430/430N),
touching the SCAN soft-key, or by using the DIRECT TUNE soft-key.
• Once the station is found, touch and hold one of the PRESET soft-keys in the list to the right, until you hear a confirmation beep.
Hard Disk Drive Operation
Copy Complete Audio Disc To Hard-Drive
• Media Center 730N: Press the OPEN/CLOSE hard-key.
• Media Center 430/430N: Press the LOAD hard-key.
• Insert a disc, then press the MENU hard-key.
• Touch the MY FILES soft-key, then select MY MUSIC.
• Touch the Add Music Files to HDD soft-key, then touch the From Disc soft-key in the next screen to start the process.
Copying From USB • The USB port on the radio face plate allows you to copying files to your hard drive. To access, lift up on the cover.
• Insert a USB device (e.g. thumb drive or memory stick), then select MY MUSIC.
• Touch the Add Music Files to HDD soft-key, then touch the From USB soft-key in the next screen.
• Select the folders or titles you would like to copy, then touch the DONE soft-key to start the copy process.
ELECTRONICS
33
Page 40 of 88
STEERING WHEEL AUDIO CONTROLS
• The steering wheel audio controls arelocated on the rear surface of the
steering wheel.
Right Switch
• Press the switch up or down toincrease or decrease the volume.
• Press the button in the center to change modes AM/FM/CD/SAT.
Left Switch
• Press the switch up or down to searchfor the next listenable station or select
the next or previous CD track.
• Press the button in the center to select the next preset station (radio) or to change CDs if equipped with a CD Changer.
Uconnect™ Phone
• To determine if your vehicle is equipped with Uconnect™ Phone, press theUconnect™ Phone button. If your vehicle has this feature, after a couple
seconds you will hear a voice prompt. If not, you will see a message on the radio
“Uconnect phone not available”.
• The Uconnect™ Phone is a voice-activated, hands-free, in-vehicle communications system with Voice Command Capability (see Voice Command section).
• The Uconnect™ Phone allows you to dial a phone number with your mobile phone using simple voice commands.
• For vehicles equipped with Video Entertainment System (VES)™, refer to the Uconnect™ Phone section of the Uconnect™ User's Manual on the DVD for further
details.
• For vehicles not equipped with VES™, refer to your vehicle Owner's Manual on the DVD for further details.
NOTE: The Uconnect™ Phone requires a mobile phone equipped with the Bluetooth
®
Hands-Free Profile, Version 0.96 or higher. For Uconnect™ customer support, call
1–877–855–8400 or visit www.jeep.com/uconnect.
Phone Pairing
NOTE:Pairing is a one-time initial setup before using the phone. You will also need to
follow the Bluetooth®instructions in your cell phone user guide to complete the phone
pairing setup.
• Press the Phone button
to begin.
• Wait for the “ready” prompt and BEEP.
• (After the BEEP), say “Uconnect setup”.
ELECTRONICS
38
Page 41 of 88
• (After the BEEP), say “phone pairing”.
• (After the BEEP), say “pair a phone”.
• Follow the audible prompts.
• You will be asked to enter a four-digit Personal Identification Number (PIN), whichyou will later need to enter into your mobile phone. You can enter any four-digit PIN.
You will not need to remember this PIN after the initial pairing process.
• You will then be prompted to give the phone pairing a name (each phone paired should have a unique name).
• Next you will be asked to give this new pairing a priority of 1 thru 7 (up to seven phones may be paired); 1 is the highest and 7 is the lowest priority. The system will
only connect to the highest priority phone that exists within the proximity of the
vehicle.
Making A Phone Call
• Press the Phone button.
• (After the BEEP), say “dial” (or “call” a name).
• (After the BEEP), say number (or name).
Phonebook Edit
• Press the Phone button.
• (After the BEEP), say “phonebook”.
• (After the BEEP), say “new entry” or “list names” or “delete”.
• Follow the prompts.
Receiving A Call – Accept (And End)
• When an incoming call rings/is announced on Uconnect™, press the Phone button.
• To end a call, press the Phone button
.
Mute (Or Unmute) Microphone During Call
• During a call, press the Voice Command button.
• (After the BEEP), say “mute” (or “mute off”).
Transfer Ongoing Call Between Handset And Vehicle
• During a call, press the Voice Command button.
• (After the BEEP), say “transfer call”.
Changing The Volume
• Start a dialogue by pressing the Phone button, then adjust the volume during a
normal call.
• Use the radio ON/OFF VOLUME rotary knob to adjust the volume to a comfortable level while the Uconnect™ system is speaking. Please note the volume setting for
Uconnect™ is different than the audio system.
ELECTRONICS
39
Page 42 of 88
NOTE:To access the tutorial, press the Uconnect™ hard-key. After the BEEP, say
“tutorial”. Press any hard-key/button or touch the display (Touch-Screen radio) to cancel
the tutorial.
WARNING!
• Any voice commanded system should be used only in safe driving conditions following local laws and phone use. All attention should be kept on the
roadway ahead. Failure to do so may result in a collision causing you and
others to be severely injured or killed.
• In an emergency, to use Uconnect™ Phone, your mobile phone must be: • turned on,
• paired to Uconnect™ Phone,
• and have network coverage.
Uconnect™ VOICE COMMAND
• The Uconnect™ Voice Command system allows you to control your AM, FM radio,satellite radio, disc player, Uconnect™ Phone, a memo recorder, and supported
portable media devices.
• When you press the Voice Command button
located on the radio faceplate
or steering wheel, you will hear a beep. The beep is your signal to give a command.
If you do not say a command within a few seconds, the system will present you with
a list of options. If you ever wish to interrupt the system while it lists options, press
the Voice Command button
, listen for the BEEP, and say your command.
Voice Command for Text Messaging
• If equipped with Uconnect™ Voice Command, your Media Center 430N radio may be able to play incoming SMS messages through the vehicle sound system.
• It also allows you to respond by selecting from various pre-defined phrases.
• Not all phones are compatible with this feature. Refer to the phone compatibility list at www.jeep.com/uconnect. Connected mobile phones must be bluetooth-
compatible, and paired with your radio.
Changing The Volume
• Start a dialogue by pressing the Voice Command button,thensaya
command (for example, “tutorial”).
• Use the radio ON/OFF VOLUME rotary knob to adjust the volume to a comfortable level while the Voice Command system is speaking. The volume setting for Voice
Command is different than the audio system.
• For vehicles equipped with Video Entertainment System (VES)™, refer to the Uconnect™ Voice Command section of the Uconnect™ User's Manual on the DVD
for further details.
• For vehicles not equipped with VES™, refer to your vehicle Owner's Manual on the DVD for Uconnect™ Voice Command information.
ELECTRONICS
40
Page 43 of 88
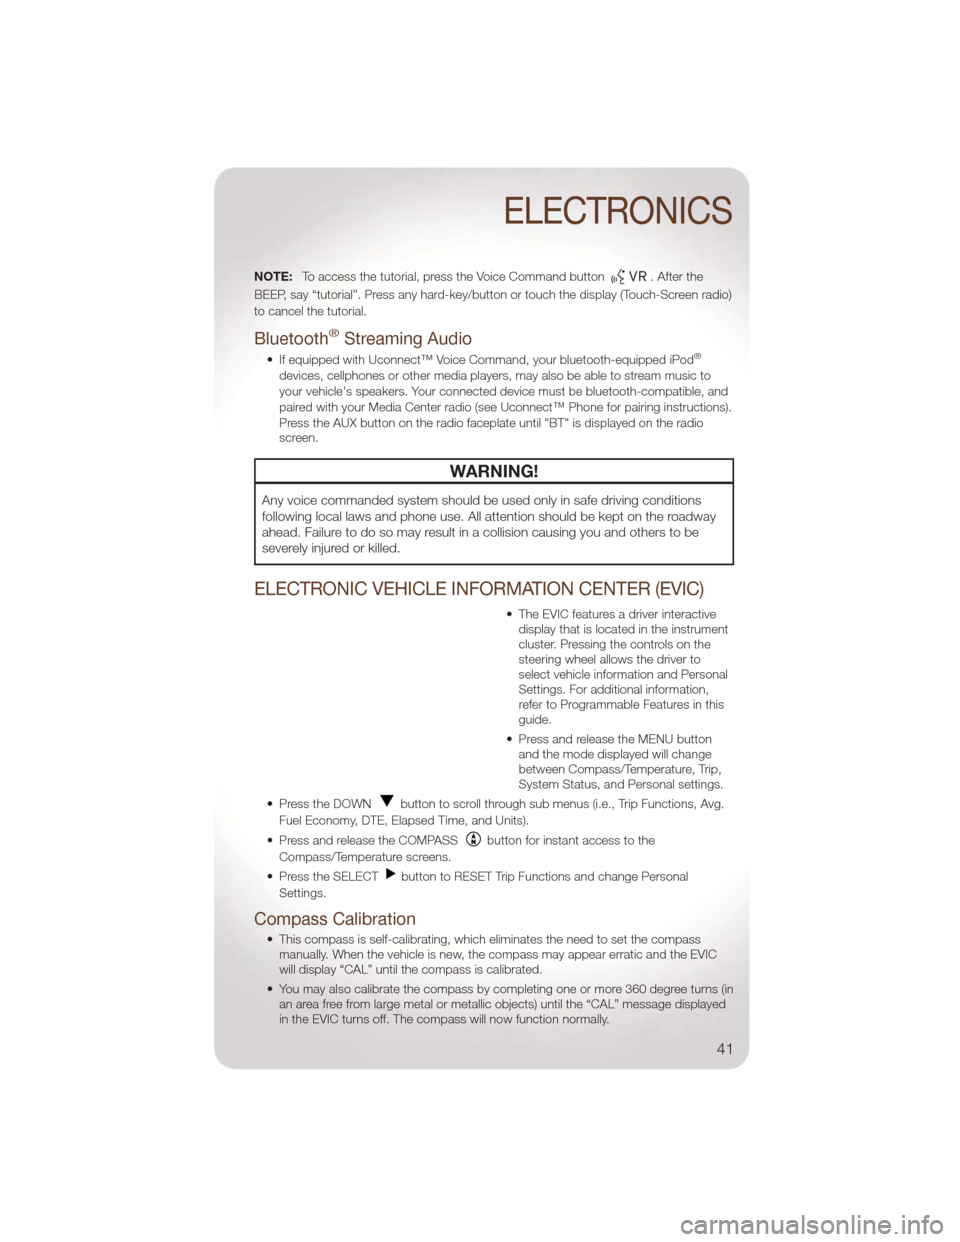
NOTE:To access the tutorial, press the Voice Command button. After the
BEEP, say “tutorial”. Press any hard-key/button or touch the display (Touch-Screen radio)
to cancel the tutorial.
Bluetooth®Streaming Audio
• If equipped with Uconnect™ Voice Command, your bluetooth-equipped iPod®
devices, cellphones or other media players, may also be able to stream music to
your vehicle's speakers. Your connected device must be bluetooth-compatible, and
paired with your Media Center radio (see Uconnect™ Phone for pairing instructions).
Press the AUX button on the radio faceplate until "BT" is displayed on the radio
screen.
WARNING!
Any voice commanded system should be used only in safe driving conditions
following local laws and phone use. All attention should be kept on the roadway
ahead. Failure to do so may result in a collision causing you and others to be
severely injured or killed.
ELECTRONIC VEHICLE INFORMATION CENTER (EVIC)
• The EVIC features a driver interactive display that is located in the instrument
cluster. Pressing the controls on the
steering wheel allows the driver to
select vehicle information and Personal
Settings. For additional information,
refer to Programmable Features in this
guide.
• Press and release the MENU button and the mode displayed will change
between Compass/Temperature, Trip,
System Status, and Personal settings.
• Press the DOWN
button to scroll through sub menus (i.e., Trip Functions, Avg.
Fuel Economy, DTE, Elapsed Time, and Units).
• Press and release the COMPASS
button for instant access to the
Compass/Temperature screens.
• Press the SELECT
button to RESET Trip Functions and change Personal
Settings.
Compass Calibration
• This compass is self-calibrating, which eliminates the need to set the compass manually. When the vehicle is new, the compass may appear erratic and the EVIC
will display “CAL” until the compass is calibrated.
• You may also calibrate the compass by completing one or more 360 degree turns (in an area free from large metal or metallic objects) until the “CAL” message displayed
in the EVIC turns off. The compass will now function normally.
ELECTRONICS
41
Page 75 of 88
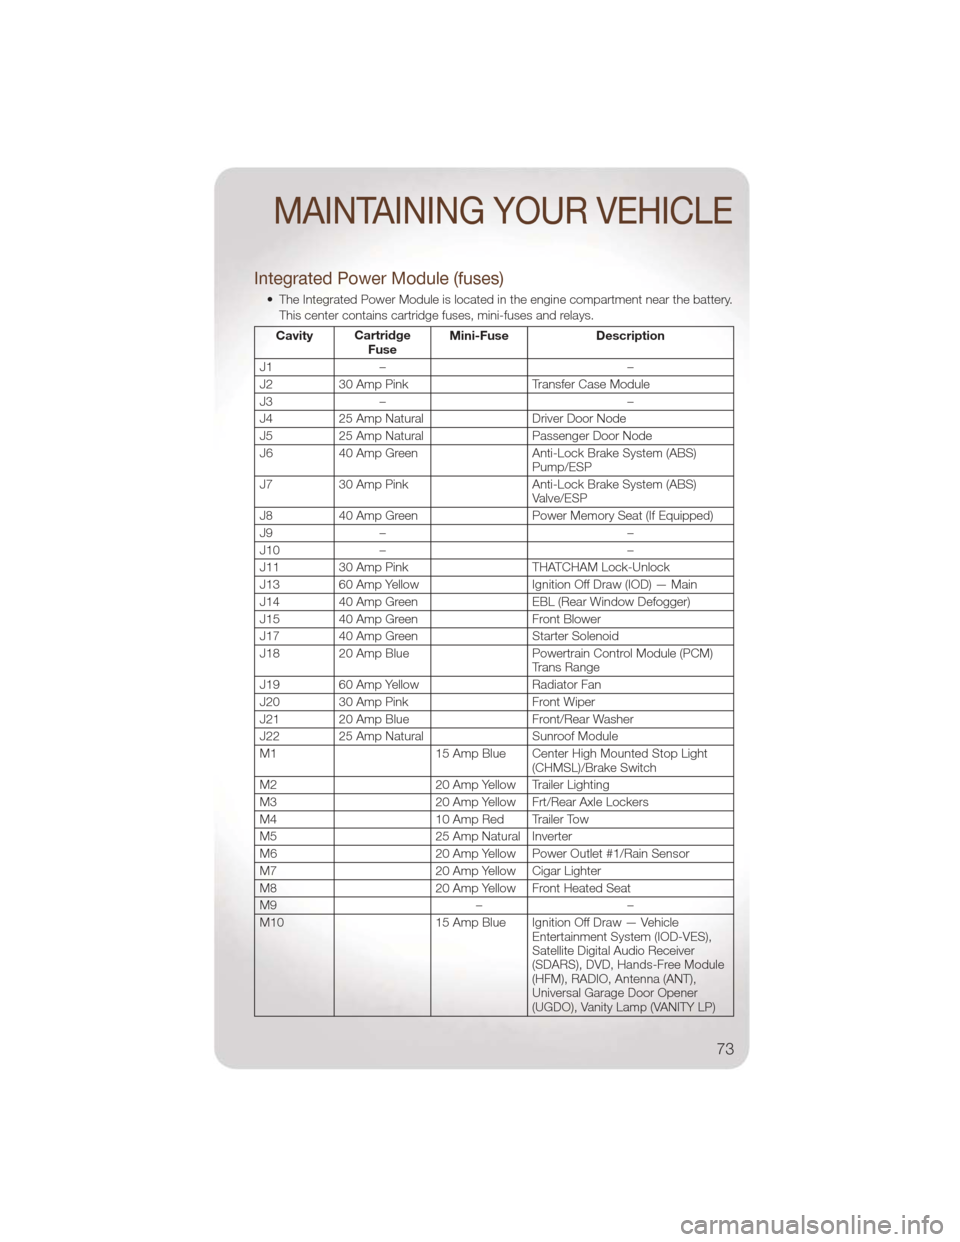
Integrated Power Module (fuses)
• The Integrated Power Module is located in the engine compartment near the battery.This center contains cartridge fuses, mini-fuses and relays.
Cavity Cartridge
Fuse Mini-Fuse Description
J1 – –
J2 30 Amp Pink Transfer Case Module
J3 – –
J4 25 Amp Natural Driver Door Node
J5 25 Amp Natural Passenger Door Node
J6 40 Amp Green Anti-Lock Brake System (ABS) Pump/ESP
J7 30 Amp Pink Anti-Lock Brake System (ABS)
Valve/ESP
J8 40 Amp Green Power Memory Seat (If Equipped)
J9 – –
J10 – –
J11 30 Amp Pink THATCHAM Lock-Unlock
J13 60 Amp Yellow Ignition Off Draw (IOD) — Main
J14 40 Amp Green EBL (Rear Window Defogger)
J15 40 Amp Green Front Blower
J17 40 Amp Green Starter Solenoid
J18 20 Amp Blue Powertrain Control Module (PCM)
Trans Range
J19 60 Amp Yellow Radiator Fan
J20 30 Amp Pink Front Wiper
J21 20 Amp Blue Front/Rear Washer
J22 25 Amp Natural Sunroof Module
M1 15 Amp Blue Center High Mounted Stop Light
(CHMSL)/Brake Switch
M2 20 Amp Yellow Trailer Lighting
M3 20 Amp Yellow Frt/Rear Axle Lockers
M4 10 Amp Red Trailer Tow
M5 25 Amp Natural Inverter
M6 20 Amp Yellow Power Outlet #1/Rain Sensor
M7 20 Amp Yellow Cigar Lighter
M8 20 Amp Yellow Front Heated Seat
M9 ––
M10 15 Amp Blue Ignition Off Draw — Vehicle
Entertainment System (IOD-VES),
Satellite Digital Audio Receiver
(SDARS), DVD, Hands-Free Module
(HFM), RADIO, Antenna (ANT),
Universal Garage Door Opener
(UGDO), Vanity Lamp (VANITY LP)
MAINTAINING YOUR VEHICLE
73