charging JEEP LIBERTY 2011 KK / 2.G User Guide
[x] Cancel search | Manufacturer: JEEP, Model Year: 2011, Model line: LIBERTY, Model: JEEP LIBERTY 2011 KK / 2.GPages: 88, PDF Size: 3.24 MB
Page 8 of 88
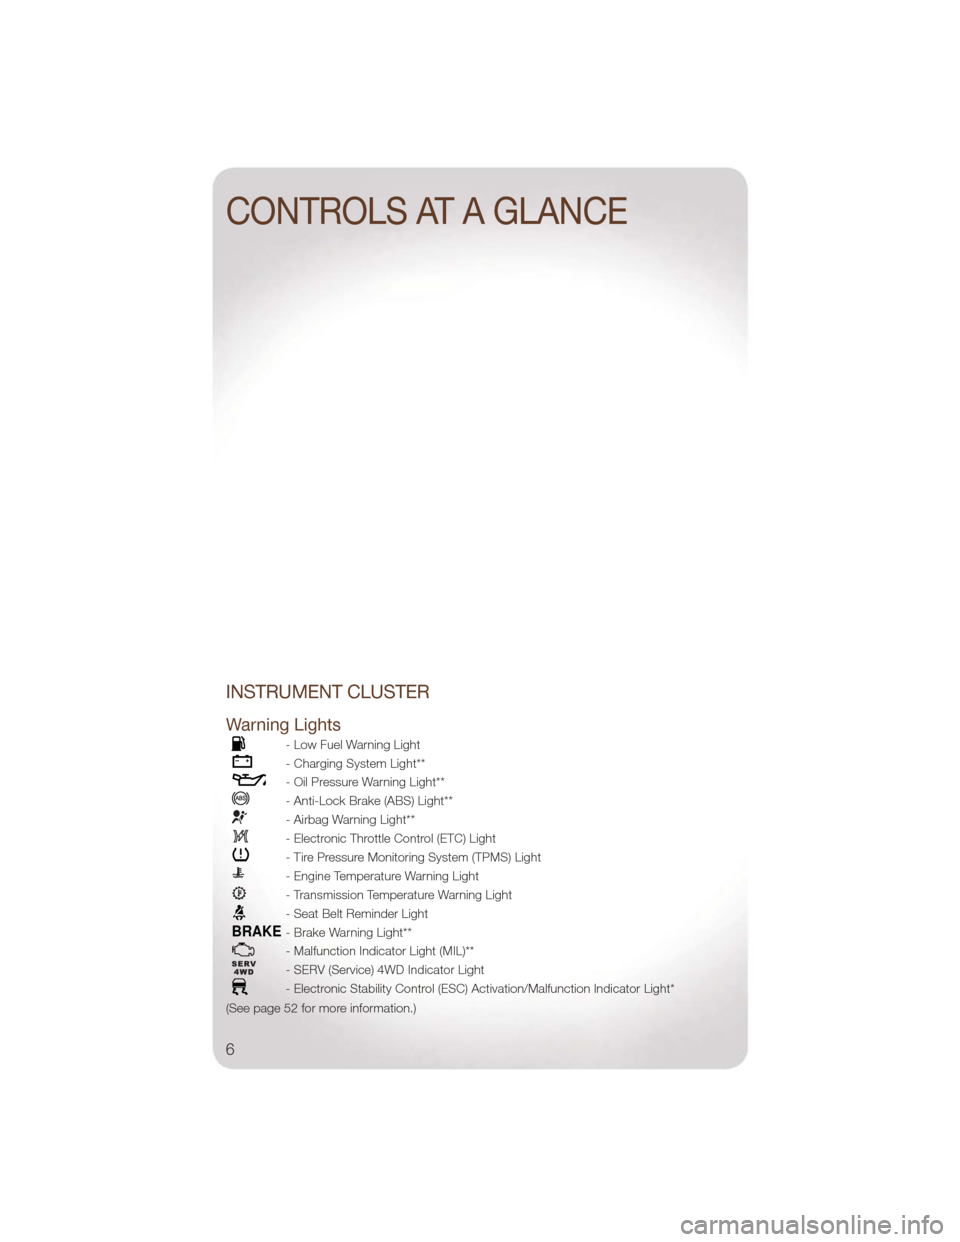
INSTRUMENT CLUSTER
Warning Lights
- Low Fuel Warning Light
- Charging System Light**
- Oil Pressure Warning Light**
- Anti-Lock Brake (ABS) Light**
- Airbag Warning Light**
- Electronic Throttle Control (ETC) Light
- Tire Pressure Monitoring System (TPMS) Light
- Engine Temperature Warning Light
- Transmission Temperature Warning Light
- Seat Belt Reminder Light
BRAKE- Brake Warning Light**
- Malfunction Indicator Light (MIL)**
- SERV (Service) 4WD Indicator Light
- Electronic Stability Control (ESC) Activation/Malfunction Indicator Light*
(See page 52 for more information.)
CONTROLS AT A GLANCE
6
Page 36 of 88
Copy Pictures To The Hard-Drive• Insert either a CD or a USB device containing your pictures in JPEG format into the USB port on the radio face.
• Touch the MY FILES soft-key, then go to the MANAGE MY FILES screen.
• Touch the MY PICTURES soft-key to get an overview of the currently stored images.
• Touch one of the ADD PICTURES soft-keys, then select the type of media inserted.
• Use the PAGE soft-keys to page through a list of pictures and press the picture you would like to import.
• Confirm your selection by touching the YES or SAVE soft-key. The imported picture is now available in the MANAGE MY PICTURES screen.
• In order to display the imported picture in the radio screen, touch the desired picture soft-key.
• Select this picture by pressing the PICTURE VIEW soft-key. A check mark indicates the currently used picture.
Cleaning Your Touch-Screen Radio
• Do not spray any liquid or caustic chemicals directly on the screen. Use a clean anddry micro fiber lens cleaning cloth in order to clean the touch-screen.
• If necessary, use a lint-free cloth dampened with a cleaning solution such as isopropyl alcohol or an isopropyl alcohol and water solution ratio of 50:50. Be sure
to follow the solvent manufacturer's precautions and directions.
USB Port
• The USB Port on the radio allows you to copy songs from a connected USB drive orsupported media device onto your Media Center hard drive. You can also playback
music from your USB device through the USB Port on the radio. The USB Port on a
Media Center 730N (RHR) allows you to support iPod
®devices or USB drives for
music playback, charging, control through radio or steering wheel buttons, voice
commands and song selection by voice.
Navigation – Media Center 730N (Sales Code RER) & (Sales
Code RHR) Only
• Navigation radios require digital data from a navigation database. The data in the navigation database is licensed from Navigation Technologies®. Not all roads are
digitized.
• For software updates, visit http://www.navteq.com website, or contact your authorized dealer for the latest available software.
NOTE: Many features of this radio are speed dependent. For your own safety, it is not
possible to use the touch-screen keyboard to enter a name (e.g., street name) while the
vehicle is in motion. Pull over at a safe location to complete your task or use Voice
Command.
• The Navigation system receives GPS signals from satellites to display the position ofyour vehicle.
ELECTRONICS
34
Page 56 of 88
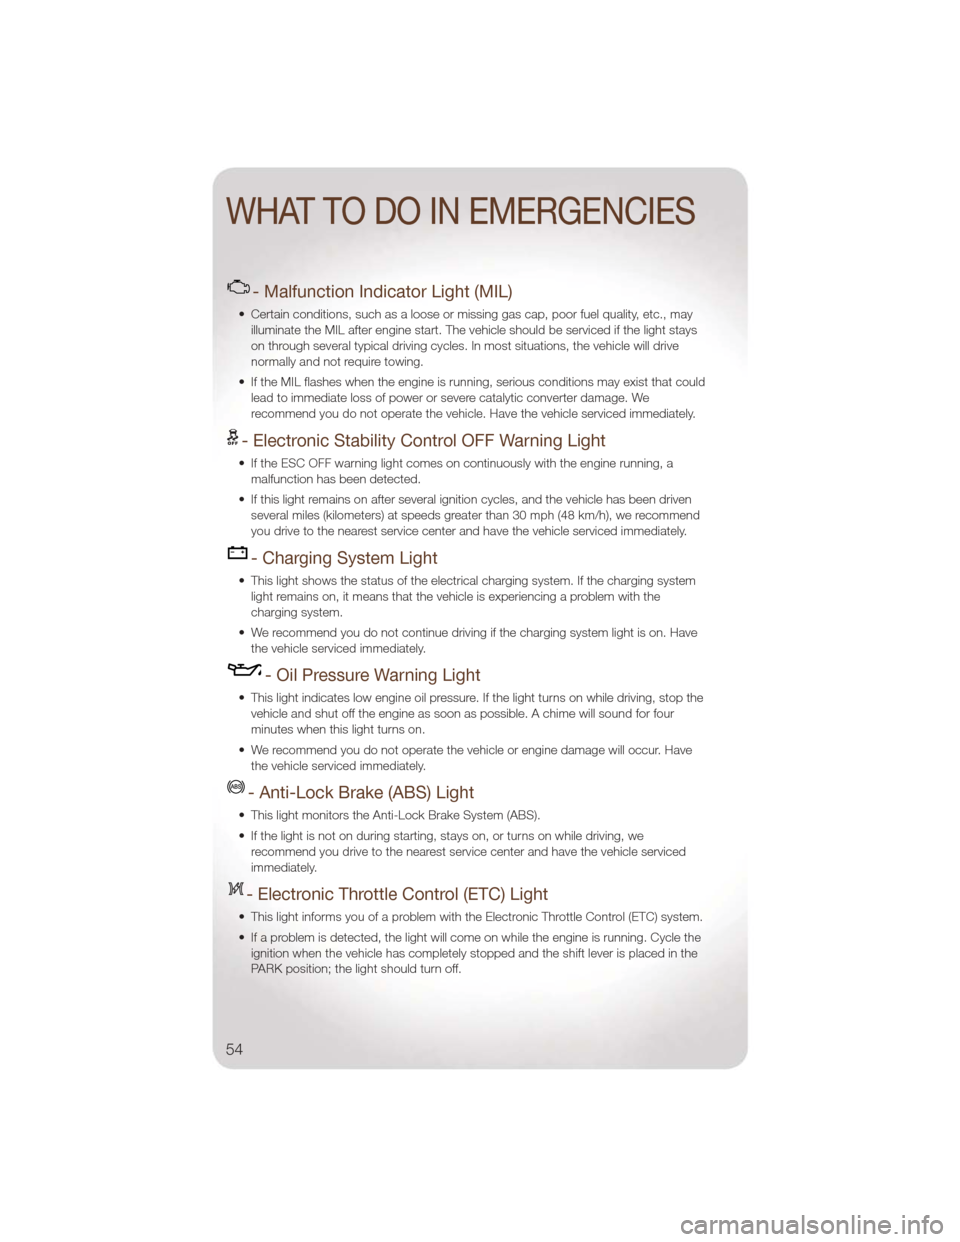
- Malfunction Indicator Light (MIL)
• Certain conditions, such as a loose or missing gas cap, poor fuel quality, etc., mayilluminate the MIL after engine start. The vehicle should be serviced if the light stays
on through several typical driving cycles. In most situations, the vehicle will drive
normally and not require towing.
• If the MIL flashes when the engine is running, serious conditions may exist that could lead to immediate loss of power or severe catalytic converter damage. We
recommend you do not operate the vehicle. Have the vehicle serviced immediately.
- Electronic Stability Control OFF Warning Light
• If the ESC OFF warning light comes on continuously with the engine running, amalfunction has been detected.
• If this light remains on after several ignition cycles, and the vehicle has been driven several miles (kilometers) at speeds greater than 30 mph (48 km/h), we recommend
you drive to the nearest service center and have the vehicle serviced immediately.
- Charging System Light
• This light shows the status of the electrical charging system. If the charging systemlight remains on, it means that the vehicle is experiencing a problem with the
charging system.
• We recommend you do not continue driving if the charging system light is on. Have the vehicle serviced immediately.
- Oil Pressure Warning Light
• This light indicates low engine oil pressure. If the light turns on while driving, stop thevehicle and shut off the engine as soon as possible. A chime will sound for four
minutes when this light turns on.
• We recommend you do not operate the vehicle or engine damage will occur. Have the vehicle serviced immediately.
- Anti-Lock Brake (ABS) Light
• This light monitors the Anti-Lock Brake System (ABS).
• If the light is not on during starting, stays on, or turns on while driving, werecommend you drive to the nearest service center and have the vehicle serviced
immediately.
- Electronic Throttle Control (ETC) Light
• This light informs you of a problem with the Electronic Throttle Control (ETC) system.
• If a problem is detected, the light will come on while the engine is running. Cycle theignition when the vehicle has completely stopped and the shift lever is placed in the
PARK position; the light should turn off.
WHAT TO DO IN EMERGENCIES
54
Page 63 of 88
• Connect the negative end (-) of the jumper cable to the negative (-) post of thebooster battery.
• Connect the opposite end of the negative (-) jumper cable to a good engine ground (exposed metal part of the discharged vehicle’s engine) away from the battery and
the fuel injection system.
• Start the engine in the vehicle that has the booster battery, let the engine idle a few minutes, and then start the engine in the vehicle with the discharged battery.
Once the engine is started, remove the jumper cables in the reverse sequence:
• Disconnect the negative (-) jumper cable from the engine ground of the vehicle with the discharged battery.
• Disconnect the negative end (-) of the jumper cable from the negative (-) post of the booster battery.
• Disconnect the opposite end of the positive (+) jumper cable from the positive (+) post of the booster battery.
• Disconnect the positive (+) end of the jumper cable from the positive (+) post of the discharged vehicle.
• If frequent jump-starting is required to start your vehicle you should have the battery and charging system inspected at your authorized dealer.
CAUTION!
• Do not use a portable battery booster pack or any other booster source with asystem voltage greater than 12 Volts or damage to the battery, starter motor,
alternator or electrical system may occur.
• Failure to follow these procedures could result in damage to the charging system of the booster vehicle or the discharged vehicle.
• Accessories that can be plugged into the vehicle power outlets draw power from the vehicle’s battery, even when not in use (i.e., cellular phones, etc.).
Eventually, if plugged in long enough, the vehicle’s battery will discharge
sufficiently to degrade battery life and/or prevent the engine from starting.
WARNING!
• When temperatures are below the freezing point, electrolyte in a dischargedbattery may freeze. Do not attempt jump-starting because the battery could
rupture or explode and cause personal injury. Battery temperature must be
brought above the freezing point before attempting a jump-start.
• Take care to avoid the radiator cooling fan whenever the hood is raised. It can start anytime the ignition switch is on. You can be injured by moving fan
blades.
• Remove any metal jewelry, such as watch bands or bracelets, that might make an inadvertent electrical contact. You could be severely injured.
(Continued)
WHAT TO DO IN EMERGENCIES
61
Page 83 of 88
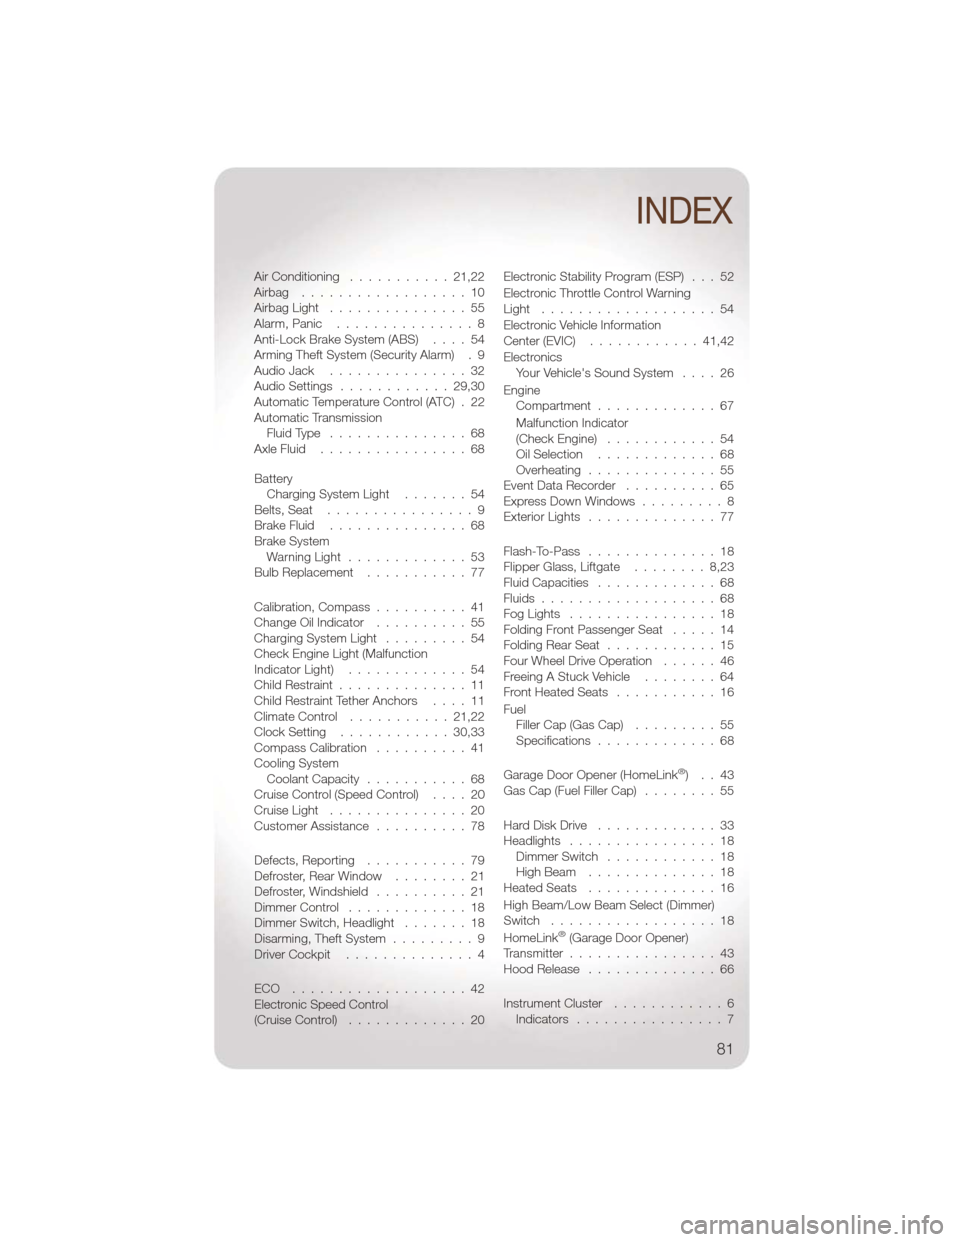
Air Conditioning...........21,22
Airbag ..................10
AirbagLight ...............55
Alarm,Panic ...............8
Anti-Lock Brake System (ABS) ....54
Arming Theft System (Security Alarm) . 9
Audio Jack ...............32
Audio Settings ............29,30
Automatic Temperature Control (ATC) . 22
Automatic Transmission FluidType ...............68
AxleFluid ................68
Battery Charging System Light .......54
Belts, Seat ................9
BrakeFluid ...............68
Brake System WarningLight .............53
Bulb Replacement ...........77
Calibration, Compass ..........41
Change Oil Indicator ..........55
Charging System Light .........54
Check Engine Light (Malfunction
IndicatorLight) .............54
Child Restraint ..............11
Child Restraint Tether Anchors ....11
Climate Control ...........21,22
Clock Setting ............30,33
Compass Calibration ..........41
Cooling System Coolant Capacity ...........68
Cruise Control (Speed Control) ....20
CruiseLight ...............20
Customer Assistance ..........78
Defects, Reporting ...........79
Defroster, Rear Window ........21
Defroster,Windshield ..........21
Dimmer Control .............18
Dimmer Switch, Headlight .......18
Disarming, Theft System .........9
Driver Cockpit ..............4
ECO ...................42
Electronic Speed Control
(Cruise Control) .............20 Electronic Stability Program (ESP) . . . 52
Electronic Throttle Control Warning
Light ...................54
Electronic Vehicle Information
Center (EVIC)
............41,42
Electronics Your Vehicle's Sound System ....26
Engine Compartment .............67
Malfunction Indicator
(Check Engine) ............54
Oil Selection .............68
Overheating ..............55
Event Data Recorder ..........65
Express Down Windows .........8
Exterior Lights ..............77
Flash-To-Pass ..............18
Flipper Glass, Liftgate ........8,23
Fluid Capacities .............68
Fluids ...................68
FogLights ................18
Folding Front Passenger Seat .....14
Folding Rear Seat ............15
Four Wheel Drive Operation ......46
Freeing A Stuck Vehicle ........64
Front Heated Seats ...........16
Fuel Filler Cap (Gas Cap) .........55
Specifications .............
68
Garage Door Opener (HomeLink
®)..43
Gas Cap (Fuel Filler Cap) ........55
Hard Disk Drive .............33
Headlights ................18
Dimmer Switch ............18
High Beam ..............18
HeatedSeats ..............16
High Beam/Low Beam Select (Dimmer)
Switch ..................18
HomeLink
®(Garage Door Opener)
Transmitter ................43
Hood Release ..............66
Instrument Cluster ............6
Indicators ................7
INDEX
81