radiator JEEP LIBERTY 2011 KK / 2.G User Guide
[x] Cancel search | Manufacturer: JEEP, Model Year: 2011, Model line: LIBERTY, Model: JEEP LIBERTY 2011 KK / 2.GPages: 88, PDF Size: 3.24 MB
Page 58 of 88

NOTE:There are steps that you can take to slow down an impending overheat
condition:
• If your air conditioner (A/C) is on, turn it off. The A/C system adds heat to the engine cooling system and turning the A/C off can help remove this heat.
• You can also turn the Temperature Control to maximum heat, the Mode Control to floor and the Fan Control to high. This allows the heater core to act as a supplement to the
radiator and aids in removing heat from the engine cooling system.
• If the temperature reading does not return to normal, turn the engine off immediately.
• We recommend that you do not operate the vehicle or engine damage will occur. Have the vehicle serviced immediately.
CAUTION!
Driving with a hot cooling system could damage your vehicle. If the temperature
gauge reads HOT (H), pull over and stop the vehicle. Idle the vehicle with the air
conditioner turned off until the pointer drops back into the normal range. If the
pointer remains on HOT (H), and you hear continuous chimes, turn the engine off
immediately and call for service.
WARNING!
You or others can be badly burned by hot engine coolant (antifreeze) or steam
from your radiator. If you see or hear steam coming from under the hood, do not
open the hood until the radiator has had time to cool. Never try to open a cooling
system pressure cap when the radiator or coolant bottle is hot.
JACKING AND TIRE CHANGING
Jack Location
• The scissor-type jack and tire changingtools are located in the left rear trim
panel behind the second row seat.
WHAT TO DO IN EMERGENCIES
56
Page 63 of 88

• Connect the negative end (-) of the jumper cable to the negative (-) post of thebooster battery.
• Connect the opposite end of the negative (-) jumper cable to a good engine ground (exposed metal part of the discharged vehicle’s engine) away from the battery and
the fuel injection system.
• Start the engine in the vehicle that has the booster battery, let the engine idle a few minutes, and then start the engine in the vehicle with the discharged battery.
Once the engine is started, remove the jumper cables in the reverse sequence:
• Disconnect the negative (-) jumper cable from the engine ground of the vehicle with the discharged battery.
• Disconnect the negative end (-) of the jumper cable from the negative (-) post of the booster battery.
• Disconnect the opposite end of the positive (+) jumper cable from the positive (+) post of the booster battery.
• Disconnect the positive (+) end of the jumper cable from the positive (+) post of the discharged vehicle.
• If frequent jump-starting is required to start your vehicle you should have the battery and charging system inspected at your authorized dealer.
CAUTION!
• Do not use a portable battery booster pack or any other booster source with asystem voltage greater than 12 Volts or damage to the battery, starter motor,
alternator or electrical system may occur.
• Failure to follow these procedures could result in damage to the charging system of the booster vehicle or the discharged vehicle.
• Accessories that can be plugged into the vehicle power outlets draw power from the vehicle’s battery, even when not in use (i.e., cellular phones, etc.).
Eventually, if plugged in long enough, the vehicle’s battery will discharge
sufficiently to degrade battery life and/or prevent the engine from starting.
WARNING!
• When temperatures are below the freezing point, electrolyte in a dischargedbattery may freeze. Do not attempt jump-starting because the battery could
rupture or explode and cause personal injury. Battery temperature must be
brought above the freezing point before attempting a jump-start.
• Take care to avoid the radiator cooling fan whenever the hood is raised. It can start anytime the ignition switch is on. You can be injured by moving fan
blades.
• Remove any metal jewelry, such as watch bands or bracelets, that might make an inadvertent electrical contact. You could be severely injured.
(Continued)
WHAT TO DO IN EMERGENCIES
61
Page 75 of 88

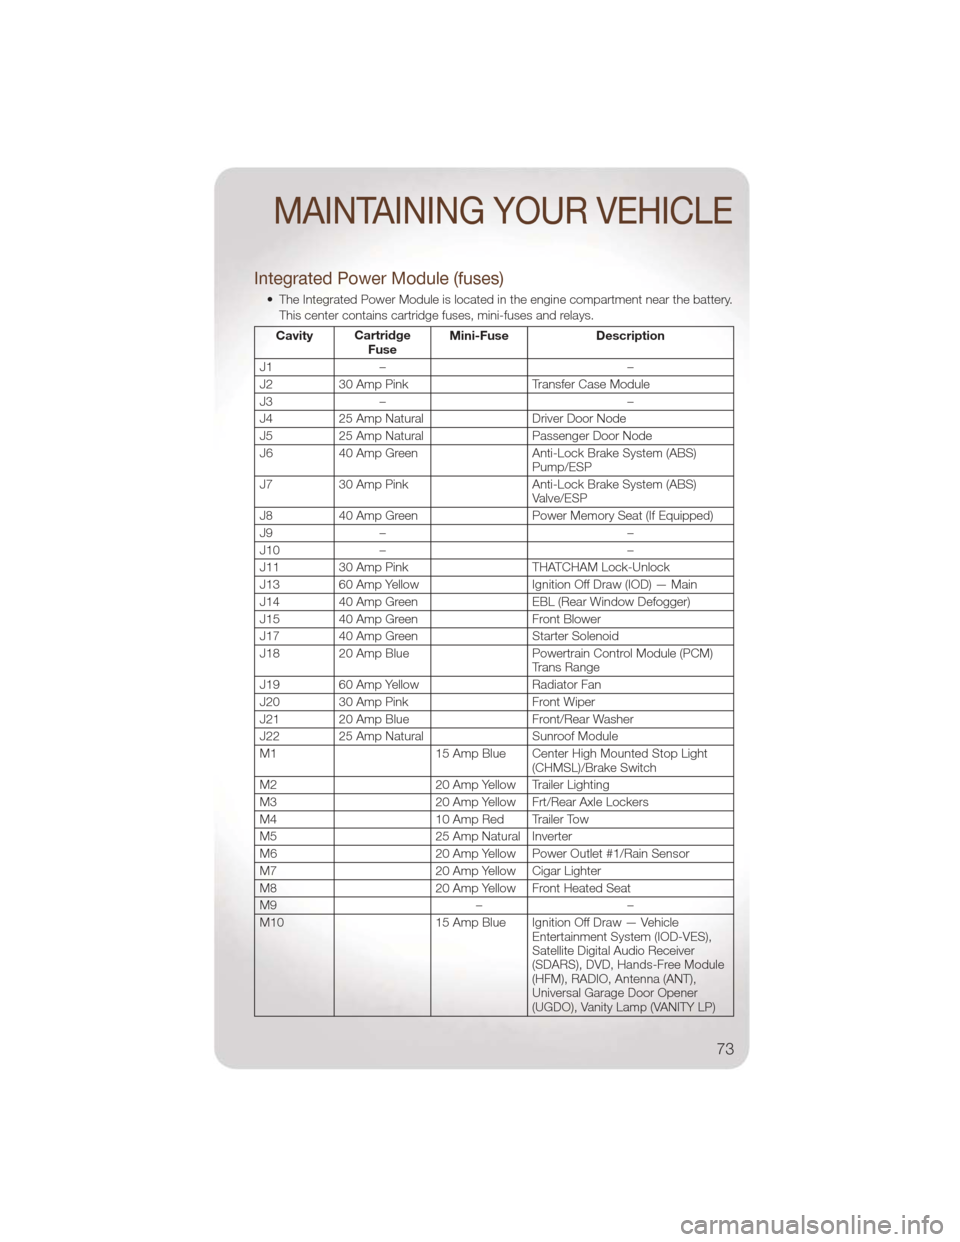
Integrated Power Module (fuses)
• The Integrated Power Module is located in the engine compartment near the battery.This center contains cartridge fuses, mini-fuses and relays.
Cavity Cartridge
Fuse Mini-Fuse Description
J1 – –
J2 30 Amp Pink Transfer Case Module
J3 – –
J4 25 Amp Natural Driver Door Node
J5 25 Amp Natural Passenger Door Node
J6 40 Amp Green Anti-Lock Brake System (ABS) Pump/ESP
J7 30 Amp Pink Anti-Lock Brake System (ABS)
Valve/ESP
J8 40 Amp Green Power Memory Seat (If Equipped)
J9 – –
J10 – –
J11 30 Amp Pink THATCHAM Lock-Unlock
J13 60 Amp Yellow Ignition Off Draw (IOD) — Main
J14 40 Amp Green EBL (Rear Window Defogger)
J15 40 Amp Green Front Blower
J17 40 Amp Green Starter Solenoid
J18 20 Amp Blue Powertrain Control Module (PCM)
Trans Range
J19 60 Amp Yellow Radiator Fan
J20 30 Amp Pink Front Wiper
J21 20 Amp Blue Front/Rear Washer
J22 25 Amp Natural Sunroof Module
M1 15 Amp Blue Center High Mounted Stop Light
(CHMSL)/Brake Switch
M2 20 Amp Yellow Trailer Lighting
M3 20 Amp Yellow Frt/Rear Axle Lockers
M4 10 Amp Red Trailer Tow
M5 25 Amp Natural Inverter
M6 20 Amp Yellow Power Outlet #1/Rain Sensor
M7 20 Amp Yellow Cigar Lighter
M8 20 Amp Yellow Front Heated Seat
M9 ––
M10 15 Amp Blue Ignition Off Draw — Vehicle
Entertainment System (IOD-VES),
Satellite Digital Audio Receiver
(SDARS), DVD, Hands-Free Module
(HFM), RADIO, Antenna (ANT),
Universal Garage Door Opener
(UGDO), Vanity Lamp (VANITY LP)
MAINTAINING YOUR VEHICLE
73