brake light JEEP PATRIOT 2007 1.G Owners Manual
[x] Cancel search | Manufacturer: JEEP, Model Year: 2007, Model line: PATRIOT, Model: JEEP PATRIOT 2007 1.GPages: 440, PDF Size: 7.26 MB
Page 18 of 440
STEERING WHEEL LOCK Ð Manual
Transmission Only
Your manual transmission vehicle is equipped with a
passive steering wheel lock. This lock prevents steering
the vehicle without the ignition key. If the steering wheel
is moved no more than 1/2 turn in either direction and
the key is not in the ignition switch, the steering wheel
will lock.
If You Wish To Manually Lock The Steering
Wheel:
With the engine running, turn the steering wheel upside
down, turn off the engine and remove the key. Turn the
steering wheel slightly in either direction until the lock
engages.
To Release The Steering Wheel Lock:
Insert the key in the ignition switch and start the engine.
If the key is difficult to turn, move the wheel slightly to
the right or left to disengage the lock.
NOTE:If you turned the wheel to the right to engage
the lock, you must turn the wheel slightly to the right to
disengage it. If you turned the wheel to the left to engage
the lock, turn the wheel slightly to the left to disengage it.
Automatic Transaxle Ignition Interlock System
This system prevents the key from being removed unless
the shift lever is in PARK. It also prevents shifting out of
PARK unless the key is in the ACC, or ON positions, and
the brake pedal is depressed.
THINGS TO KNOW BEFORE STARTING YOUR VEHICLE 17
2
Page 72 of 440
Defroster
Check operation by selecting the defrost mode and place
the blower control on high speed. You should be able to
feel the air directed against the windshield.
Periodic Safety Checks You Should Make Outside
The Vehicle
Tires
Examine tires for excessive tread wear or uneven wear
patterns. Check for stones, nails, glass, or other objects
lodged in the tread. Inspect tread and sidewall for cuts or
cracks. Check wheel nuts for tightness, and tires (includ-
ing spare) for proper pressure.
Lights
Have someone observe the operation of exterior lights
while you work the controls. Check turn signal and high
beam indicator lights on the instrument panel.
Fluid Leaks
Check area under vehicle after overnight parking for fuel,
engine coolant, oil or other fluid leaks. Also, if gasoline
fumes are detected or fuel, power steering fluid, trans-
mission fluid or brake fluid leaks are suspected, the cause
should be located and corrected immediately.
THINGS TO KNOW BEFORE STARTING YOUR VEHICLE 71
2
Page 124 of 440
Passing Light
You can signal another vehicle with your headlights by
lightly pulling the Multi-Function Control Lever toward
you. This will cause the headlights to turn on at high
beam and remain on until the lever is released.
NOTE:If the Multi-Function Control Lever is held in
the flash to pass position for more than 15 seconds, the
high beams will shut off. If this occurs, wait 30 seconds
for the next flash to pass operation.
Daytime Running Lights (DRL) Ð If Equipped
Functionality
The high beam lights will come on as Daytime Running
Lights (DRL) at DRL intensity (lower), whenever the
ignition is on, the engine is running, the headlight switch
is off, the parking brake is off, the turn signal is off, and
the gear shift is in any position except park.
WINDSHIELD WIPERS AND WASHERS
The wipers and washers are operated by a switch
on the control lever. The lever is located on the
right side of the steering column.
Windshield Washers
To use the washer, pull the control lever toward you and
hold while spray is desired. If the lever is pulled while in
the delay range, the wiper will operate in low speed for
two wipe cycles after the lever is released, and then
resume the intermittent interval previously selected.
UNDERSTANDING THE FEATURES OF YOUR VEHICLE 123
3
Page 137 of 440
Security
If you sell your vehicle, be sure to erase the frequencies.
To erase all of the previously trained frequencies, hold
down both outside buttons until the indicator light
begins to flash.
This device complies with part 15 of FCC rules and with
RS-210 of Industry Canada. Operation is subject to the
following conditions:
1. This device may not cause harmful interference.
2. This device must accept any interference that may be
received including interference that may cause undesired
operation.
NOTE:Changes or modifications not expressly ap-
proved by the party responsible for compliance could
void the user's authority to operate the equipment.HomeLinktis a trademark owned by Johnson Controls,
Inc.
ANTI-LOCK BRAKE SYSTEM (ABS) ± IF
EQUIPPED
This system aids the driver in maintaining vehicle control
under adverse braking conditions. The system controls
hydraulic brake pressure to prevent wheel lockup and
help avoid skidding on slippery surfaces during braking.
NOTE:ABS improves steering control of the vehicle
during hard braking maneuvers.
136 UNDERSTANDING THE FEATURES OF YOUR VEHICLE
Page 142 of 440
the accelerator pedal will increase vehicle speed like
normal. When either the brake or the accelerator is
released, HDC will control the vehicle back to the origi-
nal set speed.
HDC is only intended for low speed off-road driving. At
vehicle speeds above 31 mph (50 km/h) HDC will no
longer function. If the HDC indicator lamp begins to
flash it means that the brakes are getting too hot and the
vehicle should be stopped to allow the brakes to cool.
ESP (Electronic Stability Program)
This system enhances directional control and stability of
the vehicle under various driving conditions. ESP cor-
rects for over/under steering of the vehicle by applying
the brake of the appropriate wheel to assist in counter-
acting the over/under steer condition. Engine power
may also be reduced to help the vehicle maintain the
desired path. ESP uses sensors in the vehicle to determine
the vehicle path intended by the driver and compares itto the actual path of the vehicle. When the actual path
does not match the intended path, ESP applies the brake
of the appropriate wheel to assist in counteracting the
oversteer or understeer condition
²Oversteer - when the vehicle is turning more than
appropriate for the steering wheel position.
²Understeer - when the vehicle is turning less than
appropriate for the steering wheel position.
ESP/TCS Indicator Light
The ªESP/TCS Indicator Lightº located in the instrument
cluster, starts to flash as soon as the tires lose traction and
the ESP system becomes active. The ªESP/TCS Indicator
Lightº also flashes when TCS is active. If the ªESP/TCS
Indicator Lightº begins to flash during acceleration, ease
up on the accelerator and apply as little throttle as
possible. Be sure to adapt your speed and driving to the
prevailing road conditions.
UNDERSTANDING THE FEATURES OF YOUR VEHICLE 141
3
Page 170 of 440
INSTRUMENT CLUSTER DESCRIPTIONS
1. Fuel Gauge/Fuel Door Location
When the ignition switch is in the ON position,
the pointer will show the level of fuel remain-
ing in the fuel tank. The fuel pump symbol
points to the side of the vehicle where the fuel
door is located
2. Charging System Light
9This light shows the status of the electrical charg-
ing system. The light should come on when the
ignition switch is first turned ON and remain on briefly
as a bulb check. If the light stays on or comes on while
driving, turn off some of the vehicle's non essential
electrical devices or increase engine speed (if at idle). If
the Charging System light remains on, it means that the
vehicle is experiencing a problem with the charging
system. Obtain SERVICE IMMEDIATELY. See your local
authorized dealer.93. Electronic Throttle Control Indicator Light
This light informs you of a problem with the
Electronic Throttle Control system. If a prob-
lem is detected, the light will come on while the
engine is running. If the light remains lit with
the engine running your vehicle will usually be drivable
and not need towing, however see your dealer for service
as soon as possible.
If the light is flashing when the engine is running you
may experience power loss, an elevated/rough idle, and
increased brake pedal effort, and your vehicle may
require towing. Immediate service is required.
The light will come on when the ignition switch is first
turned on and remain on briefly as a bulb check. This is
normal. If the light does not come on during starting,
have the system checked by an authorized dealer.
UNDERSTANDING YOUR INSTRUMENT PANEL 169
4
Page 172 of 440
10. Anti-Lock Warning Light (ABS) Ð If Equipped
This light monitors the Anti-Lock Brake System
(ABS) described elsewhere in this manual. This
light will come on when the ignition key is
turned to the ON position and may stay on for
as long as four seconds.
If the ABS light remains on or comes on during driving,
it indicates that the Anti-Lock portion of the brake system
is not functioning and that service is required, however,
the conventional brake system will continue to operate
normally provided that the BRAKE warning light is not
on.
If the ABS light is on, the brake system should be serviced
as soon as possible to restore the benefit of Anti-Lock
Brakes.
The warning light should be checked frequently to assure
that it is operating properly. Turn the ignition key to theon position, but do not start the vehicle. The light should
come on. If the light does not come on, have the system
checked by an authorized dealer.
11. Seat Belt Reminder Light
When the ignition switch is first turned ON, this
light will come on for about six seconds. A chime
will sound if you have not pulled the shoulder belt
out of the retractor. This is a reminder to ªbuckle upº. If
you do not buckle up, the light will remain on.
12. Tachometer
The white area of the scale shows the permissible engine
revolutions-per-minute (rpm x 1000) for each gear range.
Before reaching the red area, ease up on the accelerator to
prevent engine damage.
13. Engine Temperature Warning Light
This light warns of an overheated engine condi-
tion. If the engine is critically hot, a warning chime
UNDERSTANDING YOUR INSTRUMENT PANEL 171
4
Page 173 of 440
will sound 10 times. After the chime turns off, the engine
will still be critically hot until the light goes out.
14. Brake System Warning Light
This light monitors various brake functions, in-
cluding brake fluid level and parking brake appli-
cation. If the brake light turns on, it may indicate that the
parking brake is applied, there is a low brake fluid level
or there is a problem with the anti-lock brake system.
The dual brake system provides a reserve braking capac-
ity in the event of a failure to a portion of the hydraulic
system. Failure of either half of the dual brake system is
indicated by the Brake Warning Light which will turn on
when the brake fluid level in the master cylinder has
dropped below a specified level.
The light will remain on until the cause is corrected.NOTE:The light may flash momentarily during sharp
cornering maneuvers which change fluid level condi-
tions. The vehicle should have service performed, and
the brake fluid level checked.
If brake failure is indicated, immediate repair is neces-
sary.
WARNING!
Driving a vehicle with the brake light on is danger-
ous. Part of the brake system may have failed. It will
take longer to stop the vehicle. You could have an
accident. Have the vehicle checked immediately.
Vehicles equipped with Anti-Lock brakes (ABS), are also
equipped with Electronic Brake Force Distribution (EBD).
172 UNDERSTANDING YOUR INSTRUMENT PANEL
Page 174 of 440
In the event of an EBD failure, the Brake Warning Light
will turn on along with the ABS Light. Immediate repair
to the ABS system is required.
The operation of the Brake Warning Light can be checked
by turning the ignition switch from the OFF position to
the ON position. The light should illuminate for approxi-
mately two seconds. The light should then turn off unless
the parking brake is applied or a brake fault is detected.
If the light does not illuminate, have the light inspected
by an authorized dealer.
The light also will turn on when the parking brake is
applied with the ignition switch in the ON position.
NOTE:This light shows only that the parking brake is
applied. It does not show the degree of brake application.15. Transmission Over Temp Light
During sustained high speed driving on hot
days, the automatic transaxle oil may become
too hot. If this happens, the transmission over-
heat indicator light will come on and the
vehicle will slow slightly until the automatic transaxle
cools down enough to allow a return to the requested
speed. If the high speed is maintained, the overheating
will reoccur as before in a cyclic fashion.
16. Theft Alarm Light Ð If Equipped
This light will flash rapidly for several seconds when the
alarm system is arming. The light will begin to flash
slowly indicating that the system is armed.
17. Temperature Gauge
If the pointer rises to theH(red) mark, the instrument
cluster will sound a chime. Pull over and stop the vehicle.
Idle the vehicle with the air conditioner turned off until
UNDERSTANDING YOUR INSTRUMENT PANEL 173
4
Page 245 of 440
MANUAL TRANSAXLE OPERATION
WARNING!
You or others could be injured if you leave the
vehicle unattended without having the parking
brake fully applied. The parking brake should al-
ways be applied when the driver is not in the vehicle,
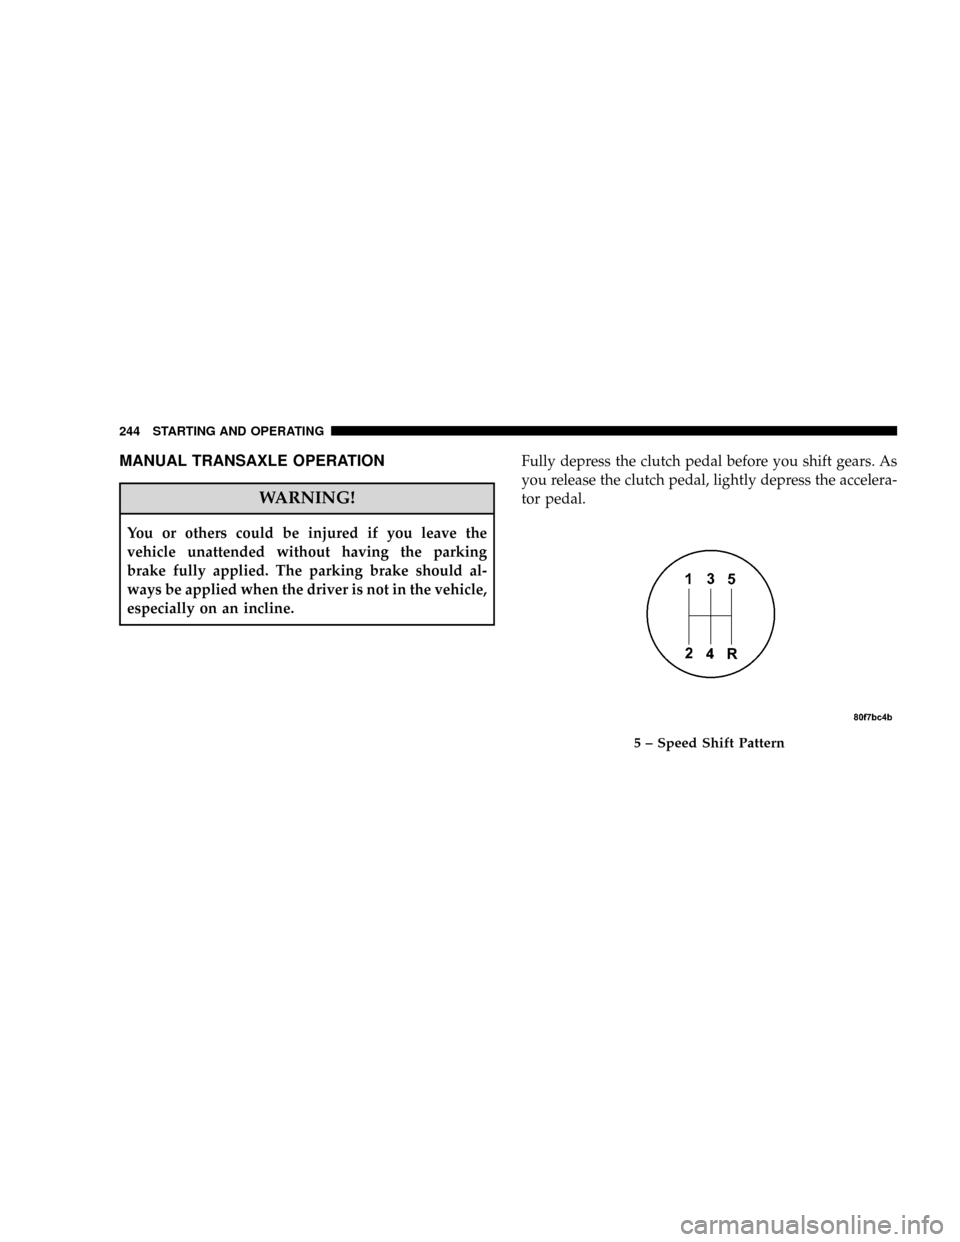
especially on an incline.Fully depress the clutch pedal before you shift gears. As
you release the clutch pedal, lightly depress the accelera-
tor pedal.
5 ± Speed Shift Pattern
244 STARTING AND OPERATING