parking brake JEEP PATRIOT 2007 1.G Owners Manual
[x] Cancel search | Manufacturer: JEEP, Model Year: 2007, Model line: PATRIOT, Model: JEEP PATRIOT 2007 1.GPages: 440, PDF Size: 7.26 MB
Page 61 of 440
Data Parameters that May Be Recorded:
²Diagnostic trouble code(s) and warning lamp status
for electronically-controlled safety systems, including
the airbag system
²Airbag disable lamp status (if equipped)
²9Time9of airbag deployment (in terms of ignition
cycles and vehicle mileage)
²Airbag deployment level (if applicable)
²Impact acceleration and angle
²Seatbelt status
²Brake status (service and parking brakes)
²Accelerator status (including vehicle speed)
²Engine control status (including engine speed)
²Transmission gear selection
²Cruise control status
²Traction/stability control status
²Tire pressure monitoring system status
Child Restraint
Everyone in your vehicle needs to be buckled up at all
times Ð babies and children, too. Every state in the
United States and all Canadian provinces require that
small children ride in proper restraint systems. This is the
law, and you can be prosecuted for ignoring it.
Children 12 years and under should ride properly buck-
led up in a rear seat, if available. According to crash
statistics, children are safer when properly restrained in
the rear seats, rather than in the front.
60 THINGS TO KNOW BEFORE STARTING YOUR VEHICLE
Page 72 of 440
Defroster
Check operation by selecting the defrost mode and place
the blower control on high speed. You should be able to
feel the air directed against the windshield.
Periodic Safety Checks You Should Make Outside
The Vehicle
Tires
Examine tires for excessive tread wear or uneven wear
patterns. Check for stones, nails, glass, or other objects
lodged in the tread. Inspect tread and sidewall for cuts or
cracks. Check wheel nuts for tightness, and tires (includ-
ing spare) for proper pressure.
Lights
Have someone observe the operation of exterior lights
while you work the controls. Check turn signal and high
beam indicator lights on the instrument panel.
Fluid Leaks
Check area under vehicle after overnight parking for fuel,
engine coolant, oil or other fluid leaks. Also, if gasoline
fumes are detected or fuel, power steering fluid, trans-
mission fluid or brake fluid leaks are suspected, the cause
should be located and corrected immediately.
THINGS TO KNOW BEFORE STARTING YOUR VEHICLE 71
2
Page 124 of 440
Passing Light
You can signal another vehicle with your headlights by
lightly pulling the Multi-Function Control Lever toward
you. This will cause the headlights to turn on at high
beam and remain on until the lever is released.
NOTE:If the Multi-Function Control Lever is held in
the flash to pass position for more than 15 seconds, the
high beams will shut off. If this occurs, wait 30 seconds
for the next flash to pass operation.
Daytime Running Lights (DRL) Ð If Equipped
Functionality
The high beam lights will come on as Daytime Running
Lights (DRL) at DRL intensity (lower), whenever the
ignition is on, the engine is running, the headlight switch
is off, the parking brake is off, the turn signal is off, and
the gear shift is in any position except park.
WINDSHIELD WIPERS AND WASHERS
The wipers and washers are operated by a switch
on the control lever. The lever is located on the
right side of the steering column.
Windshield Washers
To use the washer, pull the control lever toward you and
hold while spray is desired. If the lever is pulled while in
the delay range, the wiper will operate in low speed for
two wipe cycles after the lever is released, and then
resume the intermittent interval previously selected.
UNDERSTANDING THE FEATURES OF YOUR VEHICLE 123
3
Page 173 of 440
will sound 10 times. After the chime turns off, the engine
will still be critically hot until the light goes out.
14. Brake System Warning Light
This light monitors various brake functions, in-
cluding brake fluid level and parking brake appli-
cation. If the brake light turns on, it may indicate that the
parking brake is applied, there is a low brake fluid level
or there is a problem with the anti-lock brake system.
The dual brake system provides a reserve braking capac-
ity in the event of a failure to a portion of the hydraulic
system. Failure of either half of the dual brake system is
indicated by the Brake Warning Light which will turn on
when the brake fluid level in the master cylinder has
dropped below a specified level.
The light will remain on until the cause is corrected.NOTE:The light may flash momentarily during sharp
cornering maneuvers which change fluid level condi-
tions. The vehicle should have service performed, and
the brake fluid level checked.
If brake failure is indicated, immediate repair is neces-
sary.
WARNING!
Driving a vehicle with the brake light on is danger-
ous. Part of the brake system may have failed. It will
take longer to stop the vehicle. You could have an
accident. Have the vehicle checked immediately.
Vehicles equipped with Anti-Lock brakes (ABS), are also
equipped with Electronic Brake Force Distribution (EBD).
172 UNDERSTANDING YOUR INSTRUMENT PANEL
Page 174 of 440
In the event of an EBD failure, the Brake Warning Light
will turn on along with the ABS Light. Immediate repair
to the ABS system is required.
The operation of the Brake Warning Light can be checked
by turning the ignition switch from the OFF position to
the ON position. The light should illuminate for approxi-
mately two seconds. The light should then turn off unless
the parking brake is applied or a brake fault is detected.
If the light does not illuminate, have the light inspected
by an authorized dealer.
The light also will turn on when the parking brake is
applied with the ignition switch in the ON position.
NOTE:This light shows only that the parking brake is
applied. It does not show the degree of brake application.15. Transmission Over Temp Light
During sustained high speed driving on hot
days, the automatic transaxle oil may become
too hot. If this happens, the transmission over-
heat indicator light will come on and the
vehicle will slow slightly until the automatic transaxle
cools down enough to allow a return to the requested
speed. If the high speed is maintained, the overheating
will reoccur as before in a cyclic fashion.
16. Theft Alarm Light Ð If Equipped
This light will flash rapidly for several seconds when the
alarm system is arming. The light will begin to flash
slowly indicating that the system is armed.
17. Temperature Gauge
If the pointer rises to theH(red) mark, the instrument
cluster will sound a chime. Pull over and stop the vehicle.
Idle the vehicle with the air conditioner turned off until
UNDERSTANDING YOUR INSTRUMENT PANEL 173
4
Page 235 of 440
NOff-Road Driving Tips And Vehicle
Characteristics.......................247
NFreedom Drive II 4WD System Operation....248
NFreedom Drive II ± Off-Road Features.......249
NHigh Mobility Characteristics.............250
NWater Fording Characteristics.............252
NThe Basics Of Off-Road Driving...........254
NWhen To Use Low (L Off-Road) With The 4WD
Lock Lever Engaged...................254
NSimultaneous Brake And Throttle Operation . . 255
NDriving In Snow, Mud And Sand..........255
NCrossing Obstacles (Rocks And Other
High Points).........................257
NHill Climbing........................260NDriving Through Water.................262
NAiring Down For Off-Road Driving........265
NVehicle Recovery......................266
NAfter Driving Off-Road.................269
mParking Brake.........................270
mBrake System..........................272
NAnti-Lock Brake System (ABS) Ð If
Equipped...........................273
mPower Steering........................276
mTire Safety Information...................277
NTire Markings........................277
NTire Identification Number (TIN)..........280
NTire Loading And Tire Pressure...........281
234 STARTING AND OPERATING
Page 239 of 440
Manual Transaxle
Before starting the engine fully apply the parking brake,
press the clutch pedal to the floor and place the gear
selector in NEUTRAL.
NOTE:The engine will not start unless the clutch pedal
is pressed to the floor.
NOTE:If key won't turn and steering wheel is locked,
rotate the wheel in either direction to relieve pressure on
the locking mechanism and then turn the key.
Normal Starting
Normal Starting of either a cold or a warm engine does
not require pumping or depressing the accelerator pedal.
Simply turn the ignition switch to the ªSTART'º position
and release when the engine starts. If the engine fails to
start within 15 seconds, turn the ignition switch to the
ªOFFº position, wait 10 to 15 seconds, then repeat the
normal starting procedure.
WARNING!
Do not attempt to push or tow your vehicle to get it
started. Vehicles equipped with an automatic trans-
axle cannot be started this way. Unburned fuel could
enter the catalytic converter and once the engine has
started, ignite and damage the converter and vehicle.
If the vehicle has a discharged battery, booster cables
may be used to obtain a start from another vehicle.
This type of start can be dangerous if done improp-
erly, so follow the procedure carefully. See section 6
of this manual for jump starting instructions.
Extremely Cold Weather (below220ÉF or229ÉC)
To insure reliable starting at these temperatures, use of an
externally powered electric engine block heater (available
from your dealer) is recommended.
238 STARTING AND OPERATING
Page 243 of 440
Gear Ranges For Continuously Variable
Automatic Transaxle (CVT)
DO NOT race the engine when shifting from PARK or
NEUTRAL positions into another gear range.
ªPº Park
Supplements the parking brake by locking the transmis-
sion. The engine can be started in this range. Never use P
(Park) while the vehicle is in motion. Apply the parking
brake when leaving the vehicle in this range. Always
apply the parking brake first, and then place the selector
in P (Park) position.
WARNING!
Unintended movement of a vehicle could injure
those in and near the vehicle. As with all vehicles,
you should never exit a vehicle while the engine is
running. Before exiting a vehicle, you should always
shift the vehicle into P (Park), remove the key from
the ignition, and apply the parking brake. Once the
key is removed from the ignition, the transmission
shift lever is locked in the P (Park) position, securing
the vehicle against unwanted movement. Further-
more, you should never leave children unattended
inside a vehicle.
The following indicators should be used to ensure that
you have engaged the transmission shift lever into the P
(Park) position:
242 STARTING AND OPERATING
Page 245 of 440
MANUAL TRANSAXLE OPERATION
WARNING!
You or others could be injured if you leave the
vehicle unattended without having the parking
brake fully applied. The parking brake should al-
ways be applied when the driver is not in the vehicle,
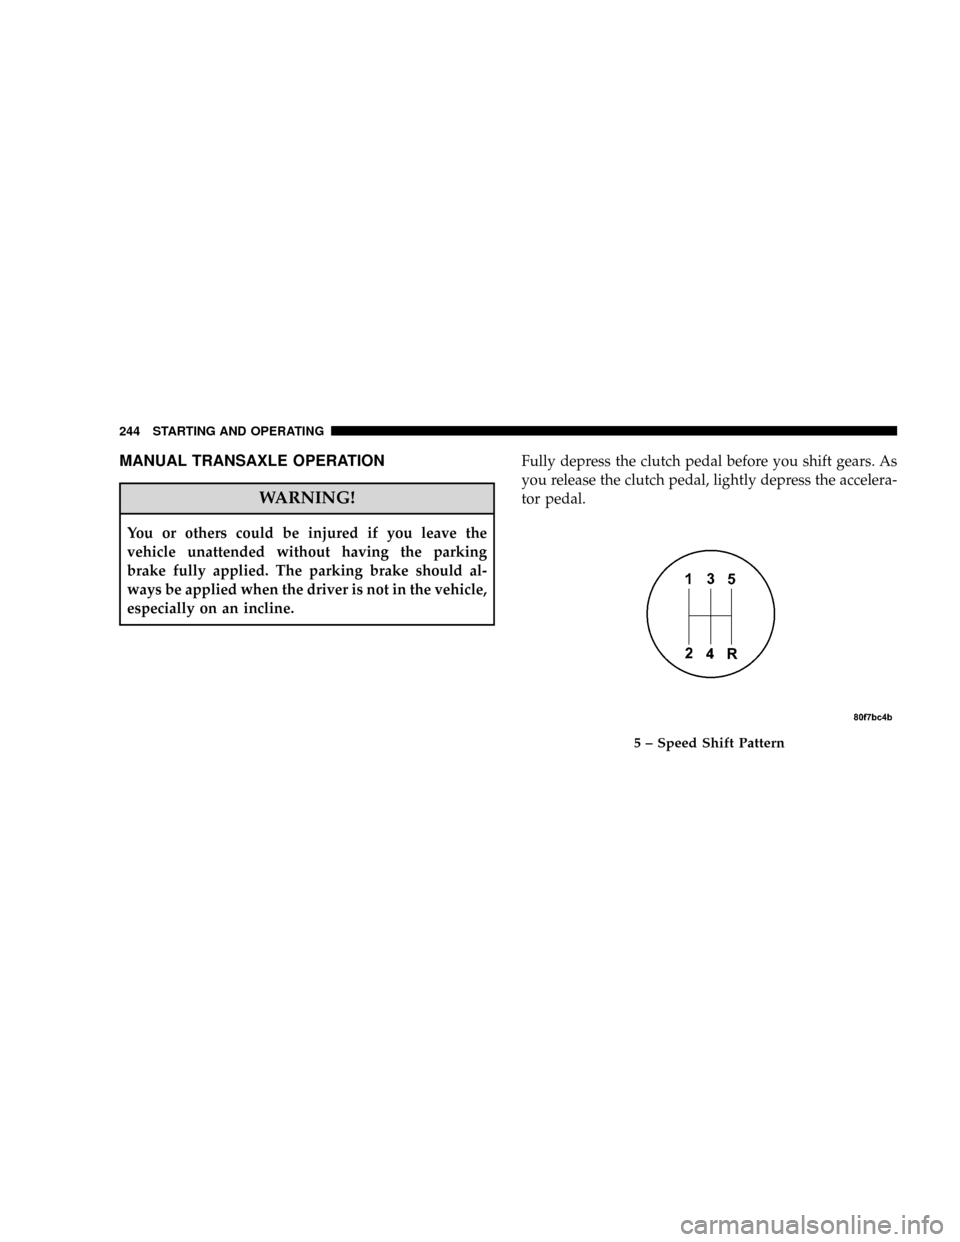
especially on an incline.Fully depress the clutch pedal before you shift gears. As
you release the clutch pedal, lightly depress the accelera-
tor pedal.
5 ± Speed Shift Pattern
244 STARTING AND OPERATING
Page 271 of 440
WARNING!
Abrasive material in any part of the brakes may cause
excessive wear or unpredictable braking. You might
not have full braking power when you need it to
prevent an accident. If you have been operating your
vehicle in dirty conditions, get your brakes checked
and cleaned as necessary. Failure to do so may result
is serious injury.
PARKING BRAKE
When the parking brake is applied with the
ignition on, the Brake Light in the instrument
cluster will come on.
NOTE:This light only shows that the parking brake is
on. It does not show the degree of brake application.If the parking brake is applied while the vehicle is
moving, a chime will sound to alert the driver. The chime
will sound up to 10 times or until the vehicle has
returned to a stop.
Before leaving the vehicle, make sure that the parking
brake is set. To set the parking brake, pull up firmly on
the lever. Also place the gear selector in the Park position
(automatic transaxle) or Reverse (manual transaxle). To
release the parking brake, apply the brake pedal, pull up
slightly on the lever, then depress the button on the end
of the lever and push the lever fully down toward the
floor.
NOTE:The parking brake lever will not release unless
the lever is pulled up slightly past its applied position.
270 STARTING AND OPERATING