key JEEP PATRIOT 2010 1.G Owner's Manual
[x] Cancel search | Manufacturer: JEEP, Model Year: 2010, Model line: PATRIOT, Model: JEEP PATRIOT 2010 1.GPages: 72, PDF Size: 13.27 MB
Page 33 of 72
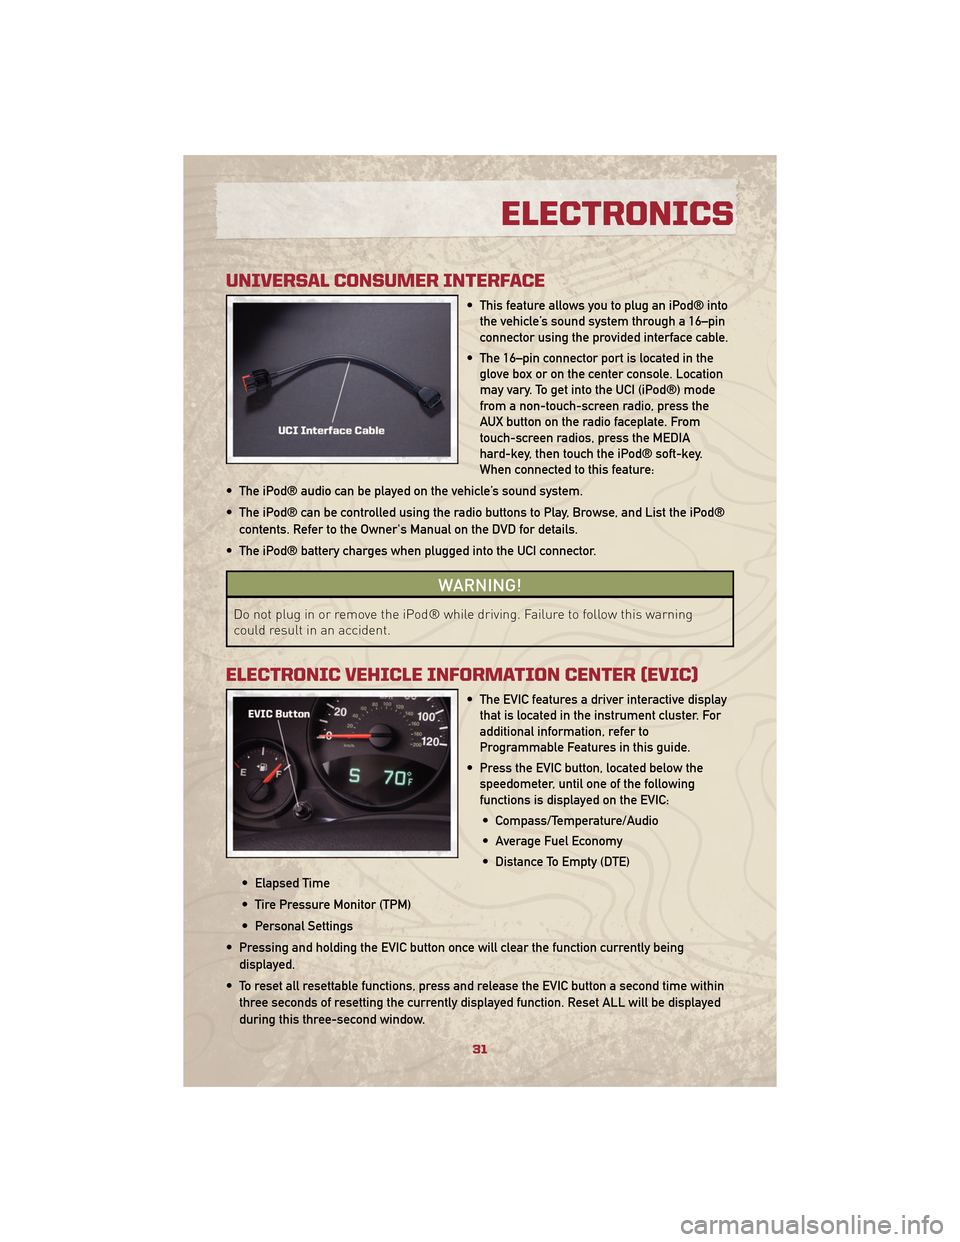
UNIVERSAL CONSUMER INTERFACE
• This feature allows you to plug an iPod® intothe vehicle’s sound system through a 16–pin
connector using the provided interface cable.
• The 16–pin connector port is located in the glove box or on the center console. Location
may vary. To get into the UCI (iPod®) mode
from a non-touch-screen radio, press the
AUX button on the radio faceplate. From
touch-screen radios, press the MEDIA
hard-key, then touch the iPod® soft-key.
When connected to this feature:
• The iPod® audio can be played on the vehicle’s sound system.
• The iPod® can be controlled using the radio buttons to Play, Browse, and List the iPod® contents. Refer to the Owner's Manual on the DVD for details.
• The iPod® battery charges when plugged into the UCI connector.
WARNING!
Do not plug in or remove the iPod® while driving. Failure to follow this warning
could result in an accident.
ELECTRONIC VEHICLE INFORMATION CENTER (EVIC)
• The EVIC features a driver interactive display that is located in the instrument cluster. For
additional information, refer to
Programmable Features in this guide.
• Press the EVIC button, located below the speedometer, until one of the following
functions is displayed on the EVIC:
• Compass/Temperature/Audio
• Average Fuel Economy
• Distance To Empty (DTE)
• Elapsed Time
• Tire Pressure Monitor (TPM)
• Personal Settings
• Pressing and holding the EVIC button once will clear the function currently being displayed.
• To reset all resettable functions, press and release the EVIC button a second time within three seconds of resetting the currently displayed function. Reset ALL will be displayed
during this three-second window.
31
ELECTRONICS
Page 37 of 72
• You will be asked to create a four-digit PIN which you will later need to enter into yourphone (typically...settings, Bluetooth®, device, list, new).
• You will then be prompted to give the phone pairing a name (each phone paired should have a unique name).
• Next you will be asked to give this new pairing a priority of 1 thru 7 (up to seven phones may be paired).
Making A Phone Call
• Press the Phone button.
• (After the BEEP), say “dial” (or “call” to a name).
• (After the BEEP), say number (or name).
Phonebook (Uconnect™ local) Edit
• Press the Phone button.
• (After the BEEP), say “phonebook”.
• (After the BEEP), say “new entry” or “list names” or “delete”.
• Follow the prompts.
Receiving A Call – Accept (And End)
• When an incoming call rings/is announced on Uconnect™, press the Phone button.
• To end a call, press the Phone button
.
Mute (Or Unmute) Microphone During Call
• During a call, press the Voice Command button.
• (After the BEEP), say “mute on” (or “mute off”).
Transfer Ongoing Call Between Handset And Vehicle
• During a call, press the Voice Command button.
• (After the BEEP), say “transfer call”.
Changing The Volume
• Start a dialogue by pressing the Phone button, then adjust the volume during a
normal call.
• Use the radio ON/OFF VOLUME rotary knob to adjust the volume to a comfortable level while the Uconnect™ system is speaking. Please note the volume setting for Uconnect™
is different than the audio system.
NOTE: To access the tutorial, press the Uconnect™ hard-key. After the BEEP, say
“tutorial”. Press any hard-key or touch the display to cancel the tutorial.
35
ELECTRONICS
Page 38 of 72
VOICE COMMAND
• The Voice Command system allows you to control your AM, FM radio, satellite radio, discplayer, and a memo recorder. When you press the Voice Command button
,you
will hear a beep. The beep is your signal to give a command. If you do not say a
command within a few seconds, the system will present you with a list of options. If you
ever wish to interrupt the system while it lists options, press the Voice Command
button
, listen for the BEEP, and say your command.
• For vehicles equipped with Video Entertainment System (VES)™, refer to the Voice Command section of the Uconnect™ User's Manual on the DVD for further details.
• For vehicles not equipped with VES™, refer to your vehicle Owner's Manual on the DVD for Voice Command information.
Changing The Volume
• Start a dialogue by pressing the Voice Command button, then say a command
(e.g., “tutorial”).
• Use the radio ON/OFF VOLUME rotary knob to adjust the volume to a comfortable level while the Voice Command system is speaking. Please note the volume setting for Voice
Command is different than the audio system.
WARNING!
Any voice commanded system should be used only in safe driving conditions and all
attention should be kept on the roadway ahead. Failure to do so may result in an
accident causing serious injury or death.
NOTE: To access the tutorial, press the Voice Command button
. After the BEEP,
say “tutorial”. Press any hard-key or touch the display to cancel the tutorial.
ELECTRONICS
36
Page 41 of 72
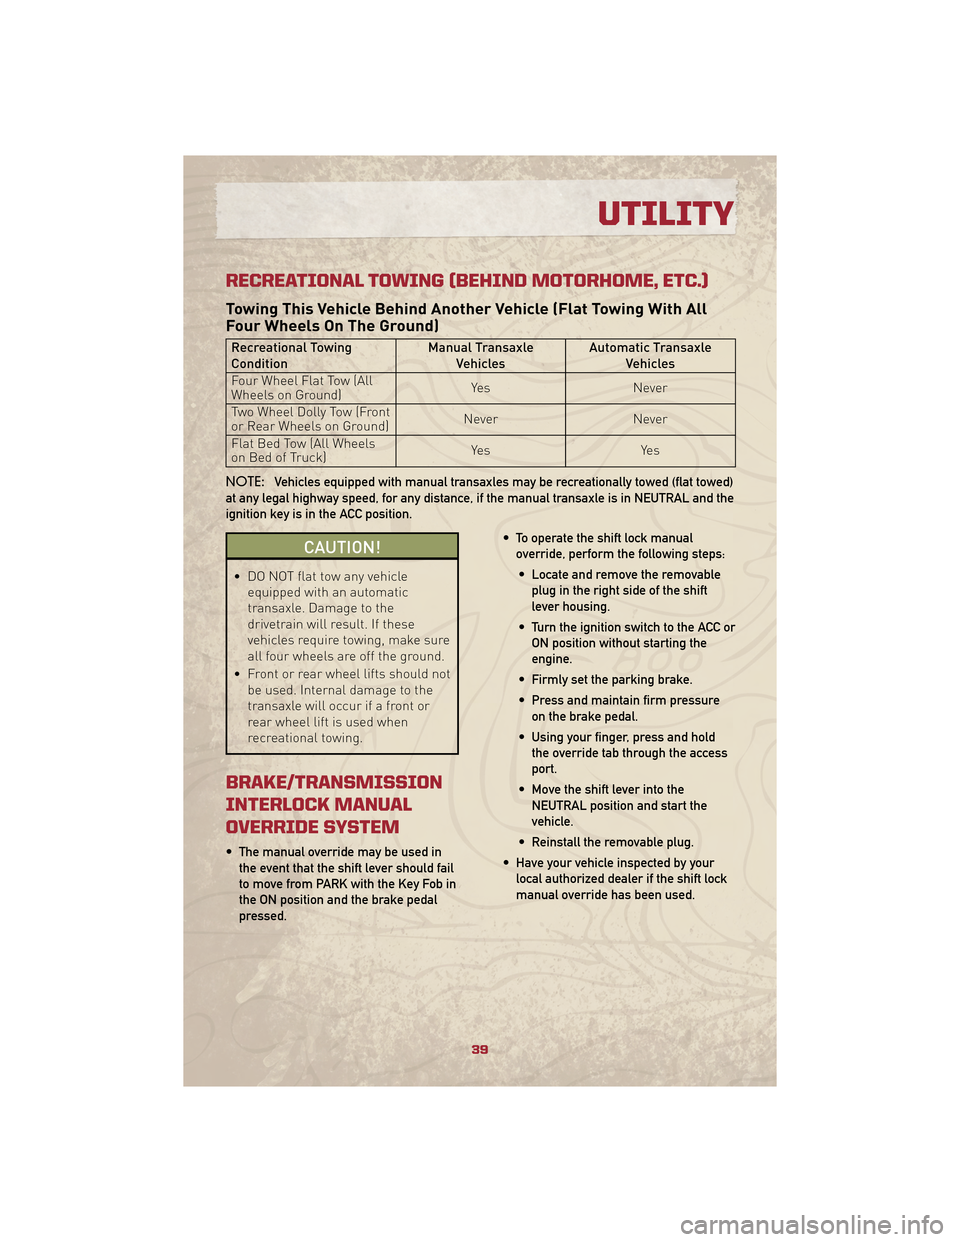
RECREATIONAL TOWING (BEHIND MOTORHOME, ETC.)
Towing This Vehicle Behind Another Vehicle (Flat Towing With All
Four Wheels On The Ground)
Recreational Towing
ConditionManual Transaxle
Vehicles Automatic Transaxle
Vehicles
Four Wheel Flat Tow (All
Wheels on Ground) Yes
Never
Two Wheel Dolly Tow (Front
or Rear Wheels on Ground) Never
Never
Flat Bed Tow (All Wheels
on Bed of Truck) Ye s
Ye s
NOTE: Vehicles equipped with manual transaxles may be recreationally towed (flat towed)
at any legal highway speed, for any distance, if the manual transaxle is in NEUTRAL and the
ignition key is in the ACC position.
CAUTION!
• DO NOT flat tow any vehicle equipped with an automatic
transaxle. Damage to the
drivetrain will result. If these
vehicles require towing, make sure
all four wheels are off the ground.
• Front or rear wheel lifts should not be used. Internal damage to the
transaxle will occur if a front or
rear wheel lift is used when
recreational towing.
BRAKE/TRANSMISSION
INTERLOCK MANUAL
OVERRIDE SYSTEM
• The manual override may be used inthe event that the shift lever should fail
to move from PARK with the Key Fob in
the ON position and the brake pedal
pressed. • To operate the shift lock manual
override, perform the following steps:
• Locate and remove the removable plug in the right side of the shift
lever housing.
• Turn the ignition switch to the ACC or ON position without starting the
engine.
• Firmly set the parking brake.
• Press and maintain firm pressure on the brake pedal.
• Using your finger, press and hold the override tab through the access
port.
• Move the shift lever into the NEUTRAL position and start the
vehicle.
• Reinstall the removable plug.
• Have your vehicle inspected by your local authorized dealer if the shift lock
manual override has been used.
39
UTILITY
Page 53 of 72
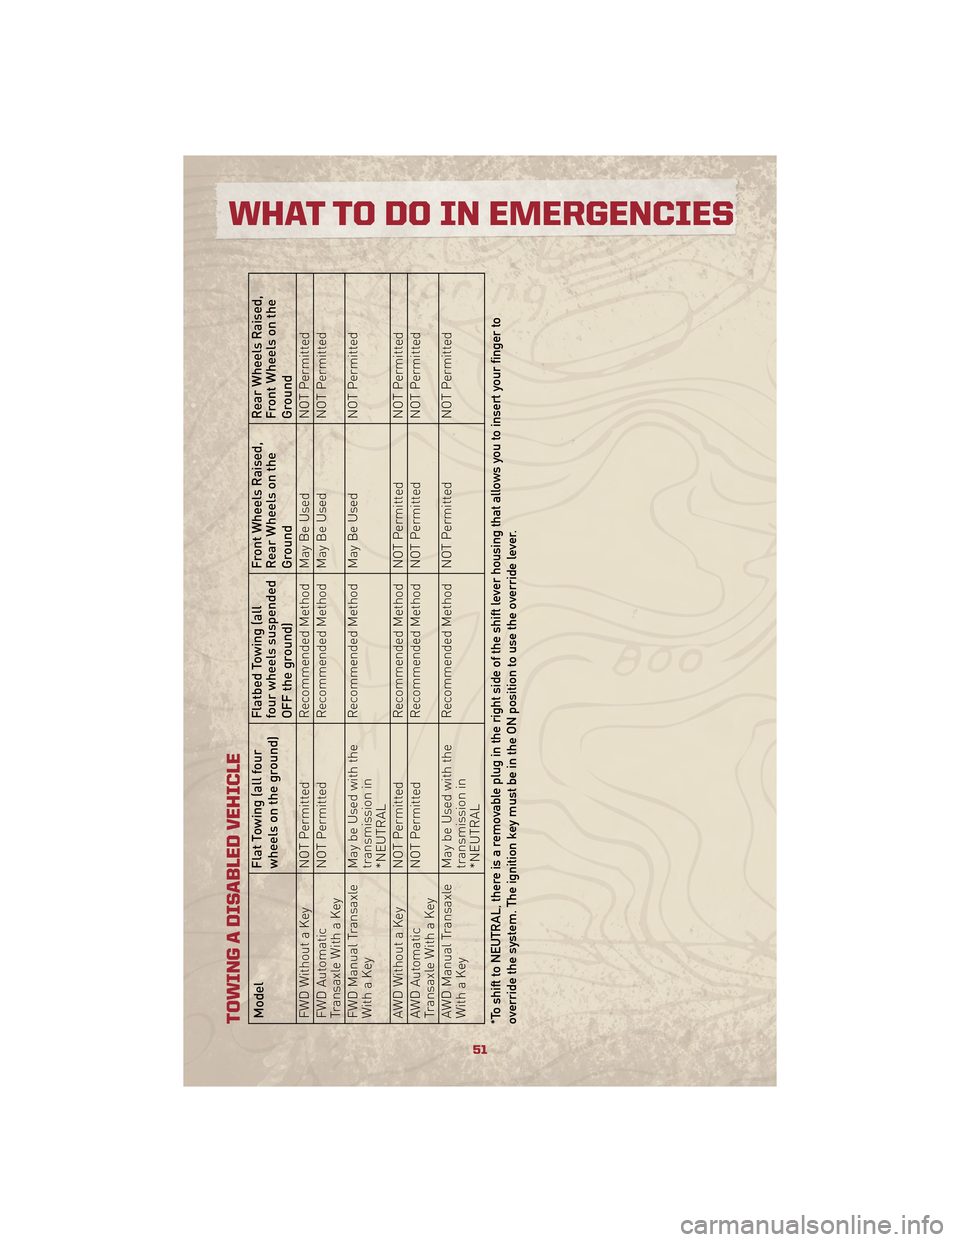
TOWING A DISABLED VEHICLEModelFlat Towing (all four
wheels on the ground)Flatbed Towing (all
four wheels suspended
OFF the ground)Front Wheels Raised,
Rear Wheels on the
GroundRear Wheels Raised,
Front Wheels on the
Ground
FWD Without a Key NOT Permitted Recommended Method May Be Used NOT Permitted
FWD Automatic
Transaxle With a Key NOT Permitted Recommended Method May Be Used
NOT Permitted
FWD Manual Transaxle
With a Key May be Used with the
transmission in
*NEUTRALRecommended Method May Be Used
NOT Permitted
AWD Without a Key NOT Permitted Recommended Method NOT Permitted NOT Permitted
AWD Automatic
Transaxle With a Key NOT Permitted Recommended Method NOT Permitted NOT Permitted
AWD Manual Transaxle
With a Key May be Used with the
transmission in
*NEUTRALRecommended Method NOT Permitted NOT Permitted
*To shift to NEUTRAL, there is a removable plug in the right side of the shift lever housing that allows you to insert your finger to
override the system. The ignition key must be in the ON position to use the override lever.
51
WHAT TO DO IN EMERGENCIES