key JEEP PATRIOT 2014 1.G Owner's Manual
[x] Cancel search | Manufacturer: JEEP, Model Year: 2014, Model line: PATRIOT, Model: JEEP PATRIOT 2014 1.GPages: 126, PDF Size: 2.29 MB
Page 60 of 126
SiriusXM Parental Controls
• SiriusXM offers the option to permanently block selected channels. Call1-888-539-7474 and request the Family Package.
• Uconnect® 430/430N and 730N: Press the MENU hard-key while in SiriusXM
Satellite Radio Mode, then touch the “Channel Lock” to enable and/or disable
desired channels. The SEEK and SCAN function will then only display channels
without Channel lock.
Search/Browse
• Touch the “magnifying glass” soft-key to search/browse the SiriusXM channel listing by Favorites and Categories such as Song, Artist and Channel Name. The
Search/Browse also allows you manage your Favorites.
SiriusXM Satellite Radio Favorites (SAT Favorites)
• You can save 50 favorite songs and 50 favorite artists.
• Touch the “add favorite” soft-key to add either the song or the artist of the
currently playing program to the SAT
Favorites list. The favorite star will ap-
pear in the upper right corner, below
the SAT soft-key.
• You will see a favorite star indicator in the upper right side of the screen be-
low the SAT soft-key and a pop up will
alert you that a favorite song or artist is currently playing on one of the SiriusXM
satellite radio channels.
NOTE:
Refer to your Uconnect
®730N or 430/
430N User's Manual for more informa-
tion.
ELECTRONICS
58
Page 61 of 126
Display SAT Favorites List
• Touch the “Search/Browse” soft-key and select “Favorites” from the SAT Browsescreen.
• Touch the desired favorites soft-key to switch the SAT tuner to the corre-
sponding channel.
• You may use the “LIST” soft-key to toggle between:
• Favorite Songs
• Favorite Artists
• Currently playing favorites
Replay
• While you are in SAT mode, you can replay 44 minutes of the current Siri-
usXM channel (when the channel is
changed, this audio buffer is erased).
Press the REPLAY button to listen to
the stored audio.
• You can touch the on-screen controls to pause and rewind audio playback,
touch the SCAN button to preview
each of the tracks stored in the buffer, or select a track from the list.
• The time displayed below the bar indicates how much time is present between the current buffer play position and the live broadcast.
ELECTRONICS
59
Page 62 of 126
Replay Option Option Description
Play/Pause Touch to pause content playback. Touch “Pause/Play” again toresume playback.
Rewind/RW Rewinds the channel content in steps of five seconds. Touch and hold to rewind continuously, then release to begin playing content at that
point.
Fast Forward/FW Forwards the content, and works similarly to Rewind/RW. However, Fast Forward/FW can only be used when content has been previously
rewound.
Replay Time Displays the amount of time in the upper center of the screen by which your content lags the live channel.
Live Resumes playback of live content at any time while replaying re- wound content.
SiriusXM Travel Link (Uconnect® 730N & Uconnect® 430N Only)
NOTE:
• SiriusXM Travel Link requires a subscription, sold separately after the 1 year trial
subscription included with your vehicle purchase.
• SiriusXM Travel Link is only available in the United States.
• SiriusXM Travel Link brings a wealth of useful information into your vehicle, right to your fingertips.
• To access Travel Link, press the MENU hard-key, then the “Travel Link” soft-key.
ELECTRONICS
60
Page 65 of 126
Uconnect® PHONE
• To determine if your vehicle is equipped with Uconnect®Phone, press the
Uconnect®Phone buttonlocated on the radio faceplate. If your vehicle has
this feature, you will hear a voice prompt. If not, you will see a message on the
radio stating “Uconnect phone not available.”
• The Uconnect
®Phone is a voice-activated, hands-free, in-vehicle communica-
tions system with Voice Command Capability (see Voice Command section).
NOTE:
To access the tutorial, press the Uconnect
®Phone buttonand after the BEEP,
say “tutorial.” Press any hard-key/button or touch the display (Touchscreen radio) to
cancel the “tutorial.”
• The Uconnect
®Phone allows you to dial a phone number with your mobile phone
using simple voice commands.
• Refer to your vehicle Owner's Manual on the DVD for further details.
NOTE:
The Uconnect
®Phone requires a mobile phone equipped with the Bluetooth®
Hands-Free Profile Version 1.0 or higher. For Uconnect®Customer Support: U.S.
residents - visit www.UconnectPhone.com or call 1–877–855–8400. Canadian
Residents - call, 1-800-465–2001 (English) or 1-800-387-9983 (French). This site
will provide specific instructions based on the type of mobile phone being paired.
Phone Pairing
NOTE:
Pairing is a one-time initial setup before using the phone. Prior to starting the pairing
procedure ensure all additional phones within the vehicle have their Bluetooth®disabled.
• Activate Bluetooth®on the phone you are pairing.
• Push the “Phone”
button to begin.
• Wait for the “ready” prompt and BEEP.
• After the BEEP, say ”setup” or “Uconnect device setup.”
• After the BEEP, say “device pairing.”
• After the BEEP, say “pair a device.”
• Follow the audible prompts.
• You will be asked to say a four-digit Personal Identification Number (PIN),
which you will later need to enter into
your mobile phone. You can say any
four-digit PIN. You will not need to
remember this PIN after the initial
pairing process.
Phone Pairing
ELECTRONICS
63
Page 69 of 126
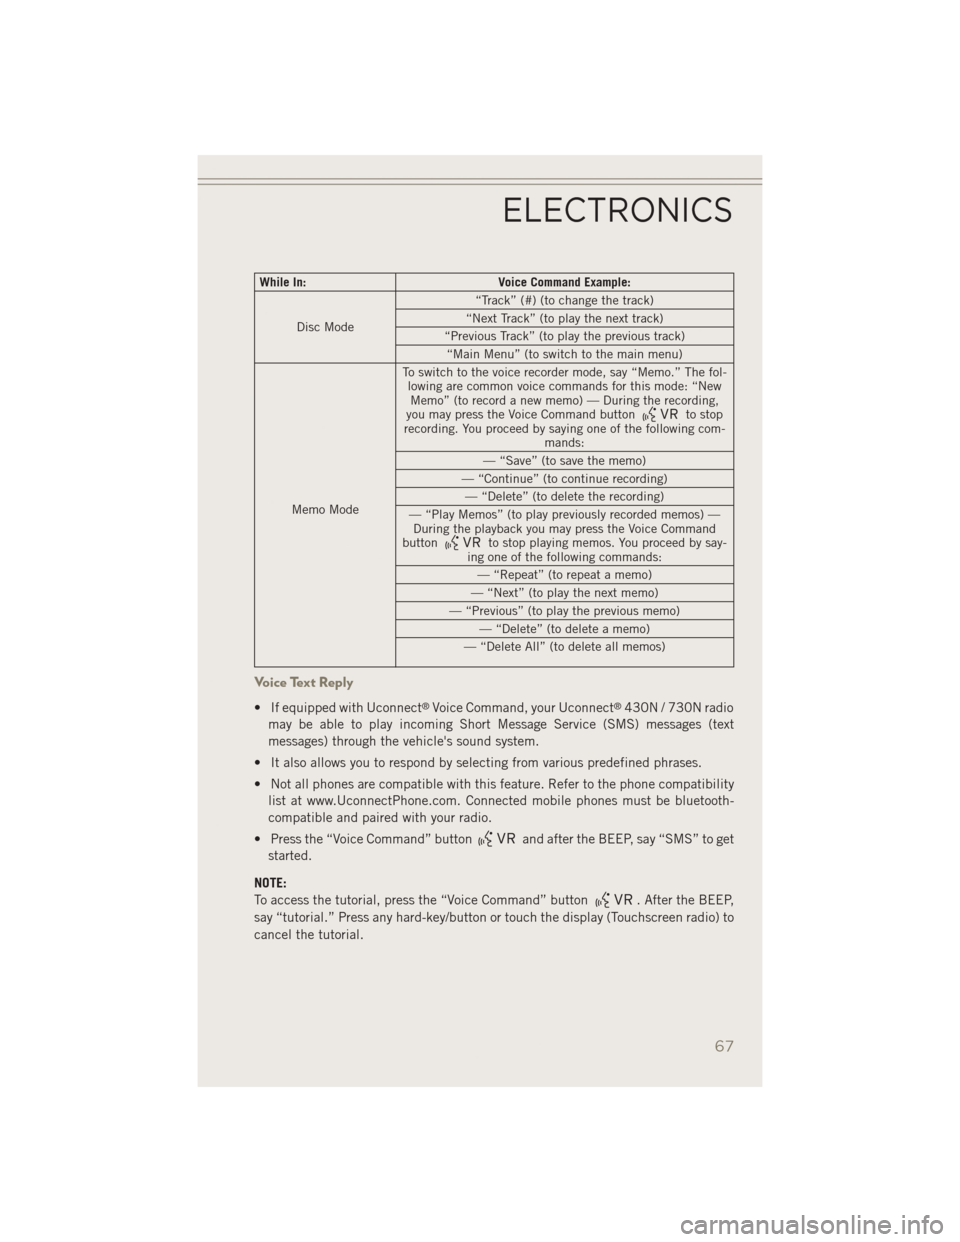
While In:Voice Command Example:
Disc Mode “Track” (#) (to change the track)
“Next Track” (to play the next track)
“Previous Track” (to play the previous track) “Main Menu” (to switch to the main menu)
Memo Mode To switch to the voice recorder mode, say “Memo.” The fol-
lowing are common voice commands for this mode: “NewMemo” (to record a new memo) — During the recording,
you may press the Voice Command button
to stop
recording. You proceed by saying one of the following com- mands:
— “Save” (to save the memo)
— “Continue” (to continue recording) — “Delete” (to delete the recording)
— “Play Memos” (to play previously recorded memos) — During the playback you may press the Voice Command
button
to stop playing memos. You proceed by say-
ing one of the following commands:
— “Repeat” (to repeat a memo)
— “Next” (to play the next memo)
— “Previous” (to play the previous memo) — “Delete” (to delete a memo)
— “Delete All” (to delete all memos)
Voice Text Reply
• If equipped with Uconnect®Voice Command, your Uconnect®430N / 730N radio
may be able to play incoming Short Message Service (SMS) messages (text
messages) through the vehicle's sound system.
• It also allows you to respond by selecting from various predefined phrases.
• Not all phones are compatible with this feature. Refer to the phone compatibility list at www.UconnectPhone.com. Connected mobile phones must be bluetooth-
compatible and paired with your radio.
• Press the “Voice Command” button
and after the BEEP, say “SMS” to get
started.
NOTE:
To access the tutorial, press the “Voice Command” button
. After the BEEP,
say “tutorial.” Press any hard-key/button or touch the display (Touchscreen radio) to
cancel the tutorial.
ELECTRONICS
67
Page 70 of 126
WARNING!
Any voice commanded system should be used only in safe driving conditions
following applicable laws regarding phone use. Your attention should be focused
on safely operating the vehicle. Failure to do so may result in a collision causing
you and others to be severely injured or killed.
Bluetooth® STREAMING AUDIO
If equipped with Uconnect®Voice Command, your Bluetooth®-equipped iPod®
devices, cell phones or other media players, may also be able to stream music to your
vehicle's speakers. Your connected device must be Bluetooth®-compatible, and
paired with your radio (see Uconnect®Phone for pairing instructions).
• Non-Touchscreen Radios: Press the
“AUX” button on the radio faceplate
until “BT” or “Audio Streaming” is
displayed on the radio screen.
• Touchscreen-Radios: Press the RADIO/
MEDIA or MEDIA hard-key and then
touch the “AUX” soft-key tab.
ELECTRONIC VEHICLE INFORMATION CENTER (EVIC)
The EVIC features a driver interactive display that is located in the instrument
cluster. Pushing the controls on the steering wheel allows the driver to select vehicle
information and Personal Settings. For additional information, refer to Program-
mable Features in this guide.
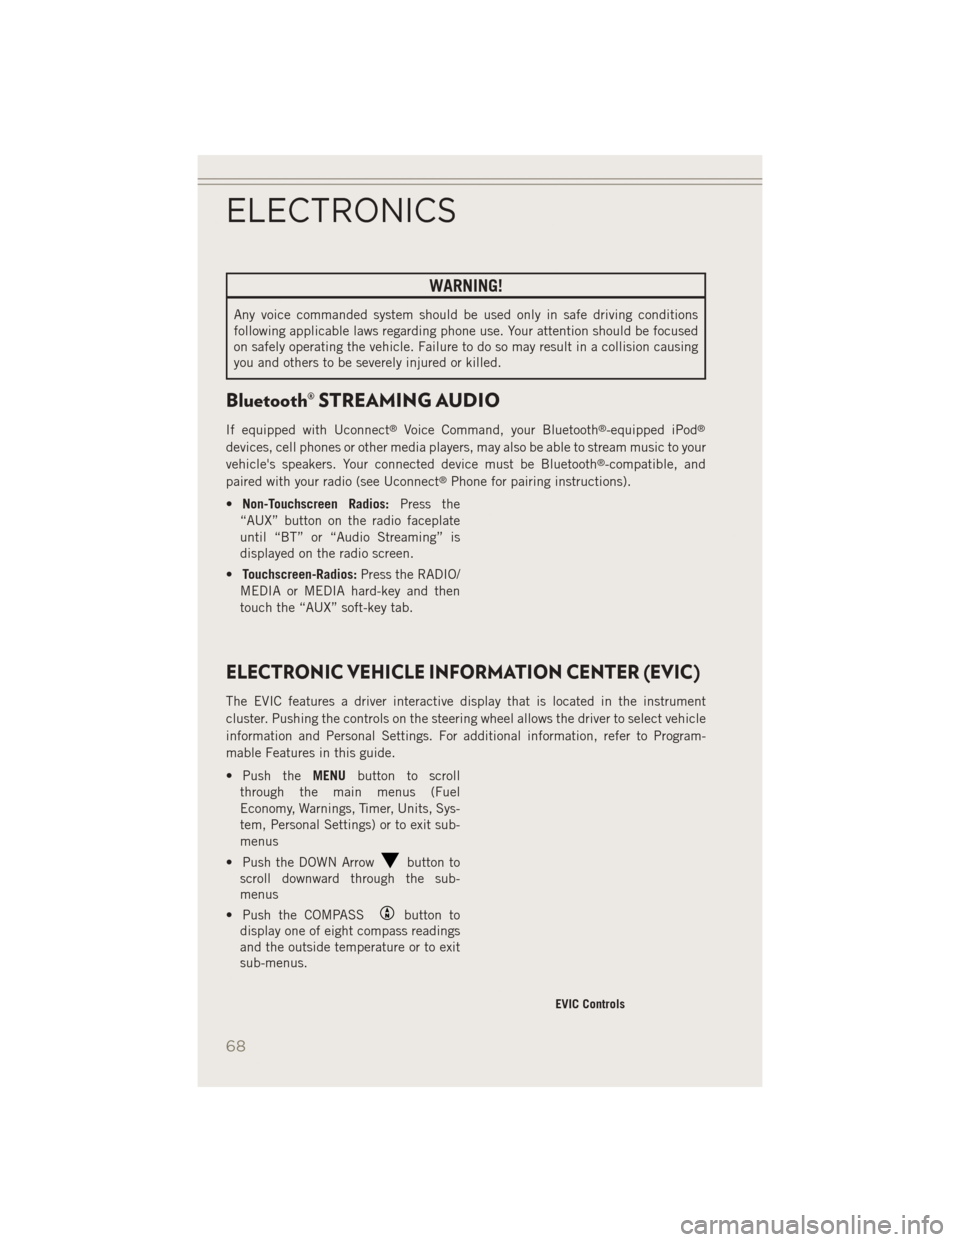
• Push the MENUbutton to scroll
through the main menus (Fuel
Economy, Warnings, Timer, Units, Sys-
tem, Personal Settings) or to exit sub-
menus
• Push the DOWN Arrow
button to
scroll downward through the sub-
menus
• Push the COMPASS
button to
display one of eight compass readings
and the outside temperature or to exit
sub-menus.
EVIC Controls
ELECTRONICS
68
Page 71 of 126
• Push the RIGHT Arrowbutton for access to main menus, sub-menus or to
select a personal setting in the setup menu.
Compass Calibration
This compass is self-calibrating, which eliminates the need to set the compass
manually. When the vehicle is new, the compass may appear erratic and the
EVIC/DID will display “CAL” until the compass is calibrated.
You may also calibrate the compass by completing one or more 360 degree turns (in
an area free from large metal or metallic objects) until the “CAL” message displayed
in the EVIC/DID turns off. The compass will now function normally.
PROGRAMMABLE FEATURES
Electronic Vehicle Information Center (EVIC)
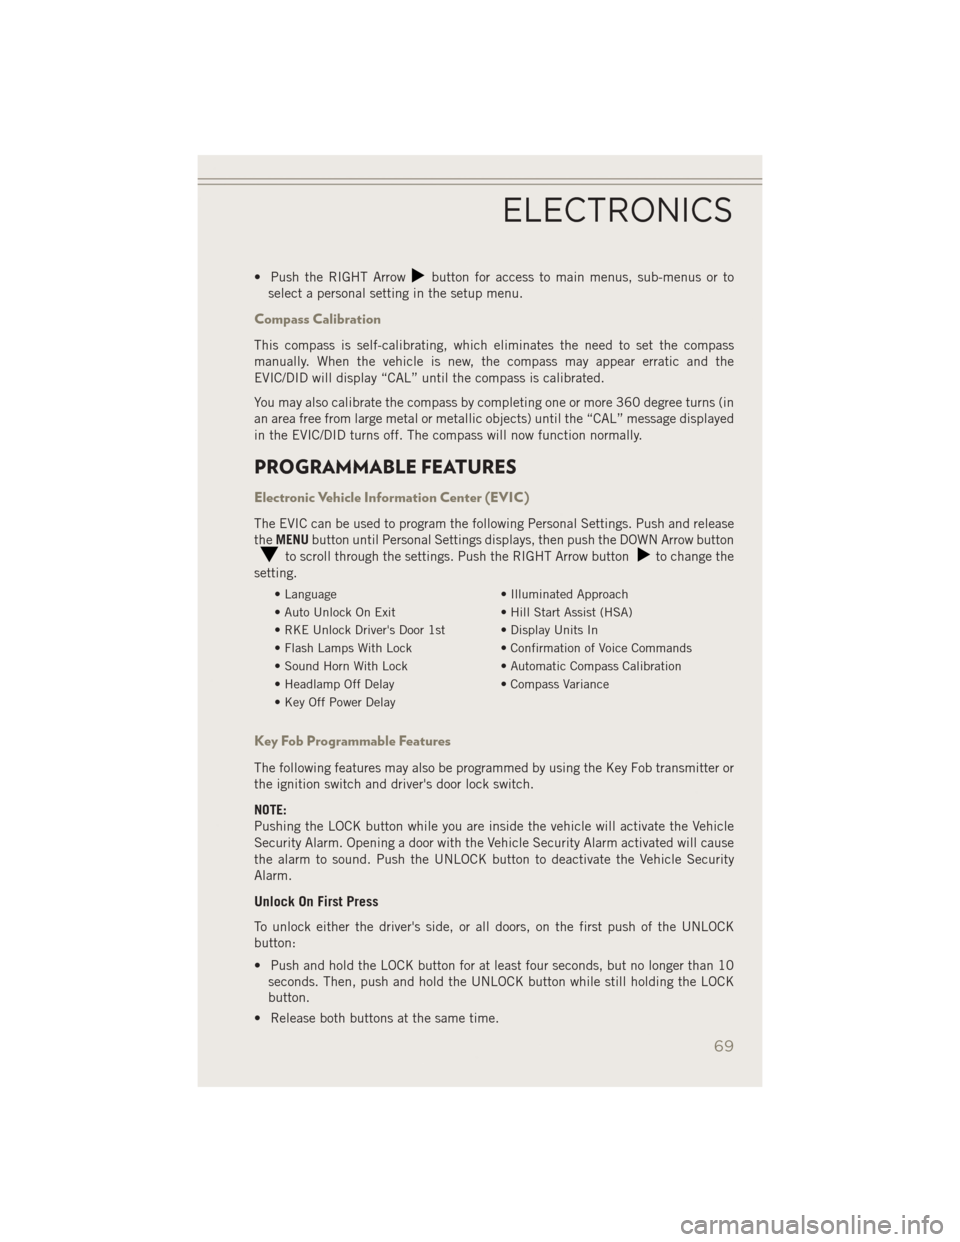
The EVIC can be used to program the following Personal Settings. Push and release
the MENU button until Personal Settings displays, then push the DOWN Arrow button
to scroll through the settings. Push the RIGHT Arrow buttonto change the
setting.
• Language • Illuminated Approach
• Auto Unlock On Exit • Hill Start Assist (HSA)
• RKE Unlock Driver's Door 1st • Display Units In
• Flash Lamps With Lock • Confirmation of Voice Commands
• Sound Horn With Lock • Automatic Compass Calibration
• Headlamp Off Delay • Compass Variance
• Key Off Power Delay
Key Fob Programmable Features
The following features may also be programmed by using the Key Fob transmitter or
the ignition switch and driver's door lock switch.
NOTE:
Pushing the LOCK button while you are inside the vehicle will activate the Vehicle
Security Alarm. Opening a door with the Vehicle Security Alarm activated will cause
the alarm to sound. Push the UNLOCK button to deactivate the Vehicle Security
Alarm.
Unlock On First Press
To unlock either the driver's side, or all doors, on the first push of the UNLOCK
button:
• Push and hold the LOCK button for at least four seconds, but no longer than 10 seconds. Then, push and hold the UNLOCK button while still holding the LOCK
button.
• Release both buttons at the same time.
ELECTRONICS
69
Page 81 of 126
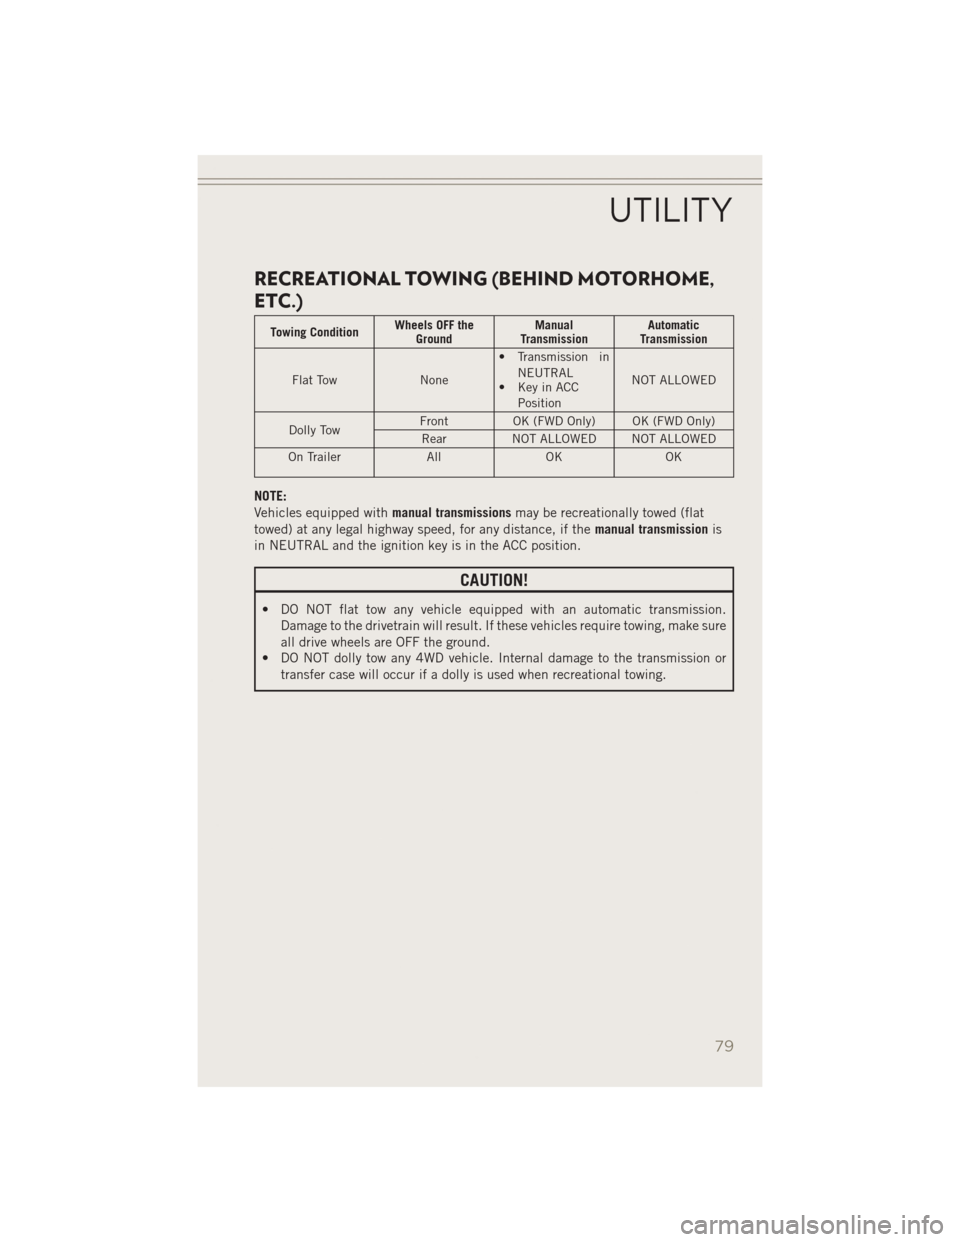
RECREATIONAL TOWING (BEHIND MOTORHOME,
ETC.)
Towing ConditionWheels OFF the
Ground Manual
Transmission Automatic
Transmission
Flat Tow None • Transmission in
NEUTRAL
• Key in ACC
Position NOT ALLOWED
Dolly Tow Front
OK (FWD Only) OK (FWD Only)
Rear NOT ALLOWED NOT ALLOWED
On Trailer AllOK OK
NOTE:
Vehicles equipped with manual transmissionsmay be recreationally towed (flat
towed) at any legal highway speed, for any distance, if the manual transmissionis
in NEUTRAL and the ignition key is in the ACC position.
CAUTION!
• DO NOT flat tow any vehicle equipped with an automatic transmission. Damage to the drivetrain will result. If these vehicles require towing, make sure
all drive wheels are OFF the ground.
• DO NOT dolly tow any 4WD vehicle. Internal damage to the transmission or
transfer case will occur if a dolly is used when recreational towing.
UTILITY
79
Page 100 of 126
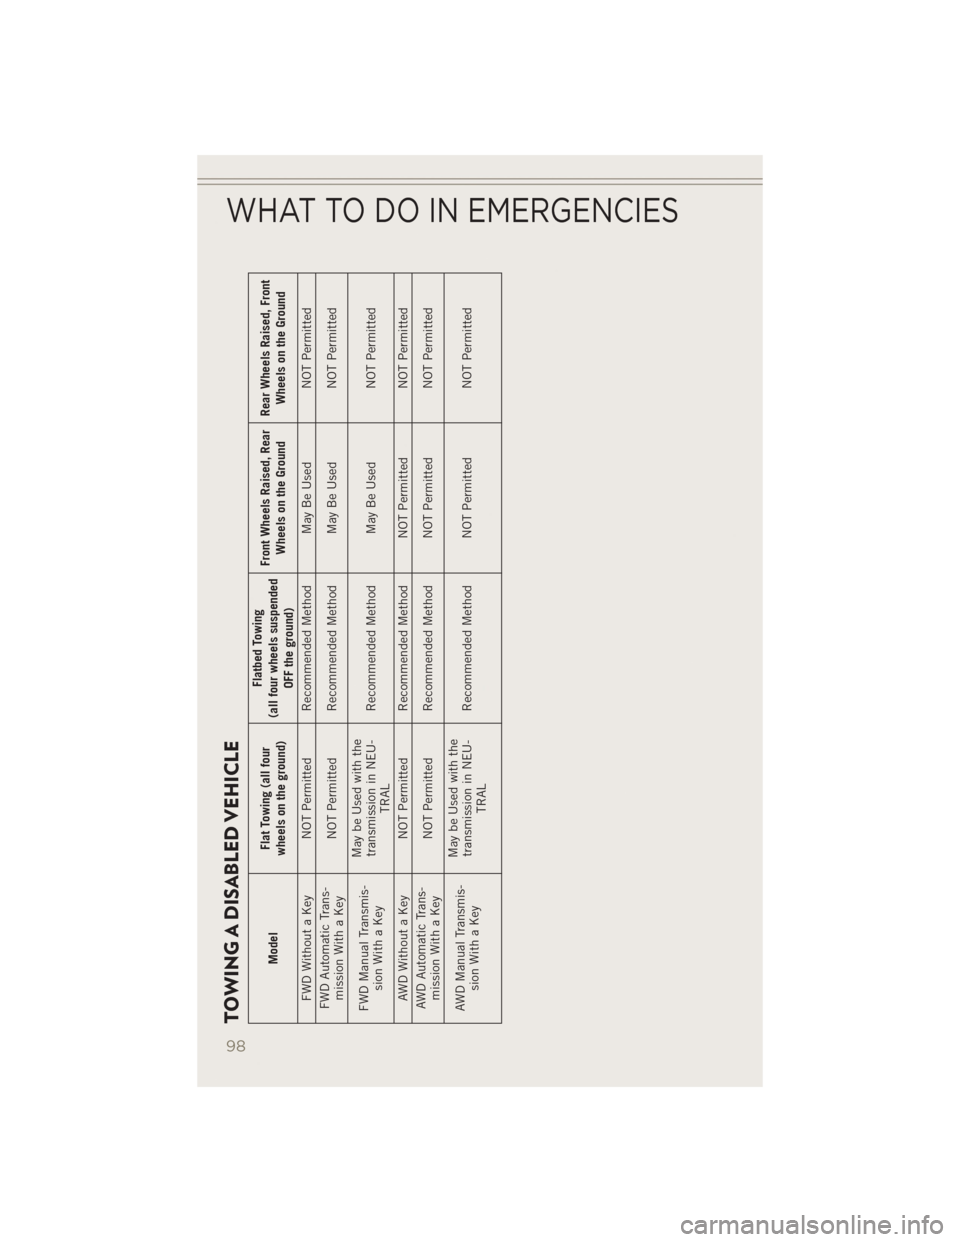
TOWING A DISABLED VEHICLE
ModelFlat Towing (all four
wheels on the ground) Flatbed Towing
(all four wheels suspended OFF the ground) Front Wheels Raised, Rear
Wheels on the Ground Rear Wheels Raised, Front
Wheels on the Ground
FWD Without a Key NOT Permitted Recommended Method May Be Used NOT Permitted
FWD Automatic Trans- mission With a Key NOT Permitted Recommended Method May Be Used
NOT Permitted
FWD Manual Transmis- sion With a Key May be Used with the
transmission in NEU- TRAL Recommended Method May Be Used
NOT Permitted
AWD Without a Key NOT Permitted Recommended Method NOT Permitted NOT Permitted
AWD Automatic Trans- mission With a Key NOT Permitted Recommended Method NOT Permitted
NOT Permitted
AWD Manual Transmis- sion With a Key May be Used with the
transmission in NEU- TRAL Recommended Method NOT Permitted
NOT Permitted
WHAT TO DO IN EMERGENCIES
98
Page 122 of 126
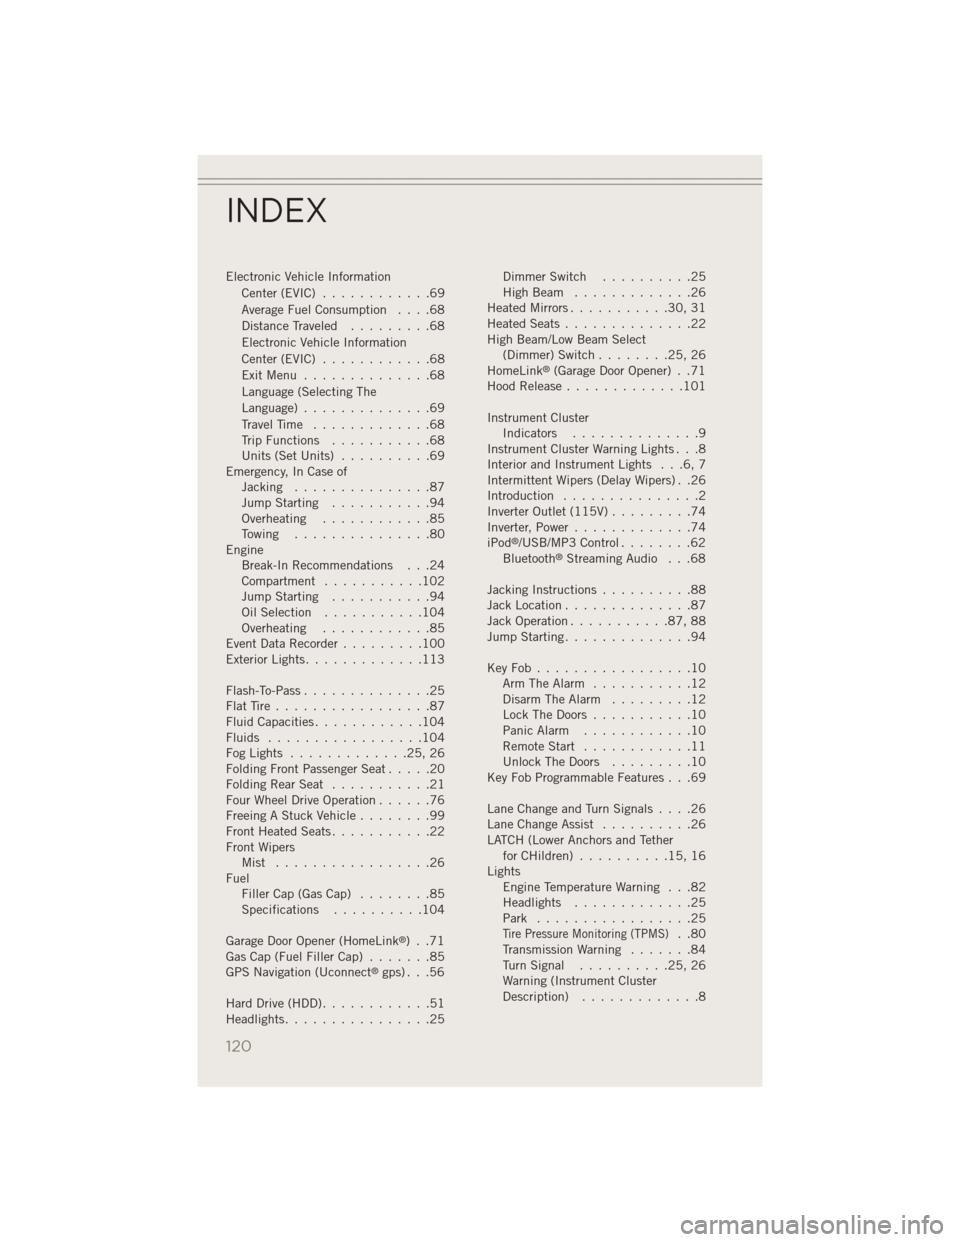
Electronic Vehicle InformationCenter(EVIC) ............69
Average Fuel Consumption ....68
Distance Traveled .........68
Electronic Vehicle Information
Center(EVIC) ............68
ExitMenu ..............68
Language (Selecting The
Language) ..............69
Travel Time .............68
Trip Functions ...........68
Units (Set Units) ..........69
Emergency, In Case of Jacking ...............87
Jump Starting ...........94
Overheating ............85
Towing ...............80
Engine Break-In Recommendations . . .24
Compartment ...........102
Jump Starting ...........94
OilSelection ...........104
Overheating ............85
Event Data Recorder .........100
Exterior Lights .............113
Flash-To-Pass ..............25
FlatTire.................87
Fluid Capacities ............104
Fluids .................104
FogLights .............25,26
FoldingFrontPassengerSeat.....20
FoldingRearSeat ...........21
Four Wheel Drive Operation ......76
Freeing A Stuck Vehicle ........99
Front Heated Seats ...........22
Front Wipers Mist .................26
Fuel Filler Cap (Gas Cap) ........85
Specifications ..........104
Garage Door Opener (HomeLink
®) . .71
Gas Cap (Fuel Filler Cap) .......85
GPS Navigation (Uconnect
®gps) . . .56
Hard Drive (HDD) ............51
Headlights ................25 Dimmer Switch
..........25
HighBeam .............26
Heated Mirrors ...........30,31
Heated Seats ..............22
High Beam/Low Beam Select (Dimmer) Switch ........25,26
HomeLink
®(Garage Door Opener) . .71
Hood Release .............101
Instrument Cluster Indicators ..............9
Instrument Cluster Warning Lights . . .8
Interior and Instrument Lights . . .6, 7
Intermittent Wipers (Delay Wipers) . .26
Introduction ...............2
Inverter Outlet (115V) .........74
Inverter, Power .............74
iPod
®/USB/MP3 Control ........62
Bluetooth®Streaming Audio . . .68
Jacking Instructions ..........88
Jack Location ..............87
Jack Operation ...........87,88
Jump Starting ..............94
KeyFob.................10 Arm The Alarm ...........12
Disarm The Alarm .........12
Lock The Doors ...........10
Panic Alarm ............10
Remote Start ............11
Unlock The Doors .........10
Key Fob Programmable Features . . .69
LaneChangeandTurnSignals....26
Lane Change Assist ..........26
LATCH (Lower Anchors and Tether for CHildren) ..........15,16
Lights Engine Temperature Warning . . .82
Headlights .............25
Park .................25
Tire Pressure Monitoring (TPMS)..80
Transmission Warning .......84
TurnSignal ..........25,26
Warning (Instrument Cluster
Description) .............8
INDEX
120