change wheel JEEP PATRIOT 2015 1.G Owners Manual
[x] Cancel search | Manufacturer: JEEP, Model Year: 2015, Model line: PATRIOT, Model: JEEP PATRIOT 2015 1.GPages: 572, PDF Size: 11.46 MB
Page 235 of 572
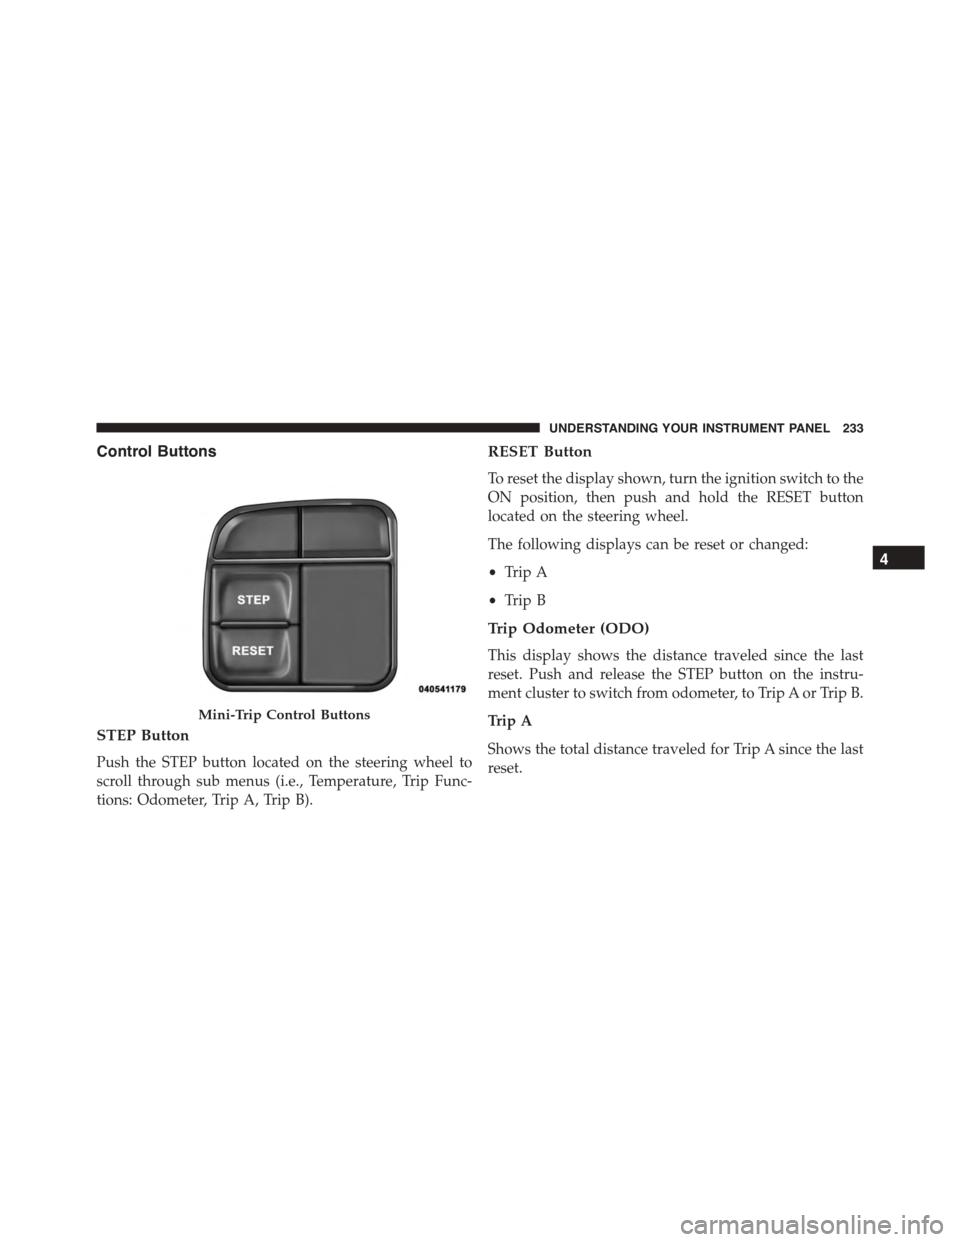
Control Buttons
STEP Button
Push the STEP button located on the steering wheel to
scroll through sub menus (i.e., Temperature, Trip Func-
tions: Odometer, Trip A, Trip B).
RESET Button
To reset the display shown, turn the ignition switch to the
ON position, then push and hold the RESET button
located on the steering wheel.
The following displays can be reset or changed:
•Trip A
•Trip B
Trip Odometer (ODO)
This display shows the distance traveled since the last
reset. Push and release the STEP button on the instru-
ment cluster to switch from odometer, to Trip A or Trip B.
Trip A
Shows the total distance traveled for Trip A since the last
reset.
Mini-Trip Control Buttons
4
UNDERSTANDING YOUR INSTRUMENT PANEL 233
Page 349 of 572
An advantage of the higher ground clearance is a better
view of the road, allowing you to anticipate problems.
They are not designed for cornering at the same speeds as
conventional two-wheel drive vehicles any more than
low-slung sports cars are designed to perform satisfacto-
rily in off-road conditions. If at all possible, avoid sharp
turns or abrupt maneuvers. As with other vehicles of this
type, failure to operate this vehicle correctly may result in
loss of control or vehicle rollover.
OFF-ROAD DRIVING TIPS
You will encounter many types of terrain driving off-
road. You should be familiar with the terrain and area
before proceeding. There are many types of surface
conditions: hard packed dirt, gravel, rocks, grass, sand,
mud, snow and ice. Every surface has a different effect on
your vehicle’s steering, handling and traction. Control-
ling your vehicle is one of the keys to successful off-road
driving, so always keep a firm grip on the steering wheel
and maintain a good driving posture. Avoid sudden
accelerations, turns or braking. In most cases there are no
road signs, posted speed limits or signal lights. Therefore
you will need to use your own good judgment on what is
safe and what is not. When on a trail, you should always
be looking ahead for surface obstacles and changes in
terrain. The key is to plan your future driving route while
remembering what you are currently driving over.
CAUTION!
Never park your vehicle over dry grass or other
combustible materials. The heat from your vehicle
exhaust system could cause a fire.
5
STARTING AND OPERATING 347
Page 353 of 572
Driving Up Hill
Once you have determined your ability to proceed and
have shifted into the appropriate gear, line your vehicle
up for the straightest possible run. Accelerate with an
easy constant throttle and apply more power as you start
up the hill. Do not race forward into a steep grade; the
abrupt change of grade could cause you to lose control. If
the front end begins to bounce, ease off the throttle
slightly to bring all four tires back on the ground. As you
approach the crest of the hill, ease off the throttle and
slowly proceed over the top. If the wheels start to slip as
you approach the crest of a hill, ease off the accelerator
and maintain headway by turning the steering wheel no
more than a 1/4 turn quickly back and forth. This will
provide a fresh#bite#into the surface and will usually
provide enough traction to complete the climb. If you do
not make it to the top, place the vehicle in REVERSE and
back straight down the grade using engine resistance
along with the vehicle brakes.
WARNING!
Never attempt to climb a hill at an angle or turn
around on a steep grade. Driving across an incline
increases the risk of a rollover, which may result in
severe injury.
Driving Down Hill
Before driving down a steep hill you need to determine if
it is too steep for a safe descent. What is the surface
traction? Is the grade too steep to maintain a slow
controlled descent? Are there obstacles? Is it a straight
descent? Is there plenty of distance at the base of the hill
to regain control if the vehicle descends to fast? If you feel
confident in your ability to proceed then make sure you
are in low (L Off-Road) with the 4WD LOCK engaged
5
STARTING AND OPERATING 351
Page 367 of 572
Electronic Roll Mitigation (ERM)
This system anticipates the potential for wheel lift by
monitoring the driver ’s steering wheel input and the
speed of the vehicle. When ERM determines that the rate
of change of the steering wheel angle and vehicles speed
are sufficient to potentially cause wheel lift, it applies the
brake of the appropriate wheel and may also reduce
engine power to lessen the chance that wheel lift will
occur. ERM will only intervene during very severe or
evasive driving maneuvers.
ERM can only reduce the chance of wheel lift occurring
during severe or evasive driving maneuvers. It can not
prevent wheel lift due to other factors such as road
conditions, leaving the roadway or striking objects or
other vehicles.
NOTE:Anytime the ESC system is in the “Full Off”
mode, ERM is disabled. Refer to “Electronic Stability
Control (ESC)” in this section for a complete explanation
of the available ESC modes.
WARNING!
Many factors, such as vehicle loading, road condi-
tions and driving conditions, influence the chance
that wheel lift or rollover may occur. ERM cannot
prevent all wheel lift or roll overs, especially those
that involve leaving the roadway or striking objects
or other vehicles. The capabilities of an ERM-
equipped vehicle must never be exploited in a reck-
less or dangerous manner which could jeopardize the
user’s safety or the safety of others.
5
STARTING AND OPERATING 365
Page 400 of 572
WARNING!
•Do not use a tire, wheel size or rating other than
that specified for your vehicle. Some combinations
of unapproved tires and wheels may change sus-
pension dimensions and performance characteris-
tics, resulting in changes to steering, handling, and
braking of your vehicle. This can cause unpredict-
able handling and stress to steering and suspen-
sion components. You could lose control and have
a collision resulting in serious injury or death. Use
only the tire and wheel sizes with load ratings
approved for your vehicle.
•Never use a tire with a smaller load index or
capacity, other than what was originally equipped
on your vehicle. Using a tire with a smaller load
index could result in tire overloading and failure.
You could lose control and have a collision.
(Continued)
WARNING!(Continued)
•Failure to equip your vehicle with tires having
adequate speed capability can result in sudden tire
failure and loss of vehicle control.
CAUTION!
Replacing original tires with tires of a different size
may result in false speedometer and odometer read-
ings.
TIRE CHAINS (TRACTION DEVICES)
Due to limited clearance, tire chains or traction devices
are not recommended.
CAUTION!
Damage to the vehicle may result if tire chains are used.
398 STARTING AND OPERATING
Page 442 of 572
WARNING!
To avoid the risk of forcing the vehicle off the jack,
do not tighten the lug nuts fully until the vehicle has
been lowered. Failure to follow this warning may
result in personal injury.
JACKING AND TIRE CHANGING
WARNING!
•Do not attempt to change a tire on the side of the
vehicle close to moving traffic. Pull far enough off
the road to avoid the danger of being hit when
operating the jack or changing the wheel.
(Continued)
WARNING!(Continued)
•Being under a jacked-up vehicle is dangerous. The
vehicle could slip off the jack and fall on you. You
could be crushed. Never put any part of your body
under a vehicle that is on a jack. If you need to get
under a raised vehicle, take it to a service center
where it can be raised on a lift.
•Never start or run the engine while the vehicle is
on a jack.
•The jack is designed to be used as a tool for
changing tires only. The jack should not be used to
lift the vehicle for service purposes. The vehicle
should be jacked on a firm level surface only.
Avoid ice or slippery areas.
440 WHAT TO DO IN EMERGENCIES
Page 443 of 572
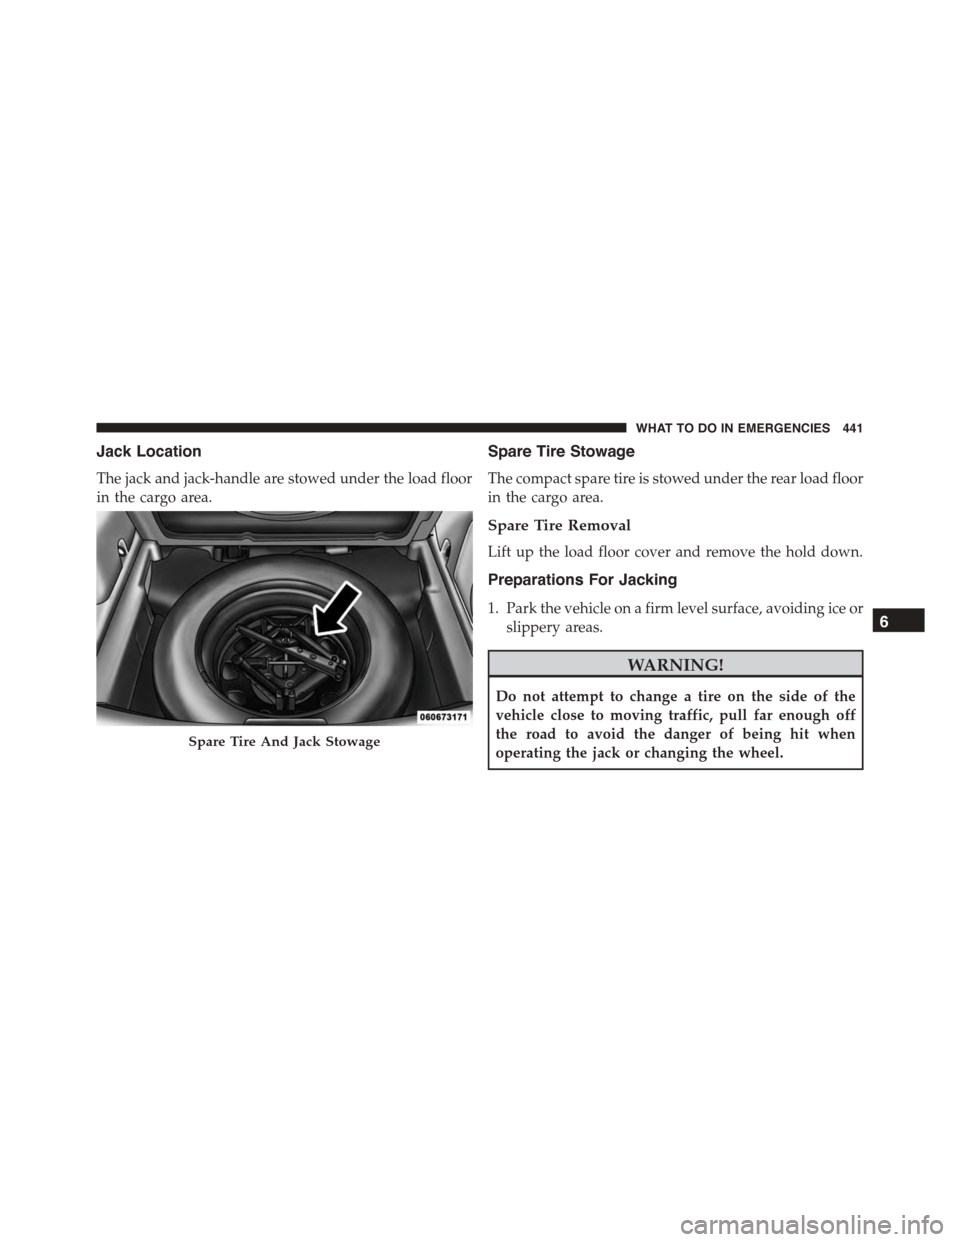
Jack Location
The jack and jack-handle are stowed under the load floor
in the cargo area.
Spare Tire Stowage
The compact spare tire is stowed under the rear load floor
in the cargo area.
Spare Tire Removal
Lift up the load floor cover and remove the hold down.
Preparations For Jacking
1. Park the vehicle on a firm level surface, avoiding ice or
slippery areas.
WARNING!
Do not attempt to change a tire on the side of the
vehicle close to moving traffic, pull far enough off
the road to avoid the danger of being hit when
operating the jack or changing the wheel.Spare Tire And Jack Stowage
6
WHAT TO DO IN EMERGENCIES 441
Page 448 of 572
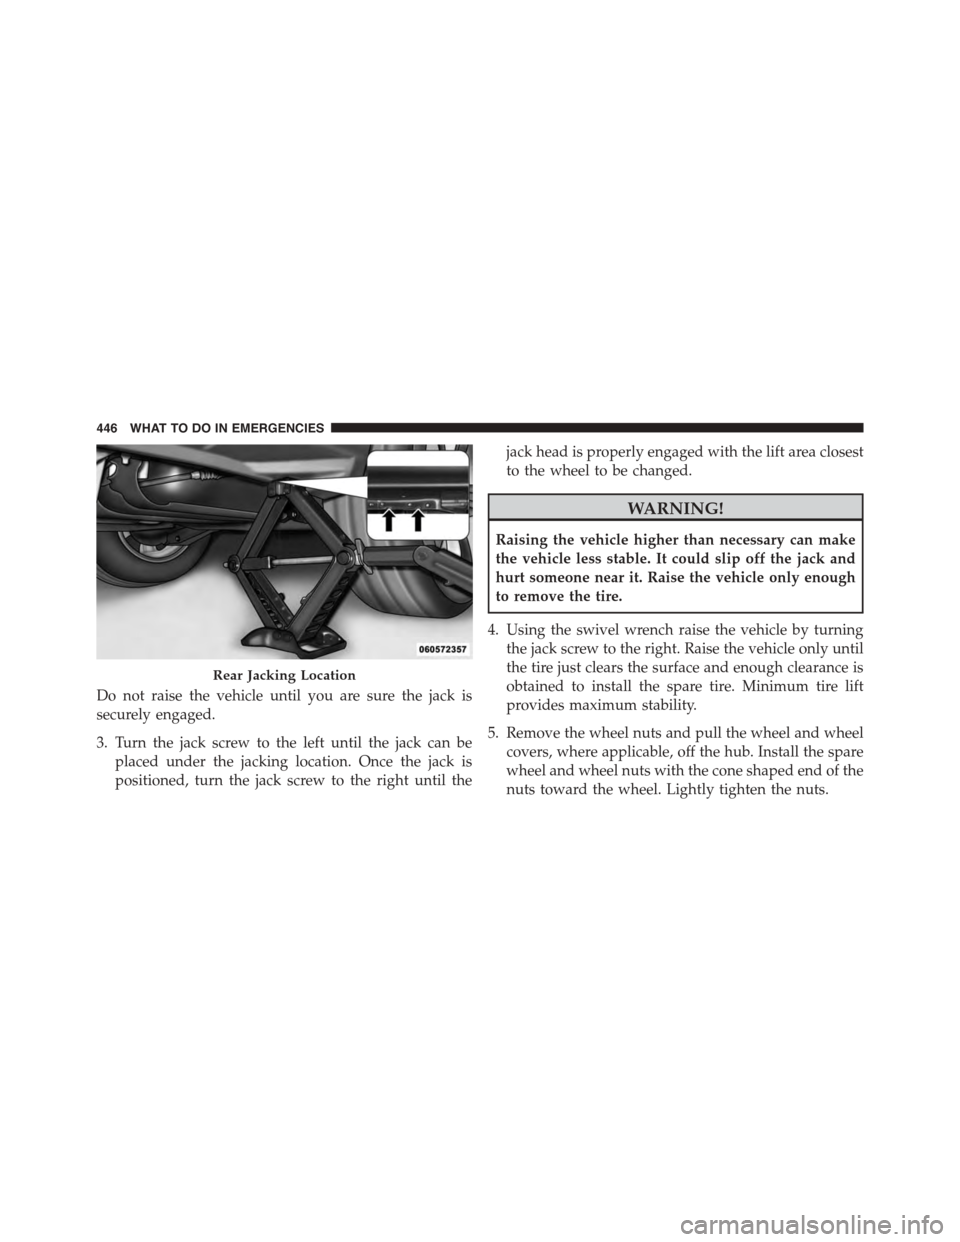
Do not raise the vehicle until you are sure the jack is
securely engaged.
3. Turn the jack screw to the left until the jack can be
placed under the jacking location. Once the jack is
positioned, turn the jack screw to the right until the
jack head is properly engaged with the lift area closest
to the wheel to be changed.
WARNING!
Raising the vehicle higher than necessary can make
the vehicle less stable. It could slip off the jack and
hurt someone near it. Raise the vehicle only enough
to remove the tire.
4. Using the swivel wrench raise the vehicle by turning
the jack screw to the right. Raise the vehicle only until
the tire just clears the surface and enough clearance is
obtained to install the spare tire. Minimum tire lift
provides maximum stability.
5. Remove the wheel nuts and pull the wheel and wheel
covers, where applicable, off the hub. Install the spare
wheel and wheel nuts with the cone shaped end of the
nuts toward the wheel. Lightly tighten the nuts.
Rear Jacking Location
446 WHAT TO DO IN EMERGENCIES
Page 457 of 572
WARNING!(Continued)
•Keep Tire Service Kit away from open flames or
heat source.
•A loose Tire Service Kit thrown forward in a
collision or hard stop could endanger the occupants
of the vehicle. Always stow the Tire Service Kit in
the place provided. Failure to follow these warn-
ings can result in injuries that are serious or fatal to
you, your passengers, and others around you.
•Take care not to allow the contents of Tire Service
Kit to come in contact with hair, eyes, or clothing.
Tire Service Kit is harmful if inhaled, swallowed,
or absorbed through the skin. It causes skin, eye,
and respiratory irritation. Flush immediately with
plenty of water if there is any contact with eyes or
skin. Change clothing as soon as possible, if there
is any contact with clothing.
(Continued)
WARNING!(Continued)
•Tire Service Kit Sealant solution contains latex. In
case of an allergic reaction or rash, consult a phy-
sician immediately. Keep Tire Service Kit out of
reach of children. If swallowed, rinse mouth imme-
diately with plenty of water and drink plenty of
water. Do not induce vomiting! Consult a physician
immediately.
Sealing A Tire With Tire Service Kit
(A) Whenever You Stop To Use Tire Service Kit:
1. Pull over to a safe location and turn on the vehicle’s
Hazard Warning flashers.
2. Verify that the valve stem (on the wheel with the
deflated tire) is in a position that is near to the ground.
This will allow the Tire Service Kit Hoses (6) and (7) to
reach the valve stem and keep the Tire Service Kit flat
6
WHAT TO DO IN EMERGENCIES 455