steering JEEP PATRIOT 2015 1.G Owner's Manual
[x] Cancel search | Manufacturer: JEEP, Model Year: 2015, Model line: PATRIOT, Model: JEEP PATRIOT 2015 1.GPages: 132, PDF Size: 19.28 MB
Page 71 of 132
ELECTRONIC VEHICLE INFORMATION CENTER
(EVIC)
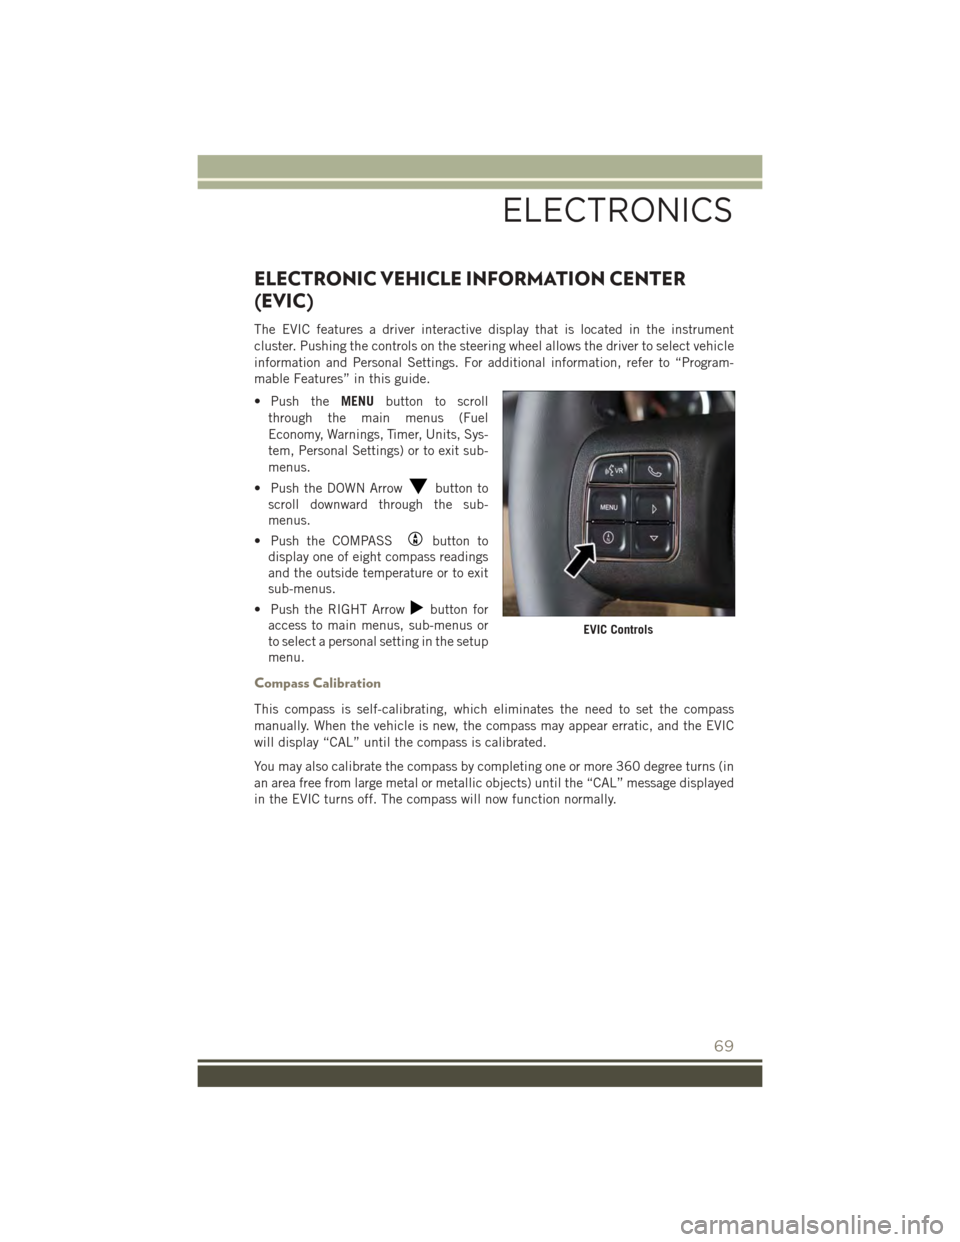
The EVIC features a driver interactive display that is located in the instrument
cluster. Pushing the controls on the steering wheel allows the driver to select vehicle
information and Personal Settings. For additional information, refer to “Program-
mable Features” in this guide.
• Push theMENUbutton to scroll
through the main menus (Fuel
Economy, Warnings, Timer, Units, Sys-
tem, Personal Settings) or to exit sub-
menus.
• Push the DOWN Arrowbutton to
scroll downward through the sub-
menus.
• Push the COMPASSbutton to
display one of eight compass readings
and the outside temperature or to exit
sub-menus.
• Push the RIGHT Arrowbutton for
access to main menus, sub-menus or
to select a personal setting in the setup
menu.
Compass Calibration
This compass is self-calibrating, which eliminates the need to set the compass
manually. When the vehicle is new, the compass may appear erratic, and the EVIC
will display “CAL” until the compass is calibrated.
You may also calibrate the compass by completing one or more 360 degree turns (in
an area free from large metal or metallic objects) until the “CAL” message displayed
in the EVIC turns off. The compass will now function normally.
EVIC Controls
ELECTRONICS
69
Page 101 of 132
TOWING A DISABLED VEHICLE
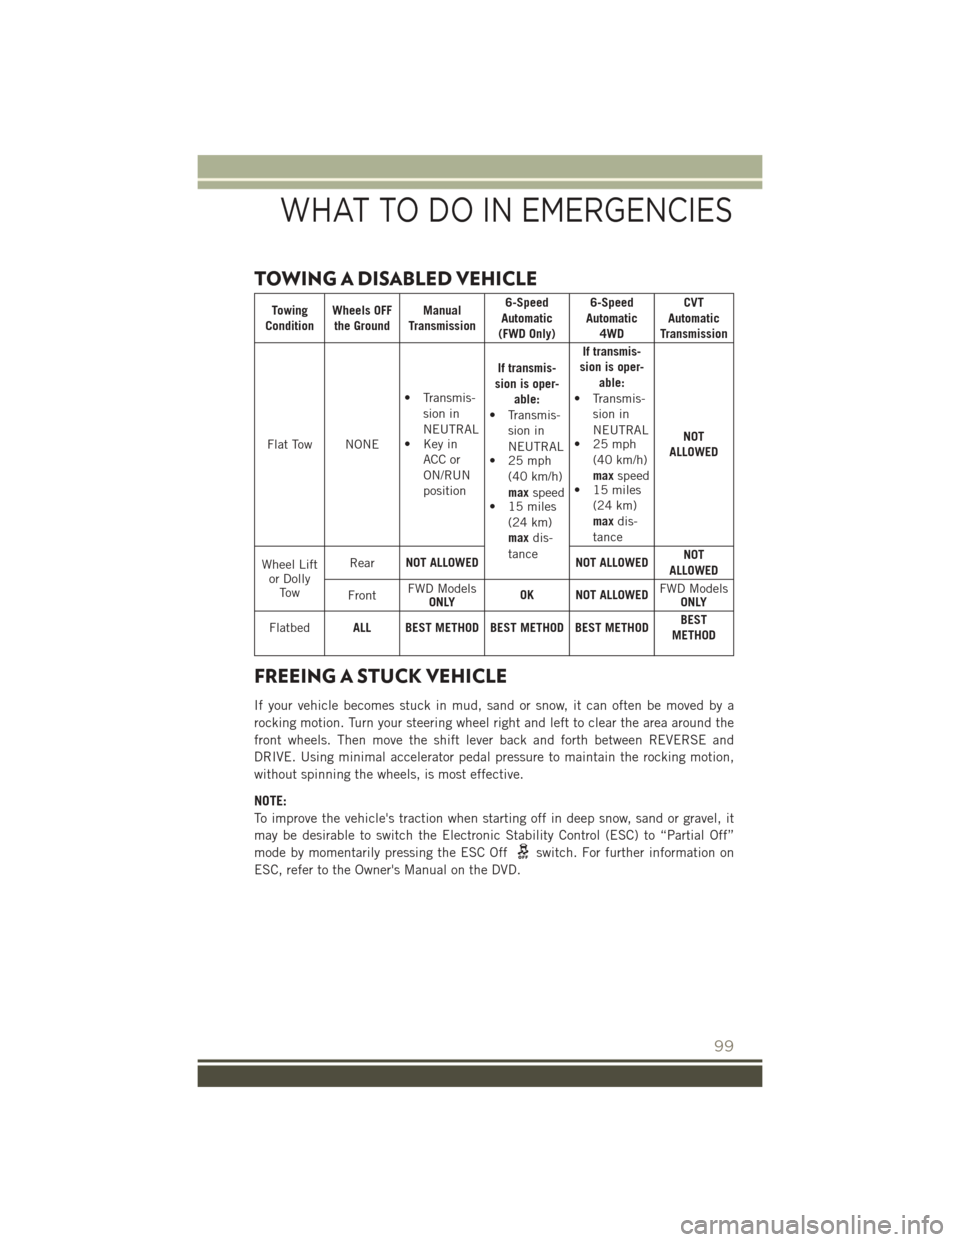
To w i n gConditionWheels OFFthe GroundManualTransmission
6-SpeedAutomatic(FWD Only)
6-SpeedAutomatic4WD
CVTAutomaticTransmission
Flat Tow NONE
• Transmis-sion in
NEUTRAL• Key inACC orON/RUNposition
If transmis-sion is oper-able:• Transmis-sion in
NEUTRAL•25mph(40 km/h)
maxspeed• 15 miles(24 km)maxdis-
tance
If transmis-sion is oper-able:• Transmis-sion in
NEUTRAL•25mph(40 km/h)
maxspeed• 15 miles(24 km)maxdis-
tance
NOTALLOWED
Wheel Liftor DollyTow
RearNOT ALLOWEDNOT ALLOWEDNOTALLOWED
FrontFWD ModelsONLYOK NOT ALLOWEDFWD ModelsONLY
FlatbedALL BEST METHOD BEST METHOD BEST METHODBESTMETHOD
FREEING A STUCK VEHICLE
If your vehicle becomes stuck in mud, sand or snow, it can often be moved by a
rocking motion. Turn your steering wheel right and left to clear the area around the
front wheels. Then move the shift lever back and forth between REVERSE and
DRIVE. Using minimal accelerator pedal pressure to maintain the rocking motion,
without spinning the wheels, is most effective.
NOTE:
To improve the vehicle's traction when starting off in deep snow, sand or gravel, it
may be desirable to switch the Electronic Stability Control (ESC) to “Partial Off”
mode by momentarily pressing the ESC Offswitch. For further information on
ESC, refer to the Owner's Manual on the DVD.
WHAT TO DO IN EMERGENCIES
99
Page 105 of 132
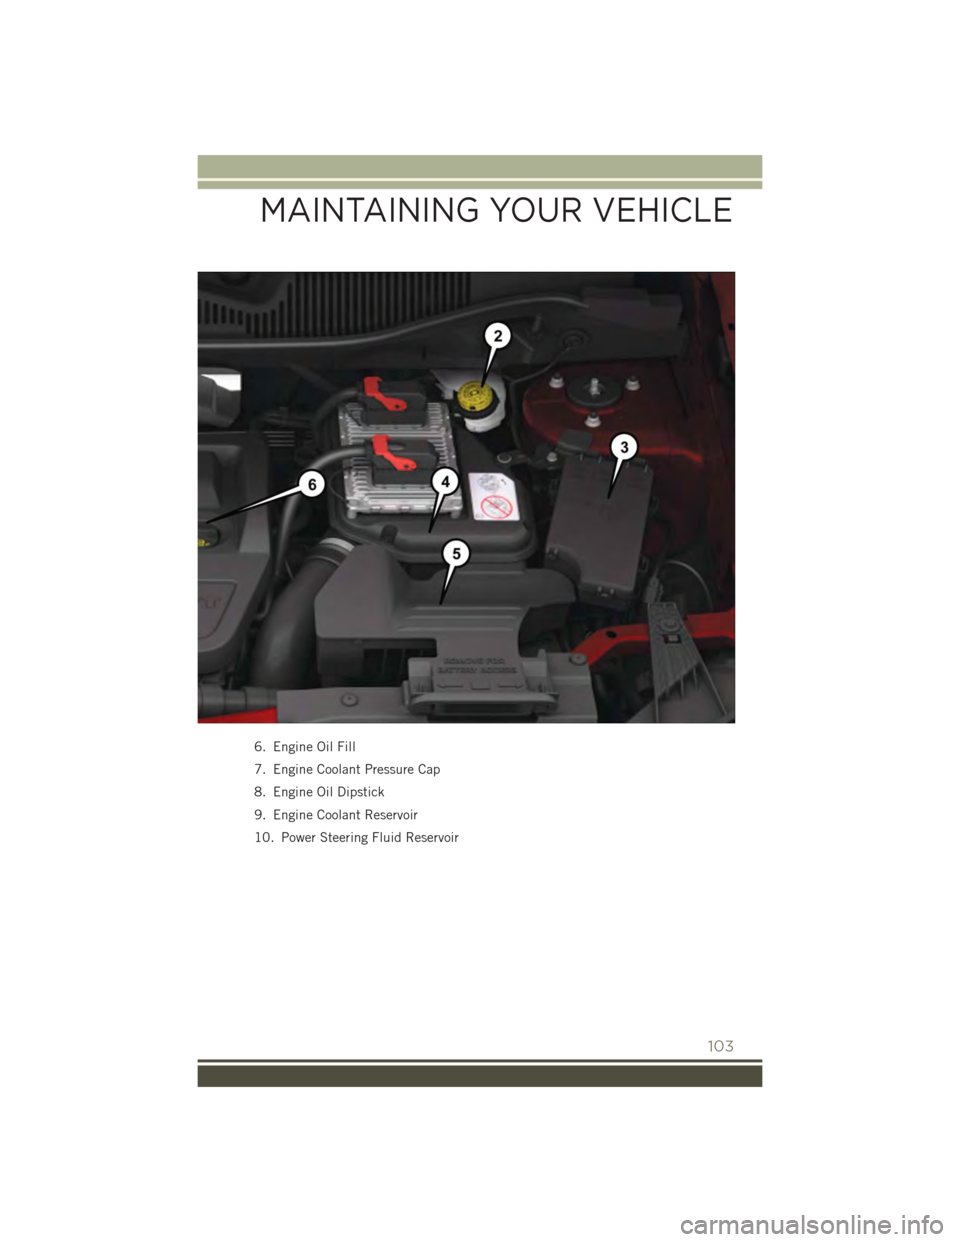
6. Engine Oil Fill
7. Engine Coolant Pressure Cap
8. Engine Oil Dipstick
9. Engine Coolant Reservoir
10. Power Steering Fluid Reservoir
MAINTAINING YOUR VEHICLE
103
Page 107 of 132
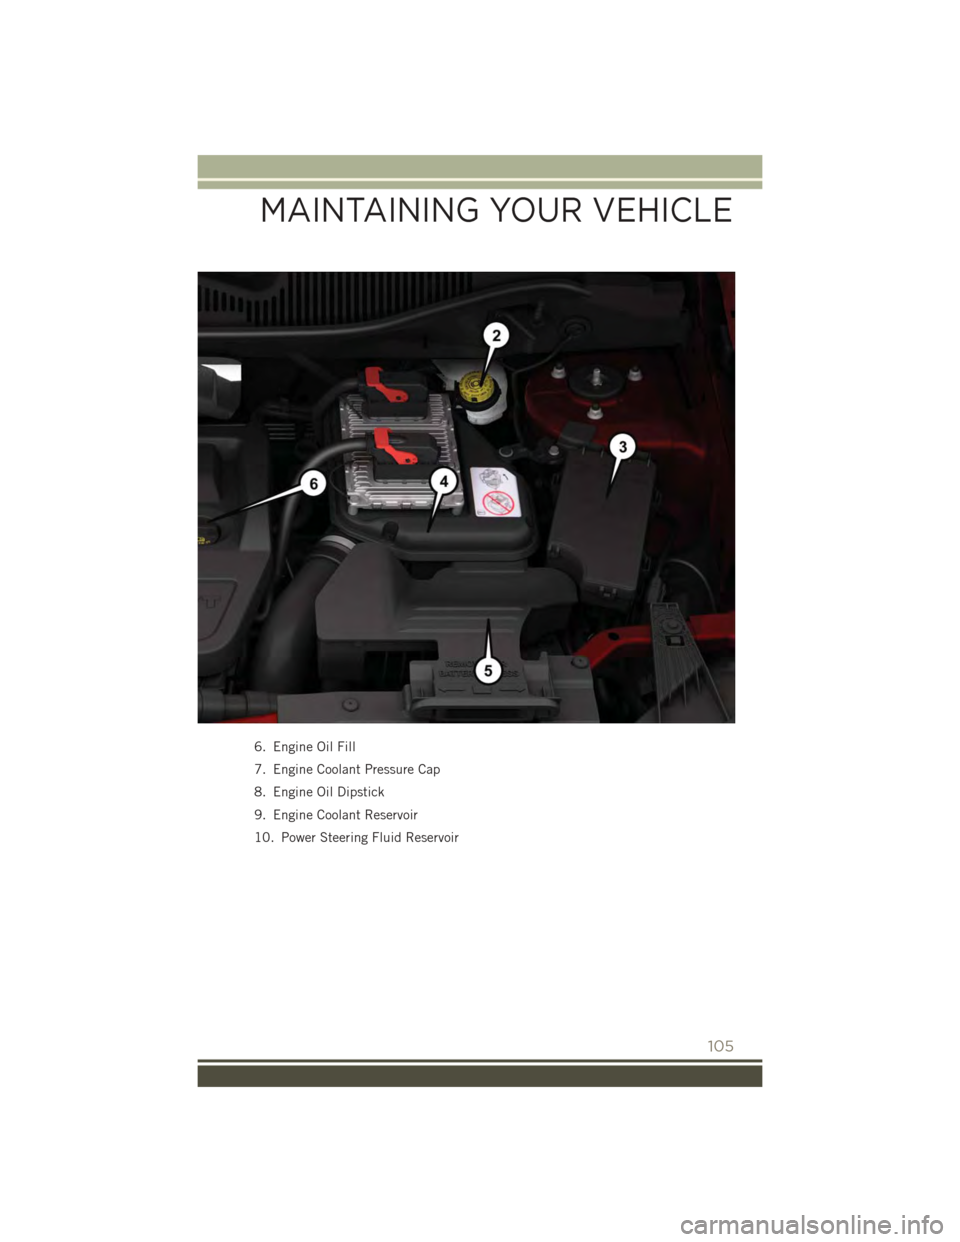
6. Engine Oil Fill
7. Engine Coolant Pressure Cap
8. Engine Oil Dipstick
9. Engine Coolant Reservoir
10. Power Steering Fluid Reservoir
MAINTAINING YOUR VEHICLE
105
Page 109 of 132
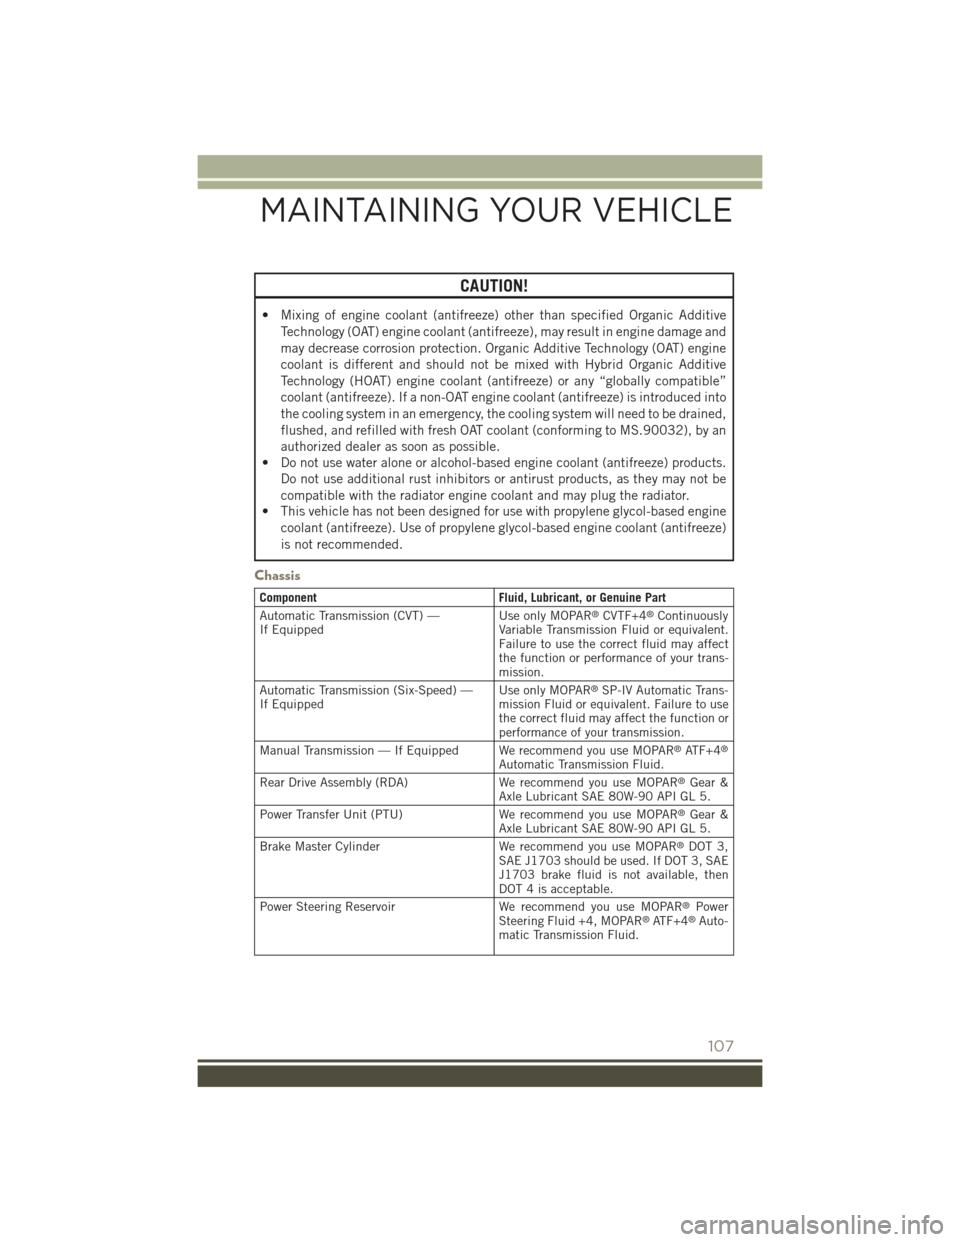
CAUTION!
• Mixing of engine coolant (antifreeze) other than specified Organic Additive
Technology (OAT) engine coolant (antifreeze), may result in engine damage and
may decrease corrosion protection. Organic Additive Technology (OAT) engine
coolant is different and should not be mixed with Hybrid Organic Additive
Technology (HOAT) engine coolant (antifreeze) or any “globally compatible”
coolant (antifreeze). If a non-OAT engine coolant (antifreeze) is introduced into
the cooling system in an emergency, the cooling system will need to be drained,
flushed, and refilled with fresh OAT coolant (conforming to MS.90032), by an
authorized dealer as soon as possible.
• Do not use water alone or alcohol-based engine coolant (antifreeze) products.
Do not use additional rust inhibitors or antirust products, as they may not be
compatible with the radiator engine coolant and may plug the radiator.
• This vehicle has not been designed for use with propylene glycol-based engine
coolant (antifreeze). Use of propylene glycol-based engine coolant (antifreeze)
is not recommended.
Chassis
ComponentFluid, Lubricant, or Genuine Part
Automatic Transmission (CVT) —If EquippedUse only MOPAR®CVTF+4®ContinuouslyVariable Transmission Fluid or equivalent.Failure to use the correct fluid may affectthe function or performance of your trans-mission.
Automatic Transmission (Six-Speed) —If EquippedUse only MOPAR®SP-IV Automatic Trans-mission Fluid or equivalent. Failure to usethe correct fluid may affect the function orperformance of your transmission.
Manual Transmission — If Equipped We recommend you use MOPAR®AT F + 4®
Automatic Transmission Fluid.
Rear Drive Assembly (RDA)We recommend you use MOPAR®Gear &Axle Lubricant SAE 80W-90 API GL 5.
Power Transfer Unit (PTU)We recommend you use MOPAR®Gear &Axle Lubricant SAE 80W-90 API GL 5.
Brake Master CylinderWe recommend you use MOPAR®DOT 3,SAE J1703 should be used. If DOT 3, SAEJ1703 brake fluid is not available, thenDOT 4 is acceptable.
Power Steering Reservoir We recommend you use MOPAR®PowerSteering Fluid +4, MOPAR®AT F + 4®Auto-matic Transmission Fluid.
MAINTAINING YOUR VEHICLE
107
Page 111 of 132
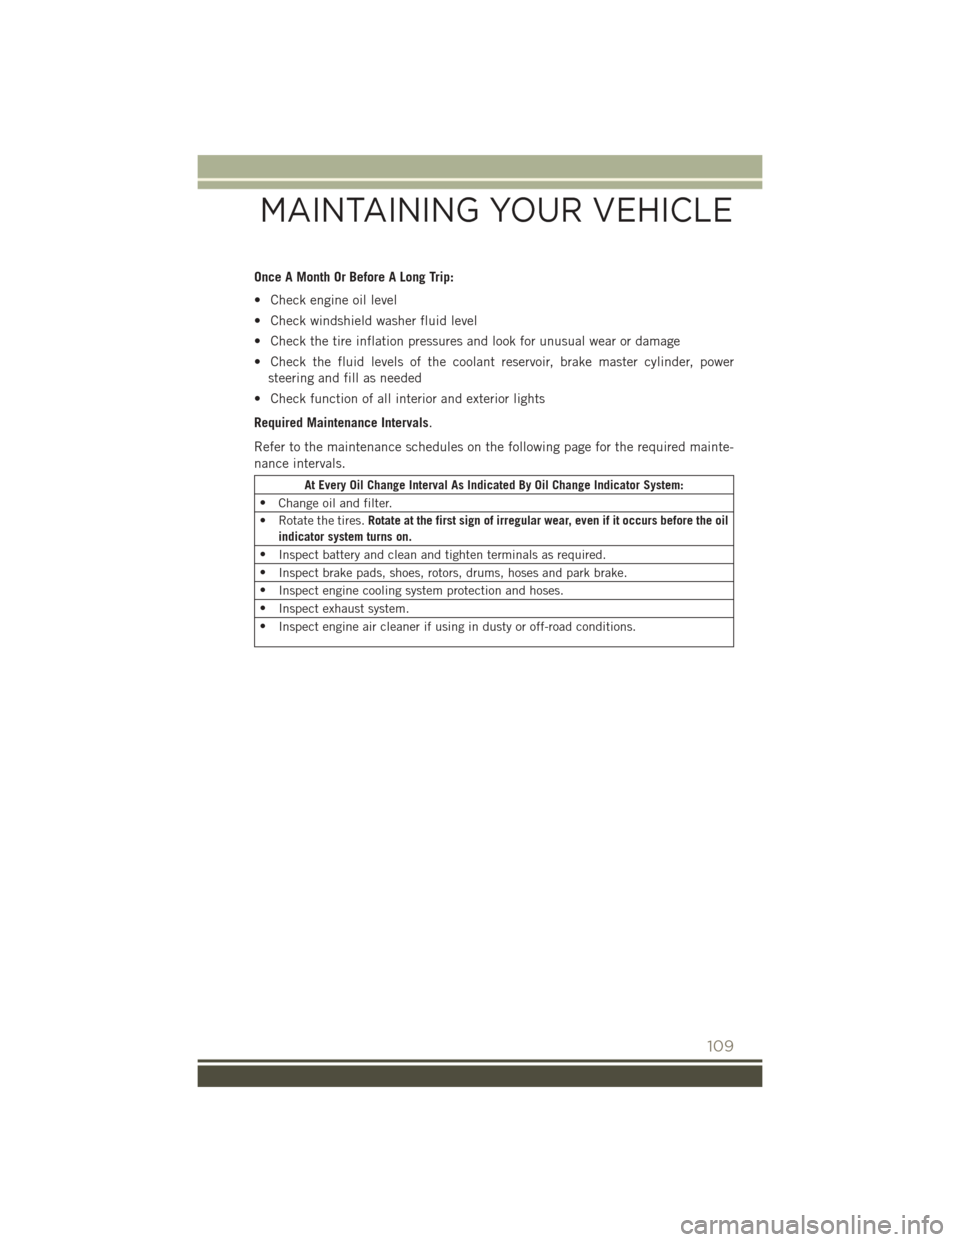
Once A Month Or Before A Long Trip:
• Check engine oil level
• Check windshield washer fluid level
• Check the tire inflation pressures and look for unusual wear or damage
• Check the fluid levels of the coolant reservoir, brake master cylinder, power
steering and fill as needed
• Check function of all interior and exterior lights
Required Maintenance Intervals.
Refer to the maintenance schedules on the following page for the required mainte-
nance intervals.
At Every Oil Change Interval As Indicated By Oil Change Indicator System:
•Change oil and filter.
• Rotate the tires.Rotate at the first sign of irregular wear, even if it occurs before the oil
indicator system turns on.
•Inspect battery and clean and tighten terminals as required.
•Inspect brake pads, shoes, rotors, drums, hoses and park brake.
•Inspect engine cooling system protection and hoses.
•Inspect exhaust system.
•Inspect engine air cleaner if using in dusty or off-road conditions.
MAINTAINING YOUR VEHICLE
109
Page 115 of 132
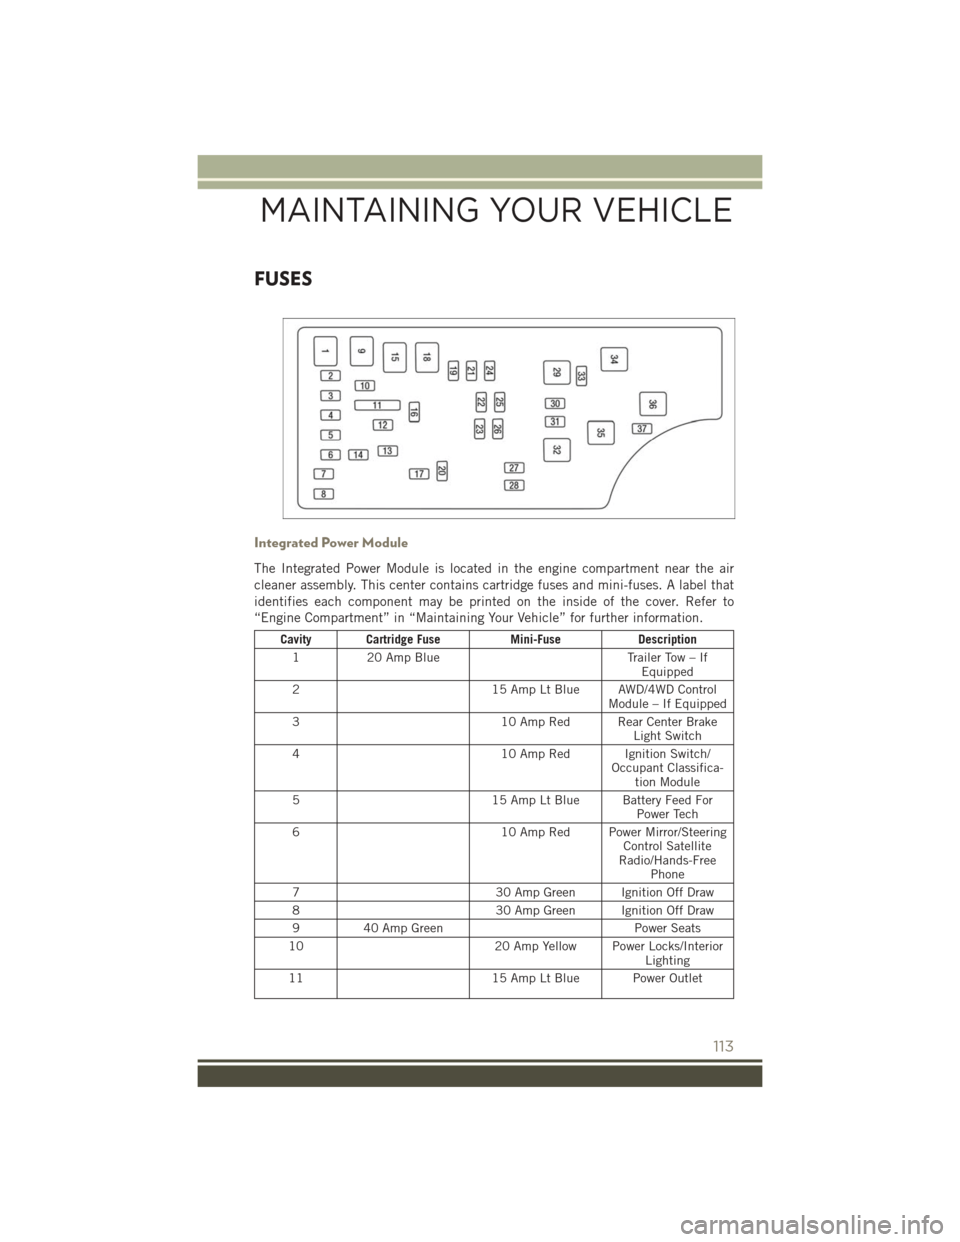
FUSES
Integrated Power Module
The Integrated Power Module is located in the engine compartment near the air
cleaner assembly. This center contains cartridge fuses and mini-fuses. A label that
identifies each component may be printed on the inside of the cover. Refer to
“Engine Compartment” in “Maintaining Your Vehicle” for further information.
Cavity Cartridge FuseMini-FuseDescription
120 Amp BlueTrailer Tow – IfEquipped
215 Amp Lt Blue AWD/4WD ControlModule – If Equipped
310 Amp Red Rear Center BrakeLight Switch
410 Amp Red Ignition Switch/Occupant Classifica-tion Module
515 Amp Lt Blue Battery Feed ForPower Tech
610 Amp Red Power Mirror/SteeringControl SatelliteRadio/Hands-FreePhone
730 Amp Green Ignition Off Draw
830 Amp Green Ignition Off Draw
940 Amp GreenPower Seats
1020 Amp Yellow Power Locks/InteriorLighting
1115 Amp Lt Blue Power Outlet
MAINTAINING YOUR VEHICLE
113
Page 117 of 132
CAUTION!
• When installing the IPM cover, it is important to ensure the cover is properly
positioned and fully latched. Failure to do so may allow water to get into the
IPM, and possibly result in an electrical system failure.
•When replacing a blown fuse, it is important to use only a fuse having the correct
amperage rating. The use of a fuse with a rating other than indicated may result
in a dangerous electrical system overload. If a properly rated fuse continues to
blow, it indicates a problem in the circuit that must be corrected.
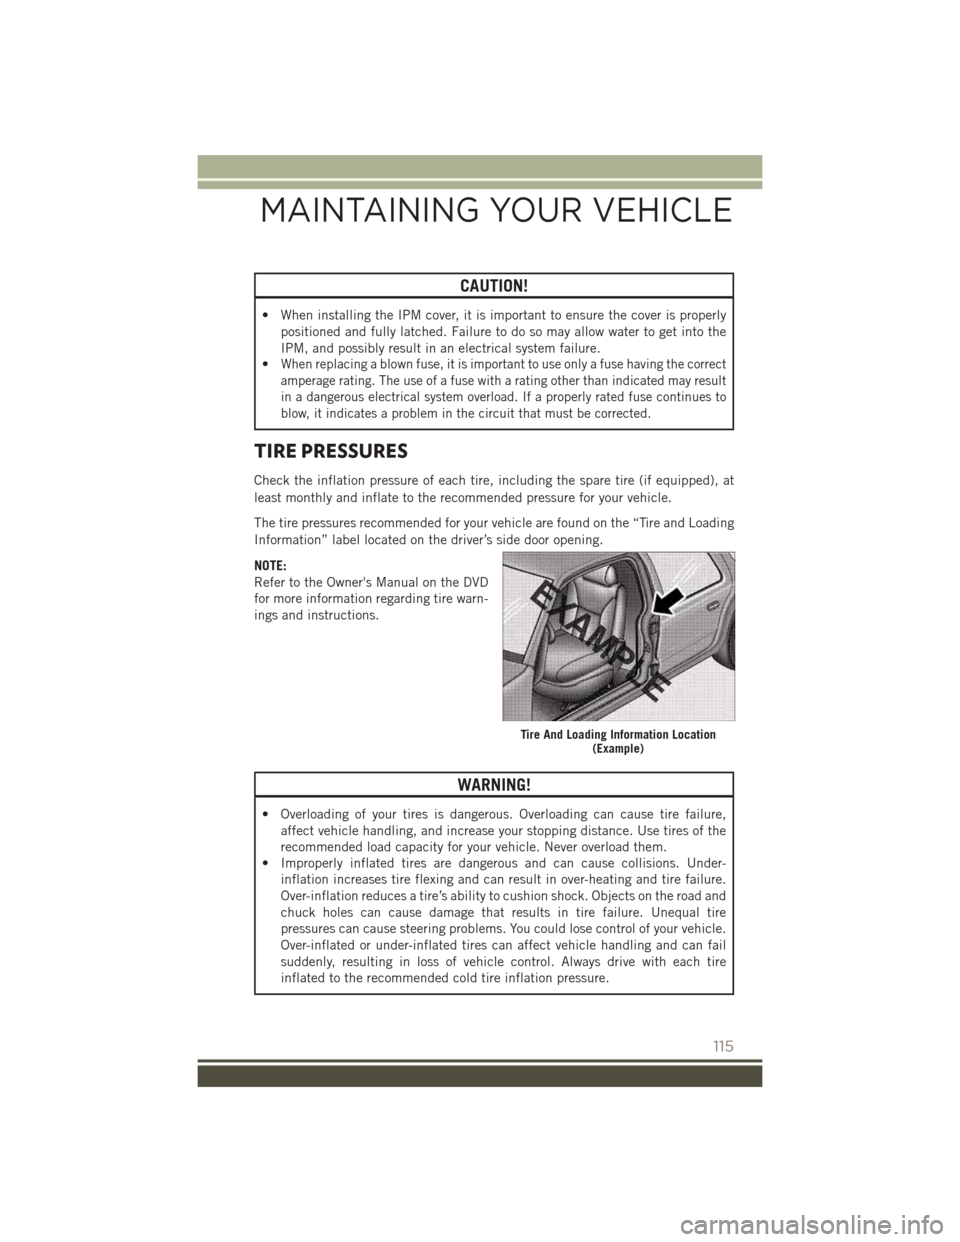
TIRE PRESSURES
Check the inflation pressure of each tire, including the spare tire (if equipped), at
least monthly and inflate to the recommended pressure for your vehicle.
The tire pressures recommended for your vehicle are found on the “Tire and Loading
Information” label located on the driver’s side door opening.
NOTE:
Refer to the Owner's Manual on the DVD
for more information regarding tire warn-
ings and instructions.
WARNING!
• Overloading of your tires is dangerous. Overloading can cause tire failure,
affect vehicle handling, and increase your stopping distance. Use tires of the
recommended load capacity for your vehicle. Never overload them.
• Improperly inflated tires are dangerous and can cause collisions. Under-
inflation increases tire flexing and can result in over-heating and tire failure.
Over-inflation reduces a tire’s ability to cushion shock. Objects on the road and
chuck holes can cause damage that results in tire failure. Unequal tire
pressures can cause steering problems. You could lose control of your vehicle.
Over-inflated or under-inflated tires can affect vehicle handling and can fail
suddenly, resulting in loss of vehicle control. Always drive with each tire
inflated to the recommended cold tire inflation pressure.
Tire And Loading Information Location(Example)
MAINTAINING YOUR VEHICLE
115
Page 129 of 132
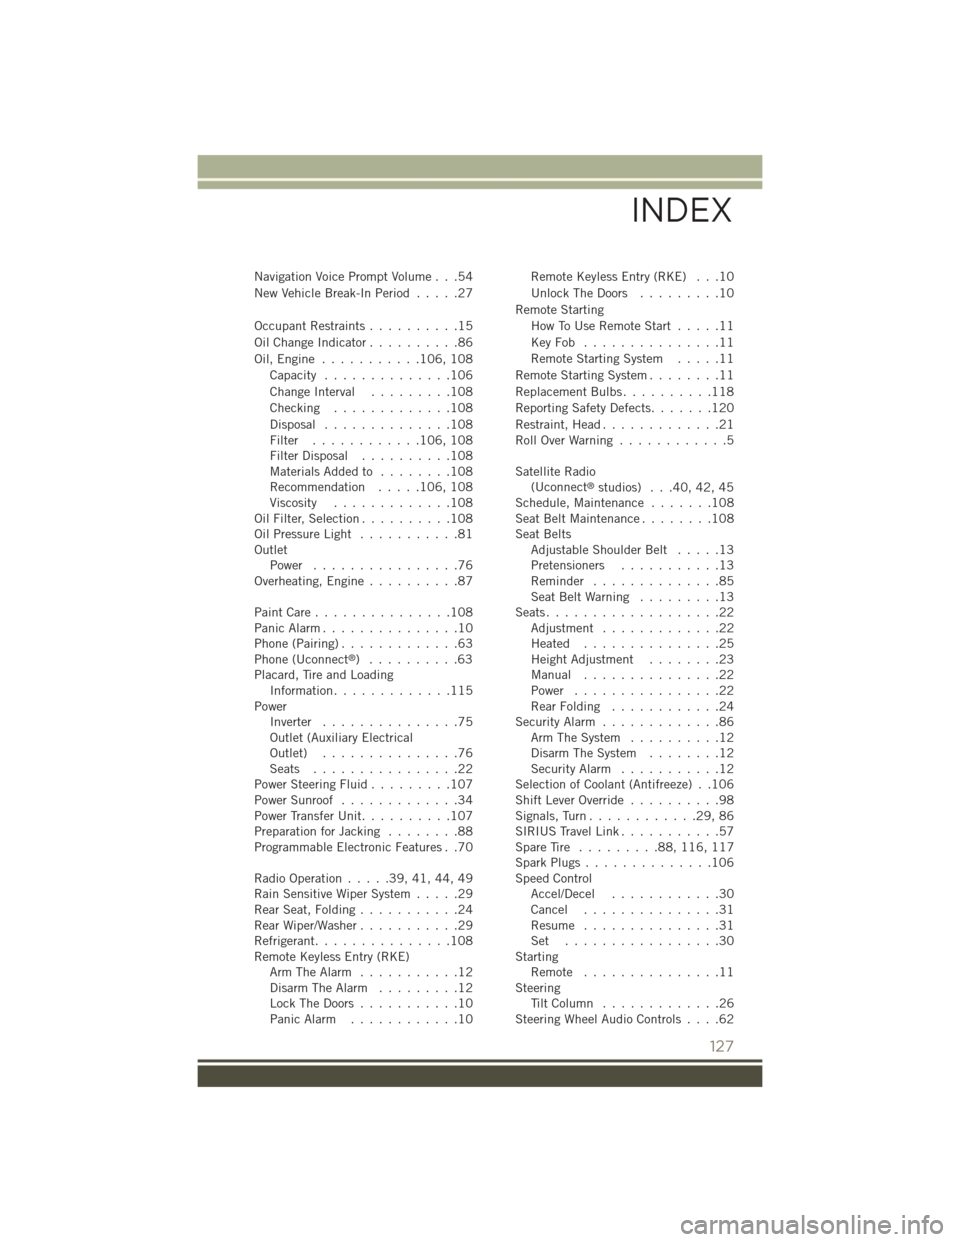
Navigation Voice Prompt Volume . . .54
New Vehicle Break-In Period.....27
Occupant Restraints..........15
Oil Change Indicator . . . . . . . . . .86
Oil, Engine . . . . . . . . . . .106, 108
Capacity..............106
Change Interval.........108
Checking.............108
Disposal..............108Filter............106, 108Filter Disposal..........108Materials Added to........108Recommendation.....106, 108Viscosity.............108Oil Filter, Selection..........108Oil Pressure Light...........81OutletPower................76Overheating, Engine..........87
Paint Care . . . . . . . . . . . . . . .108Panic Alarm...............10Phone (Pairing).............63Phone (Uconnect®)..........63Placard, Tire and LoadingInformation.............115PowerInverter...............75Outlet (Auxiliary ElectricalOutlet)...............76Seats . . . . . . . . . . . . . . . .22Power Steering Fluid.........107Power Sunroof.............34Power Transfer Unit..........107Preparation for Jacking........88Programmable Electronic Features . .70
Radio Operation.....39,41,44,49Rain Sensitive Wiper System.....29Rear Seat, Folding...........24Rear Wiper/Washer...........29Refrigerant...............108Remote Keyless Entry (RKE)Arm The Alarm...........12Disarm The Alarm.........12Lock The Doors...........10Panic Alarm............10
Remote Keyless Entry (RKE) . . .10
Unlock The Doors.........10
Remote Starting
How To Use Remote Start.....11
Key Fob . . . . . . . . . . . . . . .11
Remote Starting System.....11
Remote Starting System........11
Replacement Bulbs..........118
Reporting Safety Defects.......120
Restraint, Head.............21Roll Over Warning . . . . . . . . . . . .5
Satellite Radio(Uconnect®studios) . . .40, 42, 45Schedule, Maintenance . . . . . . .108Seat Belt Maintenance . . . . . . . .108Seat BeltsAdjustable Shoulder Belt.....13Pretensioners...........13Reminder . . . . . . . . . . . . . .85Seat Belt Warning . . . . . . . . .13Seats...................22Adjustment . . . . . . . . . . . . .22Heated...............25Height Adjustment........23Manual . . . . . . . . . . . . . . .22Power................22Rear Folding............24Security Alarm.............86Arm The System..........12Disarm The System........12Security Alarm...........12Selection of Coolant (Antifreeze) . .106Shift Lever Override..........98Signals, Turn............29,86SIRIUS Travel Link...........57Spare Tire . . . . . . . . .88,116, 117Spark Plugs . . . . . . . . . . . . . .106Speed ControlAccel/Decel............30Cancel...............31Resume...............31Set . . . . . . . . . . . . . . . . .30StartingRemote . . . . . . . . . . . . . . .11SteeringTi l t C o l u m n . . . . . . . . . . . . . 2 6Steering Wheel Audio Controls....62
INDEX
127