set clock JEEP PATRIOT 2015 1.G User Guide
[x] Cancel search | Manufacturer: JEEP, Model Year: 2015, Model line: PATRIOT, Model: JEEP PATRIOT 2015 1.GPages: 132, PDF Size: 19.28 MB
Page 40 of 132
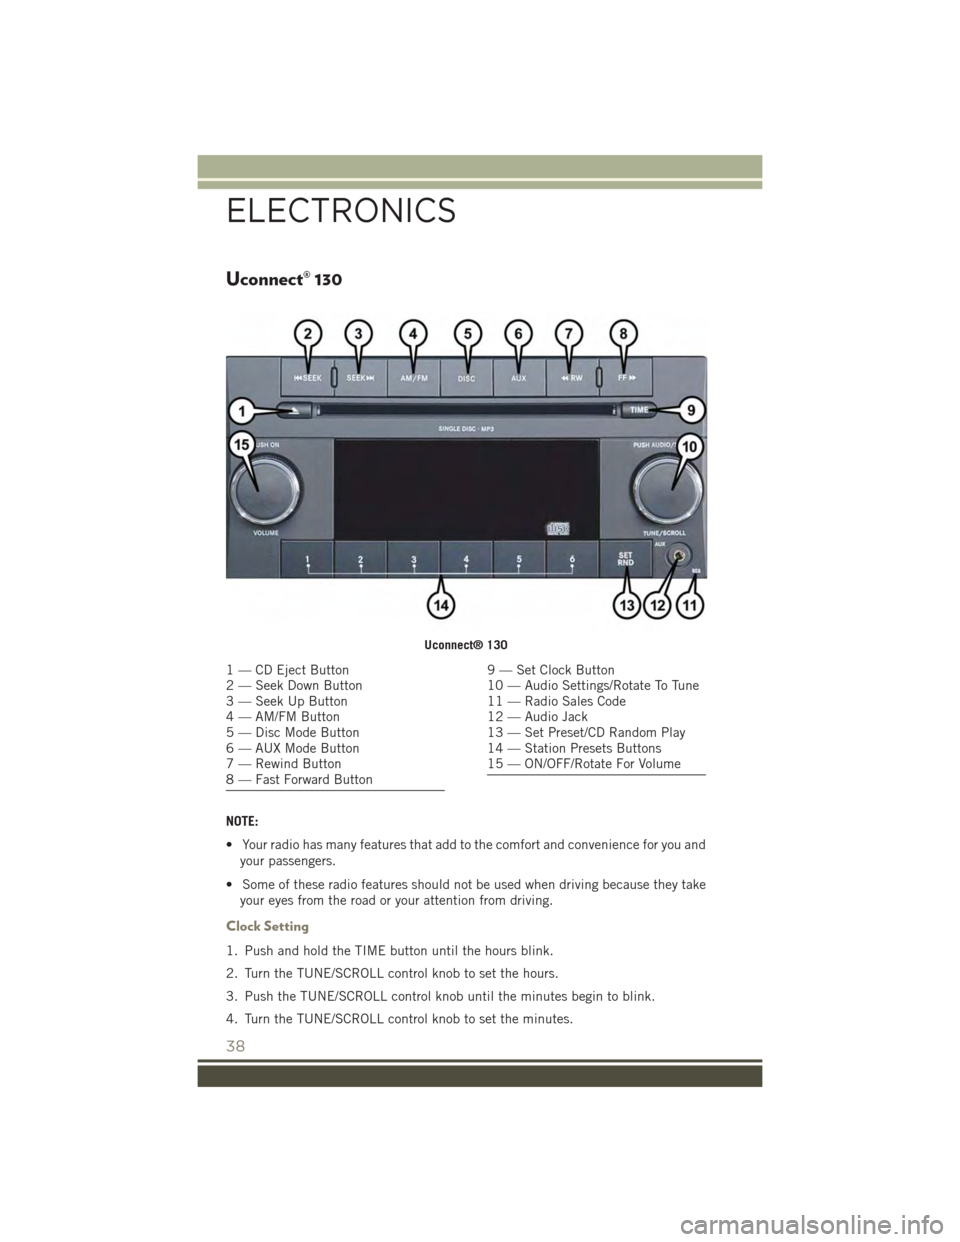
Uconnect® 130
NOTE:
• Your radio has many features that add to the comfort and convenience for you and
your passengers.
• Some of these radio features should not be used when driving because they take
your eyes from the road or your attention from driving.
Clock Setting
1. Push and hold the TIME button until the hours blink.
2. Turn the TUNE/SCROLL control knob to set the hours.
3. Push the TUNE/SCROLL control knob until the minutes begin to blink.
4. Turn the TUNE/SCROLL control knob to set the minutes.
Uconnect® 130
1 — CD Eject Button2 — Seek Down Button3 — Seek Up Button4 — AM/FM Button5 — Disc Mode Button6 — AUX Mode Button7 — Rewind Button8 — Fast Forward Button
9 — Set Clock Button10 — Audio Settings/Rotate To Tune11 — Radio Sales Code12 — Audio Jack13 — Set Preset/CD Random Play14 — Station Presets Buttons15 — ON/OFF/Rotate For Volume
ELECTRONICS
38
Page 42 of 132
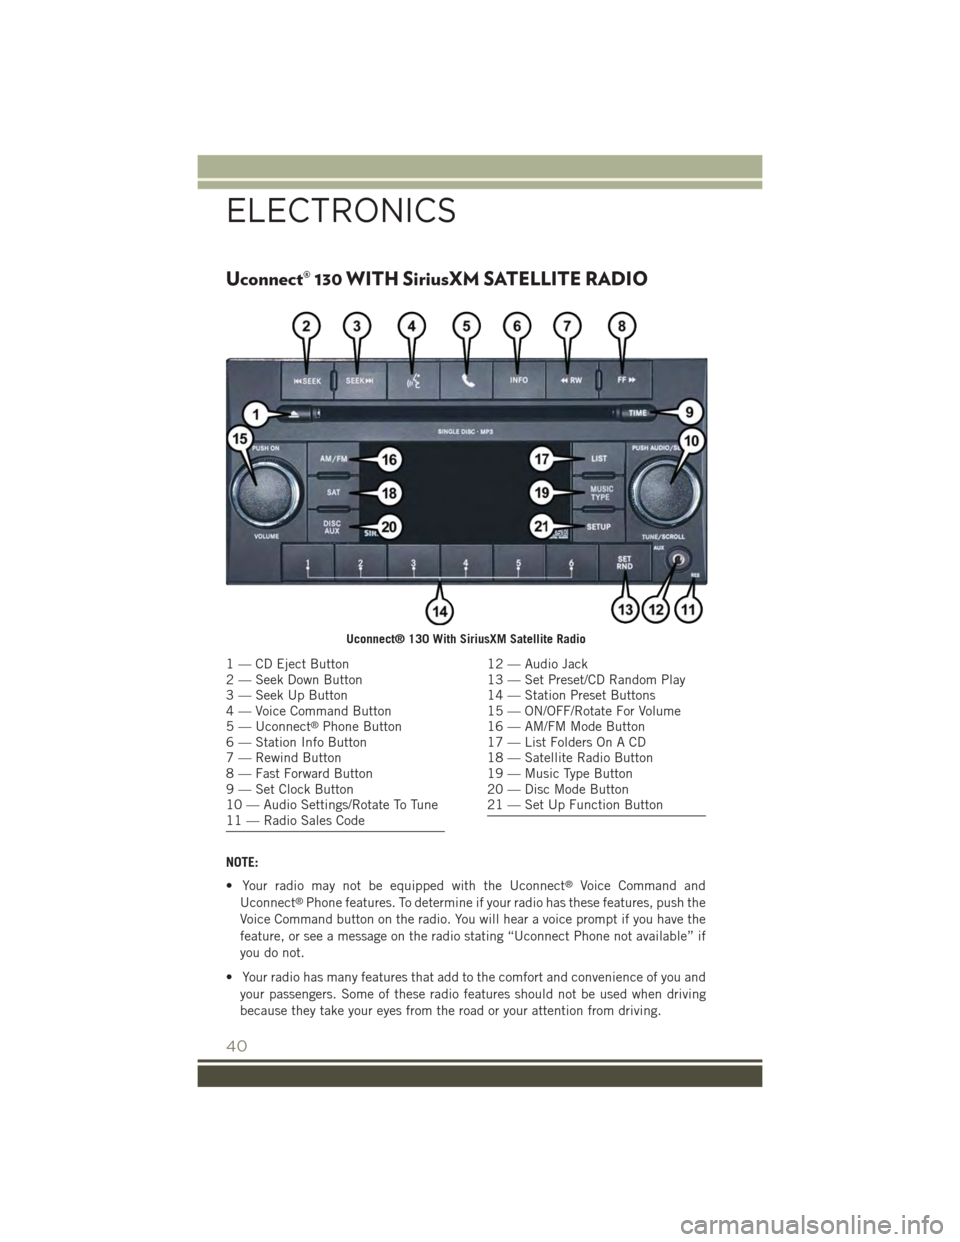
Uconnect® 130 WITH SiriusXM SATELLITE RADIO
NOTE:
• Your radio may not be equipped with the Uconnect®Voice Command and
Uconnect®Phone features. To determine if your radio has these features, push the
Voice Command button on the radio. You will hear a voice prompt if you have the
feature, or see a message on the radio stating “Uconnect Phone not available” if
you do not.
• Your radio has many features that add to the comfort and convenience of you and
your passengers. Some of these radio features should not be used when driving
because they take your eyes from the road or your attention from driving.
Uconnect® 130 With SiriusXM Satellite Radio
1 — CD Eject Button2 — Seek Down Button3 — Seek Up Button4 — Voice Command Button5 — Uconnect®Phone Button6 — Station Info Button7 — Rewind Button8 — Fast Forward Button9 — Set Clock Button10 — Audio Settings/Rotate To Tune11 — Radio Sales Code
12 — Audio Jack13 — Set Preset/CD Random Play14 — Station Preset Buttons15 — ON/OFF/Rotate For Volume16 — AM/FM Mode Button17 — List Folders On A CD18 — Satellite Radio Button19 — Music Type Button20 — Disc Mode Button21 — Set Up Function Button
ELECTRONICS
40
Page 43 of 132
Clock Setting
1. Push and hold the TIME button until the hours blink.
2. Turn the TUNE/SCROLL control knob to set the hours.
3. Push the TUNE/SCROLL control knob until the minutes begin to blink.
4. Turn the TUNE/SCROLL control knob to set the minutes.
5. Push the TUNE/SCROLL control knob to save the changes.
6. Push any button/knob or wait five seconds to exit.
Equalizer, Balance And Fade
1. Push the TUNE/SCROLL control knob and “BASS” will display.
2. Rotate the TUNE/SCROLL control knob to select the desired setting.
3. Continue pushing the TUNE/SCROLL control knob to display and set “MID
RANGE,” “TREBLE,” “BALANCE” and “FADE.”
Radio Operation
Seek Up/Down Buttons
• Push to seek through radio stations in AM, FM, or SAT bands.
• Hold either button to bypass stations without stopping.
Store Radio Presets
• Push the SET/RND or SET (depending on the radio) button once and SET 1 will
show in the display. Then select a preset button (1–6).
• A second station may be added to each push button. Push the SET/RND or SET
(depending on the radio) button twice and SET 2 will show in the display. Then
select a preset button (1–6).
Music Type
NOTE:
The Music Type function only operates when in FM mode.
• Push the MUSIC TYPE button to activate this mode. Push the MUSIC TYPE button
again or turn the TUNE/SCROLL control knob to select the desired music type
(Adult Hits, Country, Jazz, Oldies, Rock, etc.).
• When a music type is chosen and the Music type is displayed, Push either SEEK
button and the radio will only search for stations with the selected music type.
SETUP Button
• Pushing the SETUP button allows you to select between items that are available
in that particular mode.
• Turn the TUNE/SCROLL control knob to scroll through the entries. Push the
AUDIO/SELECT button to select an entry and make changes.
ELECTRONICS
41
Page 45 of 132
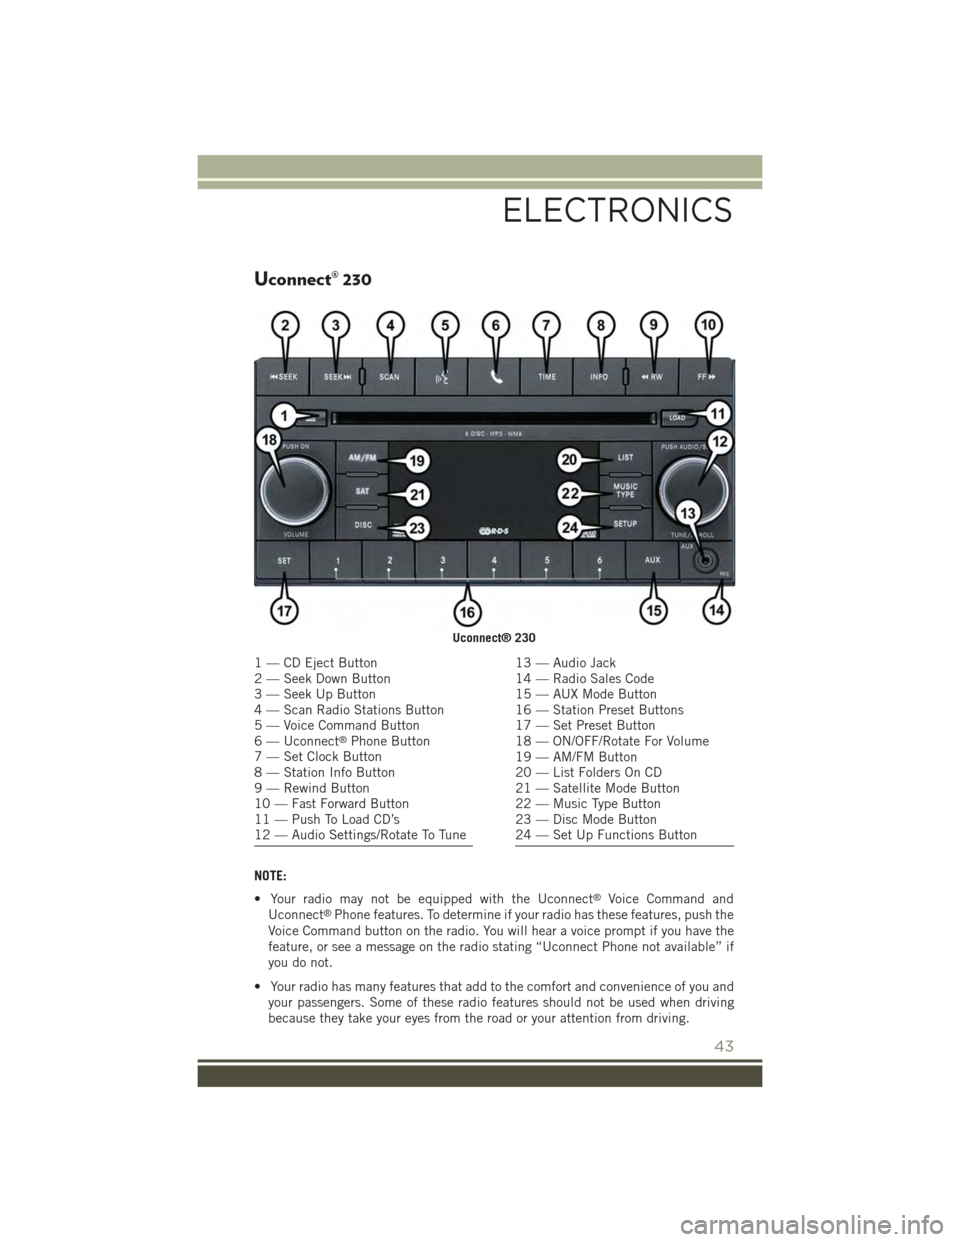
Uconnect® 230
NOTE:
• Your radio may not be equipped with the Uconnect®Voice Command and
Uconnect®Phone features. To determine if your radio has these features, push the
Voice Command button on the radio. You will hear a voice prompt if you have the
feature, or see a message on the radio stating “Uconnect Phone not available” if
you do not.
• Your radio has many features that add to the comfort and convenience of you and
your passengers. Some of these radio features should not be used when driving
because they take your eyes from the road or your attention from driving.
Uconnect® 230
1 — CD Eject Button2 — Seek Down Button3 — Seek Up Button4 — Scan Radio Stations Button5 — Voice Command Button6 — Uconnect®Phone Button7 — Set Clock Button8 — Station Info Button9 — Rewind Button10 — Fast Forward Button11 — Push To Load CD’s12 — Audio Settings/Rotate To Tune
13 — Audio Jack14 — Radio Sales Code15 — AUX Mode Button16 — Station Preset Buttons17 — Set Preset Button18 — ON/OFF/Rotate For Volume19 — AM/FM Button20 — List Folders On CD21 — Satellite Mode Button22 — Music Type Button23 — Disc Mode Button24 — Set Up Functions Button
ELECTRONICS
43
Page 46 of 132
Clock Setting
1. Push and hold the TIME button until the hours blink.
2. Turn the TUNE/SCROLL control knob to set the hours.
3. Push the TUNE/SCROLL control knob until the minutes begin to blink.
4. Turn the TUNE/SCROLL control knob to set the minutes.
5. Push the TUNE/SCROLL control knob to save the changes.
6. Push any button/knob or wait five seconds to exit.
Equalizer, Balance And Fade
1. Push the TUNE/SCROLL control knob and “BASS” will display.
2. Rotate the TUNE/SCROLL control knob to select the desired setting.
3. Continue pushing the TUNE/SCROLL control knob to display and set “MID
RANGE,” “TREBLE,” “BALANCE” and “FADE.”
Radio Operation
Seek Up/Down Buttons
• Push to seek through radio stations in AM, FM, or SAT bands.
• Hold either button to bypass stations without stopping.
Store Radio Presets
• Push the SET button once and SET 1 will show in the display. Then select button
(1–6).
• A second station may be added to each push button. Push the SET button twice
and SET 2 will show in the display. Then select button (1–6).
Music Type
NOTE:
The Music Type function only operates when in FM mode.
• Push the MUSIC TYPE button to activate this mode. Push the MUSIC TYPE button
again or turn the TUNE/SCROLL control knob to select the desired music type
(Adult Hits, Country, Jazz, Oldies, Rock, etc.).
• Once a music type is chosen and the music type is displayed, push the SEEK
button and the radio will only search for stations with the selected music type.
SETUP Button
• Pushing the SETUP button allows you to select between items that are available
in that particular mode.
• Turn the TUNE/SCROLL control knob to scroll through the entries. Push the
AUDIO/SELECT button to select an entry and make changes.
ELECTRONICS
44
Page 49 of 132
NOTE:
• Your radio may not be equipped with the Uconnect®Voice Command and
Uconnect®Phone features. To determine if your radio has these features, push the
Voice Command button on the radio. You will hear a voice prompt if you have the
feature, or see a message on the radio stating “Uconnect Phone not available” if
you do not.
• Your radio has many features that add to the comfort and convenience of you and
your passengers. Some of these radio features should not be used when driving
because they take your eyes from the road or your attention from driving.
Clock Setting
1. Turn the radio on, then press the screen where the time is displayed.
2. Press the “User Clock” button on the touchscreen or the time display (Navigation
radio only).
3. To adjust the hours, press either the “Hour Forward” or “Hour Backward” button
on the touchscreen.
4. To adjust the minutes, press either the “Minute Forward” or “Minute Backward”
button on the touchscreen.
5. To save the new time setting, press the screen where the word “Save” is displayed.
Menu
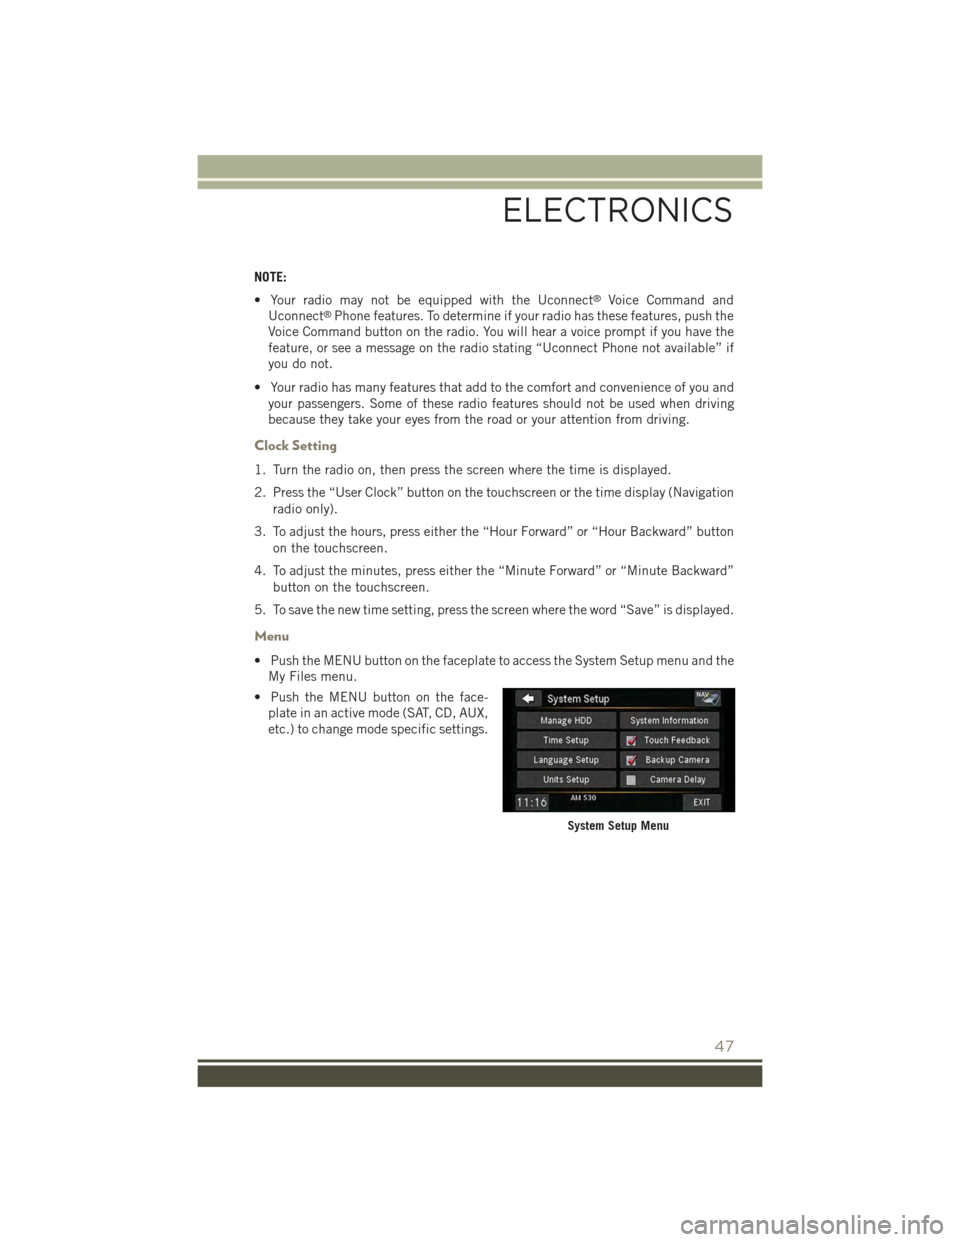
• Push the MENU button on the faceplate to access the System Setup menu and the
My Files menu.
• Push the MENU button on the face-
plate in an active mode (SAT, CD, AUX,
etc.) to change mode specific settings.
System Setup Menu
ELECTRONICS
47
Page 124 of 132
FREQUENTLY ASKED QUESTIONS
GETTING STARTED
How do I install my LATCH Equipped Child Seat? pg. 18
How do my heated seats operate? pg. 25
ELECTRONICS
Which radio is in my vehicle?
• Uconnect®130 pg. 38
• Uconnect®130 with Satellite Radio pg. 40
• Uconnect®230 pg. 43
• Uconnect®430/430N pg. 46
How do I activate the Audio Jack?
• Uconnect®130 pg. 42
• Uconnect®130 with Satellite Radio pg. 42
• Uconnect®230 pg. 42
• Uconnect®430/430N pg. 51
How do I set the clock on my radio?
• Uconnect®130 pg. 44
• Uconnect®130 with Satellite Radio pg. 44
• Uconnect®230 pg. 44
• Uconnect®430/430N pg. 47
How do I use the Navigation feature? pg. 54
How do I pair my cell phone via Bluetooth®with the Uconnect®Hands-Free Voice
Activation System? pg. 63
How do I configure my Universal Garage Door Opener (HomeLink®)? pg. 72
UTILITY
How do I know how much I can tow with my Jeep Patriot? pg. 79
WHAT TO DO IN EMERGENCIES
What do I do if my TPMS warning light is blinking? pg. 82
How do I change a flat tire? pg. 88
How do I Jump-Start my vehicle? pg. 95
FAQ (How To?)
122
Page 126 of 132
Adding Engine Coolant
(Antifreeze).............108
Adding Washer Fluid.........108
Air Bag
Advanced Front Air Bag . . . . . .14
Advance Front Air Bag . . . . . .14
Air Bags . . . . . . . . . . . . . . .14
Air Bag Warning Light . . . . . . .14
Front Air Bag . . . . . . . . . . . .14
Rollover...............14Side Air bags . . . . . . . . . . . .16Side Impact Curtains.......16Side Impacts . . . . . . . . . . . .14Air bag Light . . . . . . . . . . . . . .81Air Cleaner, Engine (Engine Air CleanerFilter)................108Air Conditioner Maintenance....108Air Conditioning............33Air Conditioning Refrigerant.....108Air Conditioning System.......108Air Recirculation..........33,34AlarmArm The System..........12Disarm The System........12Vehicle Security Alarm......12Alarm, Panic..............10Alarm (Security Alarm)......12,86Antifreeze (Engine Coolant) . .106, 108Capacities............106Disposal . . . . . . . . . . . . . .108Anti-Lock Warning Light........81Appearance Care...........108Assistance Towing...........81Audio Jack........39,42,45,51Audio Settings........39,41,44Audio Systems (Radio).........38Automatic Temperature Control(ATC) . . . . . . . . . . . . . . . . .33Automatic Transmission........32Fluid Type . . . . . . . . . . . .107Overheating............88Axle Fluid . . . . . . . . . . . . . . .107
Battery..............95,108Bluetooth®
Connecting To A Particular MobilePhone Or Audio Device AfterPairing................63
Body Mechanism Lubrication....108
Brake Fluid . . . . . . . . . . . . . .107
Brakes . . . . . . . . . . . . . . . . .108
Brake System.............108
Master Cylinder.........108
Warning Light...........83
Break-In Recommendations, New
Vehicle................27
Bulb Replacement..........118
Bulbs, Light . . . . . . . . . . . . . .118
Calibration, Compass.........69Capacities, Antifreeze (EngineCoolant)..............106Capacities, Fluid...........106Caps, FillerOil (Engine)............108Car Washes . . . . . . . . . . . . . .108CD (Compact Disc)Player.........39,42,45,50Change Oil Indicator..........86Changing A Flat Tire . . . . . . . . . .88Charging System Light.........81Child Restraint.............17Child RestraintsLower Anchors And Tethers ForChildren . . . . . . . . . . . . . .17CleaningWheels..............108Windshield Wiper Blades....108Climate Control.............32Clock Setting.......38,41,44,47Cluster Warning/Indicator LightsAnti-Lock Brake (ABS) Light . . .81Brake Warning Light........83Charging System Light......81Electronic Stability Control (ESC)Activation/Malfunction IndicatorLight . . . . . . . . . . . . . . . .85Electronic Throttle Control (ETC)Indicator Light...........82Front Fog Light Indicator.....86High Beam Indicator.......86Instrument Cluster WarningLights . . . . . . . . . . . . . . . .81Malfunction Indicator Light(MIL) . . . . . . . . . . . . . . . . .85Oil Pressure Warning Light....81
INDEX
124