radio JEEP PATRIOT 2017 1.G Owners Manual
[x] Cancel search | Manufacturer: JEEP, Model Year: 2017, Model line: PATRIOT, Model: JEEP PATRIOT 2017 1.GPages: 421, PDF Size: 3.4 MB
Page 14 of 421
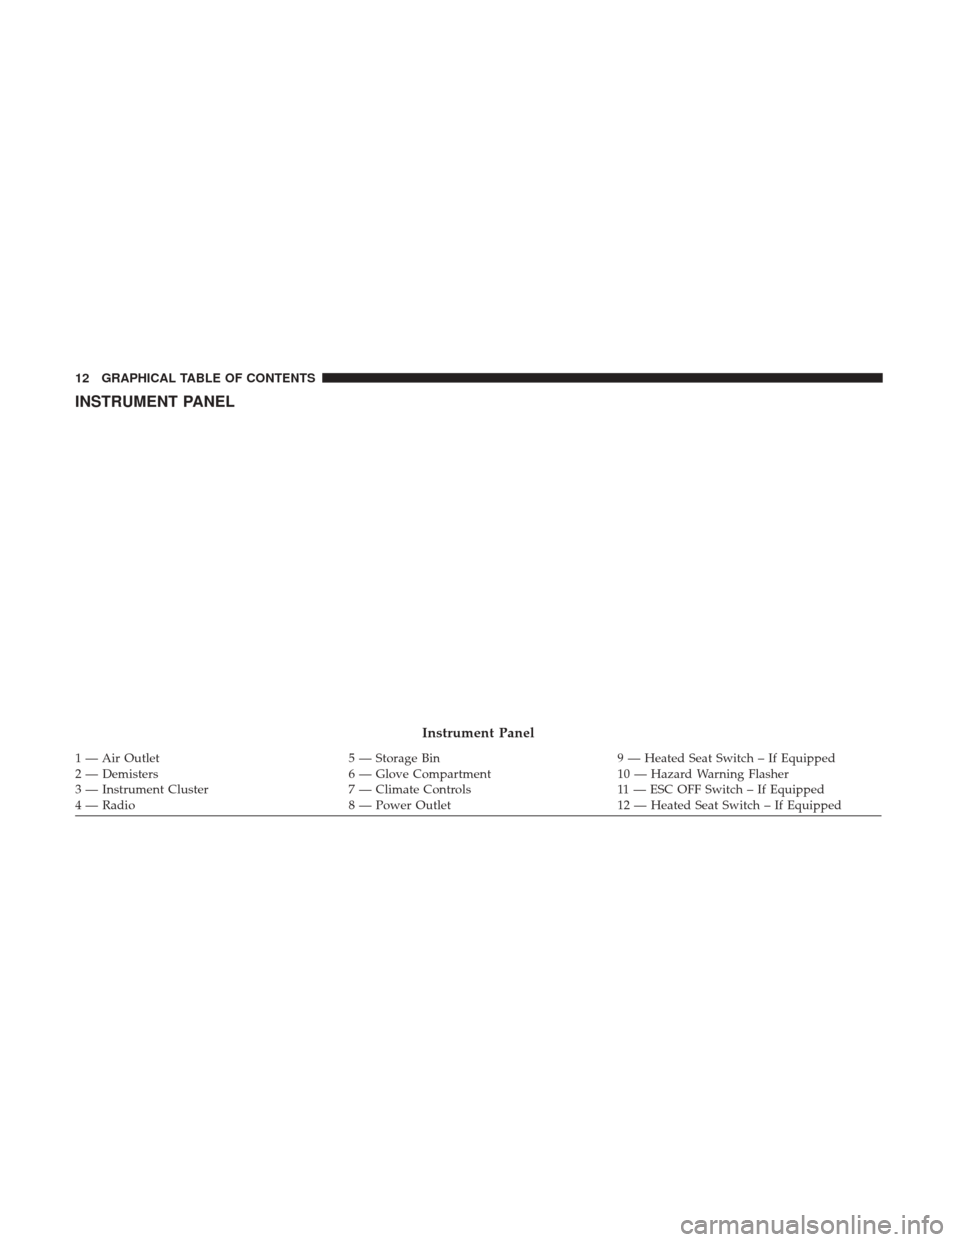
INSTRUMENT PANEL
Instrument Panel
1 — Air Outlet5 — Storage Bin9 — Heated Seat Switch – If Equipped
2 — Demisters 6 — Glove Compartment10 — Hazard Warning Flasher
3 — Instrument Cluster 7 — Climate Controls11 — ESC OFF Switch – If Equipped
4 — Radio 8 — Power Outlet12 — Heated Seat Switch – If Equipped
12 GRAPHICAL TABLE OF CONTENTS
Page 15 of 421
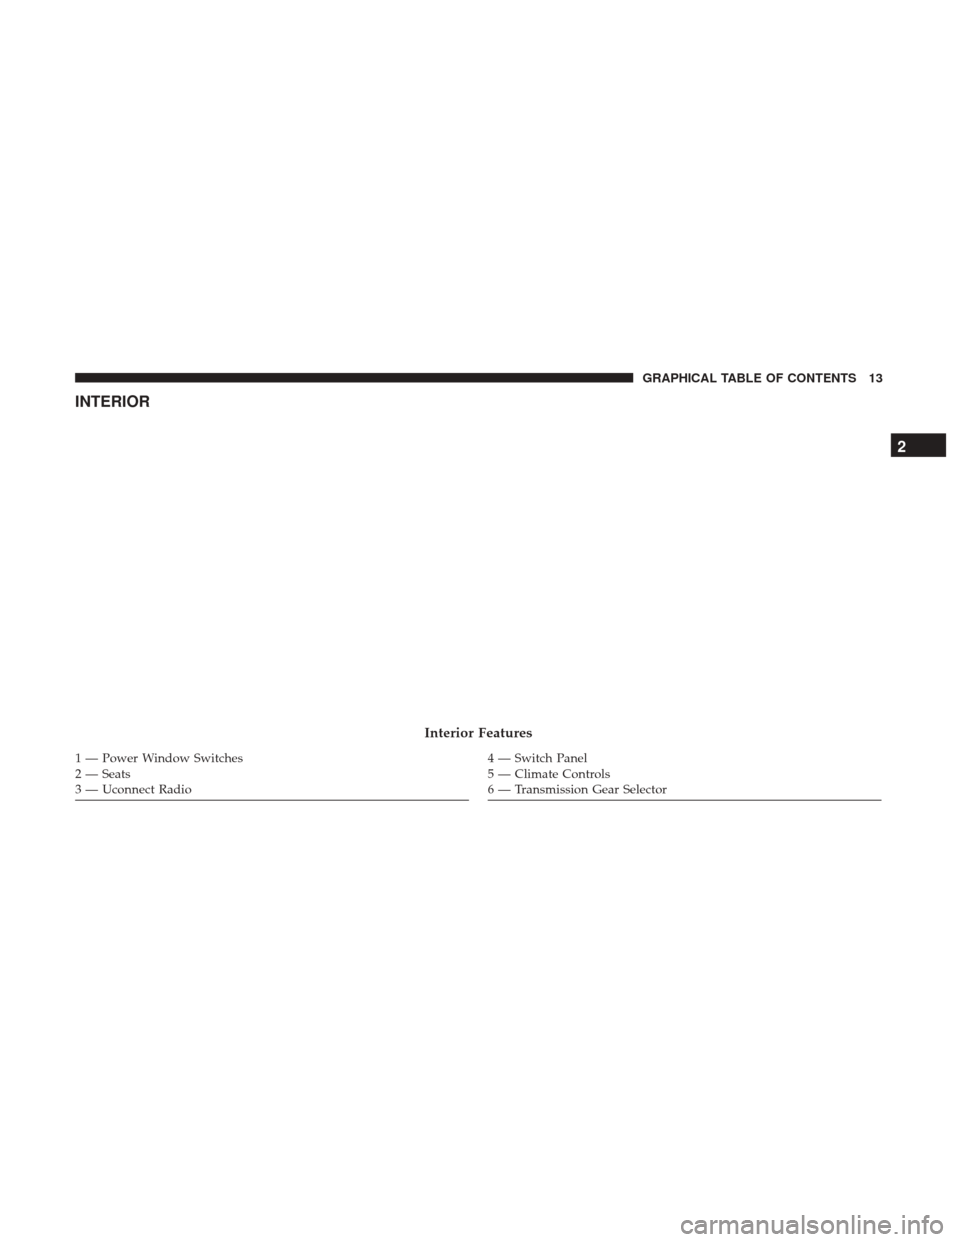
INTERIOR
Interior Features
1 — Power Window Switches
2 — Seats
3 — Uconnect Radio4 — Switch Panel
5 — Climate Controls
6 — Transmission Gear Selector
2
GRAPHICAL TABLE OF CONTENTS 13
Page 23 of 421
2. Remove and replace the battery. Avoid touching the newbattery with your fingers. Skin oils may cause battery
deterioration. If you touch a battery, clean it with
rubbing alcohol.
3. To reassemble the key fob case, snap the two halves together.
NOTE: If the key fob is equipped with a screw, reinstall
and tighten the screw until snug.
General Information
The following regulatory statement applies to all Radio
Frequency (RF) devices equipped in this vehicle:
This device complies with Part 15 of the FCC Rules and
with Industry Canada license-exempt RSS standard(s).
Operation is subject to the following two conditions:
1. This device may not cause harmful interference, and
2. This device must accept any interference received, in- cluding interference that may cause undesired opera-
tion.
NOTE: Changes or modifications not expressly approved
by the party responsible for compliance could void the
user ’s authority to operate the equipment.
IGNITION SWITCH
Ignition Key Removal
1. Place the gear selector in PARK (if equipped with an automatic transmission).
2. Place the ignition in the ACC (Accessory) position.
3. Push the key and cylinder inward and rotate the key to the LOCK position.
4. Remove the key from the ignition.
3
GETTING TO KNOW YOUR VEHICLE 21
Page 29 of 421
3. Insert the second valid key into the ignition. Place theignition in the ON/RUN position within 15 seconds.
After 10 seconds, a chime will sound. In addition, the
Vehicle Security Light will begin to flash. Place the
ignition in the LOCK position and remove the second
key.
4. Insert a blank key into the ignition. Place the ignition in the ON/RUN position within 60 seconds. After 10
seconds, a single chime will sound. In addition, the
Vehicle Security Light will stop flashing. To indicate that
programming is complete, the Vehicle Security Light
will turn on again for three seconds and then turn off.
The new key is programmed. The key fob will also be
programmed during this procedure.
Repeat this procedure to program up to eight keys. If you
do not have a programmed key fob, contact your autho-
rized dealer for details.
NOTE: If a programmed key fob is lost, see your autho-
rized dealer to have all remaining key fobs erased from the
system’s memory. This will prevent the lost key from
starting your vehicle. The remaining key fobs must then be
reprogrammed. All vehicle key fobs must be taken to an
authorized dealer at the time of service to be repro-
grammed.General Information
The following regulatory statement applies to all radio
frequency (RF) devices equipped in this vehicle:
This device complies with Part 15 of the FCC Rules and
with Industry Canada license-exempt RSS standard(s).
Operation is subject to the following two conditions:
1. This device may not cause harmful interference, and
2.
This device must accept any interference received, includ-
ing interference that may cause undesired operation.
NOTE: Changes or modifications not expressly approved
by the party responsible for compliance could void the
user ’s authority to operate the equipment.
VEHICLE SECURITY ALARM — IF EQUIPPED
This Vehicle Security Alarm monitors the doors, liftgate,
and ignition switch for unauthorized operation.
When the alarm is activated, the interior switches for door
locks are disabled. The Vehicle Security Alarm provides both
audio and visual signals, the horn will sound, the headlights,
park lamps and/or turn signals will flash repeatedly for
three minutes. If the disturbance is still present (driver’s
3
GETTING TO KNOW YOUR VEHICLE 27
Page 51 of 421
Lane Change Assist
Tap the lever up or down once, without moving beyond
the detent, and the turn signal (right or left) will flash three
times then automatically turn off.
Lights-On Reminder
If the headlights or parking lights are left on after the
ignition is turned OFF, a chime will sound to alert the
driver when the driver’s door is opened.
Headlights On With Wipers (Available With
Automatic Headlights Only)
When this feature is active, the headlights will turn on
approximately 10 seconds after the wipers are turned on if
the headlight switch is placed in the AUTO position. In
addition, the headlights will turn off when the wipers are
turned off if they were turned on by this feature.
NOTE:The Headlights On with Wipers feature can be
turned on or off using the instrument cluster display. Refer
to “Instrument Cluster Display” in “Getting To Know Your
Instrument Panel” for further information.
INTERIOR LIGHTS
Instrument Panel Dimming
Rotate the center portion of the lever to the extreme bottom
position to fully dim the instrument panel lights and
prevent the interior lights from illuminating when a door is
opened.
Rotate the center portion of the lever up to increase the
brightness of the instrument panel lights when the parking
lights or headlights are on.
Rotate the center portion of the lever upward to the next
detent position to brighten the odometer and radio when
the parking lights or headlights are on.
3
GETTING TO KNOW YOUR VEHICLE 49
Page 57 of 421
CLIMATE CONTROLS
The Climate Control System allows you to regulate the
temperature, airflow, and direction of air circulating
throughout the vehicle. The controls are located on the
instrument panel below the radio.
Manual Climate Controls
The controls for the manual heating and air conditioning
system in this vehicle consist of a series of outer rotary
dials and inner push knobs. These comfort controls can be
set to obtain desired interior conditions.
Manual Climate Control Descriptions
IconDescription
Blower Control
There are seven blower speeds. Use this control to regulate the amount of air forced through the
system in any mode you select. The blower speed increases as you move the control clockwise
from the off position.
NOTE:Depending on the configuration, your vehicle may be equipped with four blower
speeds.
Manual Climate Controls
3
GETTING TO KNOW YOUR VEHICLE 55
Page 80 of 421
HomeLink Buttons/Sunvisor/Headliner
NOTE:HomeLink is disabled when the Vehicle Security
Alarm is active.
Before You Begin Programming HomeLink
Be sure that your vehicle is parked outside of the garage
before you begin programming.
For more efficient programming and accurate transmission
of the radio-frequency signal, it is recommended that a new
battery be placed in the hand-held transmitter of the device
that is being programmed to the HomeLink system. To erase the channels, place the ignition in the ON/RUN
position and push and hold the two outside HomeLink
buttons (I and III) for up 20 seconds or until the red
indicator flashes.
NOTE:
•
Erasing all channels should only be performed when
programming HomeLink for the first time. Do not erase
channels when programming additional buttons.
• If you have any problems, or require assistance, please
call toll-free 1-800-355-3515 or, on the Internet at
HomeLink.com for information or assistance.
Programming A Rolling Code
For programming garage door openers that were manufac-
tured after 1995:
These garage door openers can be identified by the
“LEARN” or “TRAIN” button located where the hanging
antenna is attached to the garage door opener. It is NOT the
button that is normally used to open and close the door.
The name and color of the button may vary by manufac-
turer.
78 GETTING TO KNOW YOUR VEHICLE
Page 83 of 421
2. Push and hold the desired HomeLink button until theindicator light begins to flash after 20 seconds. Do not
release the button.
3. Without releasing the button, proceed with “Program-
ming A Non-Rolling Code” step 2 and follow all remain-
ing steps.
Canadian/Gate Operator Programming
For programming transmitters in Canada/United States
that require the transmitter signals to “time-out” after
several seconds of transmission:
Canadian radio frequency laws require transmitter signals
to time-out (or quit) after several seconds of transmission,
which may not be long enough for HomeLink to pick up
the signal during programming. Similar to this Canadian
law, some U.S. gate operators are designed to time-out in
the same manner.
It may be helpful to unplug the device during the cycling
process to prevent possible overheating of the garage door
or gate motor.
1. Cycle the ignition to the ON/RUN position. NOTE:
For vehicles equipped with Keyless Enter-N-Go,
place the ignition in the RUN position with the engine ON.
Make sure while programming HomeLink with the engine
ON that your vehicle is outside of your garage, or that the
garage door remains open at all times.
2. Place the hand-held transmitter 1 to 3 inches (3 to 8 cm) away from the HomeLink button you wish to program
while keeping the HomeLink indicator light in view.
3. Continue to push and hold the HomeLink button while you push and release (“cycle”) your hand-held trans-
mitter every two seconds until HomeLink has success-
fully accepted the frequency signal. The indicator light
will flash slowly and then rapidly when fully trained.
4. Watch for the HomeLink indicator to change flash rates. When it changes, it is programmed. It may take up to 30
seconds or longer in rare cases. The garage door may
open and close while you are programming.
5. Push and hold the programmed HomeLink button and observe the indicator light.
3
GETTING TO KNOW YOUR VEHICLE 81
Page 94 of 421
NOTE:
•To help control wind noise when the crossbars are not in
use, place the front crossbar in the first detent from the
front of the vehicle and the rear crossbar in the second
detent from the rear of the vehicle.
• If the rear crossbar (or any metallic object) is placed over
the satellite radio antenna (if equipped), you may expe-
rience interruption of satellite radio reception. For im-
proved satellite radio reception, place the rear crossbar
in the second detent from the rear of the vehicle when
not in use.
WARNING!
Cargo must be securely tied before driving your ve-
hicle. Improperly secured loads can fly off the vehicle,
particularly at high speeds, resulting in personal injury
or property damage. Follow the roof rack cautions
when carrying cargo on your roof rack.
CAUTION!
• To prevent damage to the roof of your vehicle, DO
NOT carry any loads on the luggage rack without
crossbars installed. The load should be secured and
placed on top of the crossbars, not directly on the
roof. If it is necessary to place the load on the roof,
place a blanket or some other protection between the
load and the roof surface.
• To avoid damage to the luggage rack and vehicle, do
not exceed the maximum luggage rack load capacity
of 150 lb (68 kg). Always distribute heavy loads as
evenly as possible and secure the load appropriately.
• Long loads which extend over the windshield, such
as wood panels or surfboards, or loads with large
frontal area should be secured to both the front and
rear of the vehicle.
• Travel at reduced speeds and turn corners carefully
when carrying large or heavy loads on the roof rack.
Wind forces, due to natural causes or nearby truck
traffic, can add sudden upward lift to a load. This is
especially true on large flat loads and may result in
damage to the cargo or your vehicle.
92 GETTING TO KNOW YOUR VEHICLE
Page 122 of 421
NOTE:If the indicator message illuminates when you
start the vehicle, the oil change indicator system did not
reset. If necessary, repeat this procedure.
Instrument Cluster Display Functions
• Compass/Temperature/Audio
• Average Fuel Economy
• Distance To Empty (DTE)
• Units In
• Elapsed Time
• Tire Pressure Monitor (TPM)
• Personal Settings
To Reset The Display
Pushing and holding the rightarrow button once will
clear the function currently being displayed. Reset will
only occur if a resettable function is currently being
displayed. To reset all resettable functions, push and
release the right
arrow button a second time within
three seconds of resetting the currently displayed func-
tion. Reset ALL will be displayed during this three-
second window. Compass/Temperature/Audio
Push and release the
compassbutton to display one of
eight compass headings to indicate the direction the ve-
hicle is facing, the outside temperature, and the current
radio station.
Average Fuel Economy
Shows the average fuel economy since the last reset
(pushing and holding the right
arrow button as
prompted in the instrument cluster display to reset). When
the fuel economy is reset, the display will read “RESET” or
show dashes for two seconds. Then, the history informa-
tion will be erased, and the averaging will continue from
the last fuel reading before the reset.
Distance To Empty (DTE)
Shows the estimated distance that can be traveled with the
fuel remaining in the tank. This estimated distance is
determined by a weighted average of the instantaneous
and average fuel economy, according to the current fuel
tank level. This is not resettable.
NOTE: Significant changes in driving style or vehicle
loading will greatly affect the actual drivable distance of
the vehicle, regardless of the DTE displayed value.
120 GETTING TO KNOW YOUR INSTRUMENT PANEL