wheel size JEEP PATRIOT 2017 1.G Owners Manual
[x] Cancel search | Manufacturer: JEEP, Model Year: 2017, Model line: PATRIOT, Model: JEEP PATRIOT 2017 1.GPages: 421, PDF Size: 3.4 MB
Page 108 of 421
Please note that the TPMS is not a substitute for proper tire
maintenance, and it is the driver ’s responsibility to main-
tain correct tire pressure, even if under-inflation has not
reached the level to trigger illumination of the TPMS low
tire pressure telltale.
Your vehicle has also been equipped with a TPMS malfunc-
tion indicator to indicate when the system is not operating
properly. The TPMS malfunction indicator is combined
with the low tire pressure telltale. When the system detects
a malfunction, the telltale will flash for approximately one
minute and then remain continuously illuminated. This
sequence will continue upon subsequent vehicle start-ups
as long as the malfunction exists. When the malfunction
indicator is illuminated, the system may not be able to
detect or signal low tire pressure as intended. TPMS
malfunctions may occur for a variety of reasons, including
the installation of replacement or alternate tires or wheels
on the vehicle that prevent the TPMS from functioning
properly. Always check the TPMS malfunction telltale after
replacing one or more tires or wheels on your vehicle, to
ensure that the replacement or alternate tires and wheels
allow the TPMS to continue to function properly.CAUTION!
The TPMS has been optimized for the original equip-
ment tires and wheels. TPMS pressures and warning
have been established for the tire size equipped on
your vehicle. Undesirable system operation or sensor
damage may result when using replacement equip-
ment that is not of the same size, type, and/or style.
Aftermarket wheels can cause sensor damage. Using
aftermarket tire sealants may cause the Tire Pressure
Monitoring System (TPMS) sensor to become inoper-
able. After using an aftermarket tire sealant it is
recommended that you take your vehicle to an autho-
rized dealer to have your sensor function checked.
106 GETTING TO KNOW YOUR INSTRUMENT PANEL
Page 137 of 421
•Understeer - when the vehicle is turning less than
appropriate for the steering wheel position.
The “ESC Activation/Malfunction Indicator Light” located
in the instrument cluster will start to flash as soon as the
ESC system becomes active. The “ESC Activation/
Malfunction Indicator Light” also flashes when the TCS is
active. If the “ESC Activation/Malfunction Indicator
Light” begins to flash during acceleration, ease up on the
accelerator and apply as little throttle as possible. Be sure to
adapt your speed and driving to the prevailing road
conditions.
WARNING!
• Electronic Stability Control (ESC) cannot prevent the
natural laws of physics from acting on the vehicle,
nor can it increase the traction afforded by prevailing
road conditions. ESC cannot prevent accidents, in-
cluding those resulting from excessive speed in
turns, driving on very slippery surfaces, or hydro-
planing. ESC also cannot prevent accidents resulting
from loss of vehicle control due to inappropriate
driver input for the conditions. Only a safe, attentive,
(Continued)
WARNING! (Continued)
and skillful driver can prevent accidents. The capa-
bilities of an ESC equipped vehicle must never be
exploited in a reckless or dangerous manner which
could jeopardize the user ’s safety or the safety of
others.
• Vehicle modifications, or failure to properly main-
tain your vehicle, may change the handling charac-
teristics of your vehicle, and may negatively affect
the performance of the ESC system. Changes to the
steering system, suspension, braking system, tire
type and size or wheel size may adversely affect ESC
performance. Improperly inflated and unevenly
worn tires may also degrade ESC performance. Any
vehicle modification or poor vehicle maintenance
that reduces the effectiveness of the ESC system can
increase the risk of loss of vehicle control, vehicle
rollover, personal injury and death.
ESC Operating Modes
The ESC system has three available operating modes for
four–wheel drive equipped vehicles and two available
operating modes for two–wheel drive equipped vehicles.
5
SAFETY 135
Page 143 of 421
approximately 23 psi (158 kPa). This tire pressure is suffi-
ciently low enough to turn ON the Tire Pressure Monitor-
ing Telltale Light. Driving the vehicle may cause the tire
pressure to rise to approximately 27 psi (186 kPa), but the
Tire Pressure Monitoring Telltale Light will still be ON. In
this situation, the Tire Pressure Monitoring Telltale Light
will turn OFF only after the tires are inflated to the
vehicle’s recommended cold placard pressure value.
NOTE:When filling warm tires, the tire pressure may need
to be increased up to an additional 4 psi (30 kPa) above the
recommended cold placard pressure in order to turn the
Tire Pressure Monitoring Telltale Light off.
CAUTION!
• The TPMS has been optimized for the original
equipment tires and wheels. TPMS pressures and
warning have been established for the tire size
equipped on your vehicle. Undesirable system op-
eration or sensor damage may result when using
replacement equipment that is not of the same size,
type, and/or style. Aftermarket wheels can cause
sensor damage.
(Continued)
CAUTION! (Continued)
•Using aftermarket tire sealants may cause the Tire
Pressure Monitoring System (TPMS) sensor to be-
come inoperable. After using an aftermarket tire
sealant it is recommended that you take your vehicle
to an authorized dealer to have your sensor function
checked.
• After inspecting or adjusting the tire pressure always
reinstall the valve stem cap. This will prevent mois-
ture and dirt from entering the valve stem, which
could damage the TPMS sensor.
NOTE:
• The TPMS is not intended to replace normal tire care and
maintenance or to provide warning of a tire failure or
condition.
• The TPMS should not be used as a tire pressure gauge
while adjusting your tire pressure.
• Driving on a significantly under-inflated tire causes the
tire to overheat and can lead to tire failure. Under-
inflation also reduces fuel efficiency and tire tread life,
and may affect the vehicle’s handling and stopping
ability.
5
SAFETY 141
Page 169 of 421
When the ORC detects a collision requiring the front air
bags, it signals the inflator units. A large quantity of
non-toxic gas is generated to inflate the front air bags.
The steering wheel hub trim cover and the upper right side
of the instrument panel separate and fold out of the way as
the air bags inflate to their full size. The front air bags fully
inflate in less time than it takes to blink your eyes. The
front air bags then quickly deflate while helping to restrain
the driver and front passenger.
Knee Impact Bolsters
The Knee Impact Bolsters help protect the knees of the
driver and front passenger, and position the front occu-
pants for improved interaction with the front air bags.
WARNING!
•Do not drill, cut, or tamper with the knee impact
bolsters in any way.
• Do not mount any accessories to the knee impact
bolsters such as alarm lights, stereos, citizen band
radios, etc.
Supplemental Side Air Bags
Your vehicle is equipped with two types of side air bags:
1. Supplemental Seat-Mounted Side Air Bags (SABs):
Located in the outboard side of the front seats. The
SABs are marked with a “SRS AIRBAG” or “AIR-
BAG” label sewn into the outboard side of the seats.
The SABs may help to reduce the risk of occupant injury
during certain side impacts and/or vehicle rollover events,
in addition to the injury reduction potential provided by
the seat belts and body structure.
Supplemental Seat-Mounted Side Air Bag Label
5
SAFETY 167
Page 223 of 421
Gross Axle Weight Rating (GAWR)
The GAWR is the maximum permissible load on the front
and rear axles. The load must be distributed in the cargo
area so that the GAWR of each axle is not exceeded.
Each axle GAWR is determined by the components in the
system with the lowest load carrying capacity (axle,
springs, tires or wheels). Heavier axles or suspension
components sometimes specified by purchasers for in-
creased durability does not necessarily increase the vehi-
cle’s GVWR.
Tire Size
The tire size on the Vehicle Certification Label represents
the actual tire size on your vehicle. Replacement tires must
be equal to the load capacity of this tire size.
Rim Size
This is the rim size that is appropriate for the tire size
listed.
Inflation Pressure
This is the cold tire inflation pressure for your vehicle for
all loading conditions up to full GAWR.
Curb Weight
The curb weight of a vehicle is defined as the total weight
of the vehicle with all fluids, including vehicle fuel, at full
capacity conditions, and with no occupants or cargo loaded
into the vehicle. The front and rear curb weight values are
determined by weighing your vehicle on a commercial
scale before any occupants or cargo are added.
Loading
The actual total weight and the weight of the front and rear
of your vehicle at the ground can best be determined by
weighing it when it is loaded and ready for operation.
The entire vehicle should first be weighed on a commercial
scale to insure that the GVWR has not been exceeded. The
weight on the front and rear of the vehicle should then be
determined separately to be sure that the load is properly
distributed over the front and rear axle. Weighing the
vehicle may show that the GAWR of either the front or rear
axles has been exceeded but the total load is within the
specified GVWR. If so, weight must be shifted from front to
rear or rear to front as appropriate until the specified
weight limitations are met. Store the heavier items down
low and be sure that the weight is distributed equally. Stow
all loose items securely before driving.6
STARTING AND OPERATING 221
Page 317 of 421
Keep dismounted tires in a cool, dry place with as little
exposure to light as possible. Protect tires from contact with
oil, grease, and gasoline.
Replacement Tires
The tires on your new vehicle provide a balance of many
characteristics. They should be inspected regularly for
wear and correct cold tire inflation pressures. The manu-
facturer strongly recommends that you use tires equivalent
to the originals in size, quality and performance when
replacement is needed. Refer to the paragraph on “Tread
Wear Indicator”. Refer to the Tire and Loading Information
placard or the Vehicle Certification Label for the size
designation of your tire. The Load Index and Speed
Symbol for your tire will be found on the original equip-
ment tire sidewall. See the Tire Sizing Chart example found
in the “Tire Safety Information” section of this manual for
more information relating to the Load Index and Speed
Symbol of a tire.
It is recommended to replace the two front tires or two rear
tires as a pair. Replacing just one tire can seriously affect
your vehicle’s handling. If you ever replace a wheel, make
sure that the wheel’s specifications match those of the
original wheels.It is recommended you contact your authorized tire dealer
or original equipment dealer with any questions you may
have on tire specifications or capability. Failure to use
equivalent replacement tires may adversely affect the
safety, handling, and ride of your vehicle.
WARNING!
•
Do not use a tire, wheel size, load rating, or speed
rating other than that specified for your vehicle.
Some combinations of unapproved tires and wheels
may change suspension dimensions and perfor-
mance characteristics, resulting in changes to steer-
ing, handling, and braking of your vehicle. This can
cause unpredictable handling and stress to steering
and suspension components. You could lose control
and have a collision resulting in serious injury or
death. Use only the tire and wheel sizes with load
ratings approved for your vehicle.
• Never use a tire with a smaller load index or capacity,
other than what was originally equipped on your
vehicle. Using a tire with a smaller load index could
result in tire overloading and failure. You could lose
control and have a collision.
(Continued)
8
SERVICING AND MAINTENANCE 315
Page 319 of 421
Snow Tires
Some areas of the country require the use of snow tires
during the Winter. Snow tires can be identified by a
“mountain/snowflake” symbol on the tire sidewall.If you need snow tires, select tires
equivalent in size and type to the origi-
nal equipment tires. Use snow tires only
in sets of four; failure to do so may
adversely affect the safety and handling
of your vehicle.
Snow tires generally have lower speed ratings than what
was originally equipped with your vehicle and should not
be operated at sustained speeds over 75 mph (120 km/h).
For speeds above 75 mph (120 km/h) refer to original
equipment or an authorized tire dealer for recommended
safe operating speeds, loading and cold tire inflation
pressures.
While studded tires improve performance on ice, skid and
traction capability on wet or dry surfaces may be poorer
than that of non-studded tires. Some states prohibit stud-
ded tires; therefore, local laws should be checked before
using these tire types.
Spare Tires — If Equipped
NOTE: For vehicles equipped with Tire Service Kit instead
of a spare tire, please refer to “Tire Service Kit” in “In Case
Of Emergency” for further information.
CAUTION!
Because of the reduced ground clearance, do not take
your vehicle through an automatic car wash with a
compact or limited use temporary spare installed.
Damage to the vehicle may result.
Spare Tire Matching Original Equipped Tire And
Wheel — If Equipped
Your vehicle may be equipped with a spare tire and wheel
equivalent in look and function to the original equipment
tire and wheel found on the front or rear axle of your
vehicle. This spare tire may be used in the tire rotation for
your vehicle. If your vehicle has this option, refer to an
authorized tire dealer for the recommended tire rotation
pattern.
Compact Spare Tire — If Equipped
The compact spare is for temporary emergency use only.
You can identify if your vehicle is equipped with a compact
8
SERVICING AND MAINTENANCE 317
Page 320 of 421
spare by looking at the spare tire description on the Tire
and Loading Information Placard located on the driver ’s
side door opening or on the sidewall of the tire. Compact
spare tire descriptions begin with the letter “T” or “S”
preceding the size designation. Example: T145/80D18
103M.
T, S = Temporary Spare Tire
Since this tire has limited tread life, the original equipment
tire should be repaired (or replaced) and reinstalled on
your vehicle at the first opportunity.
Do not install a wheel cover or attempt to mount a
conventional tire on the compact spare wheel, since the
wheel is designed specifically for the compact spare tire.
Do not install more than one compact spare tire and wheel
on the vehicle at any given time.
WARNING!
Compact and collapsible spares are for temporary
emergency use only. With these spares, do not drive
more than 50 mph (80 km/h). Temporary use spares
have limited tread life. When the tread is worn to the
tread wear indicators, the temporary use spare tire
(Continued)
WARNING!(Continued)
needs to be replaced. Be sure to follow the warnings,
which apply to your spare. Failure to do so could result
in spare tire failure and loss of vehicle control.
Full Size Spare — If Equipped
The full size spare is for temporary emergency use only.
This tire may look like the originally equipped tire on the
front or rear axle of your vehicle, but it is not. This spare
tire may have limited tread life. When the tread is worn to
the tread wear indicators, the temporary use full size spare
tire needs to be replaced. Since it is not the same as your
original equipment tire, replace (or repair) the original
equipment tire and reinstall on the vehicle at the first
opportunity.
Limited Use Spare — If Equipped
The limited use spare tire is for temporary emergency use
only. This tire is identified by a label located on the limited
use spare wheel. This label contains the driving limitations
for this spare. This tire may look like the original equipped
tire on the front or rear axle of your vehicle, but it is not.
Installation of this limited use spare tire affects vehicle
318 SERVICING AND MAINTENANCE
Page 331 of 421
BRAKE SYSTEM
Your vehicle is equipped with power assisted brakes as
standard equipment. In the event power assist is lost for
any reason (for example, repeated brake applications with
the engine off), the brakes will still function. However, the
effort required to brake the vehicle will be much greater
than that required with the power system operating.
WARNING!
Riding the brakes can lead to brake failure and possi-
bly a collision. Driving with your foot resting or riding
on the brake pedal can result in abnormally high brake
temperatures, excessive lining wear, and possible
brake damage. You would not have your full braking
capacity in an emergency.
If either of the two hydraulic systems lose normal capabil-
ity, the remaining system will still function with some loss
of overall braking effectiveness. This will be evident by
increased pedal travel during application and greater pedal
force required to slow or stop. In addition, if the malfunc-
tion is caused by an internal leak, as the brake fluid in the
master cylinder drops, the “Brake Warning Light” will
light.
WARNING!
Driving a vehicle with the “Brake Warning Light” on is
dangerous. A significant decrease in braking perfor-
mance or vehicle stability during braking may occur. It
will take you longer to stop the vehicle or will make
your vehicle harder to control. You could have a
collision. Have the vehicle checked immediately.
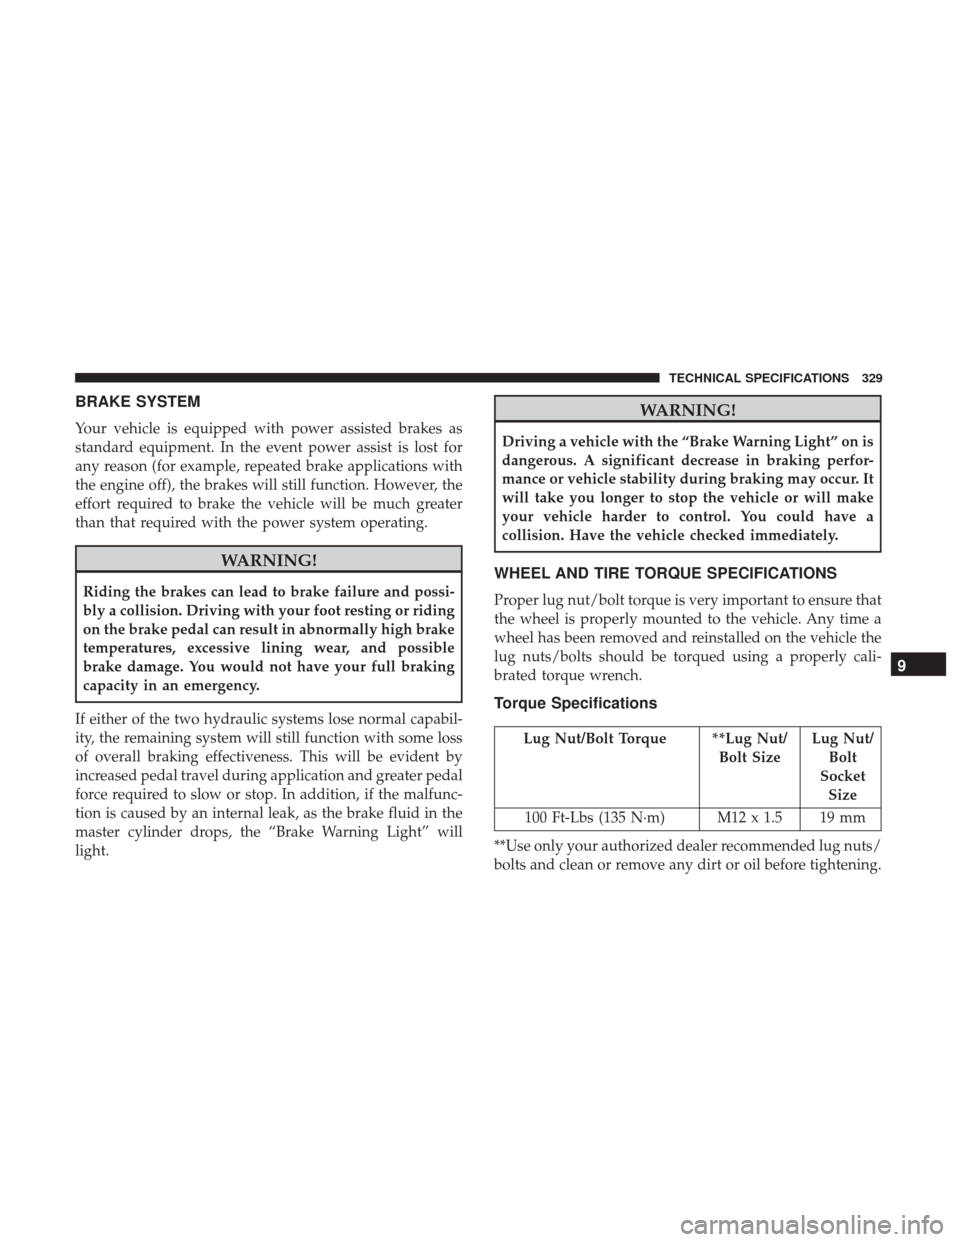
WHEEL AND TIRE TORQUE SPECIFICATIONS
Proper lug nut/bolt torque is very important to ensure that
the wheel is properly mounted to the vehicle. Any time a
wheel has been removed and reinstalled on the vehicle the
lug nuts/bolts should be torqued using a properly cali-
brated torque wrench.
Torque Specifications
Lug Nut/Bolt Torque **Lug Nut/ Bolt SizeLug Nut/
Bolt
Socket Size
100 Ft-Lbs (135 N·m) M12 x 1.5 19 mm
**Use only your authorized dealer recommended lug nuts/
bolts and clean or remove any dirt or oil before tightening.
9
TECHNICAL SPECIFICATIONS 329