instrument cluster JEEP PATRIOT 2018 Owner handbook (in English)
[x] Cancel search | Manufacturer: JEEP, Model Year: 2018, Model line: PATRIOT, Model: JEEP PATRIOT 2018Pages: 332, PDF Size: 1.99 MB
Page 19 of 332
To Arm The System
1. Remove the RKE Key Fob from the ignition
and get out of the vehicle.
2. Lock the door using either the power door
lock
switch or the RKE Key Fob lockbutton and close all doors.
3. The Vehicle Security Light in the instrument
cluster will flash rapidly for approximately 16
seconds. This shows that the Vehicle Secu-
rity Alarm is arming. During this period, if a
door is opened, the ignition is placed in the
ON/RUN position, or the power door locks
are unlocked in any manner, the Vehicle
Security Alarm will automatically disarm. Af-
ter approximately 16 seconds, the Vehicle
Security Light will flash slowly. This shows
that the Vehicle Security Alarm is fully
armed.
Rearming Of The SystemIf something triggers the alarm, and no action is
taken to disarm it, the Vehicle Security Alarm
will turn off the horn after 29 seconds, turn off all
of the visual signals after one minute, and then
the Vehicle Security Alarm will rearm itself.
To Disarm The SystemPush UNLOCK on the RKE Key Fob, or insert
the key into the ignition and place the ignition in
the ON/RUN position.
If something has triggered the Vehicle Security
Alarm in your absence, the exterior lights blink
three times when you unlock the doors. Check
the vehicle for tampering. The Vehicle Security
Alarm is designed to protect your vehicle; how-
ever, you can create conditions where the Ve-
hicle Security Alarm will arm unexpectedly. If
you remain in the vehicle and lock the doors
with the RKE Key Fob, once the Vehicle Secu-
rity Alarm is armed (after 16 seconds), when
you pull the door handle to exit, the alarm will
sound. If this occurs, push the UNLOCK button
on the RKE Key Fob to disarm the Vehicle
Security Alarm.
Vehicle Security Alarm Manual
Override
The Vehicle Security Alarm will not arm if you
lock the doors using the manual door lock
plunger.
PREMIUM VEHICLE SECURITY
ALARM — IF EQUIPPED
The Premium Vehicle Security Alarm system
monitors the doors, hood latch, liftgate, and
ignition switch for unauthorized operation.
If something triggers the security alarm, the
audible alert will sound for 29 seconds and flash
the lights for 60 seconds. If the triggering device
is not deactivated, the audible alert will sound
again after a five-second delay for another 29
seconds. If the trigger remains present, this
cycle will repeat for up to five minutes.
If the intrusion sensor is enabled, the security
alarm system will also monitor the vehicle for
movement. When this portion of the alarm is
set, movement inside the vehicle or movement
of the vehicle will trigger the Vehicle Security
Alarm.
15
Page 20 of 332
To Arm The System
1. Remove the RKE Key Fob from the ignition
and get out of the vehicle.
2. Lock the door using either the power door
lock switch or the RKE Key Fob, and close
all doors.
3. The Vehicle Security Light in the instrument
cluster will flash rapidly for 16 seconds. This
shows that the security alarm is arming. After
16 seconds, the locks will activate and the
Vehicle Security Light will continue to flash
slowly. This shows that the Vehicle Security
Alarm system is fully armed.
NOTE:
The intrusion sensor (motion detector) ac-
tively monitors your vehicle every time you
arm the security alarm. If you prefer, you can
turn off the intrusion sensor when arming
the security alarm.
To disable the intrusion sensor, activate the
LOCK request three times using the RKE Key
Fob during the arming period (lamp flashingquickly). The intrusion sensor will automatically
be enabled the next time the security alarm is
set.
To Disarm The SystemPush UNLOCK on the RKE Key Fob, or insert
the RKE Key into the ignition and place the
ignition in the ON/RUN position.
NOTE:
•Battery disconnects will not disarm the
security alarm system.
•Using the RKE Key in the door lock cylin-
der will only unlock the deadbolt locks.
•To open the doors after the security alarm
is set and the locks are activated, push
the unlock button on the RKE Key Fob.
You can also unlock the door lock plunger
and door handle by inserting the RKE Key
into lock cylinder on the door and turning
it, but the alarm will sound. In this case,
insert the RKE Key into the ignition and
place it in the ON/RUN position.If the security alarm has been triggered, the
Vehicle Security Light will flash twice every two
seconds.Vehicle Security Alarm Manual
Override
The security alarm will not arm if you lock the
doors using the manual door lock plunger.
REMOTE KEYLESS ENTRY
(RKE)
This system allows you to lock or unlock the
doors and liftgate from distances up to approxi-
mately 33 ft (10 m) using a hand-held RKE Key
Fob. The RKE Key Fob does not need to be
pointed at the vehicle to activate the system.
16
Page 79 of 332
tomer service line. Some services require im-
mediate response selection. In some instances,
that may be too quick for use of the Uconnect
Phone.
When calling a number with your Uconnect
Phone that normally requires you to enter in a
touch-tone sequence on your mobile phone
keypad, you can push the Voice Command
button and say the sequence you wish to
enter, followed by the word “Send.” For ex-
ample, if required to enter your PIN followed
with a pound, (3746#),youcanpush the
Voice Command
button and say, “3746#
Send.” Saying a number, or sequence of num-
bers, followed by “Send,” is also to be used for
navigating through an automated customer ser-
vice center menu structure, and to leave a
number on a pager.
You can also send stored Uconnect phonebook
entries as tones for fast and easy access to
voice mail and pager entries. To use this fea-
ture, dial the number you wish to call and then
push the Voice Command
button and say
“Send.” The system will prompt you to enter the
name or number and say the name of the
phonebook entry you wish to send. TheUconnect Phone will then send the correspond-
ing phone number associated with the phone-
book entry, as tones over the phone.
NOTE:
•You may not hear all of the tones due to
mobile phone network configurations.
This is normal.
•Some paging and voice mail systems
have system time out settings that are too
short and may not allow the use of this
feature.
Barge In — Overriding Prompts
The “Voice Command” button can be used
when you wish to skip part of a prompt and
issue your voice command immediately. For
example, if a prompt is asking “Would you like to
pair a phone, clear a...,” you could push the
Voice Command
button and say, “Pair a
Phone” to select that option without having to
listen to the rest of the voice prompt.Turning Confirmation Prompts ON/OFF
Turning confirmation prompts off will stop the
system from confirming your choices (e.g., the
Uconnect Phone will not repeat a phone num-
ber before you dial it).
1. Push the Phone
button to begin.
2. After the “Ready” prompt and the following
beep, say one of the following:
•“Setup Confirmation Prompts On”
•“Setup Confirmation Prompts Off”
Phone And Network Status Indicators
If available on the radio and/or on a premium
display such as the instrument panel cluster,
and supported by your mobile phone, the
Uconnect Phone will provide notification to in-
form you of your phone and network status
when you are attempting to make a phone call
using Uconnect Phone. The status is given for
network signal strength, phone battery strength,
etc.
75
Page 101 of 332
Daytime Running Lights — If
Equipped
The high beam lights will come on as Daytime
Running Lights (lower intensity), whenever the
ignition is ON, the engine is running, the head-
light switch is off, the parking brake is off, the
turn signal is off, and the gear selector is in any
position except PARK.
Lights-On ReminderIf the headlights or parking lights are left on after
the ignition is turned OFF, a chime will sound to
alert the driver when the driver’s door is opened.
Front Fog Lights
The front fog light switch is on the
multifunction lever. To activate the
front fog lights, turn on the position
lights or the high/low beam head-
lights and pull out the end of the
multifunction lever.
Rear Fog Lights
The rear fog lights may be operated
as desired when visibility is poor due
to fog. To activate the rear fog lights,turn on the Low beam, high beam, or front fog
lamps, pull out the end of the multifunction lever
and rotate the lever to the last detent.
Turn SignalsMove the multifunction lever up or down and the
arrows on each side of the instrument cluster
flash to show proper operation of the front and
rear turn signal lights.
If either light remains on and does not flash, or
there is a very fast flash rate, check for a
defective outside light bulb. If an indicator fails
to light when the lever is moved, it would
suggest that the indicator bulb is defective.
Head Light Control
Front Fog Light ControlTurn Signal Control
97
Page 106 of 332
WARNING!
Do not adjust the steering column while
driving. Adjusting the steering column while
driving or driving with the steering column
unlocked, could cause the driver to lose
control of the vehicle. Failure to follow this
warning may result in serious injury or death.
ELECTRONIC SPEED
CONTROL — IF EQUIPPED
When engaged, the Electronic Speed Control
takes over accelerator operations at speeds
greater than 25 mph (40 km/h).
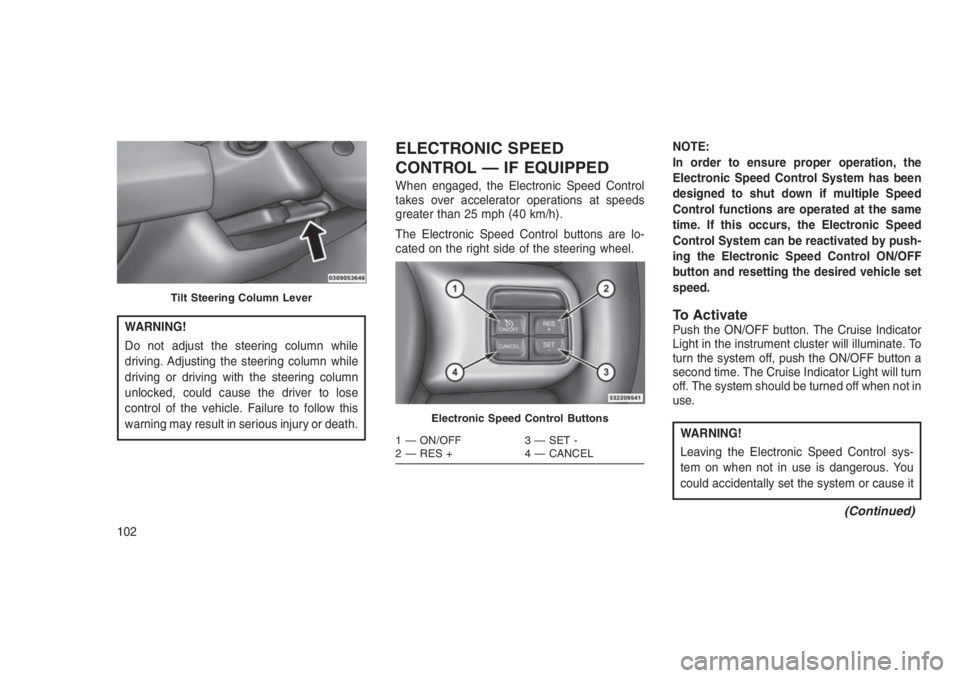
The Electronic Speed Control buttons are lo-
cated on the right side of the steering wheel.NOTE:
In order to ensure proper operation, the
Electronic Speed Control System has been
designed to shut down if multiple Speed
Control functions are operated at the same
time. If this occurs, the Electronic Speed
Control System can be reactivated by push-
ing the Electronic Speed Control ON/OFF
button and resetting the desired vehicle set
speed.
To ActivatePush the ON/OFF button. The Cruise Indicator
Light in the instrument cluster will illuminate. To
turn the system off, push the ON/OFF button a
second time. The Cruise Indicator Light will turn
off. The system should be turned off when not in
use.
WARNING!
Leaving the Electronic Speed Control sys-
tem on when not in use is dangerous. You
could accidentally set the system or cause it
(Continued)
Tilt Steering Column Lever
Electronic Speed Control Buttons
1 — ON/OFF 3 — SET -
2 — RES + 4 — CANCEL
102
Page 121 of 332
4
UNDERSTANDING YOUR INSTRUMENT
PANEL
•INSTRUMENT PANEL FEATURES...................119
•INSTRUMENT CLUSTER . . . . . . . . . . . . . . . . . . . . . . . . .120
•WARNING AND INDICATOR LIGHTS. . .. . . . . . . . . . . . . . .122
•Red Telltale Indicator Lights.....................123
•Yellow Telltale Indicator Lights....................129
•Green Telltale Indicator Lights....................136
•Blue Telltale Indicator Lights.....................137
•White Telltale Indicator Lights....................138
•ELECTRONIC VEHICLE INFORMATION CENTER (EVIC) — IF
EQUIPPED . . . . . . . ..........................139
•Engine Oil Change Indicator System — If Equipped.......140
•Compass/Temperature/Audio.....................141
•Average Fuel Economy........................141
•Distance To Empty (DTE).......................141
•Tire Pressure Monitor (TPM) — If Equipped............141
•Elapsed Time..............................141
•EVIC Units Selection (Units In Display)...............141
•System Warnings............................141
11 7
Page 123 of 332
INSTRUMENT PANEL FEATURES
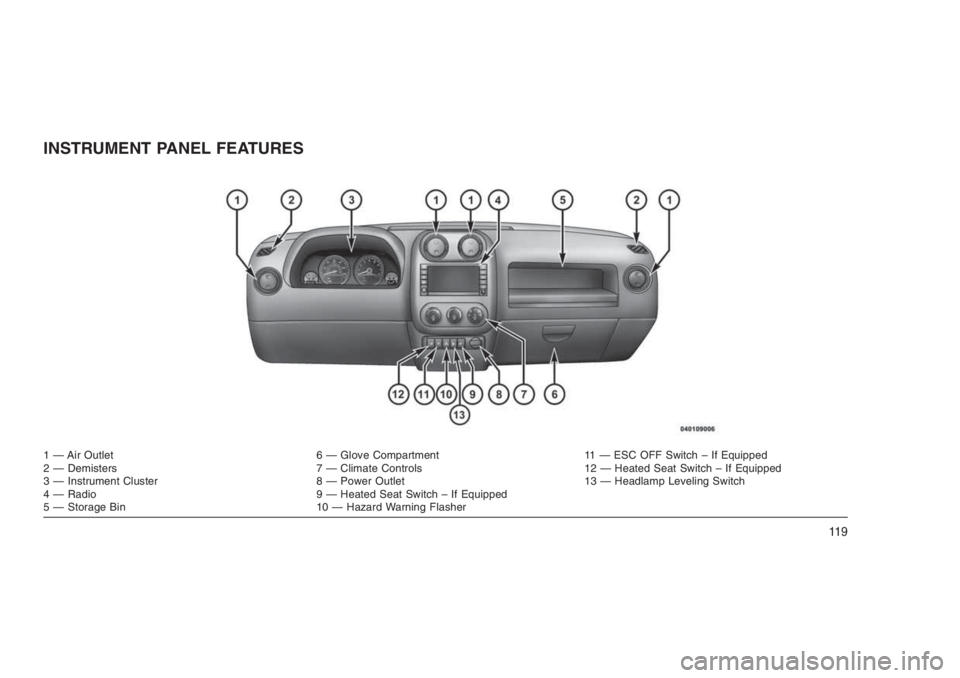
1 — Air Outlet 6 — Glove Compartment 11 — ESC OFF Switch – If Equipped
2 — Demisters 7 — Climate Controls 12 — Heated Seat Switch – If Equipped
3 — Instrument Cluster 8 — Power Outlet 13 — Headlamp Leveling Switch
4 — Radio 9 — Heated Seat Switch – If Equipped
5 — Storage Bin 10 — Hazard Warning Flasher
11 9
Page 124 of 332
INSTRUMENT CLUSTER
120
Page 125 of 332
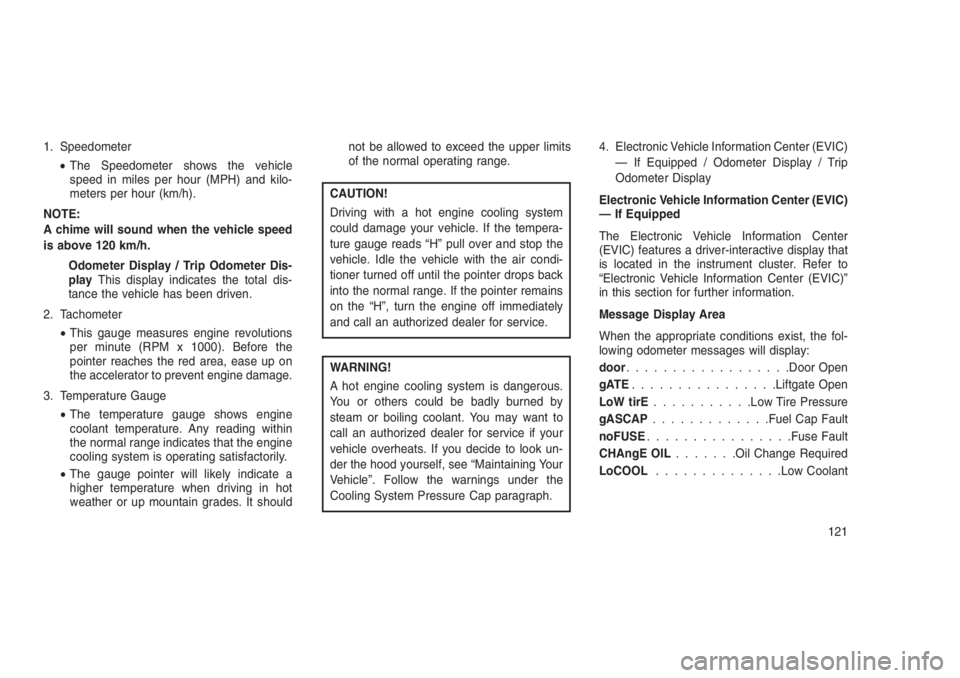
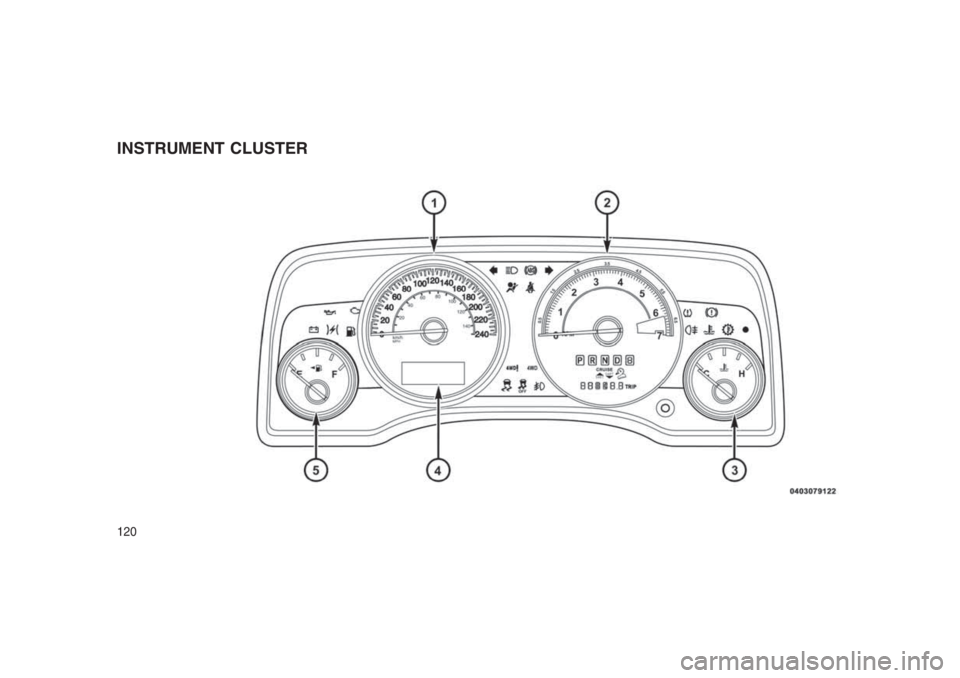
1. Speedometer
•The Speedometer shows the vehicle
speed in miles per hour (MPH) and kilo-
meters per hour (km/h).
NOTE:
A chime will sound when the vehicle speed
is above 120 km/h.
Odometer Display / Trip Odometer Dis-
playThis display indicates the total dis-
tance the vehicle has been driven.
2. Tachometer
•This gauge measures engine revolutions
per minute (RPM x 1000). Before the
pointer reaches the red area, ease up on
the accelerator to prevent engine damage.
3. Temperature Gauge
•The temperature gauge shows engine
coolant temperature. Any reading within
the normal range indicates that the engine
cooling system is operating satisfactorily.
•The gauge pointer will likely indicate a
higher temperature when driving in hot
weather or up mountain grades. It shouldnot be allowed to exceed the upper limits
of the normal operating range.
CAUTION!
Driving with a hot engine cooling system
could damage your vehicle. If the tempera-
ture gauge reads “H” pull over and stop the
vehicle. Idle the vehicle with the air condi-
tioner turned off until the pointer drops back
into the normal range. If the pointer remains
on the “H”, turn the engine off immediately
and call an authorized dealer for service.
WARNING!
A hot engine cooling system is dangerous.
You or others could be badly burned by
steam or boiling coolant. You may want to
call an authorized dealer for service if your
vehicle overheats. If you decide to look un-
der the hood yourself, see “Maintaining Your
Vehicle”. Follow the warnings under the
Cooling System Pressure Cap paragraph.4. Electronic Vehicle Information Center (EVIC)
— If Equipped / Odometer Display / Trip
Odometer Display
Electronic Vehicle Information Center (EVIC)
— If Equipped
The Electronic Vehicle Information Center
(EVIC) features a driver-interactive display that
is located in the instrument cluster. Refer to
“Electronic Vehicle Information Center (EVIC)”
in this section for further information.
Message Display Area
When the appropriate conditions exist, the fol-
lowing odometer messages will display:
door..................Door Open
gATE................Liftgate Open
LoW tirE...........Low Tire Pressure
gASCAP.............Fuel Cap Fault
noFUSE................Fuse Fault
CHAngE OIL.......Oil Change Required
LoCOOL..............Low Coolant
121
Page 126 of 332
NOTE:
Some of the above warnings will be dis-
played in the Electronic Vehicle Information
Center Display Area located in the instru-
ment cluster.
Refer to ”Electronic Vehicle Information Center
(EVIC) — If Equipped” in this section for further
information.
LoW tirE
When the appropriate condition exists, the
odometer display will toggle between LoW and
tirE for three cycles.
gASCAP
If the vehicle diagnostic system determines that
the fuel filler cap is loose, improperly installed,
or damaged, a “gASCAP” message will display
in the odometer display area. Tighten the fuel
filler cap properly and push the STEP button on
the steering wheel to turn off the message. If the
problem continues, the message will appear the
next time the vehicle is started.noFUSE
If the vehicle diagnostic system determines that
the Ignition Off Draw (IOD) fuse is improperly
installed, or damaged, a “noFUSE” message
will display in the odometer display area. Refer
to “Fuses” in “Maintaining Your Vehicle” for
further information on fuses and fuse locations.
CHAngE OIL
Your vehicle is equipped with an engine oil
change indicator system. The odometer display
will toggle betweenCHAngEandOilfor ap-
proximately 12 seconds, after a single chime
has sounded, to indicate the next scheduled oil
change interval. The engine oil change indicator
system is duty cycle-based, which means the
engine oil change interval may fluctuate depen-
dent upon your personal driving style.
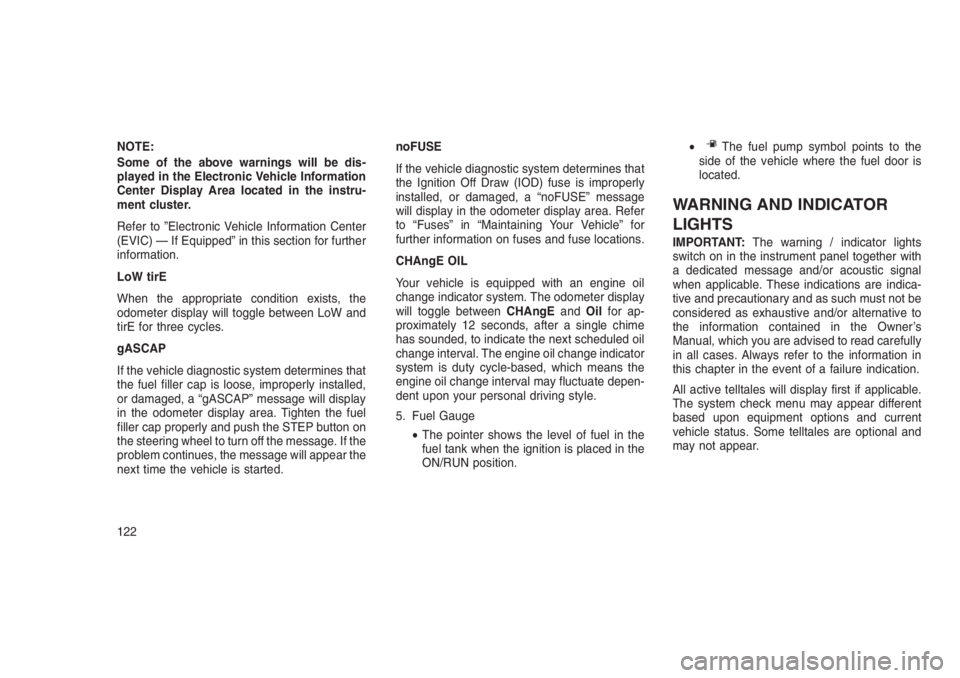
5. Fuel Gauge
•The pointer shows the level of fuel in the
fuel tank when the ignition is placed in the
ON/RUN position.•The fuel pump symbol points to the
side of the vehicle where the fuel door is
located.
WARNING AND INDICATOR
LIGHTS
IMPORTANT:The warning / indicator lights
switch on in the instrument panel together with
a dedicated message and/or acoustic signal
when applicable. These indications are indica-
tive and precautionary and as such must not be
considered as exhaustive and/or alternative to
the information contained in the Owner’s
Manual, which you are advised to read carefully
in all cases. Always refer to the information in
this chapter in the event of a failure indication.
All active telltales will display first if applicable.
The system check menu may appear different
based upon equipment options and current
vehicle status. Some telltales are optional and
may not appear.
122