child lock JEEP PATRIOT 2020 Owner handbook (in English)
[x] Cancel search | Manufacturer: JEEP, Model Year: 2020, Model line: PATRIOT, Model: JEEP PATRIOT 2020Pages: 332, PDF Size: 1.99 MB
Page 45 of 332
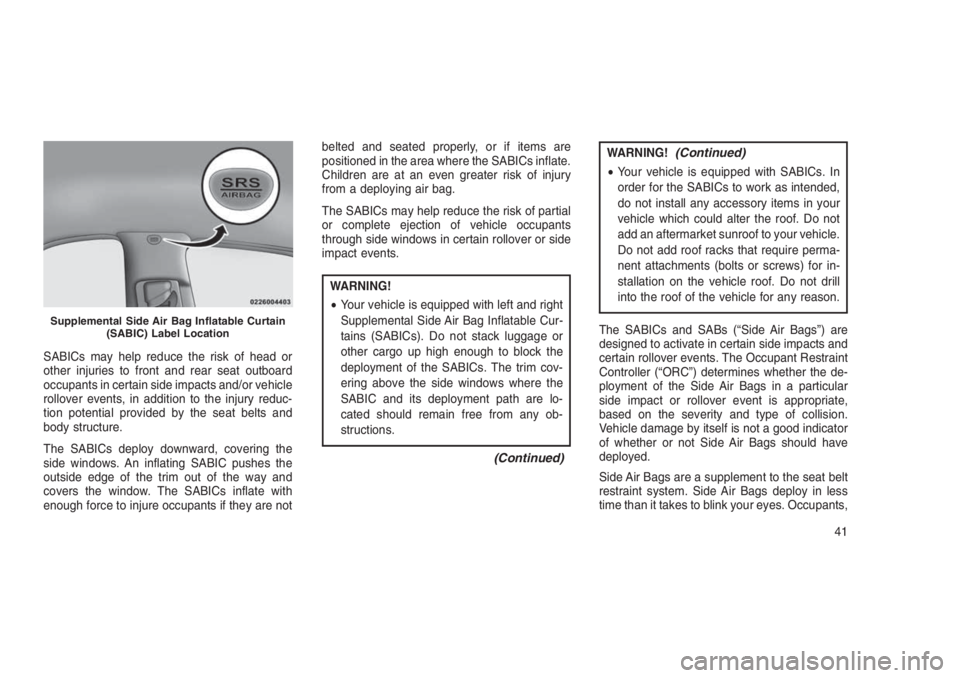
SABICs may help reduce the risk of head or
other injuries to front and rear seat outboard
occupants in certain side impacts and/or vehicle
rollover events, in addition to the injury reduc-
tion potential provided by the seat belts and
body structure.
The SABICs deploy downward, covering the
side windows. An inflating SABIC pushes the
outside edge of the trim out of the way and
covers the window. The SABICs inflate with
enough force to injure occupants if they are notbelted and seated properly, or if items are
positioned in the area where the SABICs inflate.
Children are at an even greater risk of injury
from a deploying air bag.
The SABICs may help reduce the risk of partial
or complete ejection of vehicle occupants
through side windows in certain rollover or side
impact events.
WARNING!
•Your vehicle is equipped with left and right
Supplemental Side Air Bag Inflatable Cur-
tains (SABICs). Do not stack luggage or
other cargo up high enough to block the
deployment of the SABICs. The trim cov-
ering above the side windows where the
SABIC and its deployment path are lo-
cated should remain free from any ob-
structions.
(Continued)
WARNING!(Continued)
•Your vehicle is equipped with SABICs. In
order for the SABICs to work as intended,
do not install any accessory items in your
vehicle which could alter the roof. Do not
add an aftermarket sunroof to your vehicle.
Do not add roof racks that require perma-
nent attachments (bolts or screws) for in-
stallation on the vehicle roof. Do not drill
into the roof of the vehicle for any reason.
The SABICs and SABs (“Side Air Bags”) are
designed to activate in certain side impacts and
certain rollover events. The Occupant Restraint
Controller (“ORC”) determines whether the de-
ployment of the Side Air Bags in a particular
side impact or rollover event is appropriate,
based on the severity and type of collision.
Vehicle damage by itself is not a good indicator
of whether or not Side Air Bags should have
deployed.
Side Air Bags are a supplement to the seat belt
restraint system. Side Air Bags deploy in less
time than it takes to blink your eyes. Occupants,
Supplemental Side Air Bag Inflatable Curtain
(SABIC) Label Location
41
Page 51 of 332

In Europe, children restraint systems are de-
fined by regulation ECE-R44, which divides
them into five weight groups:
Restraint Group Weight Group
Group 0 up to 10 kg
Group 0+ up to 13 kg
Group 1 9-18 kg
Group 2 15-25 kg
Group 3 22-36 kg
Check the label of your child restraint. All ap-
proved child restraints must include type-
approval data and the control mark on its label.
The label must be permanently secured to the
child restraint system. You should not remove
this label from the child restraint.
WARNING!
Extreme Hazard! Do not place a rear-facing
child restraint in front of an active air bag.
(Continued)
WARNING!(Continued)
Refer to visor mounted labels for information.
Deployment of the air bag in an accident
could cause fatal injuries to the baby regard-
less of the severity of the collision. It is
advisable to always carry children in a child
restraint system on the rear seat, which is
the most protected position in the event of a
collision.
“Universal” Child Restraint Systems
The figures in the following sections are ex-
amples of each type of universal child restraint
system. Typical installations are shown. Always
install your child restraint system according to
the child restraint manufacturer’s instructions,
which must be included with this type of re-
straint system.
See the section “Installing Child Restraints Us-
ing the Vehicle Seat Belt” for the steps to
properly lock the seat belt over the child re-
straint.Child restraint systems with ISOFIX anchor-
ages are available for installing the child re-
straint system to the vehicle without using the
vehicle’s seat belts.
Group 0 And 0+
Safety experts recommend that children ride
rearward facing in the vehicle as long as pos-
sible. Infants up to 13 kg must be restrained in
a rear-facing seat like the child seat shown in
fig. A. This type of child restraint supports the
Fig. A
47
Page 58 of 332
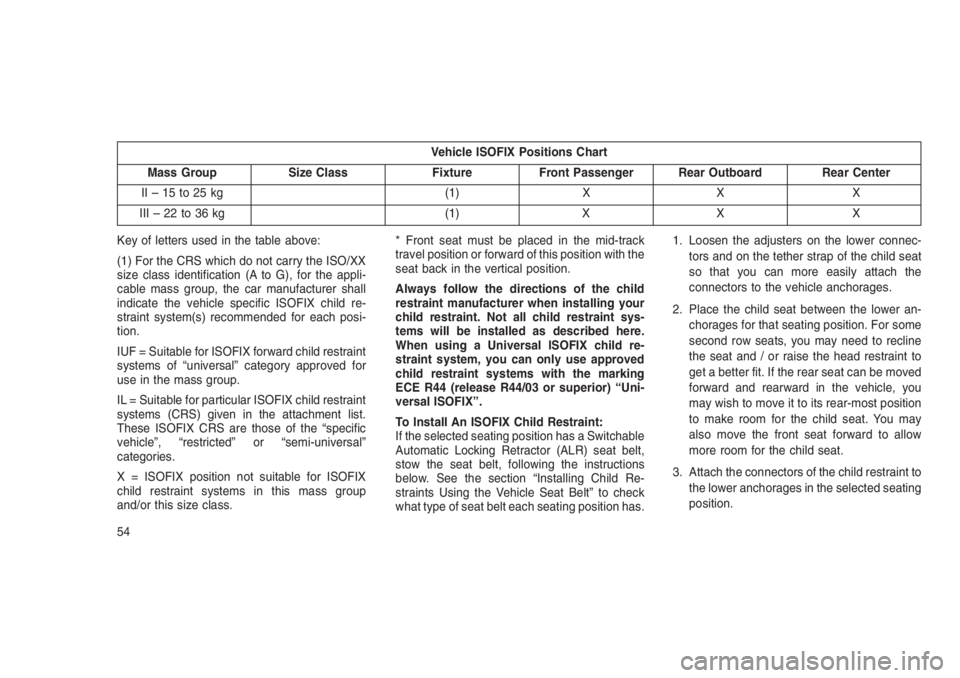
Vehicle ISOFIX Positions Chart
Mass Group Size Class Fixture Front Passenger Rear Outboard Rear Center
II–15to25kg (1) X X X
III–22to36kg (1) X X X
Key of letters used in the table above:
(1) For the CRS which do not carry the ISO/XX
size class identification (A to G), for the appli-
cable mass group, the car manufacturer shall
indicate the vehicle specific ISOFIX child re-
straint system(s) recommended for each posi-
tion.
IUF = Suitable for ISOFIX forward child restraint
systems of “universal” category approved for
use in the mass group.
IL = Suitable for particular ISOFIX child restraint
systems (CRS) given in the attachment list.
These ISOFIX CRS are those of the “specific
vehicle”, “restricted” or “semi-universal”
categories.
X = ISOFIX position not suitable for ISOFIX
child restraint systems in this mass group
and/or this size class.* Front seat must be placed in the mid-track
travel position or forward of this position with the
seat back in the vertical position.
Always follow the directions of the child
restraint manufacturer when installing your
child restraint. Not all child restraint sys-
tems will be installed as described here.
When using a Universal ISOFIX child re-
straint system, you can only use approved
child restraint systems with the marking
ECE R44 (release R44/03 or superior) “Uni-
versal ISOFIX”.
To Install An ISOFIX Child Restraint:
If the selected seating position has a Switchable
Automatic Locking Retractor (ALR) seat belt,
stow the seat belt, following the instructions
below. See the section “Installing Child Re-
straints Using the Vehicle Seat Belt” to check
what type of seat belt each seating position has.1. Loosen the adjusters on the lower connec-
tors and on the tether strap of the child seat
so that you can more easily attach the
connectors to the vehicle anchorages.
2. Place the child seat between the lower an-
chorages for that seating position. For some
second row seats, you may need to recline
the seat and / or raise the head restraint to
get a better fit. If the rear seat can be moved
forward and rearward in the vehicle, you
may wish to move it to its rear-most position
to make room for the child seat. You may
also move the front seat forward to allow
more room for the child seat.
3. Attach the connectors of the child restraint to
the lower anchorages in the selected seating
position.
54
Page 60 of 332
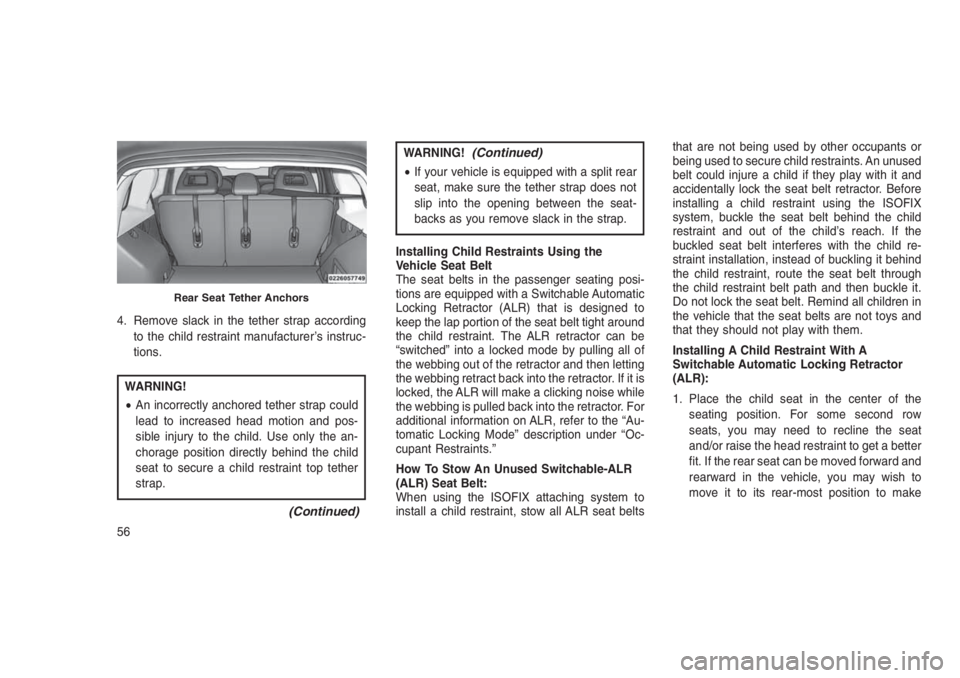
4. Remove slack in the tether strap according
to the child restraint manufacturer’s instruc-
tions.
WARNING!
•An incorrectly anchored tether strap could
lead to increased head motion and pos-
sible injury to the child. Use only the an-
chorage position directly behind the child
seat to secure a child restraint top tether
strap.
(Continued)
WARNING!(Continued)
•If your vehicle is equipped with a split rear
seat, make sure the tether strap does not
slip into the opening between the seat-
backs as you remove slack in the strap.
Installing Child Restraints Using the
Vehicle Seat Belt
The seat belts in the passenger seating posi-
tions are equipped with a Switchable Automatic
Locking Retractor (ALR) that is designed to
keep the lap portion of the seat belt tight around
the child restraint. The ALR retractor can be
“switched” into a locked mode by pulling all of
the webbing out of the retractor and then letting
the webbing retract back into the retractor. If it is
locked, the ALR will make a clicking noise while
the webbing is pulled back into the retractor. For
additional information on ALR, refer to the “Au-
tomatic Locking Mode” description under “Oc-
cupant Restraints.”
How To Stow An Unused Switchable-ALR
(ALR) Seat Belt:
When using the ISOFIX attaching system to
install a child restraint, stow all ALR seat beltsthat are not being used by other occupants or
being used to secure child restraints. An unused
belt could injure a child if they play with it and
accidentally lock the seat belt retractor. Before
installing a child restraint using the ISOFIX
system, buckle the seat belt behind the child
restraint and out of the child’s reach. If the
buckled seat belt interferes with the child re-
straint installation, instead of buckling it behind
the child restraint, route the seat belt through
the child restraint belt path and then buckle it.
Do not lock the seat belt. Remind all children in
the vehicle that the seat belts are not toys and
that they should not play with them.
Installing A Child Restraint With A
Switchable Automatic Locking Retractor
(ALR):
1. Place the child seat in the center of the
seating position. For some second row
seats, you may need to recline the seat
and/or raise the head restraint to get a better
fit. If the rear seat can be moved forward and
rearward in the vehicle, you may wish to
move it to its rear-most position to make
Rear Seat Tether Anchors
56
Page 61 of 332
room for the child seat. You may also move
the front seat forward to allow more room for
the child seat.
2. Pull enough of the seat belt webbing from
the retractor to pass it through the belt path
of the child restraint. Do not twist the belt
webbing in the belt path.
3. Slide the latch plate into the buckle until you
hear a “click.”
4. Pull on the webbing to make the lap portion
tight against the child seat.
5. To lock the seat belt, pull down on the
shoulder part of the belt until you have pulled
all the seat belt webbing out of the retractor.
Then, allow the webbing to retract back into
the retractor. As the webbing retracts, you
will hear a clicking sound. This means the
seat belt is now in the Automatic Locking
mode.6. Try to pull the webbing out of the retractor. If
it is locked, you should not be able to pull out
any webbing. If the retractor is not locked,
repeat step 5.
7.
Finally, pull up on any excess webbing to
tighten the lap portion around the child re-
straint while you push the child restraint rear-
ward and downward into the vehicle seat.
8. Test that the child restraint is installed tightly
by pulling back and forth on the child seat at
the belt path. It should not move more than
25 mm in any direction.
Any seat belt system will loosen with time, so
check the belt occasionally, and pull it tight if
necessary.
Transporting PetsAir Bags deploying in the front seat could harm
your pet. An unrestrained pet will be thrown
about and possibly injured, or injure a passen-
ger during panic braking or in a collision.
Pets should be restrained in the rear seat in pet
harnesses or pet carriers that are secured by
seat belts.
ENGINE BREAK-IN
RECOMMENDATIONS
A long break-in period is not required for the
engine and drivetrain (transmission and axle) in
your vehicle.
Drive moderately during the first 300 miles
(500 km). After the initial 60 miles (100 km),
speeds up to 50 or 55 mph (80 or 90 km/h) are
desirable.
While cruising, brief full-throttle acceleration
within the limits of local traffic laws contributes
to a good break-in. Wide-open throttle accelera-
tion in low gear can be detrimental and should
be avoided.
The engine oil installed in the engine at the
factory is a high-quality energy conserving type
lubricant. Oil changes should be consistent with
anticipated climate conditions under which ve-
hicle operations will occur. For the recom-
mended viscosity and quality grades, refer to
“Maintenance Procedures” in “Maintaining Your
Vehicle.”
57
Page 99 of 332
WARNING!
Be certain that the seatback is securely
locked into position. If the seatback is not
securely locked into position the seat will not
provide the proper stability for child seats
and/or passengers. An improperly latched
seat could cause serious injury.
Reclining Rear Seat — If EquippedFor additional comfort, pull the strap forward
just enough to release the seatback latch. Then
push the seatback to a reclined position, ap-
proximately 35 degrees maximum, and release
the strap.
WARNING!
Do not ride with the seatback reclined so that
the shoulder belt is no longer resting against
your chest. In a collision you could slide
under the seat belt and be seriously or even
fatally injured. Use the recliner only when the
vehicle is parked.
TO OPEN AND CLOSE THE
HOOD
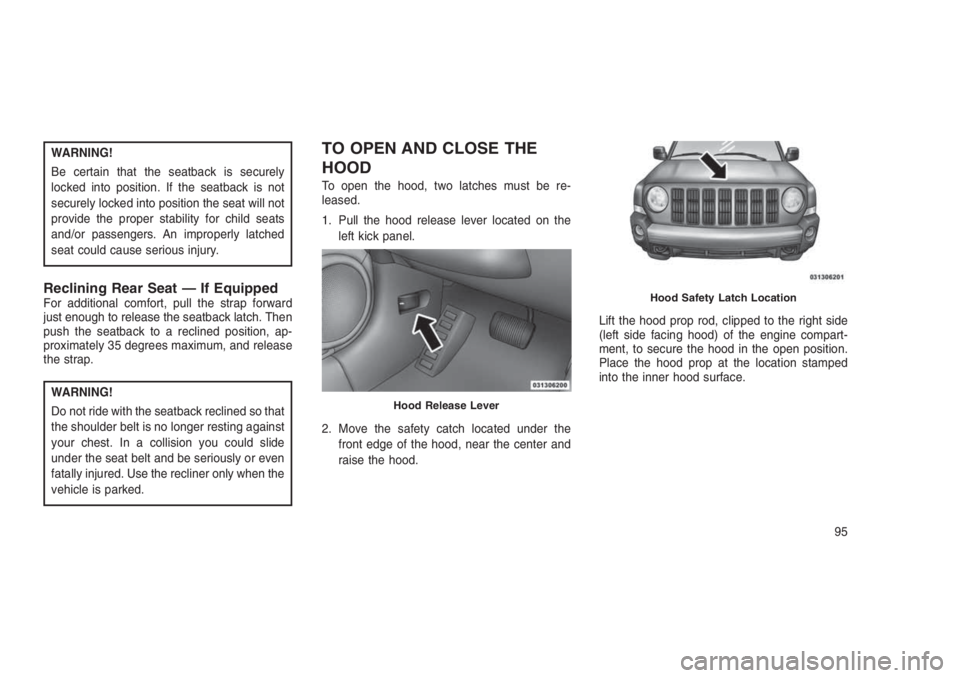
To open the hood, two latches must be re-
leased.
1. Pull the hood release lever located on the
left kick panel.
2. Move the safety catch located under the
front edge of the hood, near the center and
raise the hood.Lift the hood prop rod, clipped to the right side
(left side facing hood) of the engine compart-
ment, to secure the hood in the open position.
Place the hood prop at the location stamped
into the inner hood surface.
Hood Release Lever
Hood Safety Latch Location
95
Page 110 of 332
NOTE:
If snow, ice, mud, or any foreign substance
builds up on the camera lens, clean the lens,
rinse with water, and dry with a soft cloth. Do
not cover the lens.
POWER SUNROOF — IF
EQUIPPED
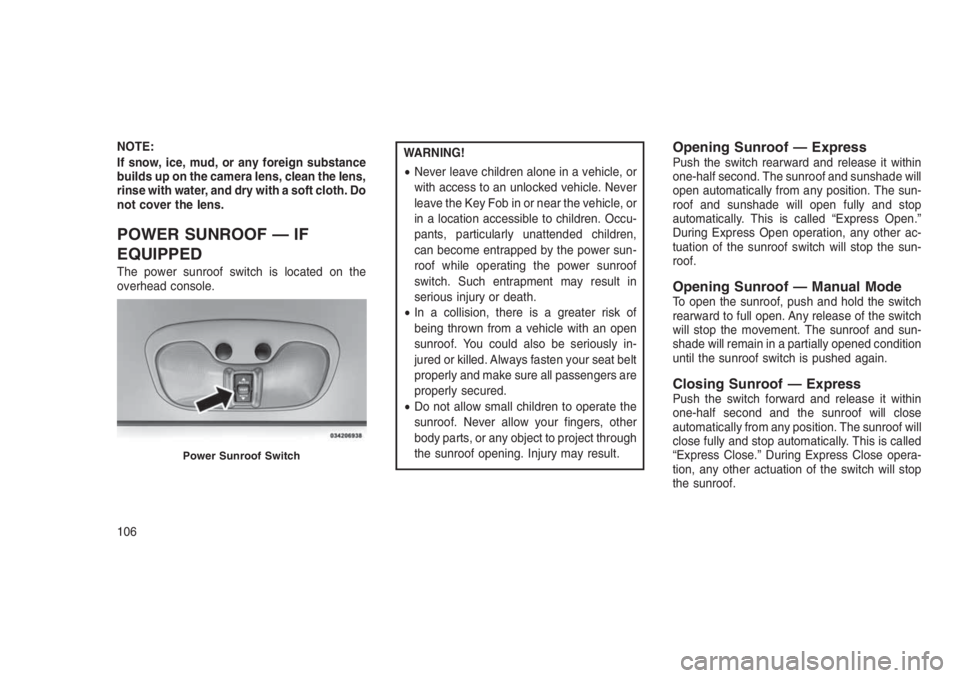
The power sunroof switch is located on the
overhead console.
WARNING!
•Never leave children alone in a vehicle, or
with access to an unlocked vehicle. Never
leave the Key Fob in or near the vehicle, or
in a location accessible to children. Occu-
pants, particularly unattended children,
can become entrapped by the power sun-
roof while operating the power sunroof
switch. Such entrapment may result in
serious injury or death.
•In a collision, there is a greater risk of
being thrown from a vehicle with an open
sunroof. You could also be seriously in-
jured or killed. Always fasten your seat belt
properly and make sure all passengers are
properly secured.
•Do not allow small children to operate the
sunroof. Never allow your fingers, other
body parts, or any object to project through
the sunroof opening. Injury may result.Opening Sunroof — ExpressPush the switch rearward and release it within
one-half second. The sunroof and sunshade will
open automatically from any position. The sun-
roof and sunshade will open fully and stop
automatically. This is called “Express Open.”
During Express Open operation, any other ac-
tuation of the sunroof switch will stop the sun-
roof.
Opening Sunroof — Manual ModeTo open the sunroof, push and hold the switch
rearward to full open. Any release of the switch
will stop the movement. The sunroof and sun-
shade will remain in a partially opened condition
until the sunroof switch is pushed again.
Closing Sunroof — ExpressPush the switch forward and release it within
one-half second and the sunroof will close
automatically from any position. The sunroof will
close fully and stop automatically. This is called
“Express Close.” During Express Close opera-
tion, any other actuation of the switch will stop
the sunroof.
Power Sunroof Switch
106
Page 169 of 332
STARTING PROCEDURES
Before starting your vehicle, adjust your seat,
adjust both inside and outside mirrors, and
fasten your seat belts.
WARNING!
•When leaving the vehicle, always remove
the Key Fob from the ignition and lock your
vehicle.
•Never leave children alone in a vehicle, or
with access to an unlocked vehicle. Allow-
ing children to be in a vehicle unattended
is dangerous for a number of reasons. A
child or others could be seriously or fatally
injured. Children should be warned not to
touch the parking brake, brake pedal or the
transmission gear selector.
•Do not leave the key fob in or near the
vehicle, or in a location accessible to chil-
dren. A child could operate power win-
dows, other controls, or move the vehicle.
(Continued)
WARNING!(Continued)
•Do not leave children or animals inside
parked vehicles in hot weather. Interior
heat build-up may cause serious injury or
death.
Manual Transmission — If EquippedBefore starting the engine fully apply the park-
ing brake, press the clutch pedal to the floor and
place the gear selector in NEUTRAL.
NOTE:
The engine will not start unless the clutch
pedal is pressed to the floor.
Automatic Transmission — If
Equipped
The gear selector must be in the PARK or
NEUTRAL position before you can start the
engine. Press the brake pedal before shifting to
any driving gear.
NOTE:
You must press the brake pedal before shift-
ing out of PARK.Tip Start
Do notpress the accelerator. Turn the ignition
switch to the START position and release it as
soon as the starter engages. The starter motor
will continue to run, and it will disengage auto-
matically when the engine is running. If the
engine fails to start, the starter will disengage
automatically in 10 seconds. If this occurs, turn
the ignition switch to the LOCK position, wait 10
to 15 seconds, then repeat the “Normal Start-
ing” procedure.
NOTE:
Normal starting of either a cold or a warm
engine is obtained without pumping or
pressing the accelerator pedal.
Normal StartingNormal starting of either a cold or a warm
engine does not require pumping or pressing
the accelerator pedal. Simply turn the ignition
switch to the START position and release when
the engine starts. If the engine fails to start
within 15 seconds, turn the ignition switch to the
OFF position, wait 10 to 15 seconds, then
repeat the “Normal Starting” procedure.
165
Page 173 of 332
WARNING!(Continued)
•When leaving the vehicle, always remove
the ignition key from the vehicle and lock
the vehicle.
•Never leave children alone in a vehicle, or
with access to an unlocked vehicle. Allow-
ing children to be in a vehicle unattended
is dangerous for a number of reasons. A
child or others could be seriously or fatally
injured. Children should be warned not to
touch the parking brake, brake pedal or the
transmission gear selector.
•Do not leave the ignition key in or near the
vehicle (or in a location accessible to chil-
dren). A child could operate power win-
dows, other controls, or move the vehicle.
Key Ignition Park InterlockThis vehicle is equipped with a Key Ignition Park
Interlock which requires the transmission to be
in PARK before the ignition switch can be turned
to the LOCK/OFF (key removal) position. The
key can only be removed from the ignition whenthe ignition is in the LOCK/OFF position, and
once removed the transmission is locked in
PARK.
NOTE:
If a malfunction occurs, the system will trap
the key in the ignition switch to warn you
that this safety feature is inoperable. The
engine can be started and stopped but the
key cannot be removed until you obtain
service.
Brake/Transmission Shift Interlock
System
This vehicle is equipped with a Brake Transmis-
sion Shift Interlock system (BTSI) that holds the
gear selector in PARK unless the brakes are
applied. To shift the transmission out of PARK,
the ignition switch must be turned to the ON/
RUN position (engine running or not) and the
brake pedal must be pressed.
Six-Speed Automatic Transmission
— If Equipped
The transmission gear position display (located
in the instrument cluster) indicates the transmis-
sion gear range. You must press the brakepedal to move the gear selector out of PARK
(refer to “Brake/Transmission Shift Interlock
System” in this section). To drive, move the gear
selector from PARK or NEUTRAL to the DRIVE
position.
The electronically-controlled transmission pro-
vides a precise shift schedule. The transmission
electronics are self-calibrating; therefore, the
first few shifts on a new vehicle may be some-
what abrupt. This is a normal condition, and
precision shifts will develop within a few hun-
dred miles (kilometers).
Only shift from DRIVE to PARK or REVERSE
when the accelerator pedal is released and the
vehicle is stopped. Be sure to keep your foot on
the brake pedal when shifting between these
gears.
The transmission gear selector has only PARK,
REVERSE, NEUTRAL, and DRIVE shift posi-
tions. Manual shifts can be made using the
AutoStick shift control (refer to “AutoStick” in
this section). Moving the gear selector to the left
or right (-/+) while in the DRIVE position will
169
Page 175 of 332

WARNING!(Continued)
•When leaving the vehicle, always remove
the ignition key from the vehicle and lock
the vehicle.
•Never leave children alone in a vehicle, or
with access to an unlocked vehicle. Allow-
ing children to be in a vehicle unattended
is dangerous for a number of reasons. A
child or others could be seriously or fatally
injured. Children should be warned not to
touch the parking brake, brake pedal or the
gear selector.
•Do not leave the ignition key in or near the
vehicle (or in a location accessible to chil-
dren). A child could operate power win-
dows, other controls, or move the vehicle.
CAUTION!
•Before moving the gear selector out of
PARK, you must turn the ignition switch
from the LOCK/OFF position to the ON/
RUN position, and also press the brake
pedal. Otherwise, damage to the gear se-
lector could result.
•DO NOT race the engine when shifting
from PARK or NEUTRAL into another gear
range, as this can damage the drivetrain.
The following indicators should be used to
ensure that you have engaged the transmission
into the PARK position:
•When shifting into PARK, firmly move the
gear selector all the way forward and to the
left until it stops and is fully seated.
•Look at the transmission gear position dis-
play and verify that it indicates the PARK
position (P).
•With brake pedal released, verify that the
gear selector will not move out of PARK.REVERSE (R)
This range is for moving the vehicle backward.
Shift into REVERSE only after the vehicle has
come to a complete stop.
NEUTRAL (N)
Use this range when the vehicle is standing for
prolonged periods with the engine running. The
engine may be started in this range. Apply the
parking brake and shift the transmission into
PARK if you must leave the vehicle.
WARNING!
Do not coast in NEUTRAL and never turn off
the ignition to coast down a hill. These are
unsafe practices that limit your response to
changing traffic or road conditions. You might
lose control of the vehicle and have a colli-
sion.
171