sensor JEEP PATRIOT 2020 Owner handbook (in English)
[x] Cancel search | Manufacturer: JEEP, Model Year: 2020, Model line: PATRIOT, Model: JEEP PATRIOT 2020Pages: 332, PDF Size: 1.99 MB
Page 19 of 332
To Arm The System
1. Remove the RKE Key Fob from the ignition
and get out of the vehicle.
2. Lock the door using either the power door
lock
switch or the RKE Key Fob lockbutton and close all doors.
3. The Vehicle Security Light in the instrument
cluster will flash rapidly for approximately 16
seconds. This shows that the Vehicle Secu-
rity Alarm is arming. During this period, if a
door is opened, the ignition is placed in the
ON/RUN position, or the power door locks
are unlocked in any manner, the Vehicle
Security Alarm will automatically disarm. Af-
ter approximately 16 seconds, the Vehicle
Security Light will flash slowly. This shows
that the Vehicle Security Alarm is fully
armed.
Rearming Of The SystemIf something triggers the alarm, and no action is
taken to disarm it, the Vehicle Security Alarm
will turn off the horn after 29 seconds, turn off all
of the visual signals after one minute, and then
the Vehicle Security Alarm will rearm itself.
To Disarm The SystemPush UNLOCK on the RKE Key Fob, or insert
the key into the ignition and place the ignition in
the ON/RUN position.
If something has triggered the Vehicle Security
Alarm in your absence, the exterior lights blink
three times when you unlock the doors. Check
the vehicle for tampering. The Vehicle Security
Alarm is designed to protect your vehicle; how-
ever, you can create conditions where the Ve-
hicle Security Alarm will arm unexpectedly. If
you remain in the vehicle and lock the doors
with the RKE Key Fob, once the Vehicle Secu-
rity Alarm is armed (after 16 seconds), when
you pull the door handle to exit, the alarm will
sound. If this occurs, push the UNLOCK button
on the RKE Key Fob to disarm the Vehicle
Security Alarm.
Vehicle Security Alarm Manual
Override
The Vehicle Security Alarm will not arm if you
lock the doors using the manual door lock
plunger.
PREMIUM VEHICLE SECURITY
ALARM — IF EQUIPPED
The Premium Vehicle Security Alarm system
monitors the doors, hood latch, liftgate, and
ignition switch for unauthorized operation.
If something triggers the security alarm, the
audible alert will sound for 29 seconds and flash
the lights for 60 seconds. If the triggering device
is not deactivated, the audible alert will sound
again after a five-second delay for another 29
seconds. If the trigger remains present, this
cycle will repeat for up to five minutes.
If the intrusion sensor is enabled, the security
alarm system will also monitor the vehicle for
movement. When this portion of the alarm is
set, movement inside the vehicle or movement
of the vehicle will trigger the Vehicle Security
Alarm.
15
Page 20 of 332
To Arm The System
1. Remove the RKE Key Fob from the ignition
and get out of the vehicle.
2. Lock the door using either the power door
lock switch or the RKE Key Fob, and close
all doors.
3. The Vehicle Security Light in the instrument
cluster will flash rapidly for 16 seconds. This
shows that the security alarm is arming. After
16 seconds, the locks will activate and the
Vehicle Security Light will continue to flash
slowly. This shows that the Vehicle Security
Alarm system is fully armed.
NOTE:
The intrusion sensor (motion detector) ac-
tively monitors your vehicle every time you
arm the security alarm. If you prefer, you can
turn off the intrusion sensor when arming
the security alarm.
To disable the intrusion sensor, activate the
LOCK request three times using the RKE Key
Fob during the arming period (lamp flashingquickly). The intrusion sensor will automatically
be enabled the next time the security alarm is
set.
To Disarm The SystemPush UNLOCK on the RKE Key Fob, or insert
the RKE Key into the ignition and place the
ignition in the ON/RUN position.
NOTE:
•Battery disconnects will not disarm the
security alarm system.
•Using the RKE Key in the door lock cylin-
der will only unlock the deadbolt locks.
•To open the doors after the security alarm
is set and the locks are activated, push
the unlock button on the RKE Key Fob.
You can also unlock the door lock plunger
and door handle by inserting the RKE Key
into lock cylinder on the door and turning
it, but the alarm will sound. In this case,
insert the RKE Key into the ignition and
place it in the ON/RUN position.If the security alarm has been triggered, the
Vehicle Security Light will flash twice every two
seconds.Vehicle Security Alarm Manual
Override
The security alarm will not arm if you lock the
doors using the manual door lock plunger.
REMOTE KEYLESS ENTRY
(RKE)
This system allows you to lock or unlock the
doors and liftgate from distances up to approxi-
mately 33 ft (10 m) using a hand-held RKE Key
Fob. The RKE Key Fob does not need to be
pointed at the vehicle to activate the system.
16
Page 42 of 332
Supplemental Restraint System
(SRS)
Air Bag System Components
Your vehicle may be equipped with the following
air bag system components:
•Occupant Restraint Controller (ORC)
•Air Bag Warning Light
•Steering Wheel and Column
•Instrument Panel
•Knee Impact Bolsters
•Advanced Front Air Bags
•Supplemental Side Air Bags
•Front and Side Impact Sensors
•Seat Belt Pretensioners
•Seat Belt Buckle Switch
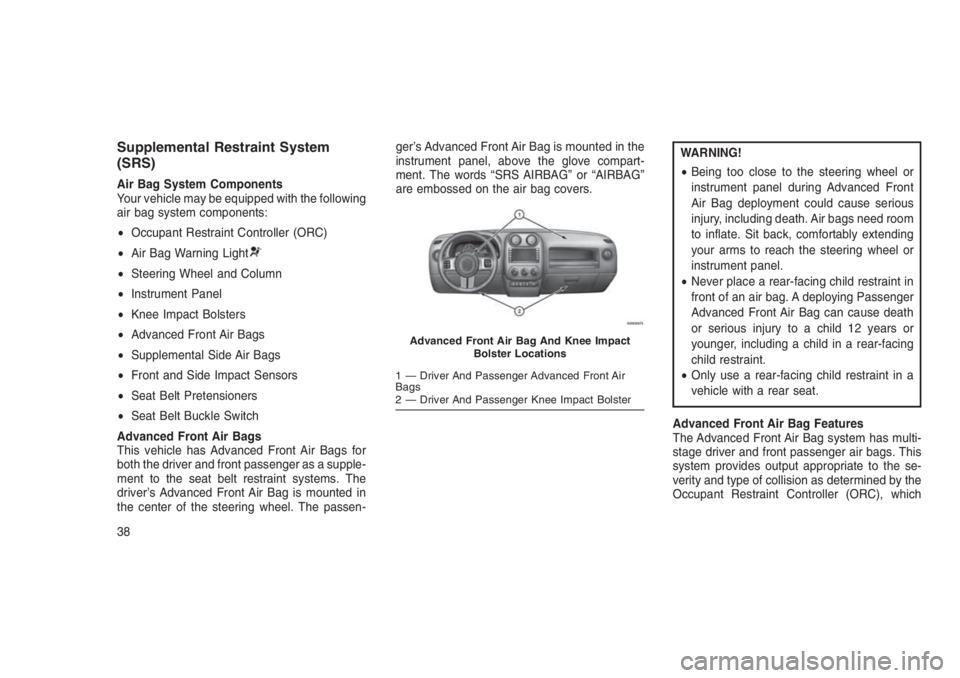
Advanced Front Air Bags
This vehicle has Advanced Front Air Bags for
both the driver and front passenger as a supple-
ment to the seat belt restraint systems. The
driver’s Advanced Front Air Bag is mounted in
the center of the steering wheel. The passen-ger’s Advanced Front Air Bag is mounted in the
instrument panel, above the glove compart-
ment. The words “SRS AIRBAG” or “AIRBAG”
are embossed on the air bag covers.
WARNING!
•Being too close to the steering wheel or
instrument panel during Advanced Front
Air Bag deployment could cause serious
injury, including death. Air bags need room
to inflate. Sit back, comfortably extending
your arms to reach the steering wheel or
instrument panel.
•Never place a rear-facing child restraint in
front of an air bag. A deploying Passenger
Advanced Front Air Bag can cause death
or serious injury to a child 12 years or
younger, including a child in a rear-facing
child restraint.
•Only use a rear-facing child restraint in a
vehicle with a rear seat.
Advanced Front Air Bag Features
The Advanced Front Air Bag system has multi-
stage driver and front passenger air bags. This
system provides output appropriate to the se-
verity and type of collision as determined by the
Occupant Restraint Controller (ORC), which
Advanced Front Air Bag And Knee Impact
Bolster Locations
1 — Driver And Passenger Advanced Front Air
Bags
2 — Driver And Passenger Knee Impact Bolster
38
Page 43 of 332
may receive information from the front impact
sensors or other system components.
The first stage inflator is triggered immediately
during an impact that requires air bag deploy-
ment. A low energy output is used in less severe
collisions. A higher energy output is used for
more severe collisions.
This vehicle may be equipped with a driver
and/or front passenger seat belt buckle switch
that detects whether the driver or front passen-
ger seat belt is buckled. The seat belt buckle
switch may adjust the inflation rate of the Ad-
vanced Front Air Bags.
WARNING!
•No objects should be placed over or near
the air bag on the instrument panel or
steering wheel because any such objects
could cause harm if the vehicle is in a
collision severe enough to cause the air
bag to inflate.
(Continued)
WARNING!(Continued)
•Do not put anything on or around the air
bag covers or attempt to open them manu-
ally. You may damage the air bags and you
could be injured because the air bags may
no longer be functional. The protective
covers for the air bag cushions are de-
signed to open only when the air bags are
inflating.
•Relying on the air bags alone could lead to
more severe injuries in a collision. The air
bags work with your seat belt to restrain
you properly. In some collisions, air bags
won’t deploy at all. Always wear your seat
belts even though you have air bags.
Advanced Front Air Bag Operation
Advanced Front Air Bags are designed to pro-
vide additional protection by supplementing the
seat belts. Advanced Front Air Bags are not
expected to reduce the risk of injury in rear,
side, or rollover collisions. The Advanced Front
Air Bags will not deploy in all frontal collisions,
including some that may produce substantialvehicle damage — for example, some pole
collisions, truck underrides, and angle offset
collisions.
On the other hand, depending on the type and
location of impact, Advanced Front Air Bags
may deploy in crashes with little vehicle front-
end damage but that produce a severe initial
deceleration.
Because air bag sensors measure vehicle de-
celeration over time, vehicle speed and damage
by themselves are not good indicators of
whether or not an air bag should have de-
ployed.
Seat belts are necessary for your protection in
all collisions, and also are needed to help keep
you in position, away from an inflating air bag.
When the ORC detects a collision requiring the
Advanced Front Air Bags, it signals the inflator
units. A large quantity of non-toxic gas is gen-
erated to inflate the Advanced Front Air Bags.
The steering wheel hub trim cover and the
upper right side of the instrument panel sepa-
rate and fold out of the way as the air bags
inflate to their full size. The Advanced Front Air
39
Page 46 of 332
including children, who are up against or very
close to Side Air Bags can be seriously injured
or killed. Occupants, including children, should
never lean on or sleep against the door, side
windows, or area where the Side Air Bags
inflate, even if they are in an infant or child
restraint.
Seat belts (and child restraints where appropri-
ate) are necessary for your protection in all
collisions. They also help keep you in position,
away from inflating Side Air Bags. To get the
best protection from the Side Air Bags, occu-
pants must wear their seat belts properly and sit
upright with their backs against the seats. Chil-
dren must be properly restrained in a child
restraint or booster seat that is appropriate for
the size of the child.
WARNING!
•Side Air Bags need room to inflate. Do not
lean against the door or window. Sit up-
right in the center of the seat.
(Continued)
WARNING!(Continued)
•Being too close to the Side Air Bags during
deployment could cause you to be se-
verely injured or killed.
•Relying on the Side Air Bags alone could
lead to more severe injuries in a collision.
The Side Air Bags work with your seat belt
to restrain you properly. In some collisions,
Side Air Bags won’t deploy at all. Always
wear your seat belt even though you have
Side Air Bags.
NOTE:
Air bag covers may not be obvious in the
interior trim, but they will open during air
bag deployment.
Side Impacts
In side impacts, the side impact sensors aid the
ORC in determining the appropriate response
to impact events. The system is calibrated to
deploy the Side Air Bags on the impact side of
the vehicle during impacts that require Side Air
Bag occupant protection. In side impacts, theSide Air Bags deploy independently; a left side
impact deploys the left Side Air Bags only and a
right side impact deploys the right Side Air Bags
only.
The Side Air Bags will not deploy in all side
collisions, including some collisions at certain
angles, or some side collisions that do not
impact the area of the passenger compartment.
The Side Air Bags may deploy during angled or
offset frontal collisions where the Advanced
Front Air Bags deploy.
Rollover Events
Side Air Bags are designed to activate in certain
rollover events. The ORC determines whether
the deployment of the Side Air Bags in a par-
ticular rollover event is appropriate, based on
the severity and type of collision. Vehicle dam-
age by itself is not a good indicator of whether or
not Side Air Bags should have deployed.
The Side Air Bags will not deploy in all rollover
events. The rollover sensing-system deter-
mines if a rollover event may be in progress and
whether deployment is appropriate. A slower-
developing event may deploy the seat belt
pretensioners on both sides of the vehicle. A
42
Page 135 of 332
able to detect or signal low tire pressure as
intended. TPMS malfunctions may occur for a
variety of reasons, including the installation of
replacement or alternate tires or wheels on the
vehicle that prevent the TPMS from functioning
properly. Always check the TPMS malfunction
telltale after replacing one or more tires or
wheels on your vehicle, to ensure that the
replacement or alternate tires and wheels allow
the TPMS to continue to function properly.CAUTION!
The TPMS has been optimized for the origi-
nal equipment tires and wheels. TPMS pres-
sures and warning have been established for
the tire size equipped on your vehicle. Un-
desirable system operation or sensor dam-
age may result when using replacement
equipment that is not of the same size, type,
(Continued)
CAUTION!(Continued)
and/or style. Aftermarket wheels can cause
sensor damage. Using aftermarket tire seal-
ants may cause the Tire Pressure Monitoring
System (TPMS) sensor to become inoper-
able. After using an aftermarket tire sealant it
is recommended that you take your vehicle
to an authorized dealership to have your
sensor function checked.
Electronic Stability Control (ESC) OFF Indicator Light — If Equipped
Yellow Telltale Light What It Means
Electronic Stability Control (ESC) OFF Indicator Light — If Equipped
This light indicates the Electronic Stability Control (ESC) is off.
131
Page 195 of 332
four times within twenty seconds. The “ESC
Off Indicator Light” should turn on and turn
off two times.
7. Rotate the steering wheel back to center and
then an additional slighty more than one-half
turn to the right.
8. Turn the ignition switch to the OFF position
and then back to the ON position. If the
sequence was completed properly, the “ESC
Off Indicator Light” will blink several times to
confirm HSA is disabled.
9. Repeat these steps if you want to return this
feature to its previous setting.
Traction Control System (TCS)This system monitors the amount of wheel spin
of each of the driven wheels. If wheel spin is
detected, the TCS may apply brake pressure to
the spinning wheel(s) and/or reduce engine
power to provide enhanced acceleration and
stability. A feature of the TCS, Brake Limited
Differential (BLD), functions similar to a limited
slip differential and controls the wheel spin
across a driven axle. If one wheel on a drivenaxle is spinning faster than the other, the sys-
tem will apply the brake of the spinning wheel.
This will allow more engine torque to be applied
to the wheel that is not spinning. BLD may
remain enabled even if TCS and ESC are in a
reduced mode.
Electronic Stability Control (ESC)This system enhances directional control and
stability of the vehicle under various driving
conditions. ESC corrects for over-steering or
under-steering of the vehicle by applying the
brake of the appropriate wheel to assist in
counteracting the over-steering or under-
steering condition. Engine power may also be
reduced to help the vehicle maintain the desired
path. ESC uses sensors in the vehicle to deter-
mine the vehicle path intended by the driver and
compares it to the actual path of the vehicle.
When the actual path does not match the
intended path, ESC applies the brake of the
appropriate wheel to assist in counteracting the
over-steer or under-steer condition
•Oversteer - when the vehicle is turning more
than appropriate for the steering wheel posi-
tion.•Understeer - when the vehicle is turning less
than appropriate for the steering wheel
position.
WARNING!
•The Electronic Stability Control (ESC) can-
not prevent the natural laws of physics
from acting on the vehicle, nor can it
increase the traction afforded by prevailing
road conditions.
•ESC cannot prevent accidents, including
those resulting from excessive speed in
turns, driving on very slippery surfaces, or
hydroplaning. ESC also cannot prevent
collisions resulting from loss of vehicle
control due to inappropriate driver input for
the conditions. Only a safe, attentive, and
skillful driver can prevent collisions.
(Continued)
191
Page 209 of 332
CAUTION!
•The TPMS has been optimized for the
original equipment tires and wheels. TPMS
pressures and warning have been estab-
lished for the tire size equipped on your
vehicle. Undesirable system operation or
sensor damage may result when using
replacement equipment that is not of the
same size, type, and/or style. Aftermarket
wheels can cause sensor damage.
•Using aftermarket tire sealants may cause
the Tire Pressure Monitoring System
(TPMS) sensor to become inoperable. Af-
ter using an aftermarket tire sealant it is
recommended that you take your vehicle
to an authorized dealership to have your
sensor function checked.
•After inspecting or adjusting the tire pres-
sure always reinstall the valve stem cap.
This will prevent moisture and dirt from
entering the valve stem, which could dam-
age the TPMS sensor.NOTE:
•The TPMS is not intended to replace nor-
mal tire care and maintenance or to pro-
vide warning of a tire failure or condition.
•The TPMS should not be used as a tire
pressure gauge while adjusting your tire
pressure.
•Driving on a significantly under-inflated
tire causes the tire to overheat and can
lead to tire failure. Under-inflation also
reduces fuel efficiency and tire tread life,
and may affect the vehicle’s handling and
stopping ability.
•The TPMS is not a substitute for proper
tire maintenance, and it is the driver’s
responsibility to maintain correct tire
pressure using an accurate tire gauge,
even if under-inflation has not reached
the level to trigger illumination of the Tire
Pressure Monitoring Telltale Light.
•Seasonal temperature changes will affect
tire pressure, and the TPMS will monitor
the actual tire pressure in the tire.Base System
This is the TPMS warning indicator
located in the instrument cluster.
The TPMS uses wireless technology with wheel
rim mounted electronic sensors to monitor tire
pressure levels. Sensors, mounted to each
wheel as part of the valve stem, transmit tire
pressure readings to the Receiver Module.
NOTE:
It is particularly important for you to check
the tire pressure in all of the tires on your
vehicle regularly and to maintain the proper
pressure.
The TPMS consists of the following compo-
nents:
•Receiver Module.
•Four Tire Pressure Monitoring Sensors.
•Tire Pressure Monitoring Telltale Light.
205
Page 210 of 332
Tire Pressure Monitoring Low Pressure
Warnings
The Tire Pressure Monitoring Telltale Light will
illuminate in the instrument cluster, a LOW TIRE
message will be displayed for a minimum of five
seconds, and an audible chime will be activated
when one or more of the four active road tire
pressures are low. Should this occur, you
should stop as soon as possible, check the
inflation pressure of each tire on your vehicle,
and inflate each tire to the vehicle’s recom-
mended cold placard pressure value. The sys-
tem will automatically update and the Tire Pres-
sure Monitoring Light will extinguish and the
LOW TIRE message will turn off once the
updated tire pressures have been received.
NOTE:
When filling warm tires, the tire pressure
may need to be increased up to an additional
4 psi (30 kPa) above the recommended cold
placard pressure in order to turn the Tire
Pressure Monitoring Telltale Light off.
The vehicle may need to be driven for up to 10
minutes above 15 mph (24 km/h) to receive this
information.Check TPMS Warnings
The Tire Pressure Monitoring Telltale Light will
flash on and off for 75 seconds and remain on
solid when a system fault is detected. The
system fault will also sound a chime. If the
ignition key is cycled, this sequence will repeat
providing the system fault still exists. The Tire
Pressure Monitoring Telltale Light will turn off
when the fault condition no longer exists. A
system fault can occur with any of the following
scenarios:
1. Jamming due to electronic devices or driving
next to facilities emitting the same radio
frequencies as the TPM sensors.
2. Installing some form of aftermarket window
tinting that affects radio wave signals.
3. Snow or ice around the wheels or wheel
housings.
4. Using tire chains on the vehicle.
5. Using wheels/tires not equipped with TPM
sensors.NOTE:
Your vehicle is equipped with a compact
spare wheel and tire assembly.
1. The compact spare tire does not have a tire
pressure monitoring sensor. Therefore, the
TPMS will not monitor the tire pressure in the
compact spare tire.
2. If you install the compact spare tire in place
of a road tire that has a pressure below the
low-pressure warning limit, upon the next
ignition key cycle, a chime will sound and the
Tire Pressure Monitoring Telltale Light and
LOW TIRE message will still turn ON due to
the low tire.
3. However, after driving the vehicle for up to
10 minutes above 15 mph (24 km/h), the Tire
Pressure Monitoring Telltale Light will flash
on and off for 75 seconds and then remain
on solid.
4. For each subsequent ignition key cycle, a
chime will sound and the Tire Pressure
Monitoring Telltale Light will flash on and off
for 75 seconds and then remain on solid.
206
Page 211 of 332
5. Once you repair or replace the original road
tire and reinstall it on the vehicle in place of
the compact spare tire, the TPMS will update
automatically and the Tire Pressure Monitor-
ing Telltale Light will turn OFF, as long as no
tire pressure is below the low-pressure
warning limit in any of the four active road
tires. The vehicle may need to be driven for
up to 10 minutes above 15 mph (24 km/h) in
order for the TPMS to receive this informa-
tion.
Premium System — If EquippedThe TPMS uses wireless technology with wheel
rim mounted electronic sensors to monitor tire
pressure levels. Sensors, mounted to each
wheel as part of the valve stem, transmit tire
pressure readings to the receiver module.
NOTE:
It is particularly important for you to check
the tire pressure in all of your tires regularly
and to maintain the proper pressure.
The TPMS consists of the following compo-
nents:•Receiver Module
•Four Tire Pressure Monitoring Sensors
•Three Trigger Modules (mounted in three of
the four wheel wells)
•Various Tire Pressure Monitoring System
Messages, which display in the Electronic
Vehicle Information Center (EVIC)
•Tire Pressure Monitoring Telltale Light
Tire Pressure Monitoring Low Pressure
Warnings
The Tire Pressure Monitoring Telltale Light will
illuminate in the instrument cluster and an au-
dible chime will be activated when one or more
of the four active road tire pressures are low.
The audible chime will sound once every igni-
tion cycle for the first condition that it detects. In
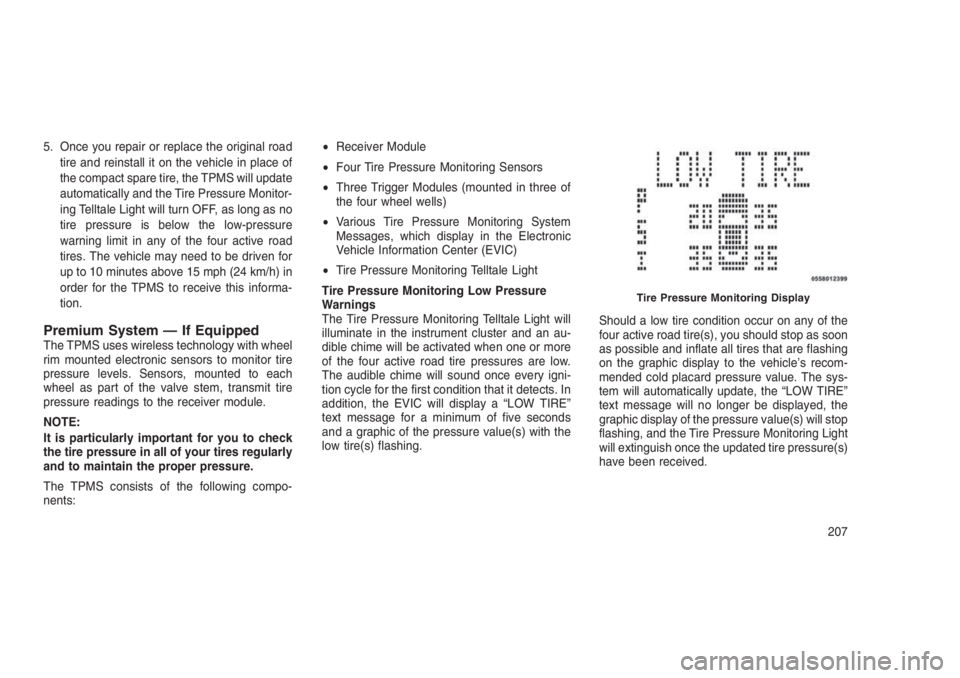
addition, the EVIC will display a “LOW TIRE”
text message for a minimum of five seconds
and a graphic of the pressure value(s) with the
low tire(s) flashing.Should a low tire condition occur on any of the
four active road tire(s), you should stop as soon
as possible and inflate all tires that are flashing
on the graphic display to the vehicle’s recom-
mended cold placard pressure value. The sys-
tem will automatically update, the “LOW TIRE”
text message will no longer be displayed, the
graphic display of the pressure value(s) will stop
flashing, and the Tire Pressure Monitoring Light
will extinguish once the updated tire pressure(s)
have been received.
Tire Pressure Monitoring Display
207