navigation JEEP RENEGADE 2014 1.G Owners Manual
[x] Cancel search | Manufacturer: JEEP, Model Year: 2014, Model line: RENEGADE, Model: JEEP RENEGADE 2014 1.GPages: 212, PDF Size: 17.48 MB
Page 43 of 212
CONTROL BUTTONS
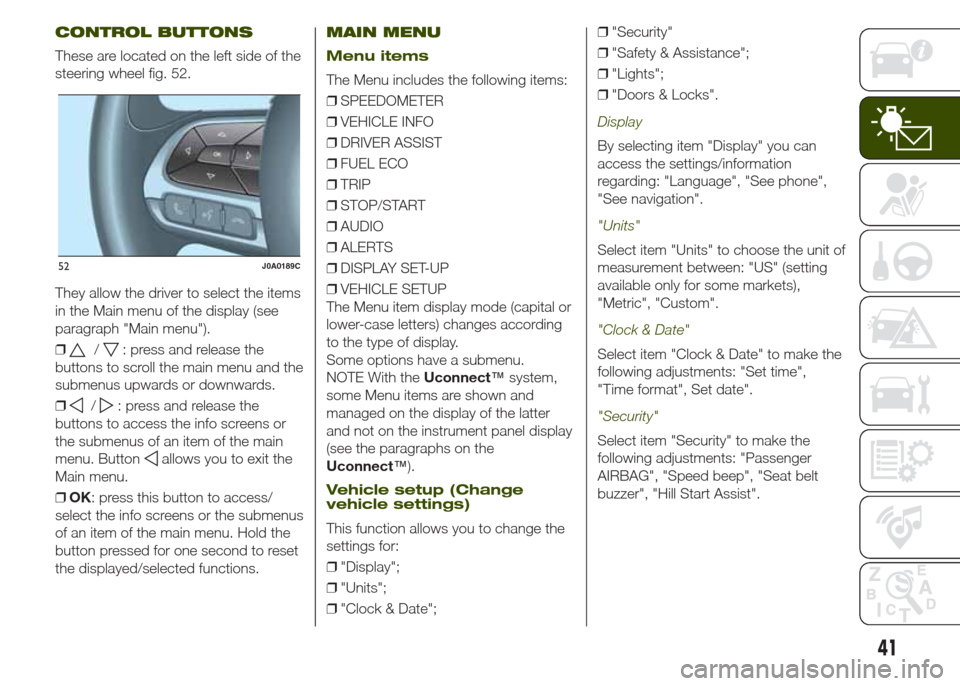
These are located on the left side of the
steering wheel fig. 52.
They allow the driver to select the items
in the Main menu of the display (see
paragraph "Main menu").
❒
/: press and release the
buttons to scroll the main menu and the
submenus upwards or downwards.
❒
/: press and release the
buttons to access the info screens or
the submenus of an item of the main
menu. Button
allows you to exit the
Main menu.
❒OK: press this button to access/
select the info screens or the submenus
of an item of the main menu. Hold the
button pressed for one second to reset
the displayed/selected functions.
MAIN MENU
Menu items
The Menu includes the following items:
❒SPEEDOMETER
❒VEHICLE INFO
❒DRIVER ASSIST
❒FUEL ECO
❒TRIP
❒STOP/START
❒AUDIO
❒ALERTS
❒DISPLAY SET-UP
❒VEHICLE SETUP
The Menu item display mode (capital or
lower-case letters) changes according
to the type of display.
Some options have a submenu.
NOTE With theUconnect™system,
some Menu items are shown and
managed on the display of the latter
and not on the instrument panel display
(see the paragraphs on the
Uconnect™).
Vehicle setup (Change
vehicle settings)
This function allows you to change the
settings for:
❒"Display";
❒"Units";
❒"Clock & Date";❒"Security"
❒"Safety & Assistance";
❒"Lights";
❒"Doors & Locks".
Display
By selecting item "Display" you can
access the settings/information
regarding: "Language", "See phone",
"See navigation".
"Units"
Select item "Units" to choose the unit of
measurement between: "US" (setting
available only for some markets),
"Metric", "Custom".
"Clock & Date"
Select item "Clock & Date" to make the
following adjustments: "Set time",
"Time format", Set date".
"Security"
Select item "Security" to make the
following adjustments: "Passenger
AIRBAG", "Speed beep", "Seat belt
buzzer", "Hill Start Assist".
52J0A0189C
41
Page 44 of 212
The "Passenger AIRBAG" function is
used to activate/deactivate the front
passenger side airbag.Passenger's
protection active: the LED
ON
comes on constantly on the dashboard
located in the instrument panel.
Passenger's protection not active:
the LED
OFFon the dashboard
comes on constantly in the control
panel.
"Safety & Assistance"
For possible adjustments see
paragraphUconnect™in chapter
"Multimedia".
"Lights"
Select item "Lights" to make the
following adjustments: "Ambient
lighting", "Follow me", "Headlights while
opening", "Headlight sensor", "High
Beams Auto Dim", "Daytime Lights",
"Cornering lights".
"Doors & Locks"
Select item "Doors & Locks" to make
the following adjustments: "Autoclose",
"Auto unlock on exit", "Flash Lights
w/Lock", "Horn with Lock", "Horn
w/Remote Start", "Remote Unlock"
(versions without Passive Entry), "Door
Unlock" (versions with Passive Entry),
"Passive Entry".
Versions with
reconfigurable multifunction
display
On versions equipped with
reconfigurable multifunction display only
the following items are available:
"Display" (only items "See phone" and
"See navigation" can be selected),
"Security" and "Safety & Assistance"
(only item "Buzzer volume" can be
selected). All other items will be shown
and managed on theUconnect™
system display.
TRIP COMPUTER
The “Trip computer” is used to display
information on vehicle operation when
the ignition device is at MAR.
This function is characterised by two
separate memories, called "Trip A" and
"Trip B", where the vehicle's "complete
missions" (journeys) are recorded in a
reciprocally independent manner.
“Trip A”allows the following values to
be displayed: "Distance travelled A",
"Average consumption A", "Journey
time (driving time) A".
“Trip B”allows the following values to
be displayed: "Distance travelled B",
"Average consumption B", "Journey
time (driving time) B". The “Trip B”
function may be excluded.
Both memories can be reset: (reset -
start of a new journey).
To reset the values of "Trip A" and "Trip
B" press and hold theOKbutton on
the steering wheel controls.
NOTE “Range” and “Instantaneous fuel
consumption" parameters cannot be
reset.
42
KNOWING THE INSTRUMENT PANEL
Page 186 of 212
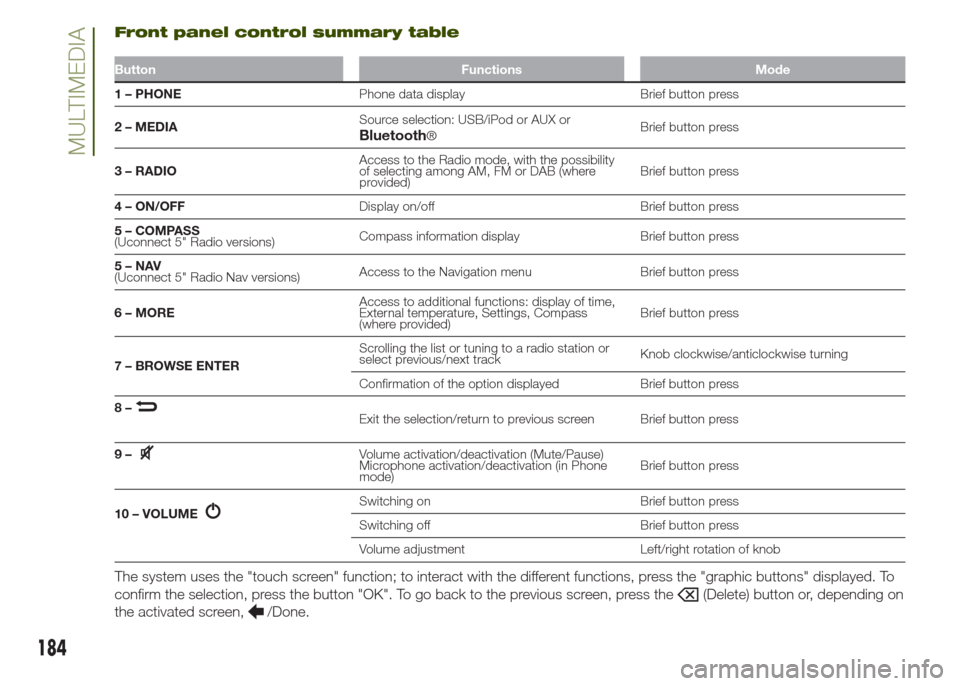
Front panel control summary table
Button Functions Mode
1 – PHONEPhone data display Brief button press
2 – MEDIASource selection: USB/iPod or AUX or
®Brief button press
3 – RADIOAccess to the Radio mode, with the possibility
of selecting among AM, FM or DAB (where
provided)Brief button press
4 – ON/OFFDisplay on/off Brief button press
5 – COMPASS
(Uconnect 5" Radio versions)Compass information display Brief button press
5–NAV
(Uconnect 5" Radio Nav versions)Access to the Navigation menu Brief button press
6 – MOREAccess to additional functions: display of time,
External temperature, Settings, Compass
(where provided)Brief button press
7 – BROWSE ENTERScrolling the list or tuning to a radio station or
select previous/next trackKnob clockwise/anticlockwise turning
Confirmation of the option displayed Brief button press
8–
Exit the selection/return to previous screen Brief button press
9–
Volume activation/deactivation (Mute/Pause)
Microphone activation/deactivation (in Phone
mode)Brief button press
10 – VOLUME
Switching on Brief button press
Switching off Brief button press
Volume adjustment Left/right rotation of knob
The system uses the "touch screen" function; to interact with the different functions, press the "graphic buttons" displayed. To
confirm the selection, press the button "OK". To go back to the previous screen, press the
(Delete) button or, depending on
the activated screen,
/Done.
184
MULTIMEDIABluetooth
Page 192 of 212
❒"Sound & Display": the system warns
the driver that an obstacle is present
through acoustic (via the speakers
in the vehicle) and visual (on the
instrument panel) warnings.
Front ParkSense Vol.(where provided)
This function can be used to select the
volume of the acoustic warnings
provided by the front Parksense
system.
Rear ParkSense Vol.(where provided)
This function can be used to select the
volume of the acoustic warnings
provided by the rear Parksense system.
ParkSense Vol.(where provided)
This function can be used to select the
volume of the acoustic warnings
provided by the Parksense system.
LaneSense Warning(where provided)
This function can be used to select the
"readiness" of the LaneSense system to
intervene.
LaneSense Strength(where provided)
This function can be used to select the
force to apply to the steering wheel
to put the vehicle back in the lane
through the electric steering system, in
the event of LaneSense system
intervention.
SideSense(where provided)
This function can be used to select the
Side Distance Warning system warning
type.
The options available are:
❒"Off": the system is deactivated;
❒"Sound Only": the system warns the
driver that an obstacle is present
through acoustic warnings only, via the
speakers in the vehicle.
❒"Sound & Display": the system warns
the driver that an obstacle is present
through acoustic (via the speakers
in the vehicle) and visual (on the
instrument panel) warnings.
SideSense Intensity(where provided)
This function can be used to select the
Side Distance Warning system acoustic
warning volume.
Blind Spot Alert(where provided)
This function can be used to select the
type of warning ("Sound Only" or
"Sound & Display") to indicate the
presence of objects in the blind spot of
the door mirror.
Rain sensor(where provided)
This function can be used to activate/
deactivate the automatic operation
of the wipers in the event of rain.
Brakes(where provided)
This function can be used to select the
following submenus:
❒"Brake Service" (where provided):
permits the activation of the procedure
to carry out braking system servicing;
❒"Auto Park Brake" (where provided):
permits the activation/deactivation of
automatic parking brake engagement.
NAVIGATION(Uconnect 5" Radio Nav versions only)
Programming a route
IMPORTANT In the interest of safety
and to reduce distractions while you are
driving, you should always plan a route
before you start driving.
190
MULTIMEDIA
Page 193 of 212
❒tap the screen to open the Main
menu;
❒select "Navigate to" or "Drive to";
❒select "Address": you can change the
country or state setting by tapping the
flag before you select a city;
❒enter the town or city name, or the
postcode. Towns with similar names
are shown in the list while you type;
Tip: tap the arrow to the right of the list
to expand the list of suggested towns.
When the correct city or town appears
in the list, tap the name to select the
destination.
❒enter the street name. Streets with
similar names are shown in the list while
you type. When the correct street
name appears in the list, tap the name
to select the destination;
❒enter the house number, then tap
"Done";
❒the location is shown on the map.
Tap "Select" to continue or tap "Back"
to enter another address;
❒when the new route is shown, tap
"Done". For more information about the
route, tap "Details". To change your
route, for example, to travel via a
particular location or to select a new
destination, tap "Change route". You
are guided to your destination, using
spoken instructions and on-screen
directions.
MAP UPDATE(Uconnect 5" Radio Nav versions only)
The map can be updated in two
different ways:
❒most recent maps guarantee:ifa
new map is available for your system
within 90 day of initial use, it can be
downloaded once free of charge.
❒map update: it is possible to
purchase a new version of the map
installed on your system.
Preparing a USB device
To update the map, a USB device that
meets the following requirements must
be used:
❒ideally, the USB device should be
empty;
❒the USB device must have at least
8 GB of memory free;
❒the USB must use a FAT-32 file
system;
❒the USB device must not be blocked
and must allow files to be saved.
NOTE The use of a memory stick is
recommended, while the use of mass
storage devices, such as mobile
phones or multimedia players, is not
recommended.
To prepare a USB device, proceed as
follows:❒ensure that the map you wish to
update is active in the navigation
system. If the navigation system has
several maps and you wish to update a
map which is not currently active,
activate the map. To do this, select
"Change map" in the "Settings" menu
of the navigation application;
❒select "Navigation updates" in the
"Settings" menu. You are asked
whether you wish to prepare a USB
device for downloading updates;
❒select "Yes";
❒insert the USB device.
The system starts to prepare the USB
device.
When the USB device is ready, the
display shows a dedicated message.
Remove the USB device and connect it
to the computer. The new map can
now be downloaded to the USB
device.
TomTom HOME installation
To install TomTom HOME and create
a MyTomTom account, proceed as
follows:
❒download and install the TomTom
HOME application on the computer. On
the computer, access
www.tomtom.com/getstarted. Select
"Download TomTom HOME", then
follow the instructions provided.
191
To plan a route, do the following:
Page 195 of 212
VOICE COMMANDS
NOTE For languages not supported by
the system, voice commands are not
available.
To use the voice commands, press the
button ("Voice" button) or
("Phone" button) on the controls of
the steering wheel and give the
command you want to activate, out
loud.
Phone functions
Thebutton activates the following
functions:
❒Call
❒Dial
❒Redial
❒Call back
❒Last calls
❒Outgoing calls
❒Missed calls
❒Incoming calls
❒Phonebook
❒Search
❒Show SMS
Radio functions
Thebutton activates the following
functions:
❒Tune to XXX-FM
❒Tune to XXX AM
❒Tune to Radio XXX
❒Tune to DAB channel
Media Functions
Thebutton activates the following
functions:
❒Play song...
❒Play album…
❒Play artist…
❒Play genre…
❒Play playlist…
❒Play podcast…
❒Play audiobook…
❒Play track number…
❒Select the media
❒Display
Navigation functions(only versions with Uconnect 5" Radio
Nav and Uconnect 6.5" Radio Nav)
The
button activates the following
functions:
❒Drive Home
❒2D view
❒3D view
❒Clear route
❒Add Favourite
❒Repeat instruction
193
Page 197 of 212
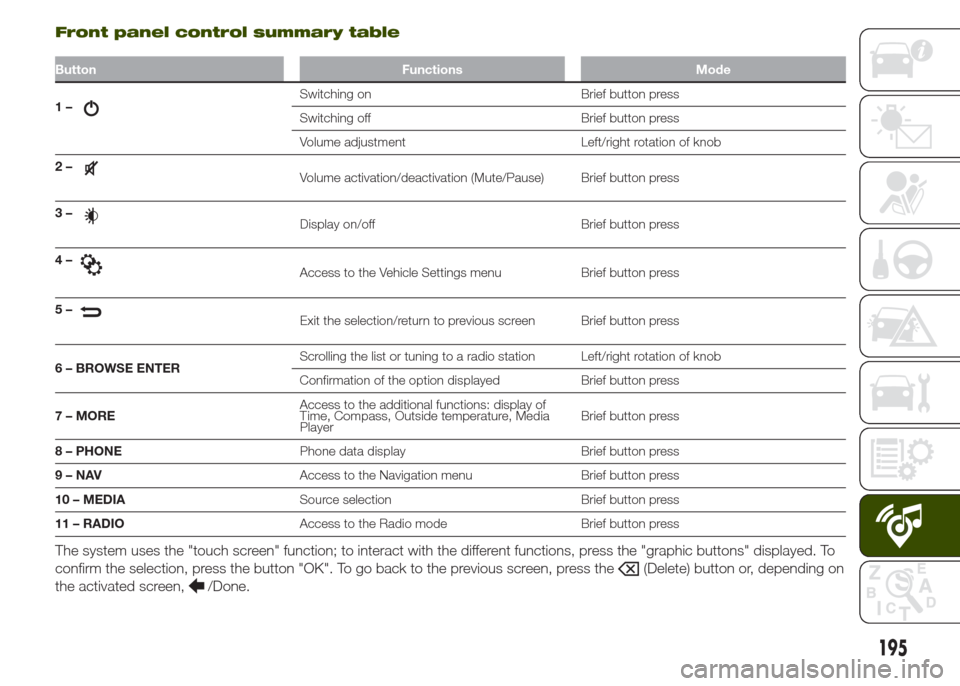
Front panel control summary table
Button Functions Mode
1–Switching on Brief button press
Switching off Brief button press
Volume adjustment Left/right rotation of knob
2–
Volume activation/deactivation (Mute/Pause) Brief button press
3–
Display on/off Brief button press
4–
Access to the Vehicle Settings menu Brief button press
5–
Exit the selection/return to previous screen Brief button press
6 – BROWSE ENTERScrolling the list or tuning to a radio station Left/right rotation of knob
Confirmation of the option displayed Brief button press
7 – MOREAccess to the additional functions: display of
Time, Compass, Outside temperature, Media
PlayerBrief button press
8 – PHONEPhone data display Brief button press
9–NAVAccess to the Navigation menu Brief button press
10 – MEDIASource selection Brief button press
11 – RADIOAccess to the Radio mode Brief button press
The system uses the "touch screen" function; to interact with the different functions, press the "graphic buttons" displayed. To
confirm the selection, press the button "OK". To go back to the previous screen, press the
(Delete) button or, depending on
the activated screen,
/Done.
195
Page 201 of 212
❒"Audio Only": the system warns the
driver that an obstacle is present
through acoustic warnings only, via the
speakers in the vehicle;
❒"Audio and visual": the system
warns the driver that an obstacle is
present through acoustic (via the
speakers in the vehicle) and visual (on
the instrument panel) warnings.
Front ParkSense Vol.(where provided)
Allows you to select the volume of the
acoustic warnings for the front
ParkSense system.
Rear ParkSense Vol.(where provided)
Allows you to select the volume of the
acoustic warnings for the rear
ParkSense system.
LaneSense Warning(where provided)
Allows you to select the intervention
readiness for the LaneSense system.
LaneSense Strength(where provided)
Allows you to select the force to apply
to the steering wheel to put the vehicle
back in the lane through the electric
steering system, in the event of
LaneSense system intervention.
SideSense(where provided)
Allows you to select the type of warning
provided by the Side Distance Warning
system.
The options available are:
❒"Off": the system is off;
❒"Audio Only": the system warns the
driver that an obstacle is present
through acoustic warnings only, via the
speakers in the vehicle;
❒"Audio and visual": the system
warns the driver that an obstacle is
present through acoustic (via the
speakers in the vehicle) and visual (on
the instrument panel) warnings.
SideSense Volume(where provided)
Allows you to select the volume of the
acoustic warnings for the front Side
Distance Warning system.
Rain sensor(where provided)
Allows you to activate/deactivate the
automatic switching on of the wipers in
the case of rain.
Brakes
This option can be used to select the
following submenus:
❒"Brake Service"(for versions/
markets, where provided): permits the
activation of the procedure to carry
out braking system servicing;
❒"Auto Park Brake"(for versions/
markets, where provided): permits the
activation/deactivation of automatic
parking brake engagement.
NAVIGATION MODE
IMPORTANT Navigation maps are
pre-loaded on the system, therefore no
external support is needed.
To activate the main navigation menu,
press the NAV button on the front
panel, then press one of the following
buttons:
❒"Where to?": it searches or
navigates to the destination;
❒"View map": it displays the map;
❒"Info": it displays all info about
navigation;
❒"Emergency": it searches for
Hospitals or Police Stations located
near the destination. It is also possible
to view your current position on the
display and save, in "Favourites", the
location of the Hospitals or Police
Stations.
199
Page 202 of 212
View Map
Press the "View Map" button in the
main Navigation Menu to display the
map relative to the current position.
When the display shows the map, the
following options are available:
❒"Menu": press this button to return to
the main Navigation Menu;
❒"+/–": press the "+" or " –" button to
change the dimension of the map (it
is not possible to zoom in on minor
roads);
❒"Time of Arrival/Time to Destination/
Distance"(only during navigation): press
this button at the top right of the
display to view one of the following
options: "Time of Arrival", "Time to
Destination", "Distance".
❒"Turn List"(only during navigation):
press the list of turns along the route at
the middle of the top of the display.
Select a turn through the following
options: "Show on Map" or "Avoid
Street".
❒"Options": press this button to
display the map display options.
Information
Press the "Information" button in the
main Navigation Menu to select from
the following information:
❒Traffic
❒Where Am I?
❒Trip Computer
Emergency
Press the "Emergency" button in the
main Navigation Menu to select one of
the following options for searching
for and navigating towards a
destination:
❒"Hospital": press this button to set a
trip to a hospital near the destination;
❒"Police": press this button to set
a trip to a police station near the
destination.
VOICE COMMANDS
For the functions controlled with voice
commands see paragraph Uconnect 5"
Radio/Uconnect 5" Radio Nav.
200
MULTIMEDIA