odometer JEEP RENEGADE 2015 1.G Owners Manual
[x] Cancel search | Manufacturer: JEEP, Model Year: 2015, Model line: RENEGADE, Model: JEEP RENEGADE 2015 1.GPages: 678, PDF Size: 29.84 MB
Page 177 of 678
GETTING TO KNOW YOUR INSTRUMENT PANEL
CONTENTS
!INSTRUMENT CLUSTER.................177
▫Instrument Cluster With Multi-Functional Display
(EVIC).............................177
▫Instrument Cluster With Reconfigurable
Multi-Functional Display (DID)............178
▫Speedometer (EVIC)....................179
▫Speedometer (DID)....................180
▫Odometer...........................181
▫Tachometer..........................181
▫Fuel Gauge..........................181
▫Engine Coolant Temperature Gauge.........182
!WARNING LIGHTS AND MESSAGES........183
▫Telltales On The EVIC/DID Instrument
Cluster............................184
▫Symbols Displayed In The EVIC/DID......193
!ELECTRONIC VEHICLE INFORMATION CENTER
(EVIC) / DRIVER INFORMATION
DISPLAY (DID)........................201
▫EVIC/DID Description..................201
▫Mapping And Reconfigurable Zone Display
(EVIC) — (If Equipped).................201
5
Page 183 of 678
•In#night#mode the display, the graphics, and the
indexes are adjustable on 8 levels. Adjusted accord-
ingly even the light intensity of the display of the
automatic dual zone climate control system and the
Uconnect system
Odometer
The odometer display shows the total distance the ve-
hicle has been driven.
U.S. Federal regulations require that upon transfer of
vehicle ownership, the seller certify to the purchaser the
correct mileage that the vehicle has been driven. If your
odometer needs to be repaired or serviced, the repair
technician should leave the odometer reading the same
as it was before the repair or service. If s/he cannot do so,
then the odometer must be set at zero, and a sticker must
be placed in the door jamb stating what the mileage was
before the repair or service.
It is a good idea for you to make a record of the odometer
reading before the repair/service, so that you can be sure
that it is properly reset, or that the door jamb sticker is
accurate if the odometer must be reset at zero.
Tachometer
Reports the number of Revolutions Per Minute (RPM) of
the engine.
Fuel Gauge
The digital indicator on the display indicates the amount
of fuel in the fuel tank.
When the fuel tank level drops to 1.3-1.85 gallons (5-7
liters) remaining, a light will illuminate, a message will
display, and a chime will sound.
5
GETTING TO KNOW YOUR INSTRUMENT PANEL 181
Page 203 of 678
ELECTRONIC VEHICLE INFORMATION CENTER
(EVIC) / DRIVER INFORMATION DISPLAY (DID)
EVIC/DID Description
The vehicle can be equipped with multifunctional dis-
play (EVIC), or a reconfigurable multifunctional display
(DID), which offers useful information to the driver.
With the ignition in the STOP/OFF position (and the key
removed, for vehicles with mechanical key), opening/
closing of a door will activate the display for viewing,
and display the total miles or kilometers in the odometer.
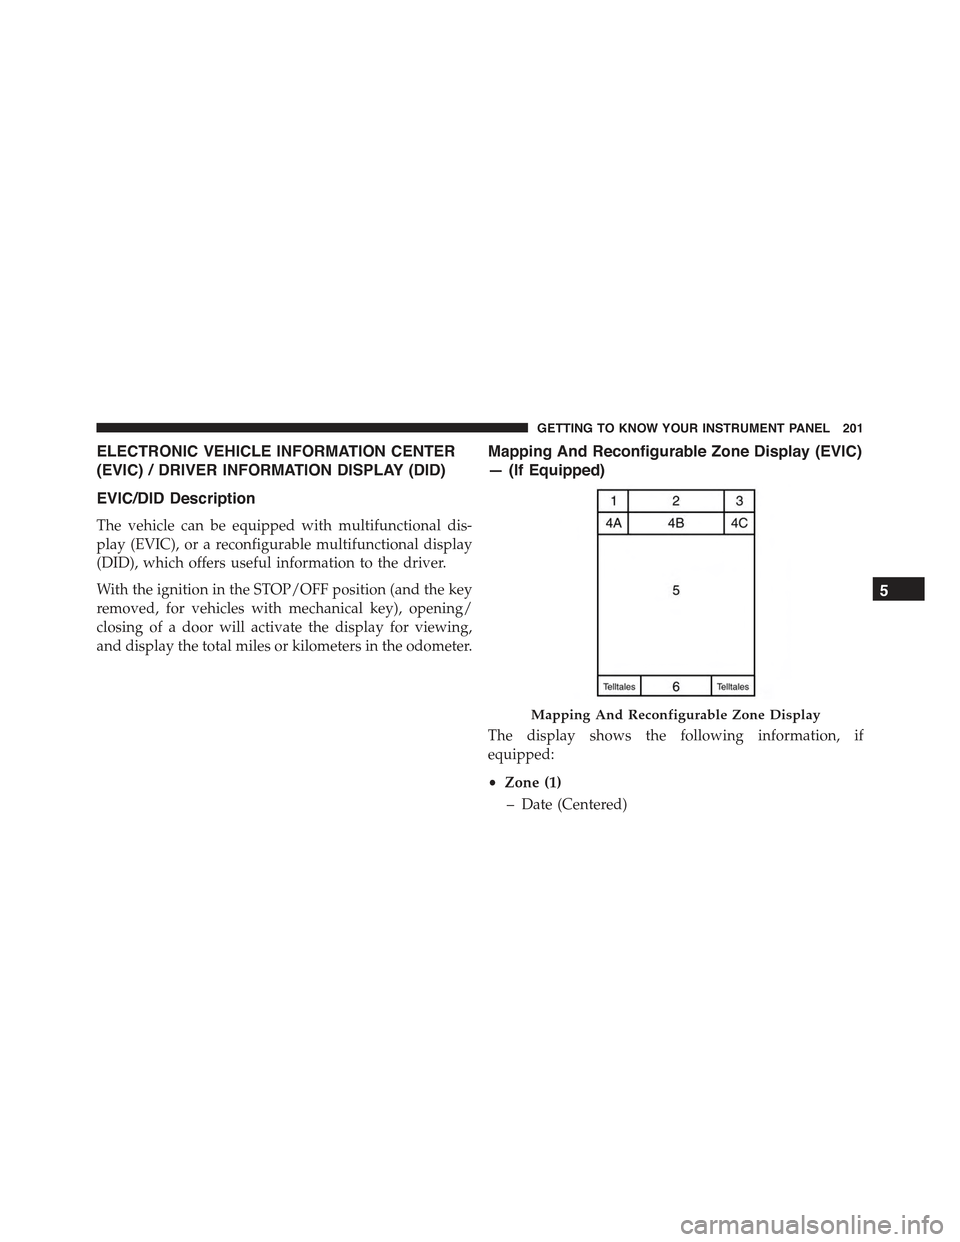
Mapping And Reconfigurable Zone Display (EVIC)
— (If Equipped)
The display shows the following information, if
equipped:
•Zone (1)
– Date (Centered)
Mapping And Reconfigurable Zone Display
5
GETTING TO KNOW YOUR INSTRUMENT PANEL 201
Page 205 of 678
•Zone (6)
– Odometer Digits (Left)
– Odometer Unit (Right)
– Speed Limiter (Left)
– Speed Limiter and Cruise Control Speed Set (Cen-
ter)
– Speed Buzzer (Right)
•Red Telltales(Left)
•Amber Telltales(Right)
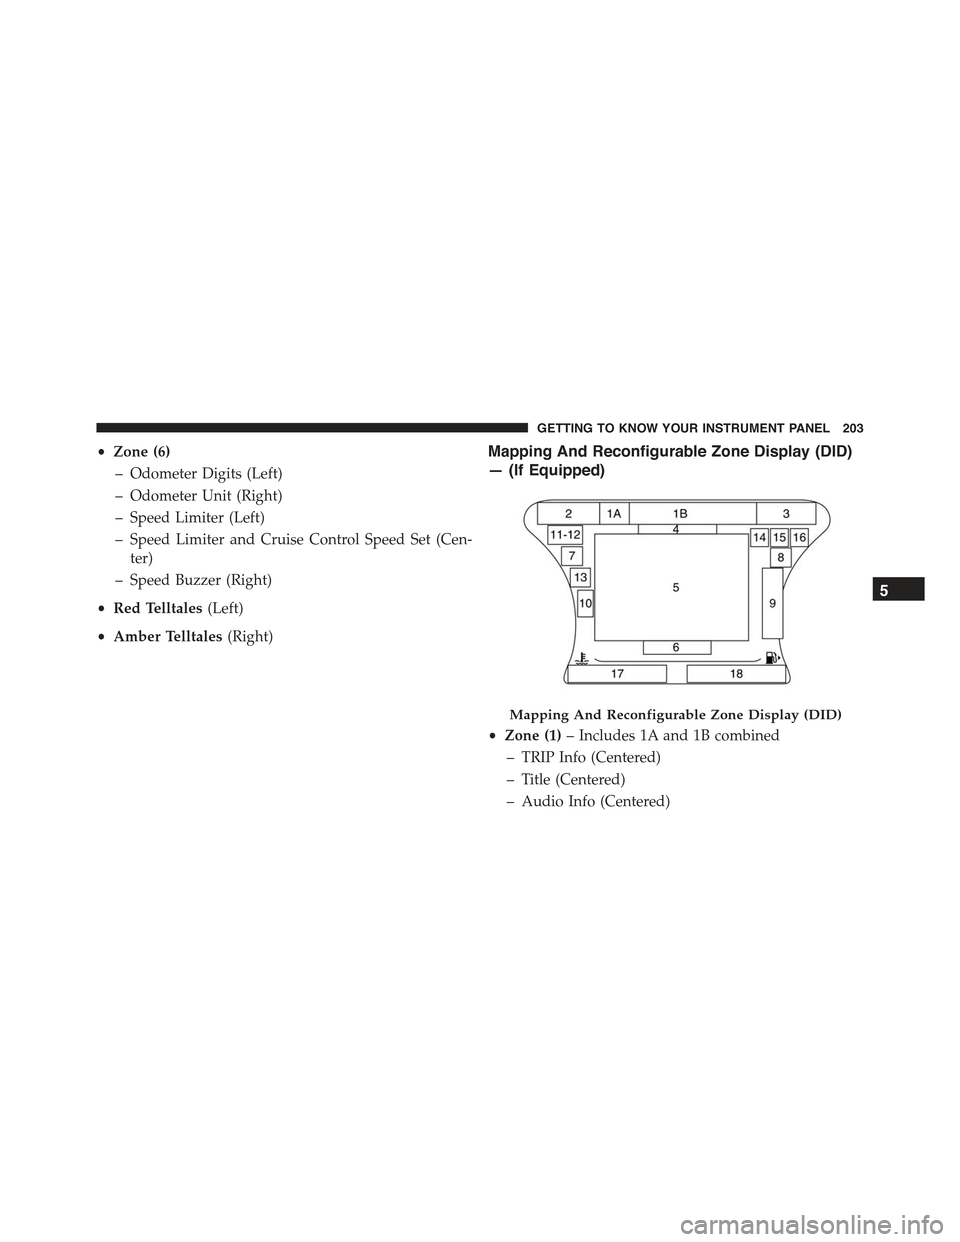
Mapping And Reconfigurable Zone Display (DID)
— (If Equipped)
•Zone (1)– Includes 1A and 1B combined
– TRIP Info (Centered)
– Title (Centered)
– Audio Info (Centered)
Mapping And Reconfigurable Zone Display (DID)
5
GETTING TO KNOW YOUR INSTRUMENT PANEL 203
Page 206 of 678
•Zone (1A)
– Up and down arrow (Left)
– Title number
•Zone (1B)
– External Temp. (Centered)
– Title (Centered)
– Time (Centered)
•Zones (1, 2 & 3)
– Date
– Compass
– Time
– External Temp.
•Zone (2)
– Double scale (Centered)
•Zone (2 & 3)
– Ignition Button Info (Centered)
•Zone (4)
– Speed Warning Title
•Zone (5)
– Text (Centered)
– Side Distance Warning
– Park Sense: Front & Rear
•Zone (6)
– Odometer Digits (Left)
– Odometer Unit (Right)
– Side Distance Warning
– Park Sense: Front & Rear
•Zone (7)
– Red Telltales (Centered)
•Zone (8)
– Amber Telltales (Centered)
204 GETTING TO KNOW YOUR INSTRUMENT PANEL
Page 585 of 678
WARNING!(Continued)
•Never use a tire with a smaller load index or
capacity, other than what was originally equipped
on your vehicle. Using a tire with a smaller load
index could result in tire overloading and failure.
You could lose control and have a collision.
•Failure to equip your vehicle with tires having
adequate speed capability can result in sudden tire
failure and loss of vehicle control.
CAUTION!
Replacing original tires with tires of a different size
may result in false speedometer and odometer read-
ings.
TIRE CHAINS (TRACTION DEVICES)
Use of traction devices require sufficient tire-to-body
clearance. Follow these recommendations to guard
against damage.
•Traction device must be of proper size for the tire, as
recommended by the traction device manufacturer.
•Install on front tires only
•Due to limited clearance, the following traction de-
vices are recommended:
Front Wheel Drive (FWD) Models
•Original equipment 215/60R17 and 225/55R18 tire
sizes are not chainable.
•The use of 7mm snow chains is permitted with the use
of 215/60R16 tires.
9
MAINTAINING AND CARING FOR YOUR VEHICLE 583
Page 621 of 678
Units
•Units
When in this display, you may select to have the Driver
Information Display (DID), odometer, and navigation
system (if equipped) changed between US and Metric
units of measure. Press “US” or “Metric.” Press the back
arrow button on the touchscreen to return to the previous
menu.
The following selectable units of measure are listed
below:
Distance— Select from: “MI” or “KM.”
Fuel Consumption— Select from: “MPG” (US), “MPG”
(UK), L/100 km, or km/L.
Tire Pressure— Select from: “psi”, “kPa”, or “bar.”
Temperature— Select from: “°F” or “°C.”
Voice
After pressing the “Voice” button on the touchscreen the
following settings will be available:
•Voice Response Length
When in this display, you may change the Voice Re-
sponse Length settings. To change the Voice Response
Length, press the “Voice Response Length” button on the
touchscreen and select from “Brief” or “Detailed.” Press
the back arrow button on the touchscreen to return to the
previous menu.
•Show Command List
When in this display, you may change the Show Com-
mand List settings. To change the Show Command List
settings, press the “Show Command List” button on the
touchscreen and select from “Always,” “With Help” or
“Never.” Press the back arrow button on the touchscreen
to return to the previous menu.11
MULTIMEDIA 619