steering wheel JEEP RENEGADE 2015 1.G Owner's Manual
[x] Cancel search | Manufacturer: JEEP, Model Year: 2015, Model line: RENEGADE, Model: JEEP RENEGADE 2015 1.GPages: 220, PDF Size: 34.11 MB
Page 120 of 220
4. Each time you give a Voice Command, you must first press either the VR or Phone
button, wait untilafterthe beep, then say your Voice Command.
5. You can interrupt the help message or system prompts by pressing the VR or
Phone button and saying a Voice Command from current category.
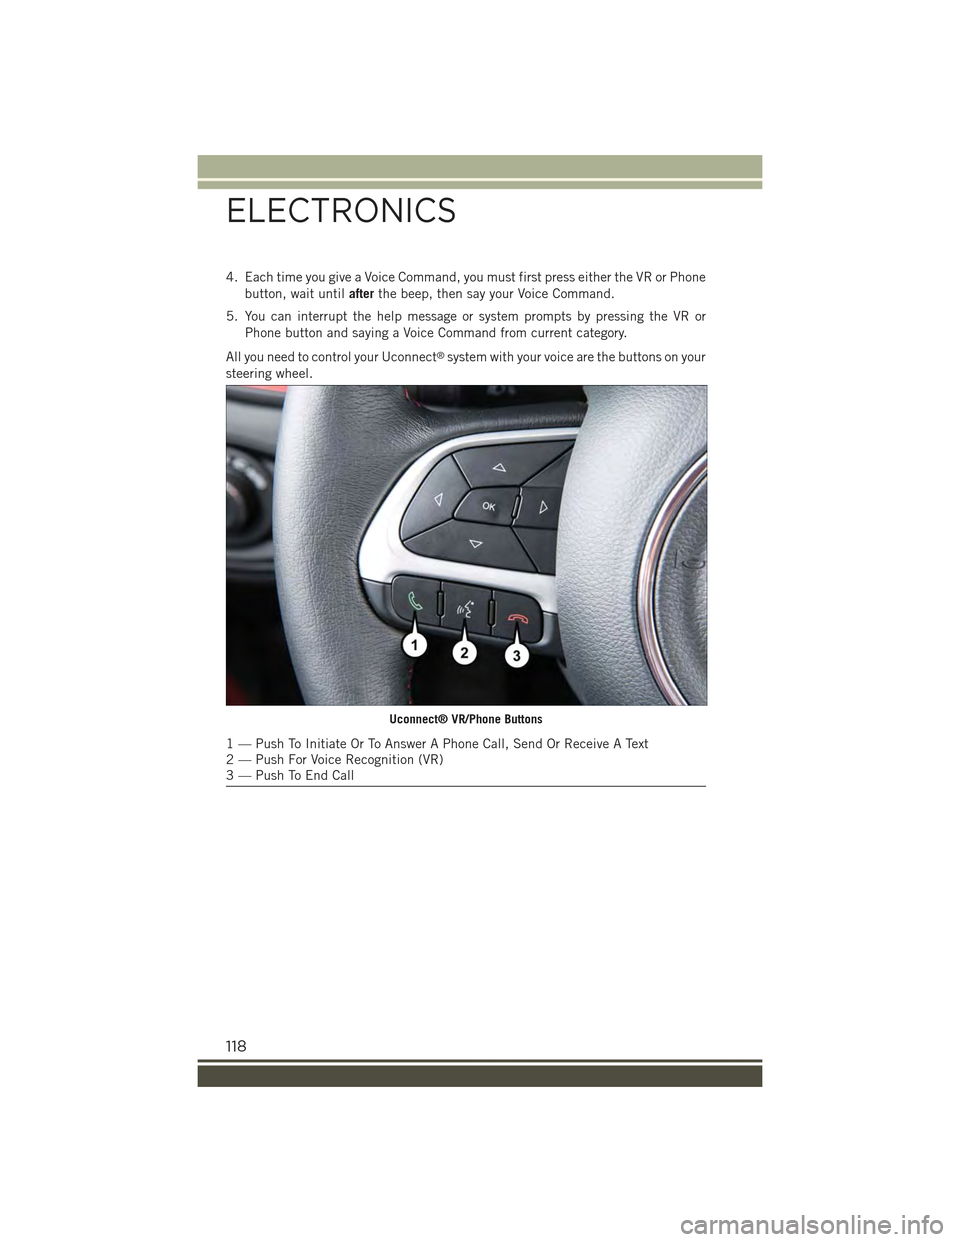
All you need to control your Uconnect®system with your voice are the buttons on your
steering wheel.
Uconnect® VR/Phone Buttons
1 — Push To Initiate Or To Answer A Phone Call, Send Or Receive A Text2 — Push For Voice Recognition (VR)3 — Push To End Call
ELECTRONICS
118
Page 131 of 220
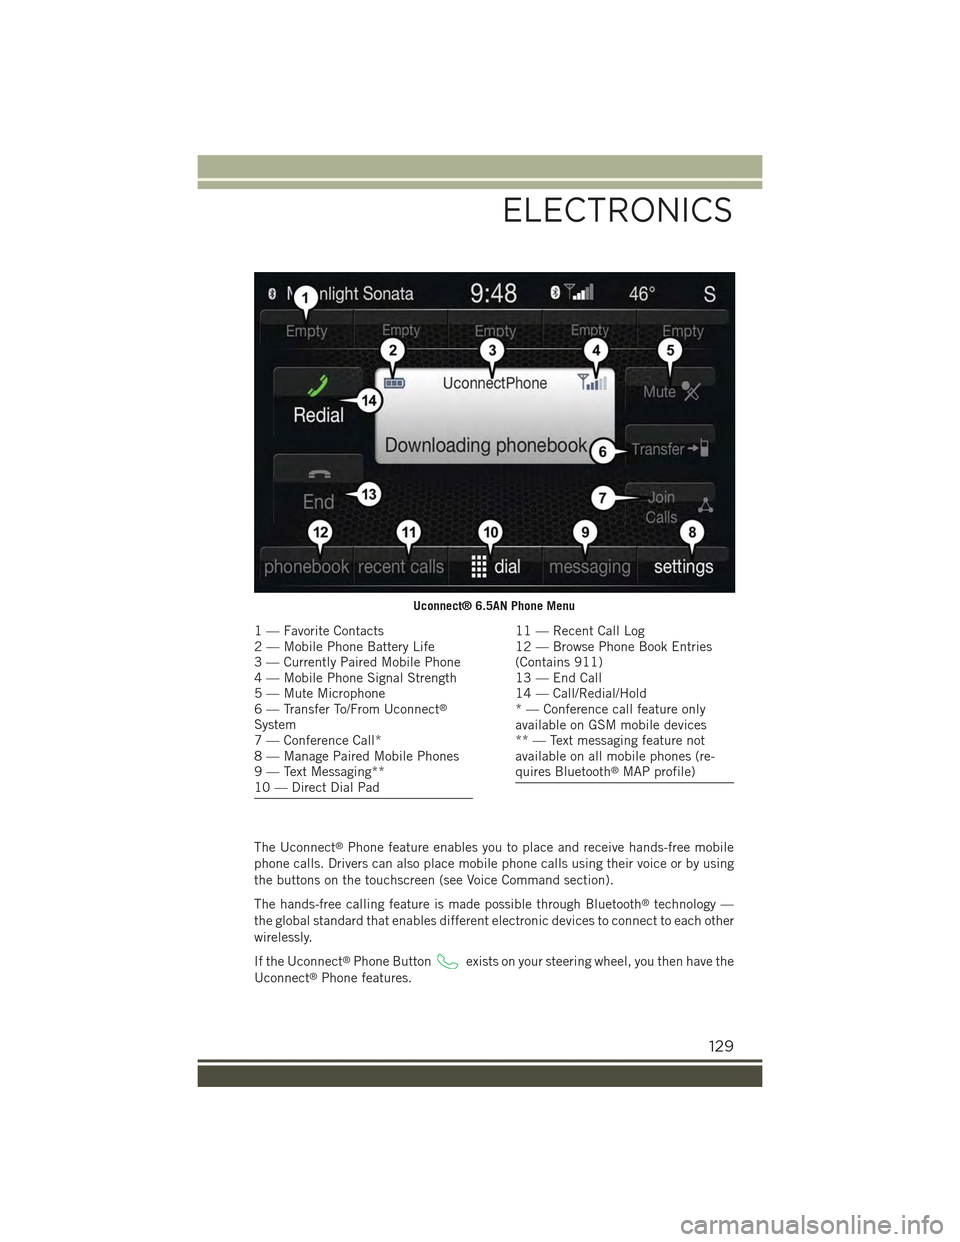
The Uconnect®Phone feature enables you to place and receive hands-free mobile
phone calls. Drivers can also place mobile phone calls using their voice or by using
the buttons on the touchscreen (see Voice Command section).
The hands-free calling feature is made possible through Bluetooth®technology —
the global standard that enables different electronic devices to connect to each other
wirelessly.
If the Uconnect®Phone Buttonexists on your steering wheel, you then have the
Uconnect®Phone features.
Uconnect® 6.5AN Phone Menu
1 — Favorite Contacts2 — Mobile Phone Battery Life3 — Currently Paired Mobile Phone4 — Mobile Phone Signal Strength5 — Mute Microphone6 — Transfer To/From Uconnect®
System7 — Conference Call*8 — Manage Paired Mobile Phones9 — Text Messaging**10 — Direct Dial Pad
11 — Recent Call Log12 — Browse Phone Book Entries(Contains 911)13 — End Call14 — Call/Redial/Hold* — Conference call feature onlyavailable on GSM mobile devices** — Text messaging feature notavailable on all mobile phones (re-quires Bluetooth®MAP profile)
ELECTRONICS
129
Page 135 of 220
Select The Android Mobile Phone's Priority Level
When the pairing process has successfully completed, the system will prompt you to
choose whether or not this is your favorite mobile phone. Selecting “Yes” will make
this mobile phone the highest priority. This mobile phone will take precedence over
other paired mobile phones within range and will connect to the Uconnect®system
automatically when entering the vehicle. Only one mobile phone and/or one
Bluetooth®audio device can be connected to the Uconnect®system at a time. If
“No” is selected, simply select “Uconnect” from the mobile phone/audio device
Bluetooth®screen, and the Uconnect®system will reconnect to the Bluetooth®
device.
You are now ready to make hands-free calls. Press the Uconnect®“Phone” button
on your steering wheel to begin.
NOTE:
Refer to UconnectPhone.com website for additional information on mobile phone
pairing and for a list of compatible phones.
Common Phone Commands (Examples)
• “Call John Smith”
• “Call John Smith mobile”
• “Dial 1 248 555 1212”
• “Redial”
Mute (Or Unmute) Microphone During Call
• During a call, press the “Mute” button on the Phone main screen to mute and
unmute the call.
Transfer Ongoing Call Between Handset And Vehicle
• During an on-going call, press the “Transfer” button on the Phone main screen to
transfer an on-going call between handset and vehicle.
Phonebook
The Uconnect®system will automatically sync your phonebook from your paired
phone, if this feature is supported by your phone. Phonebook contacts are updated
each time that the phone is connected. If your phone book entries do not appear,
check the settings on your phone. Some phones require you to enable this feature
manually.
• Your phonebook can be browsed on the Uconnect®system touchscreen, but
editing can only be done on your phone. To browse, press the “Phone” button on
the touchscreen, then the “Phonebook” button on the touchscreen.
Favorite phonebook entries can be saved as Favorites for quicker access. Favorites
are shown at the top of the main phone screen.
ELECTRONICS
133
Page 136 of 220
Voice Command Tips
• Speaking complete names (i.e; Call John Doe vs. Call John) will result in greater
system accuracy.
• You can “link” commands together for faster results. Say “Call John Doe, mobile,”
for example.
• If you are listening to available voice command options, you do not have to listen
to the entire list. When you hear the command that you need, push the
button on the steering wheel, wait for the beep and say your command.
Changing The Volume
• Start a dialogue by pushing the Phone button, then say a command for
example - "Help."
• Use the radio VOLUME/MUTE rotary knob to adjust the volume to a comfortable
level while the Uconnect®system is speaking. Please note the volume setting for
Uconnect®is different than the audio system.
NOTE:
To access help, push the Uconnect®Phone buttonon the steering wheel and
say "help." Press the display or press either the Phoneor VRbutton and
say "cancel" to cancel the help session.
Incoming Text Messages
After pairing your Uconnect®system with a Bluetooth®enabled mobile device with
the Message Access Profile (MAP), the Uconnect®system can announce a new
incoming text message and read it to you over the vehicle’s audio system.
NOTE:
Only incoming text messages received during the current ignition cycle can be
viewed/read.
To enable incoming text messaging:
iPhone®
1. Press the settings button on the mobile phone.
2. Select Bluetooth®.
• Ensure Bluetooth is enabled, and the mobile phone is paired to the Uconnect®
system.
3. Selectlocated under DEVICES next to Uconnect.
ELECTRONICS
134
Page 140 of 220
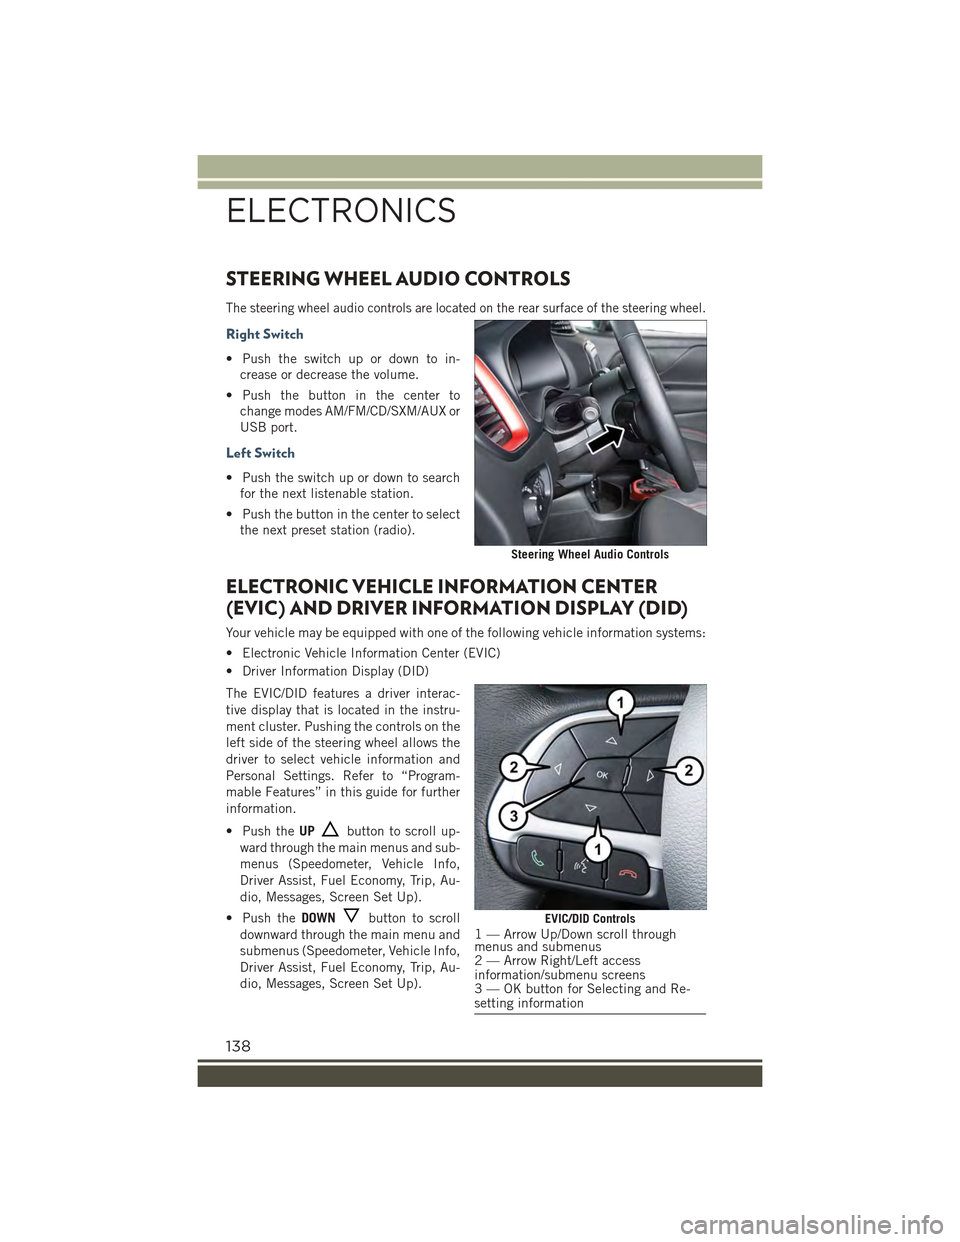
STEERING WHEEL AUDIO CONTROLS
The steering wheel audio controls are located on the rear surface of the steering wheel.
Right Switch
• Push the switch up or down to in-
crease or decrease the volume.
• Push the button in the center to
change modes AM/FM/CD/SXM/AUX or
USB port.
Left Switch
• Push the switch up or down to search
for the next listenable station.
• Push the button in the center to select
the next preset station (radio).
ELECTRONIC VEHICLE INFORMATION CENTER
(EVIC) AND DRIVER INFORMATION DISPLAY (DID)
Your vehicle may be equipped with one of the following vehicle information systems:
• Electronic Vehicle Information Center (EVIC)
• Driver Information Display (DID)
The EVIC/DID features a driver interac-
tive display that is located in the instru-
ment cluster. Pushing the controls on the
left side of the steering wheel allows the
driver to select vehicle information and
Personal Settings. Refer to “Program-
mable Features” in this guide for further
information.
• Push theUPbutton to scroll up-
ward through the main menus and sub-
menus (Speedometer, Vehicle Info,
Driver Assist, Fuel Economy, Trip, Au-
dio, Messages, Screen Set Up).
• Push theDOWNbutton to scroll
downward through the main menu and
submenus (Speedometer, Vehicle Info,
Driver Assist, Fuel Economy, Trip, Au-
dio, Messages, Screen Set Up).
Steering Wheel Audio Controls
EVIC/DID Controls1 — Arrow Up/Down scroll throughmenus and submenus2 — Arrow Right/Left accessinformation/submenu screens3 — OK button for Selecting and Re-setting information
ELECTRONICS
138
Page 142 of 220
Vehicle Info (Information About The Status Of The Car)
Push and release the UP or DOWN arrow button until "Vehicle Info" is highlighted in
the EVIC/DID. Push and release the RIGHT arrow button and Coolant Temp will be
displayed. Push the RIGHT or LEFT arrow button to scroll through the following
information displays:
Tire Pressure
• View the information relating to the TPMS system (if equipped).
Engine Coolant Temperature
• View the engine coolant temperature.
Tr a n s m i s s i o n Te m p e r a t u r e
• Display the temperature of the automatic transmission (if equipped).
Engine Oil Temperature
• View the engine oil temperature.
Battery Voltage
• View the voltage value (state of charge) of the battery.
Driver Assist
This menu item allows you to change the settings ("Notice LaneSense" and "Intensity
LaneSense") relating to the LaneSense system (if equipped).
Notice LaneSense
• By selecting this function, you can select the "readiness" of LaneSense, choosing
between the options "Near," "Medium," or "Far."
Intensity LaneSense
• Using this function, you can select the force applied to the steering wheel to keep
the car in the roadway through the electrical drive system due to LaneSense.
Fuel Consumption
This menu item allows you to set the unit of measurement for the "Fuel Consumption
and Range."
Average Consumption/Instantaneous Consumption
• By selecting these options, you can choose the unit of measurement of the average
consumption and the instantaneous, choosing between "MPG" or "l/100 km" or
"km/l."
Range
• By selecting this option, you can choose the unit of measurement for Range,
choosing between “miles” or "km."
Trip
This menu item allows you to view information about the "Trip Computer."
The information displayed, for Trip A and for Trip B, are:
Distance
• (Miles or Km)
ELECTRONICS
140
Page 146 of 220
Speed Belt Buzzer:
• This function is only viewable when the Seat Belt Reminder (SBR) system is
active.
Hill Start Assist:
• Activation/Deactivation of the Hill Start Assist system.
"Safety & Assistance"
By selecting the item "Safety & Assistance," you can make the following adjustments:
• FCW: a selection of operating modes of the system Forward Collision Warning Plus
• FCW Sensitivity: a selection of the "readiness" of intervention of the Forward
Collision Warning Plus system, based on the distance to the obstacle
• ParkSense: a selection of the type of reporting provided by ParkSense
• Rear Parks. Vol.: selection of the volume of acoustic signals provided by
ParkSense
• ParkSense Vol.: a selection of the volume of acoustic signals provided by
ParkSense
• Front Parks. Vol.: selection of the volume of the beeps provided by ParkSense
• Side Dist. Warn. Vol. (If equipped) : a selection of the volume of the beeps of
SideSense system
• Side Dist. Warn. (if Equipped) : Select the type of reporting provided by SideSense
system
• Auto Wipers: enabling/disabling the automatic operation of wipers in the event of
rain
• LaneSense Warn.: a selection of the "readiness" of intervention of LaneSense
• LaneSense Force: selection of the force to be applied to the steering wheel to put
the car in the roadway through the system of electrical drive, in case of operation
of the system LaneSense
• Buzzer Volume
• Maintenance Brakes (If Equipped): activation of the procedure to carry out
braking system maintenance
• Auto Park Brake (If Equipped): enable/disable auto-insertion of the Electric
Parking Brake
"Lights"
By selecting the item "Lights," you can make the following adjustments:
• Headlight Off Delay: setting the delay for headlight shutoff after engine shutoff
• Lights in the opening: activation of the direction indicators when opening the
doors
• Headlight Sensor: adjusting the sensitivity of headlight brightness
• Auto. High Beam: activation/deactivation of the automatic main beam headlights
(If Equipped)
ELECTRONICS
144
Page 154 of 220
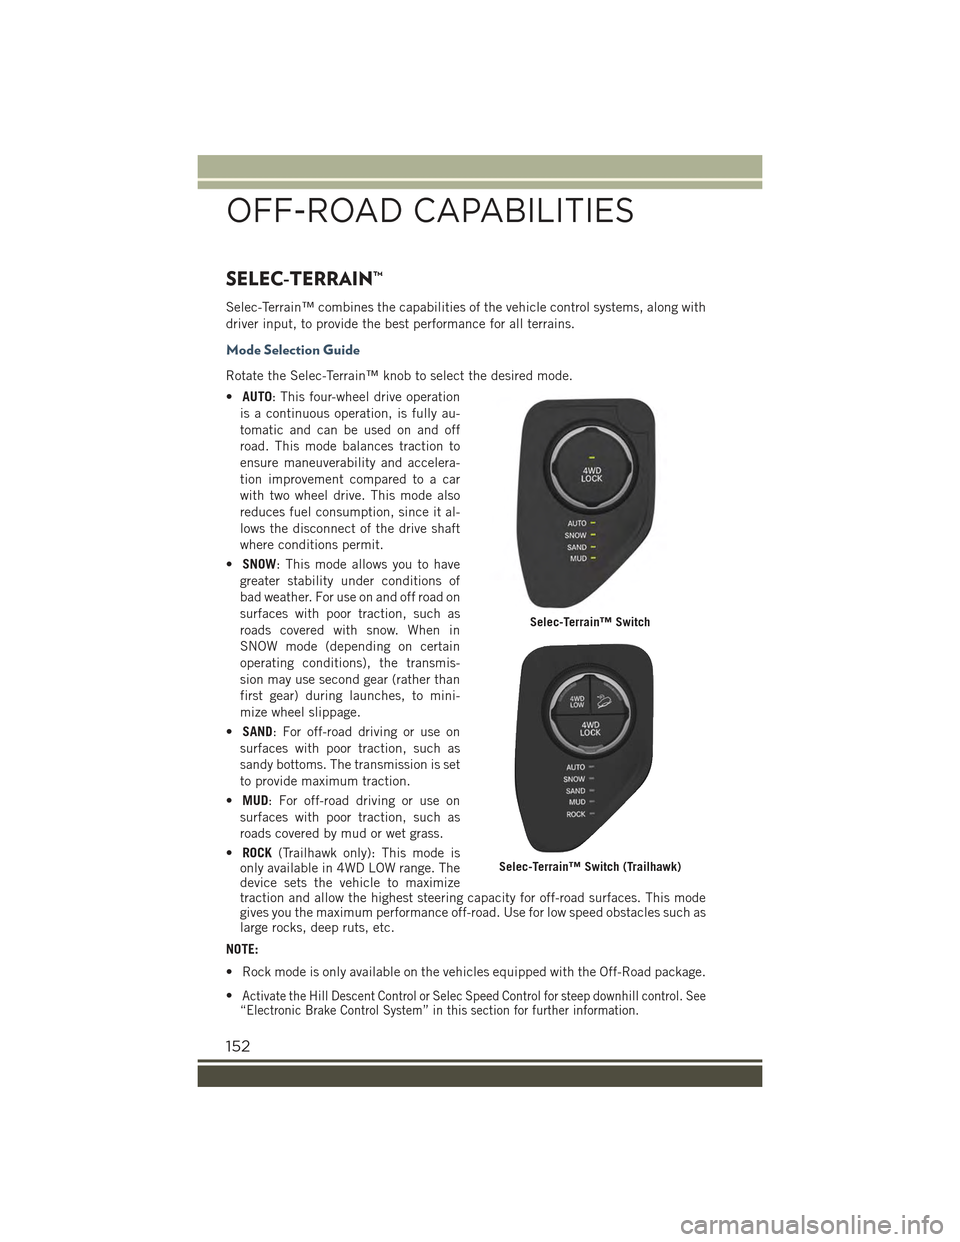
SELEC-TERRAIN™
Selec-Terrain™ combines the capabilities of the vehicle control systems, along with
driver input, to provide the best performance for all terrains.
Mode Selection Guide
Rotate the Selec-Terrain™ knob to select the desired mode.
•AUTO: This four-wheel drive operation
is a continuous operation, is fully au-
tomatic and can be used on and off
road. This mode balances traction to
ensure maneuverability and accelera-
tion improvement compared to a car
with two wheel drive. This mode also
reduces fuel consumption, since it al-
lows the disconnect of the drive shaft
where conditions permit.
•SNOW: This mode allows you to have
greater stability under conditions of
bad weather. For use on and off road on
surfaces with poor traction, such as
roads covered with snow. When in
SNOW mode (depending on certain
operating conditions), the transmis-
sion may use second gear (rather than
first gear) during launches, to mini-
mize wheel slippage.
•SAND: For off-road driving or use on
surfaces with poor traction, such as
sandy bottoms. The transmission is set
to provide maximum traction.
•MUD: For off-road driving or use on
surfaces with poor traction, such as
roads covered by mud or wet grass.
•ROCK(Trailhawk only): This mode isonly available in 4WD LOW range. Thedevice sets the vehicle to maximizetraction and allow the highest steering capacity for off-road surfaces. This modegives you the maximum performance off-road. Use for low speed obstacles such aslarge rocks, deep ruts, etc.
NOTE:
• Rock mode is only available on the vehicles equipped with the Off-Road package.
•Activate the Hill Descent Control or Selec Speed Control for steep downhill control. See“Electronic Brake Control System” in this section for further information.
Selec-Terrain™ Switch
Selec-Terrain™ Switch (Trailhawk)
OFF-ROAD CAPABILITIES
152
Page 178 of 220
6. Once the engine is started, remove the jumper cables in the reverse sequence:
Disconnecting The Jumper Cables
1. Disconnect the negative(-)end of the jumper cable from the engine ground of the
vehicle with the discharged battery.
2. Disconnect the opposite end of the negative(-)jumper cable from the negative(-)
post of the booster battery.
3. Disconnect the positive(+)end of the jumper cable from the positive(+)post of
the booster battery.
4. Disconnect the opposite end of the positive(+)jumper cable from the positive(+)
post of the vehicle with the discharged battery.
If frequent jump-starting is required to start your vehicle you should have the battery
and charging system inspected at your authorized dealer.
CAUTION!
Accessories plugged into the vehicle power outlets draw power from the vehicle’s
battery, even when not in use (i.e., cellular phones, etc.). Eventually, if plugged in
long enough without engine operation, the vehicle’s battery will discharge suffi-
ciently to degrade battery life and/or prevent the engine from starting.
FREEING A STUCK VEHICLE
If your vehicle becomes stuck in mud, sand or snow, it can often be moved using a
rocking motion. Turn the steering wheel right and left to clear the area around the
front wheels. For vehicles with automatic transmission, push and hold the lock
button on the shift lever. Then shift back and forth between DRIVE and REVERSE
(with automatic transmission) or 2ND GEAR and REVERSE (with manual transmis-
sion), while gently pushing the accelerator.
For Vehicles With Automatic Transmission:
Shifts between DRIVE and REVERSE can only be achieved at wheel speeds of 5 mph
(8 km/h) or less. Whenever the transmission remains in NEUTRAL for more than two
seconds, you must push the brake pedal to engage DRIVE or REVERSE.
Use the least amount of accelerator pedal pressure that will maintain the rocking
motion without spinning the wheels or racing the engine.
WHAT TO DO IN EMERGENCIES
176
Page 179 of 220
CAUTION!
• Racing the engine or spinning the wheels may lead to transmission overheatingand failure. Allow the engine to idle with the transmission in NEUTRAL for atleast one minute after every five rocking-motion cycles. This will minimizeoverheating and reduce the risk of clutch or transmission failure duringprolonged efforts to free a stuck vehicle.
• When “rocking” a stuck vehicle by shifting between DRIVE/2nd gear and
REVERSE, do not spin the wheels faster than 15 mph (24 km/h), or drivetrain
damage may result.
• Revving the engine or spinning the wheels too fast may lead to transmission
overheating and failure. It can also damage the tires. Do not spin the wheels
above 30 mph (48 km/h) while in gear (no transmission shifting occurring).
WARNING!
Fast spinning tires can be dangerous. Forces generated by excessive wheel speeds
may cause damage, or even failure, of the axle and tires. A tire could explode and
injure someone. Do not spin your vehicle's wheels faster than 30 mph (48 km/h)
or for longer than 30 seconds continuously without stopping when you are stuck
and do not let anyone near a spinning wheel, no matter what the speed.
EMERGENCY TOW HOOKS
If your vehicle is equipped with tow hooks, there will be one in the rear and two
mounted on the front of the vehicle. The rear hook will be located on the driver's side
of the vehicle.
NOTE:
For off-road recovery, it is recommended to use both of the front tow hooks to
minimize the risk of damage to the vehicle.
Vehicles Equipped With RKE Transmitter With An Integrated Vehicle Key
Turn the ignition key to the MAR/RUN and then STOP/OFF position, without
removing it. By extracting the key this will automatically engage the steering wheel
lock. Place the transmission into NEUTRAL.
Vehicles With Keyless Enter-N-Go™
Place the ignition in the RUN and subsequently on STOP, without opening the door.
During towing remember that not having the aid of the power brakes and the
electromechanical power steering, greater force is needed in applying the brakes and
steering of the vehicle.
WHAT TO DO IN EMERGENCIES
177