ECO mode JEEP RENEGADE 2015 1.G User Guide
[x] Cancel search | Manufacturer: JEEP, Model Year: 2015, Model line: RENEGADE, Model: JEEP RENEGADE 2015 1.GPages: 220, PDF Size: 34.11 MB
Page 5 of 220
VEHICLES SOLD IN CANADA
With respect to any vehicles sold in Canada, the name FCA US LLC shall be deemed
to be deleted and the name Chrysler Canada Inc. used in substitution (excluding
legal lines).
WARNING!
• Pedals that cannot move freely can cause loss of vehicle control and increase
the risk of serious personal injury.
• Always make sure that objects cannot fall into the driver foot well while the
vehicle is moving. Objects can become trapped under the brake pedal and
accelerator pedal causing a loss of vehicle control.
• Failure to properly follow floor mat installation or mounting can cause inter-
ference with the brake pedal and accelerator pedal operation causing loss of
control of the vehicle.
• Never leave children alone in a vehicle, or with access to an unlocked vehicle.
Allowing children to be in a vehicle unattended is dangerous for a number of
reasons. A child or others could be seriously or fatally injured. Children should
be warned not to touch the parking brake, brake pedal or the shift lever.
• Do not leave the key fob in or near the vehicle, or in a location accessible to
children, and do not leave the ignition of a vehicle equipped with Keyless
Enter-N-Go in the MAR/RUN mode. A child could operate power windows,
other controls, or move the vehicle.
• Never use the “PARK” position as a substitute for the parking brake. Always
apply the parking brake fully when parked to guard against vehicle movement
and possible injury or damage.
• Refer to your Owner's Manual on the DVD for further details.
INTRODUCTION/WELCOME
3
Page 14 of 220
WARNING!
• When leaving the vehicle, always make sure the keyless ignition node is in
“OFF” mode, remove the Key Fob from the vehicle and lock the vehicle.
• Never leave children alone in a vehicle, or with access to an unlocked vehicle.
Allowing children to be in a vehicle unattended is dangerous for a number of
reasons. A child or others could be seriously or fatally injured. Children should
be warned not to touch the parking brake, brake pedal or the transmission gear
selector.
• Do not leave the Key Fob in or near the vehicle (or in a location accessible to
children), and do not leave the ignition of a vehicle equipped with Keyless
Enter-N-Go™ in the ON/RUN mode. A child could operate power windows,
other controls, or move the vehicle.
REMOTE START
This system uses the Remote Keyless Entry (RKE) transmitter to start the engine
conveniently from outside the vehicle while still maintaining security. The system has
a range of at least 300 ft (91 m).
The Remote Starting System also activates the Climate Control and (if equipped) the
optional heated seats and optional heated steering wheel depending on temperatures
outside and inside the car.
• Push REMOTE START buttonx2on the Key Fob twice within five seconds.
Pushing the REMOTE START button a third time shuts the engine off.
• To drive the vehicle, push UNLOCK button, insert the key in the ignition and turn
to the MAR/RUN position.
• With Remote Start, the engine will only run for 15 minutes (timeout) unless the
ignition key is placed in the MAR/RUN position.
• The vehicle must be started with the key after two consecutive timeouts.
NOTE:
The Remote Start Comfort System can be activated and deactivated through the
Uconnect®Settings. Refer to “Uconnect®Programmable Features” in “Electronics”
for more information on Remote Start Comfort System operation.
WARNING!
• Do not start or run an engine in a closed garage or confined area. Exhaust gas
contains Carbon Monoxide (CO) which is odorless and colorless. Carbon
Monoxide is poisonous and can cause serious injury or death when inhaled.
• Keep Key Fob transmitters away from children. Operation of the Remote Start
System, windows, door locks or other controls could cause serious injury or
death.
GETTING STARTED
12
Page 36 of 220
ENGINE BREAK-IN RECOMMENDATIONS
A long break-in period is not required for the engine and drivetrain (transmission and
axle) in your vehicle.
Drive moderately during the first 300 miles (500 km). After the initial 60 miles
(100 km), speeds up to 50 or 55 mph (80 or 90 km/h) are desirable.
While cruising, brief full-throttle acceleration within the limits of local traffic laws
contributes to a good break-in. Wide-open throttle acceleration in low gear can be
detrimental and should be avoided.
The engine oil installed in the engine at the factory is a high-quality energy
conserving type lubricant. Oil changes should be consistent with anticipated climate
conditions under which vehicle operations will occur. Refer to “Maintaining Your
Vehicle” for the recommended viscosity and quality grades.
NOTE:
A new engine may consume some oil during its first few thousand miles (kilometers)
of operation. This should be considered a normal part of the break-in and not
interpreted as an indication of an engine problem or malfunction.
CAUTION!
Never use Non-Detergent Oil or Straight Mineral Oil in the engine or damage may
result.
EXTERIOR LIGHTS
Headlights
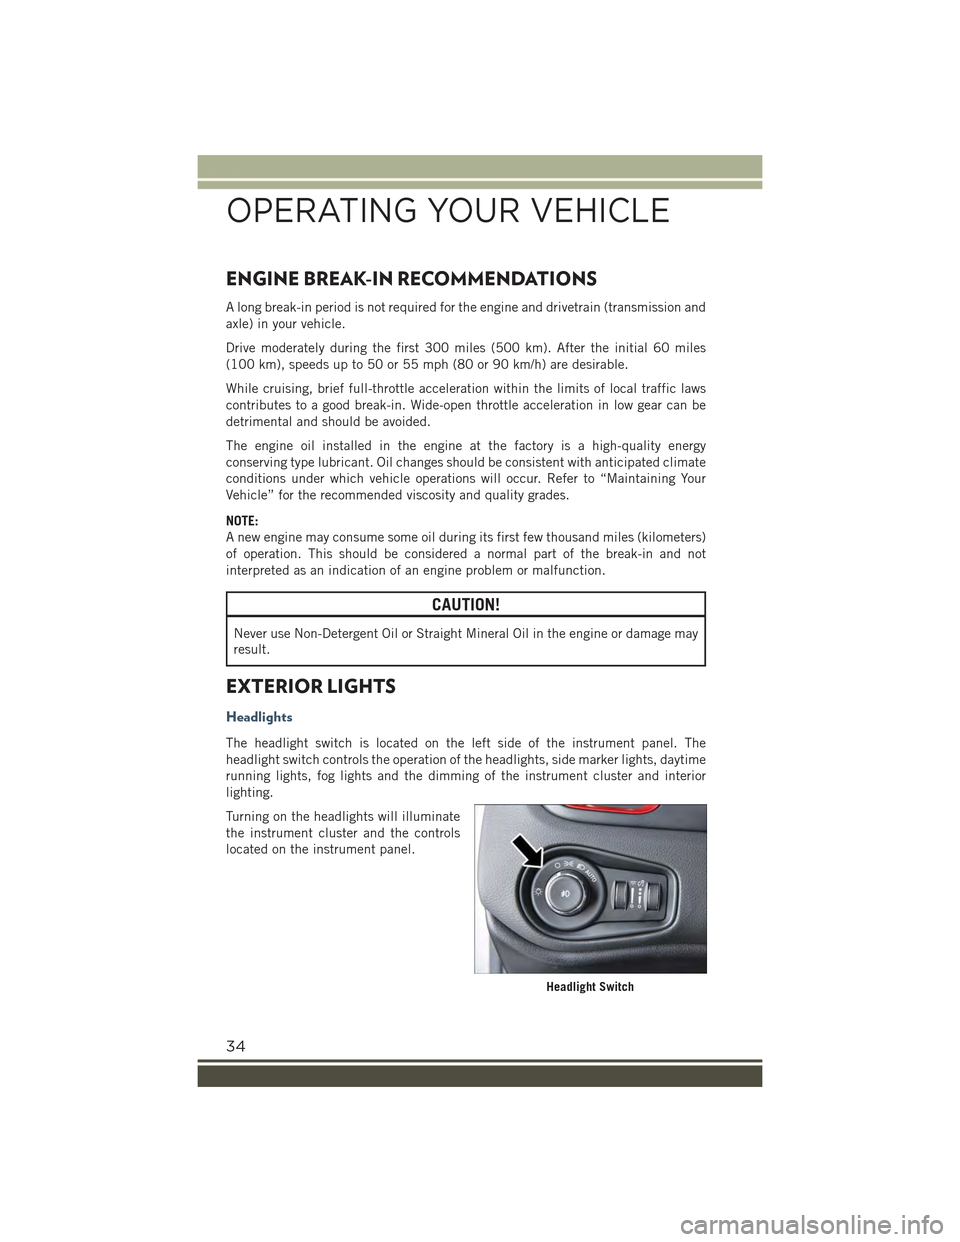
The headlight switch is located on the left side of the instrument panel. The
headlight switch controls the operation of the headlights, side marker lights, daytime
running lights, fog lights and the dimming of the instrument cluster and interior
lighting.
Turning on the headlights will illuminate
the instrument cluster and the controls
located on the instrument panel.
Headlight Switch
OPERATING YOUR VEHICLE
34
Page 37 of 220
Automatic Lighting — If Equipped
Light Sensor
The light sensor is equipped with an infrared LED, located on the windshield. It
detects changes in light intensity outside the vehicle, based on the sensitivity of light
set by using the Menu on the display or on the Uconnect®system.
The higher the sensitivity, the lesser the amount of external light required for
controlling the lighting.
Automatic Headlights
Turn the headlight switch to the AUTO position.
When the automatic headlights are enabled, the headlight time delay is active. After
the ignition switch is placed in the STOP/OFF position, the headlights will automati-
cally turn off after approximately 90 seconds depending on the settings of the
feature.
The timing of the headlights is adjustable between 0, 30, 60 and 90 seconds.
NOTE:
The engine must be running before the headlights will come on in the automatic
mode.
Daytime Running Lights (DRL) — If Equipped
The Daytime Running Lights (DRLs) will turn on when the engine is started and
remain on unless the headlights are turned on, the electronic parking brake is
applied, or the engine is shut off.
The DRLs will be disabled during turn signal operation and resume operation when
the turn signal operation has ended.
Front Fog Lights — If Equipped
The front fog light switch is built into the headlight switch.
To activate the front fog lights, turn on the parking lights or the low beam headlights
and push the headlight switch. To turn off the front fog lights, push the headlight
switch a second time or turn off the headlight switch.
An indicator light in the instrument cluster illuminates when the fog lights are turned
on.
NOTE:
The fog lights will operate with the low beam headlights or parking lights on.
Selecting the high beam headlights will turn off the fog lights.
Parking Lights
Rotate the headlight switch to the first position to turn on the parking lights. The
parking light indicator in the cluster will illuminate.
OPERATING YOUR VEHICLE
35
Page 64 of 220
If it’s necessary to keep the trailer hitch and hitch ball assembly mounted for a long
period, it is possible to filter out the trailer hitch and hitch ball assembly presence in
sensor field of view. The filtering operation must be performed only by an authorized
dealer.
PARKVIEW® REAR BACK UP CAMERA
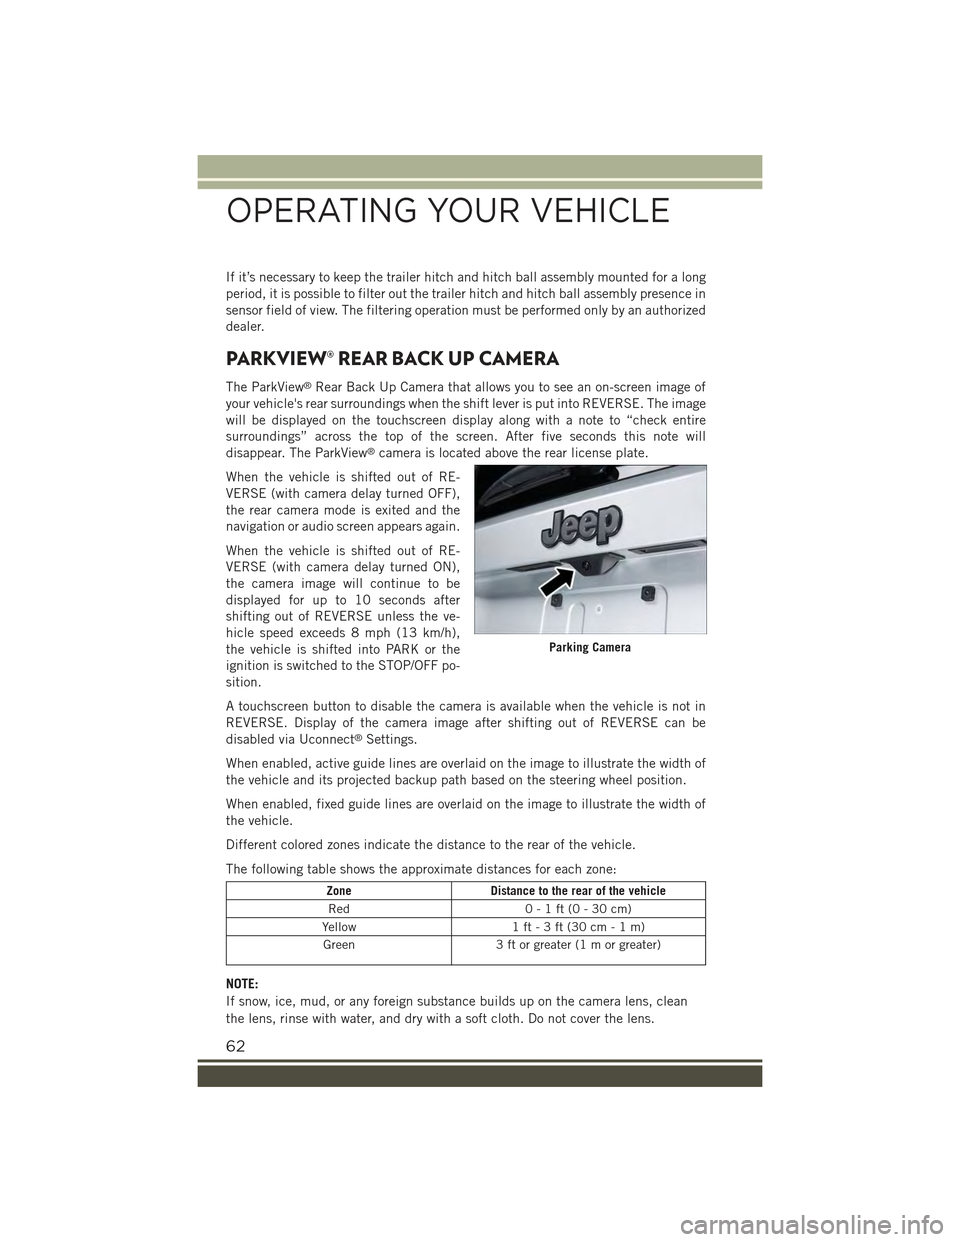
The ParkView®Rear Back Up Camera that allows you to see an on-screen image of
your vehicle's rear surroundings when the shift lever is put into REVERSE. The image
will be displayed on the touchscreen display along with a note to “check entire
surroundings” across the top of the screen. After five seconds this note will
disappear. The ParkView®camera is located above the rear license plate.
When the vehicle is shifted out of RE-
VERSE (with camera delay turned OFF),
the rear camera mode is exited and the
navigation or audio screen appears again.
When the vehicle is shifted out of RE-
VERSE (with camera delay turned ON),
the camera image will continue to be
displayed for up to 10 seconds after
shifting out of REVERSE unless the ve-
hicle speed exceeds 8 mph (13 km/h),
the vehicle is shifted into PARK or the
ignition is switched to the STOP/OFF po-
sition.
A touchscreen button to disable the camera is available when the vehicle is not in
REVERSE. Display of the camera image after shifting out of REVERSE can be
disabled via Uconnect®Settings.
When enabled, active guide lines are overlaid on the image to illustrate the width of
the vehicle and its projected backup path based on the steering wheel position.
When enabled, fixed guide lines are overlaid on the image to illustrate the width of
the vehicle.
Different colored zones indicate the distance to the rear of the vehicle.
The following table shows the approximate distances for each zone:
ZoneDistance to the rear of the vehicle
Red0-1ft(0-30cm)
Yellow1 ft - 3 ft (30 cm - 1 m)
Green3 ft or greater (1 m or greater)
NOTE:
If snow, ice, mud, or any foreign substance builds up on the camera lens, clean
the lens, rinse with water, and dry with a soft cloth. Do not cover the lens.
Parking Camera
OPERATING YOUR VEHICLE
62
Page 94 of 220
Clock Setting
1. Push the Menu button at the bottom of the radio, and push the Enter/Browse
button for System Settings. Next, select the Time and Format setting and then
select Set Time by pushing the Enter/Browse button.
2. Adjust the hours or minutes by turning the Tune/Scroll knob, then pushing the
Enter/Browse button to move to the next entry. You can also select 12hr or 24hr
format by turning the Tune/Scroll knob, then pushing the Enter/Browse button on
the desired selection.
3. Once the time is set push the “Back” button to exit the time screen.
Audio
• Push the AUDIO button on the radio faceplate.
The Audio Menu shows the following options for you to customize your audio settings.
Treble, Mid, Bass, Fade, Balance, Speed Adjusted Volume, Loudness
• Select the desired setting to adjust, then push the ENTER/BROWSE button. Turnthe TUNE/SCROLL knob to adjust the setting + or - 9. Push the “Back” buttonwhen done.
Radio Operation
Seek Previous/Next Buttons
• Push to seek through radio stations in AM, FM or SXM bands.
• Hold either button to bypass stations without stopping.
Store Radio Presets
• The Presets are available for all Radio Modes, and are activated by pushing any of
the six Preset buttons.
• When you are receiving a station that you wish to commit into memory, push and
hold the desired numbered button for more than two seconds, or until you hear a
confirmation beep.
• The Radio stores up to 18 presets in each of the Radio modes. Push the A-B-C
button on the faceplate to select the A, B or C preset list.
ELECTRONICS
92
Page 98 of 220
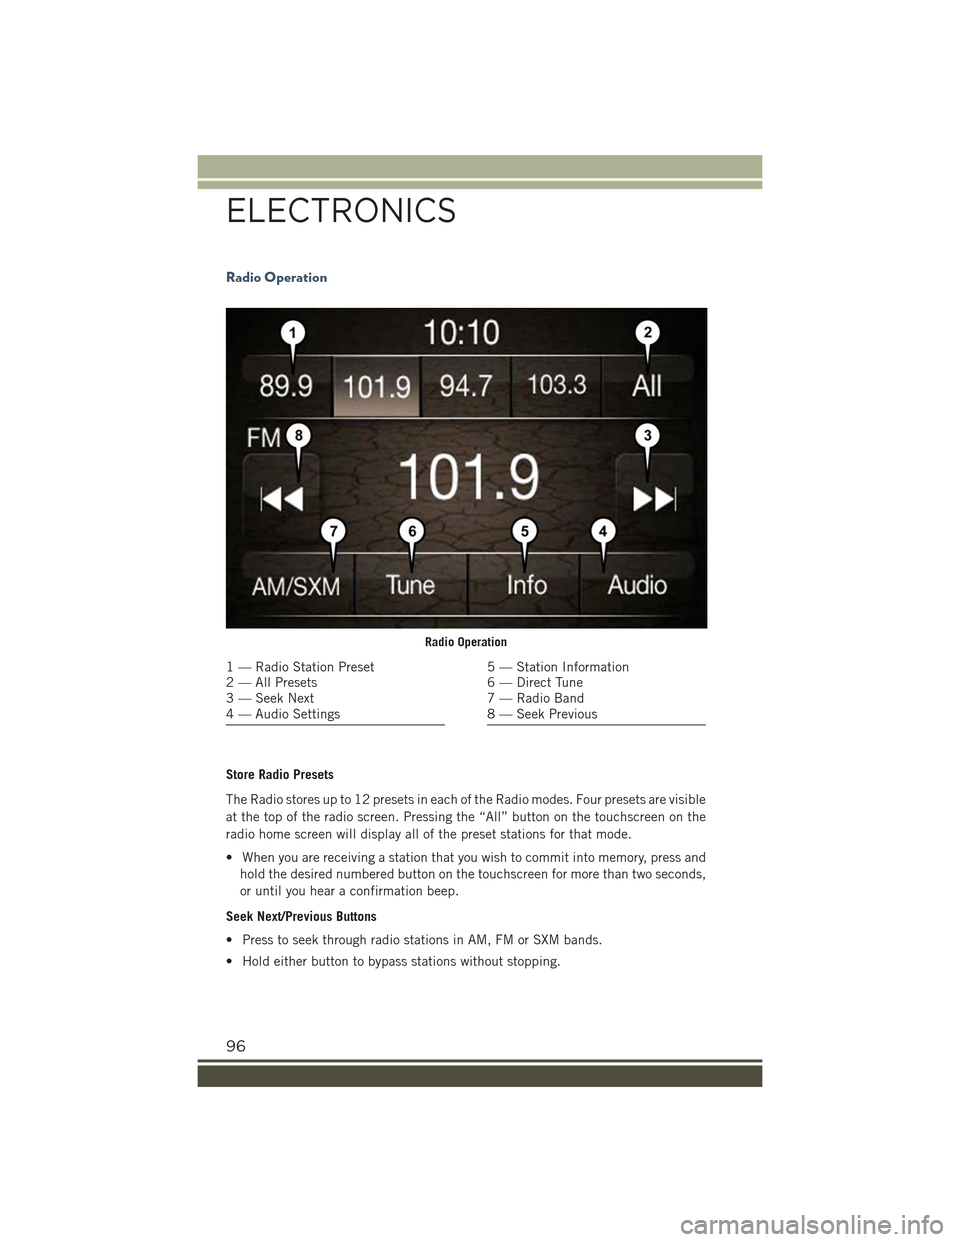
Radio Operation
Store Radio Presets
The Radio stores up to 12 presets in each of the Radio modes. Four presets are visible
at the top of the radio screen. Pressing the “All” button on the touchscreen on the
radio home screen will display all of the preset stations for that mode.
• When you are receiving a station that you wish to commit into memory, press and
hold the desired numbered button on the touchscreen for more than two seconds,
or until you hear a confirmation beep.
Seek Next/Previous Buttons
• Press to seek through radio stations in AM, FM or SXM bands.
• Hold either button to bypass stations without stopping.
Radio Operation
1 — Radio Station Preset2 — All Presets3 — Seek Next4 — Audio Settings
5 — Station Information6 — Direct Tune7 — Radio Band8 — Seek Previous
ELECTRONICS
96
Page 100 of 220
Audio Jack (AUX)
The AUX jack allows a portable device, such as an MP3 player or an iPod®,tobe
plugged into the radio and utilize the vehicle’s audio system, using a 3.5 mm audio
cable, to amplify the source and play through the vehicle speakers.
• Push the MEDIA button on the faceplate, press the “Source” button on the
touchscreen then select AUX to change the mode to AUX.
• The functions of the portable device are controlled using the device. However, the
volume may be controlled using the radio or portable device.
Bluetooth®
If using a Bluetooth®- equipped device, you may also be able to stream music to your
vehicle's sound system.
• Push the MEDIA button on the faceplate, press the “Source” button on the
touchscreen then select Bluetooth®to change the mode to Bluetooth®.Ifthe
device is paired, music from your portable device will play through the vehicle's
speakers.
Uconnect® 5.0 Available Media Hubs
Uconnect®5.0Media Hub (USB, AUX Ports)
S
S = Standard Equipment
Voice Text Reply (Not Compatible With iPhone®)
Once your Uconnect®system is paired with a compatible mobile device, the system
can announce a new incoming text message, and read it to your over the vehicle audio
system. You can reply to the message using Voice Recognition by selecting, or saying,
one of the 18 pre-defined messages.
ELECTRONICS
98
Page 110 of 220
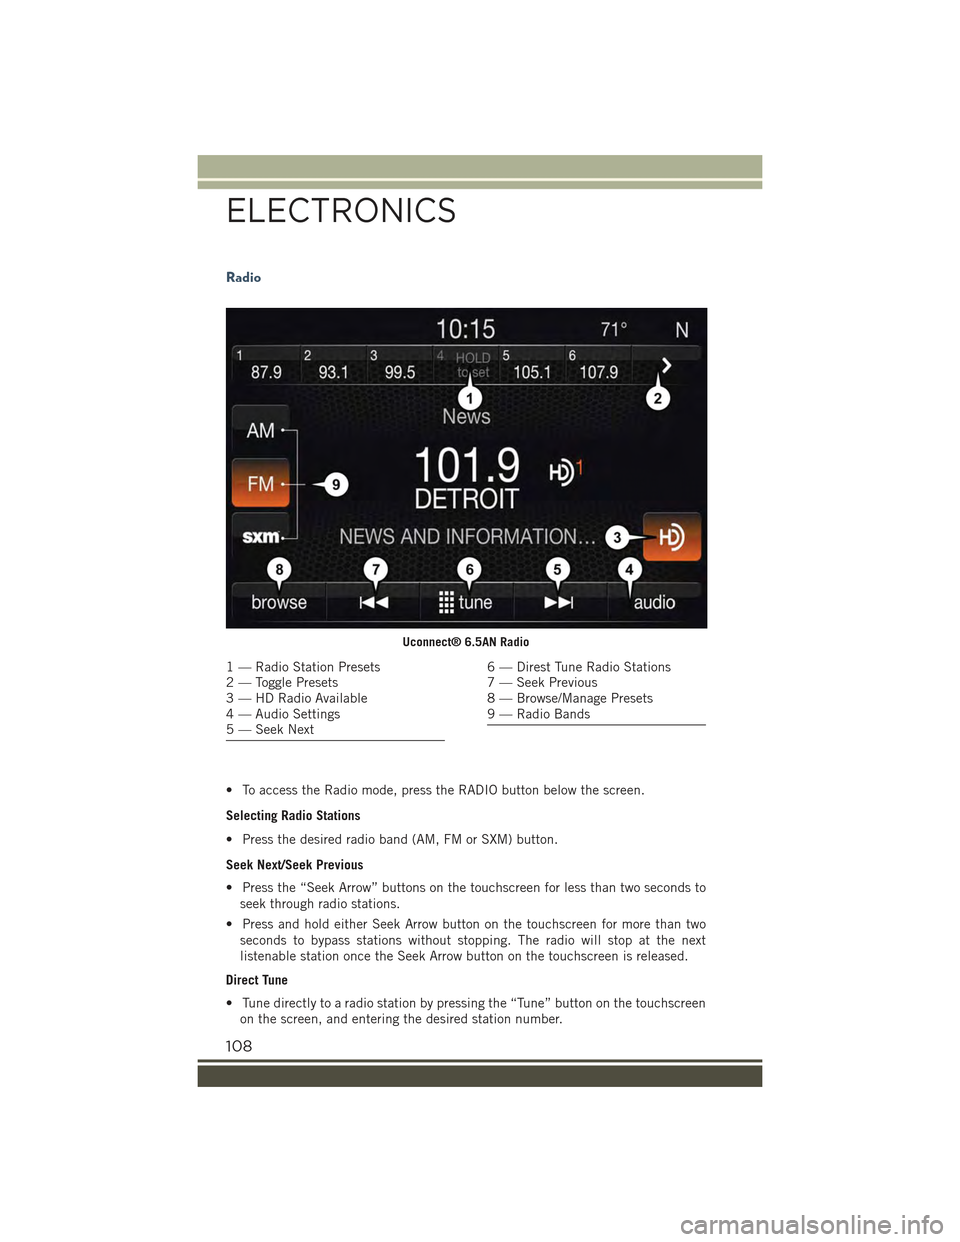
Radio
• To access the Radio mode, press the RADIO button below the screen.
Selecting Radio Stations
• Press the desired radio band (AM, FM or SXM) button.
Seek Next/Seek Previous
• Press the “Seek Arrow” buttons on the touchscreen for less than two seconds to
seek through radio stations.
• Press and hold either Seek Arrow button on the touchscreen for more than two
seconds to bypass stations without stopping. The radio will stop at the next
listenable station once the Seek Arrow button on the touchscreen is released.
Direct Tune
• Tune directly to a radio station by pressing the “Tune” button on the touchscreen
on the screen, and entering the desired station number.
Uconnect® 6.5AN Radio
1 — Radio Station Presets2 — Toggle Presets3 — HD Radio Available4 — Audio Settings5 — Seek Next
6 — Direst Tune Radio Stations7 — Seek Previous8 — Browse/Manage Presets9 — Radio Bands
ELECTRONICS
108
Page 111 of 220
Store Radio Presets
• Your radio can store 36 total preset stations, 12 presets per band (AM, FM and
SXM). They are shown at the top of your radio screen. To see the 12 preset stations
per band, press the “Arrow” button on the touchscreen at the top right of the
screen to toggle between the two sets of six presets.
• You can also see all presets for a band by pressing the "Browse" button on the
touchscreen. This browse screen lets you delete a preset and shows the station
frequency, name and genre.
• To set a station into memory press and hold the desired numbered button on the
touchscreen for more than two seconds or until you hear a confirmation beep.
SiriusXM Premier Over 160 Channels
Get every channel available on your satellite radio, and enjoy all you want, all in one
place. Hear commercial-free music plus sports, news, talk and entertainment. Get all
the premium programming, including Howard Stern, every NFL game, Oprah Radio®,
every MLB®and NHL®game, every NASCAR®race and more. And get 20+ Xtra
channels, including SiriusXM Latino, a selection of channels dedicated to Spanish
language programming.
• To access SiriusXM Satellite Radio, press the “SXM” button on the main Radio
screen.
The following describes features that are available when in SiriusXM Satellite Radio
mode.
Seek Up/Seek Down
• Press the “Seek Arrow” buttons on the touchscreen for less than two seconds to
seek through channels in SXM mode.
• Press and hold either arrow button on the touchscreen for more than two seconds
to bypass channels without stopping. The radio will stop at the next listenable
channel once the arrow button on the touchscreen is released.
Direct Tune
• Tune directly to a SXM channel by pressing the “Tune” button on the touchscreen
on the screen, and entering the desired station number.
Traffic & Weather
Automatically tells you when Traffic & Weather for a favorite city is available, and
gives you the option to switch to that channel.
Fav
Activates the favorites menu. You can add up to 50 favorite artists or songs. Just
press Add Fav Artist or Add Fav Song while the song is playing. You will then be
alerted any time one of these songs, or works by these artists, is playing on other
SiriusXM channels.
ELECTRONICS
109