clock JEEP RENEGADE 2015 1.G User Guide
[x] Cancel search | Manufacturer: JEEP, Model Year: 2015, Model line: RENEGADE, Model: JEEP RENEGADE 2015 1.GPages: 220, PDF Size: 34.11 MB
Page 73 of 220
Emergency Open/Close
If the Power My Sky switch fails, the retractable roof can be operated manually as
follows:
1. Remove the protective cap located on the inner lining.
2. Remove the Allen Key that is supplied in the tool bag in the cargo area.
3. Insert the Allen Key into the key hole and turn it clockwise to open the roof or
counter-clockwise to close.
CAUTION!
• When refitting panels, be careful to avoid fingers, scarves, ties and items of
clothing from getting caught under the panels themselves.
• Do not open the roof in the presence of snow or ice. There is risk of damage.
OPERATING YOUR VEHICLE
71
Page 94 of 220
Clock Setting
1. Push the Menu button at the bottom of the radio, and push the Enter/Browse
button for System Settings. Next, select the Time and Format setting and then
select Set Time by pushing the Enter/Browse button.
2. Adjust the hours or minutes by turning the Tune/Scroll knob, then pushing the
Enter/Browse button to move to the next entry. You can also select 12hr or 24hr
format by turning the Tune/Scroll knob, then pushing the Enter/Browse button on
the desired selection.
3. Once the time is set push the “Back” button to exit the time screen.
Audio
• Push the AUDIO button on the radio faceplate.
The Audio Menu shows the following options for you to customize your audio settings.
Treble, Mid, Bass, Fade, Balance, Speed Adjusted Volume, Loudness
• Select the desired setting to adjust, then push the ENTER/BROWSE button. Turnthe TUNE/SCROLL knob to adjust the setting + or - 9. Push the “Back” buttonwhen done.
Radio Operation
Seek Previous/Next Buttons
• Push to seek through radio stations in AM, FM or SXM bands.
• Hold either button to bypass stations without stopping.
Store Radio Presets
• The Presets are available for all Radio Modes, and are activated by pushing any of
the six Preset buttons.
• When you are receiving a station that you wish to commit into memory, push and
hold the desired numbered button for more than two seconds, or until you hear a
confirmation beep.
• The Radio stores up to 18 presets in each of the Radio modes. Push the A-B-C
button on the faceplate to select the A, B or C preset list.
ELECTRONICS
92
Page 96 of 220
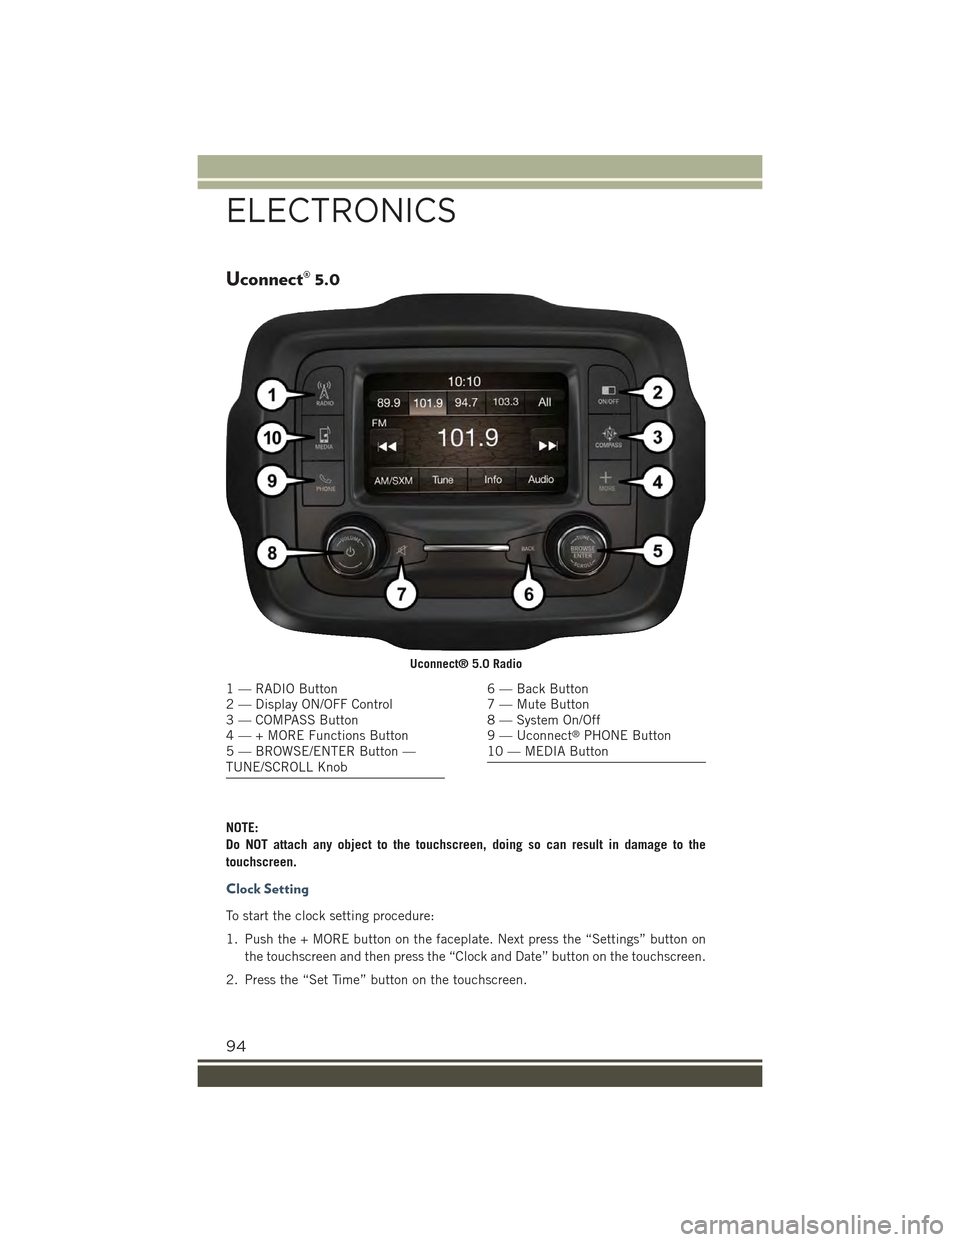
Uconnect® 5.0
NOTE:
Do NOT attach any object to the touchscreen, doing so can result in damage to the
touchscreen.
Clock Setting
To start the clock setting procedure:
1. Push the + MORE button on the faceplate. Next press the “Settings” button on
the touchscreen and then press the “Clock and Date” button on the touchscreen.
2. Press the “Set Time” button on the touchscreen.
Uconnect® 5.0 Radio
1 — RADIO Button2 — Display ON/OFF Control3 — COMPASS Button4 — + MORE Functions Button5 — BROWSE/ENTER Button —TUNE/SCROLL Knob
6 — Back Button7 — Mute Button8 — System On/Off9 — Uconnect®PHONE Button10 — MEDIA Button
ELECTRONICS
94
Page 97 of 220
3. Press the “Up” or “Down” arrows to adjust the hours or minutes, then select the
“AM” or “PM” button on the touchscreen. You can also select 12hr or 24hr
format by pressing the desired button on the touchscreen.
4. Once the time is set press the “Done” button on the touchscreen to exit the time
screen.
NOTE:
In the Clock Setting Menu you can also select Display Clock. Display Clock turns the
clock display in the status bar on or off.
Equalizer, Balance And Fade
1. Push the MORE button on the faceplate below the display then press the
“Setting” button on the touchscreen.
2. Scroll down and press the “Audio” button on the touchscreen to open the Audio
menu.
3. The Audio Menu shows the following options for you to customize your audio
settings.
Equalizer
• Press the “Equalizer” button on the touchscreen to adjust the Bass, Mid and
Treble. Use the “+” or “-” button on the touchscreen to adjust the equalizer to your
desired settings.
Balance/Fade
• Press the “Balance/Fade” button on the touchscreen to adjust the sound from the
speakers. Use the arrow buttons on the touchscreen to adjust the sound level from
the front and rear or right and left side speakers. Press the Center “C” button on
the touchscreen to reset the balance and fade to the factory setting.
Speed Adjusted Volume — If Equipped
• Press the “Speed Adjusted Volume” button on the touchscreen to select between
OFF, 1, 2 or 3. This will decrease the radio volume relative to a decrease in vehicle
speed.
Loudness
• Press the “Loudness” button on the touchscreen to select the Loudness feature.
When this feature is activated it improves sound quality at lower volumes.
Surround Sound — If Equipped
• Press the “Surround Sound” button on the touchscreen, select On or Off followed
by pressing the back arrow button on the touchscreen. When this feature is
activated, it provides simulated surround sound mode.
ELECTRONICS
95
Page 108 of 220
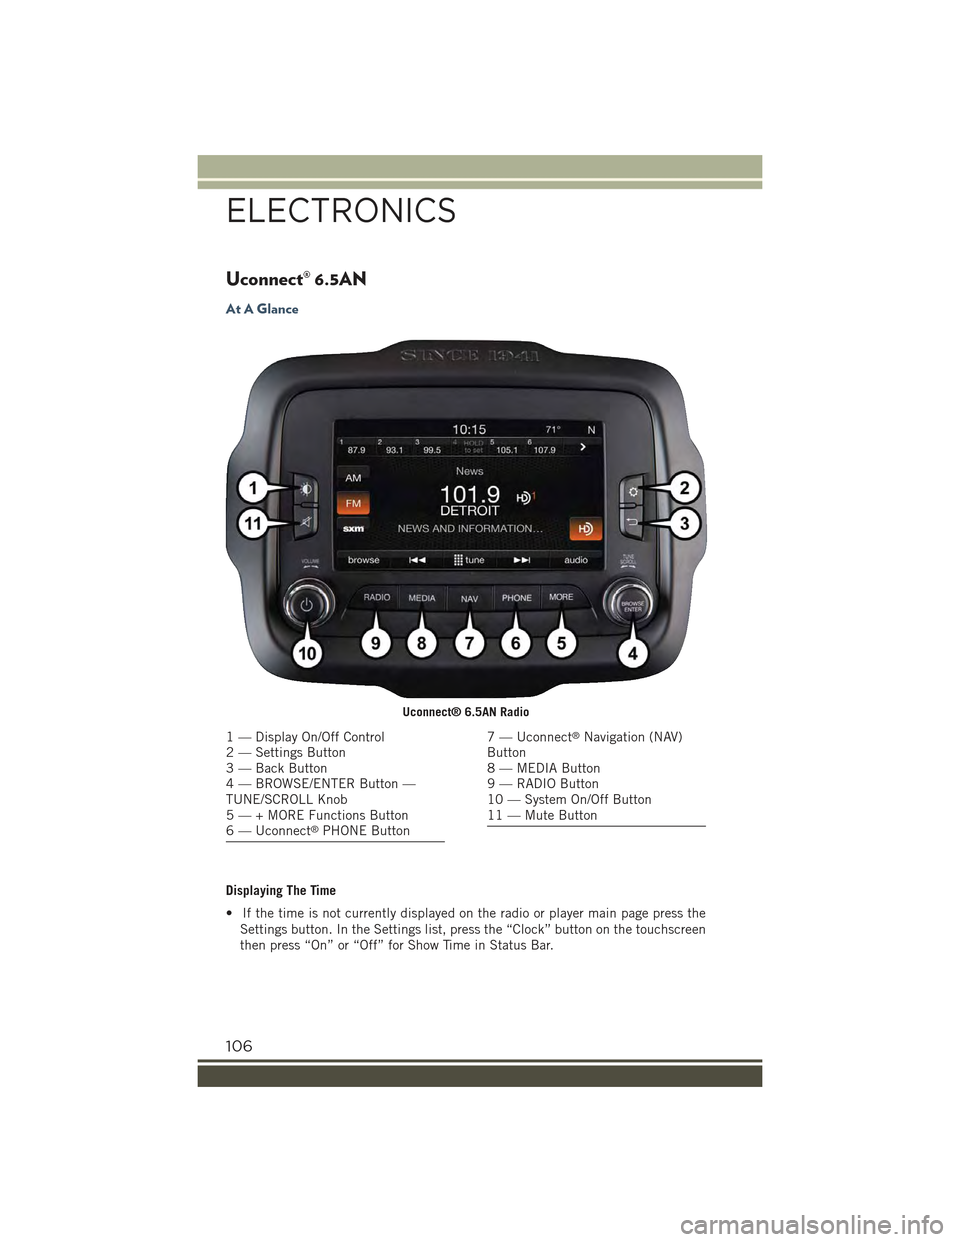
Uconnect® 6.5AN
At A Glance
Displaying The Time
• If the time is not currently displayed on the radio or player main page press the
Settings button. In the Settings list, press the “Clock” button on the touchscreen
then press “On” or “Off” for Show Time in Status Bar.
Uconnect® 6.5AN Radio
1 — Display On/Off Control2 — Settings Button3 — Back Button4 — BROWSE/ENTER Button —TUNE/SCROLL Knob5 — + MORE Functions Button6 — Uconnect®PHONE Button
7 — Uconnect®Navigation (NAV)Button8 — MEDIA Button9 — RADIO Button10 — System On/Off Button11 — Mute Button
ELECTRONICS
106
Page 109 of 220
Setting The Time
Model 6.5AN synchronizes time automatically via GPS, so should not require any
time adjustment. If you do need to set the time manually, follow the instructions
below.
• For Model 6.5AN, turn the unit on, then press the time display at the top of the
screen, a pop-up will ask if you want to set the time. Press “Yes.”
• If the time is not displayed at the top of the screen, press the Settings button. In
the Settings screen, press the “Clock” button on the touchscreen, then select
“ON” for “Show Time Status.”
• Press “+” or “–” next to Set Time Hours and Set Time Minutes to adjust the time.
• If these features are not available, press “Off” for Sync with GPS.
• Press “X” to exit out of the Clock Setting screen.
Audio Settings
• Press the “Audio” button on the touchscreen to activate the Audio settings screen
to adjust Balance\Fade, Equalizer, and Speed Adjusted Volume.
• You can return to the Radio screen by pressing the “X” or back arrow located at the
top right.
Balance/Fade
• Press the “Balance/Fade” button on the touchscreen to Balance audio between
the front speakers or fade the audio between the rear and front speakers.
• Pressing the “Front,” “Rear,” “Left,” or “Right” buttons on the touchscreen or
press and drag the Speaker Icon to adjust the Balance/Fade.
Equalizer
• Press the “Equalizer” button on the touchscreen to activate the Equalizer screen.
• Press the “+” or “-” buttons on the touchscreen, or press and drag over the level
bar for each of the equalizer bands. The level value, which spans between plus or
minus 9, is displayed at the bottom of each of the Bands.
Speed Adjusted Volume — If Equipped
• Press the “Speed Adjusted Volume” button on the touchscreen to activate the
Speed Adjusted Volume screen. The Speed Adjusted Volume is adjusted by
pressing the “+” and “–” buttons or by pressing and dragging over the level bar.
This alters the automatic adjustment of the audio volume with variation to vehicle
speed.
Surround Sound — If Equipped
• Press the “Surround Sound” button on the touchscreen, select “On” or “Off”
followed by pressing the back arrow button on the touchscreen. When this feature
is activated, it provides simulated surround sound mode.
ELECTRONICS
107
Page 144 of 220
Display Gears (Vehicles With Reconfigurable Multi-Functional Display And Automatic
Transmission)
By selecting this item, you can select the display mode, the particulars relating to the
automatic transmission, and choose between the following options:
"Single digit"
• The right side of the display will show the letter concerning the automatic
transmission shift lever (P,N,R or D) position. After approximately two seconds, the
letter will be displayed in a central position.
"Full PNRD"
• (Default): The right side of the display the letters PNRD, the position assumed by
the shift lever will be highlighted in the display. During the operation in sequential
mode ("AutoStick"), in place of the letter D, the gear will be will be displayed.
In The Top Left/Top Right
The information relating to the following can be displayed:
• External temperature
• Compass (If Equipped)
• Date (Month/Day)
• Time (Hours/Minutes)
In the central area of the display, you can view all of the information listed above as
well as the following:
• Audio Information
• Speed Display (If Equipped)
• Date (Day/Month/Year)
• Range To Empty
• Menu Item
• Average Consumption
• Current Consumption
• Distance Traveled (Trip)
• Distance Traveled B (Trip B)
Restore Default Settings
Selecting this item, and you can reset and restore the default settings.
Vehicle Setup (Edit Settings Of The Car)
This menu item allows you to change the settings for the following:
• Display
• Units of measure
• Clock and Data
• Safety
ELECTRONICS
142
Page 145 of 220
• Safety and Assistance
• Lights
• Doors and Locks
• Compass (If Equipped)
Vehicles Equipped With Multifunctional Display Reconfigurable:Menu
items "Display" (you can select only the items "See Phone" and "See Navigation,"
"Security," and "Safety & Assistance" (only "Volume Alerts" is selectable) are present.
All other entries are displayed and selected on the display of the Uconnect®system.
“Display”
By selecting the "Display," you can access the following settings:
•Language: allows you to select the language in which to display the information/
warnings.
•See Phone:allows you to view, on the instrument cluster display, the information
relating to Phone mode displayed on the display of the Uconnect®system.
•See Navigation:allows you to view, on the instrument cluster display, information
relating to the navigation mode.
"Units Of Measure"
By selecting the item "Units of measure," you can select the unit of measure to use
for displaying various magnitudes.
Possible options are:
•US
• Metric
• Custom
"Clock & Data"
By selecting the item, "Clock & Data" you can adjust the clock.
Possible options are:
• Set Time: adjusting hours/minutes
• Set Format: adjusting the time format "12h" (12 hours) or "24h" (24 hours)
• Set Date: adjustment day/month/year
Safety
By selecting the item “Safety,” you can make the following adjustments:
Speed Warning:
• Set the vehicle speed limit (mph or km/h), which the driver is notified through a
visual and acoustic signaling (display of a message and a symbol on the display).
ELECTRONICS
143
Page 148 of 220
PROGRAMMABLE FEATURES
Uconnect® Customer Programmable Features
The Uconnect®system allows you to access Customer Programmable feature
settings such as Display, Units, Voice, Clock, Safety & Driving Assistance, Lights,
Doors & Locks, Engine Off Options, Audio, Phone/Bluetooth®, SiriusXM Setup,
System Information, Restore Default Settings, Clear Personal Data, and Compass
(Uconnect®5.0) through buttons on the touchscreen.
• For the Uconnect 5.0 system, push the Morebutton on the faceplate, then
press the “Settings”button on the touchscreen. For the Uconnect 6.5 system,
push the Settingsbutton located on the right side of the display. When making
a selection, scroll up or down until the preferred setting is highlighted, then press
and release the preferred setting until the selection is highlighted showing that
setting has been selected. Depending on the vehicles options, the following
feature settings are available:
• Display• Audio
• Units• Phone/Bluetooth®
• Voice• SiriusXM Setup
• Clock• System Information
• Safety & Driving Assistance• Restore Default Settings
• Lights• Clear Personal Data
• Doors & Locks• Compass (Uconnect®5.0)
• Engine Off Options
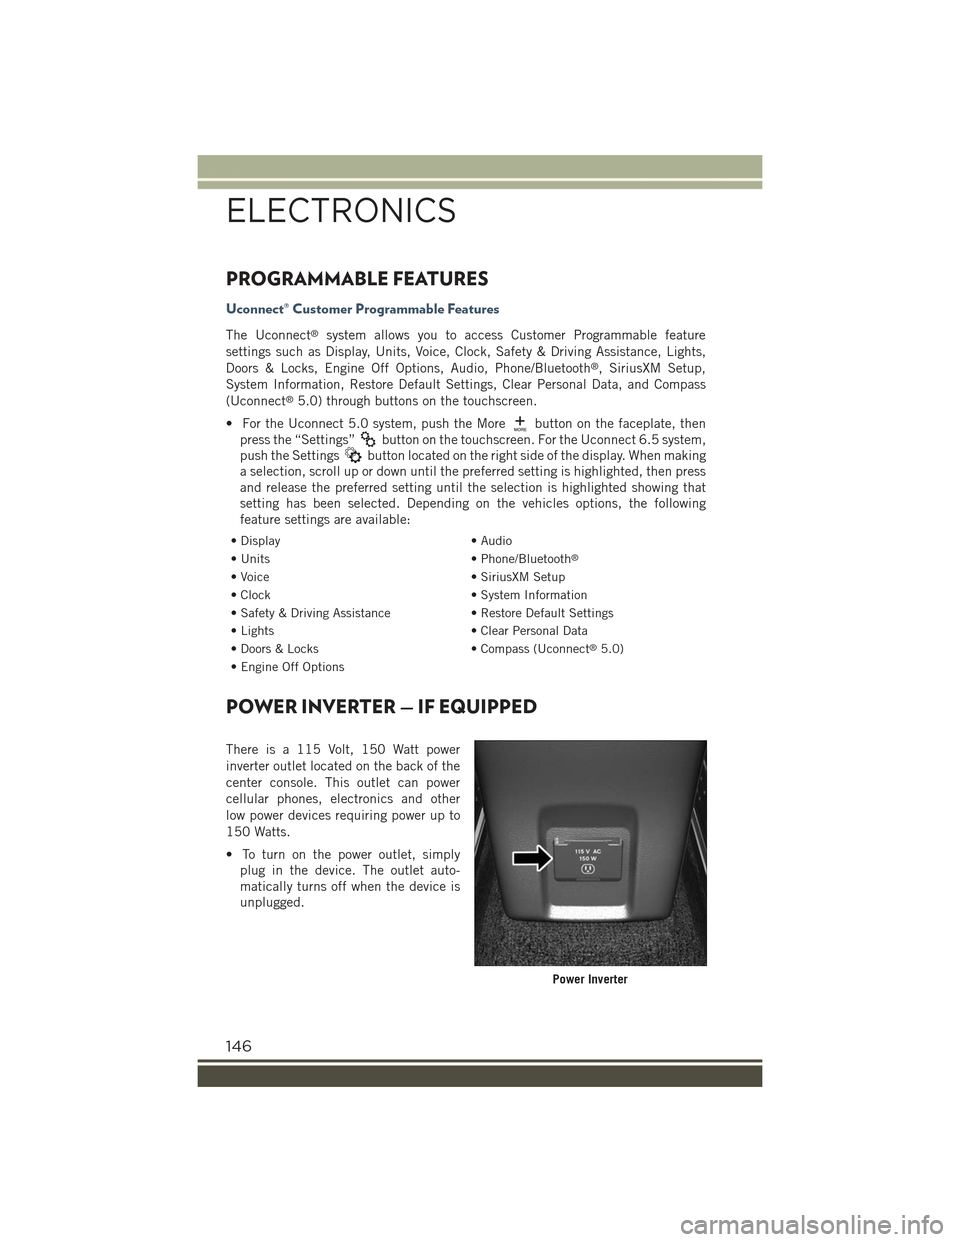
POWER INVERTER — IF EQUIPPED
There is a 115 Volt, 150 Watt power
inverter outlet located on the back of the
center console. This outlet can power
cellular phones, electronics and other
low power devices requiring power up to
150 Watts.
• To turn on the power outlet, simply
plug in the device. The outlet auto-
matically turns off when the device is
unplugged.
Power Inverter
ELECTRONICS
146
Page 172 of 220
Jacking Instructions
WARNING!
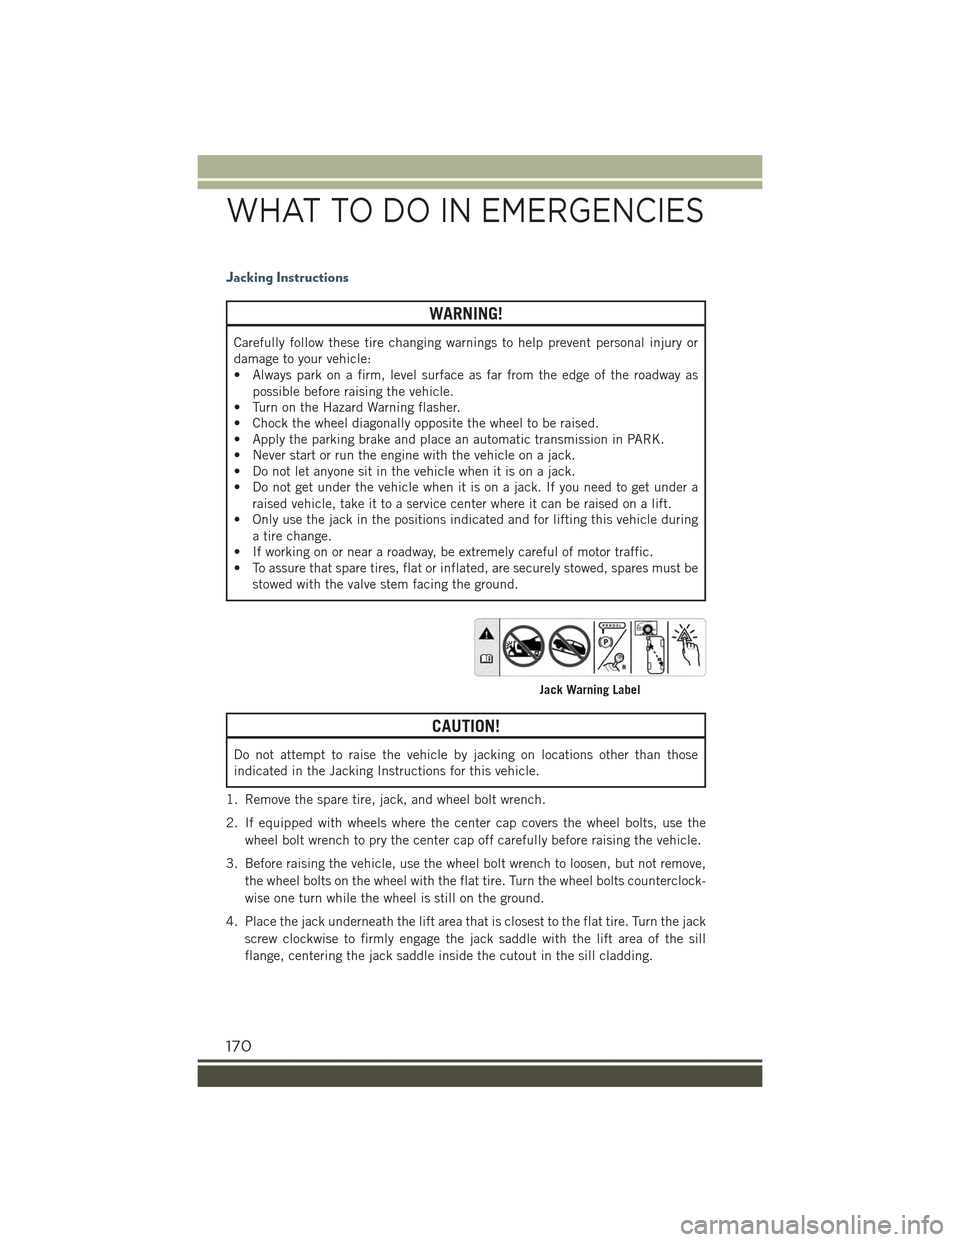
Carefully follow these tire changing warnings to help prevent personal injury or
damage to your vehicle:
• Always park on a firm, level surface as far from the edge of the roadway as
possible before raising the vehicle.
• Turn on the Hazard Warning flasher.
• Chock the wheel diagonally opposite the wheel to be raised.
• Apply the parking brake and place an automatic transmission in PARK.
• Never start or run the engine with the vehicle on a jack.
• Do not let anyone sit in the vehicle when it is on a jack.
• Do not get under the vehicle when it is on a jack. If you need to get under a
raised vehicle, take it to a service center where it can be raised on a lift.
• Only use the jack in the positions indicated and for lifting this vehicle during
a tire change.
• If working on or near a roadway, be extremely careful of motor traffic.
• To assure that spare tires, flat or inflated, are securely stowed, spares must be
stowed with the valve stem facing the ground.
CAUTION!
Do not attempt to raise the vehicle by jacking on locations other than those
indicated in the Jacking Instructions for this vehicle.
1. Remove the spare tire, jack, and wheel bolt wrench.
2. If equipped with wheels where the center cap covers the wheel bolts, use the
wheel bolt wrench to pry the center cap off carefully before raising the vehicle.
3. Before raising the vehicle, use the wheel bolt wrench to loosen, but not remove,
the wheel bolts on the wheel with the flat tire. Turn the wheel bolts counterclock-
wise one turn while the wheel is still on the ground.
4. Place the jack underneath the lift area that is closest to the flat tire. Turn the jack
screw clockwise to firmly engage the jack saddle with the lift area of the sill
flange, centering the jack saddle inside the cutout in the sill cladding.
Jack Warning Label
WHAT TO DO IN EMERGENCIES
170