turn signal JEEP RENEGADE 2015 1.G User Guide
[x] Cancel search | Manufacturer: JEEP, Model Year: 2015, Model line: RENEGADE, Model: JEEP RENEGADE 2015 1.GPages: 220, PDF Size: 34.11 MB
Page 8 of 220
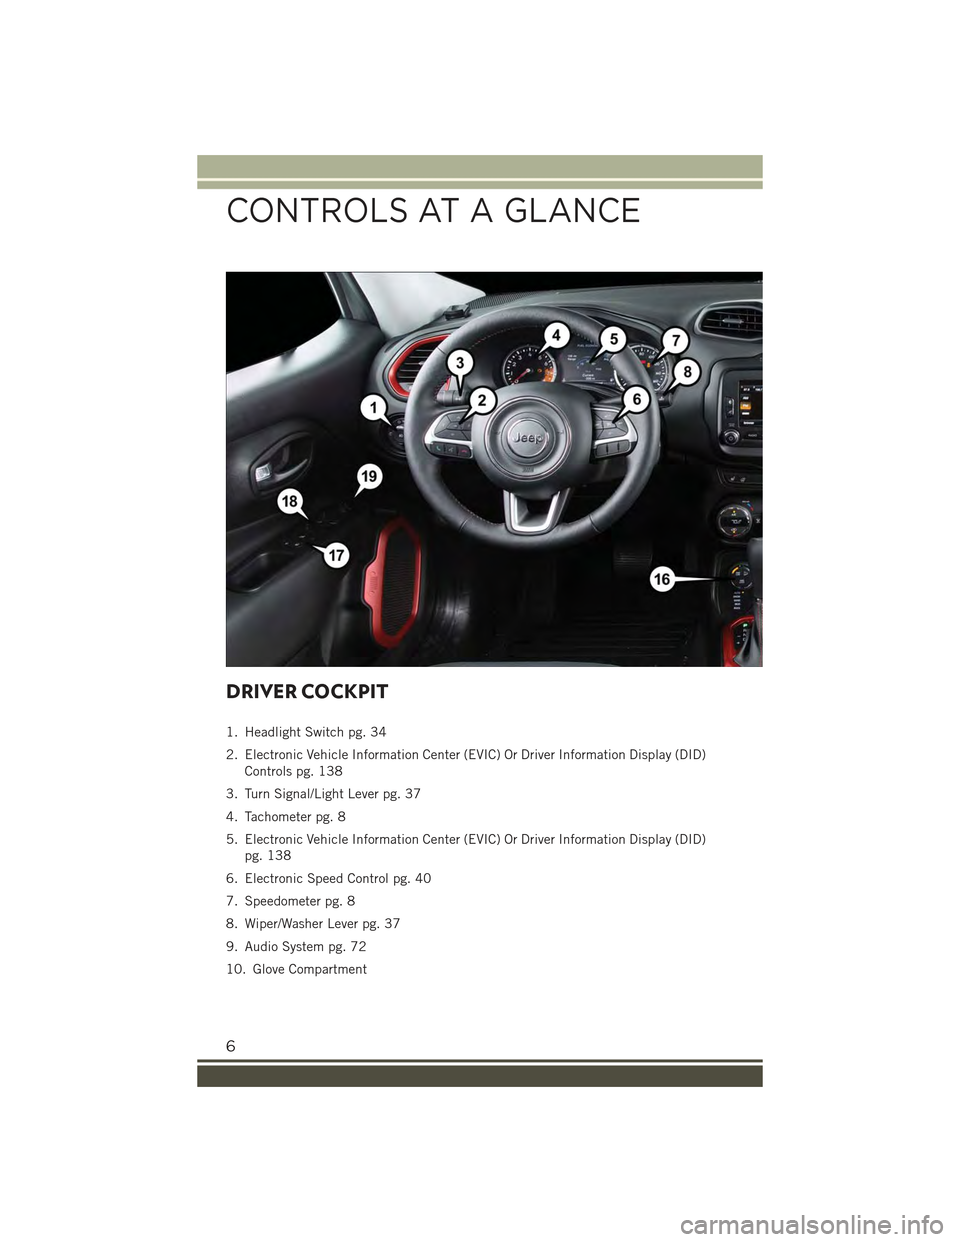
DRIVER COCKPIT
1. Headlight Switch pg. 34
2. Electronic Vehicle Information Center (EVIC) Or Driver Information Display (DID)
Controls pg. 138
3. Turn Signal/Light Lever pg. 37
4. Tachometer pg. 8
5. Electronic Vehicle Information Center (EVIC) Or Driver Information Display (DID)
pg. 138
6. Electronic Speed Control pg. 40
7. Speedometer pg. 8
8. Wiper/Washer Lever pg. 37
9. Audio System pg. 72
10. Glove Compartment
CONTROLS AT A GLANCE
6
Page 15 of 220
Remote Start Windshield Wiper De–icer Activation — If Equipped
When Remote Start is active and the outside ambient temperature is less than 41° F
(5° C), the wiper De-Icer will be enabled. On exiting Remote Start, resume the
previous operation except if the De-Icer is active; the De-Icer timer and operation will
continue.
VEHICLE SECURITY ALARM
The Vehicle Security Alarm monitors the vehicle doors for unauthorized entry and the
Keyless Enter-N-Go™ START/STOP button for unauthorized operation. While the
Vehicle Security Alarm is armed, interior switches for door locks and decklid release
are disabled. If something triggers the alarm, the Vehicle Security Alarm will provide
the following audible and visible signals: the horn will pulse, the park lamps and/or
turn signals will flash, and the Vehicle Security Light in the instrument cluster will
flash.
To A r m :
Lock the door using either the power door lock switch (one door must be open) or the
LOCK button on the Remote Keyless Entry (RKE) transmitter (doors can be open or
closed), and close all doors.
The Vehicle Security Light in the instrument cluster will flash for 16 seconds. This
shows that the Vehicle Security Alarm is arming. During this period, if a door is
opened, the ignition is cycled to MAR/RUN, or the power door locks are unlocked in
any manner, the Vehicle Security Alarm will automatically disarm.
NOTE:
• The Vehicle Security Alarm will not arm if you lock the doors with the manual door
lock plungers.
• Once armed, the Vehicle Security Alarm disables the unlock switch on the driver
door trim panel and passenger door trim panel.
To D i s a r m T h e S y s t e m :
Push the Key Fob UNLOCK button or cycle the ignition to the MAR/RUN position.
The Vehicle Security Alarm is designed to protect your vehicle. However, you can
create conditions where the Vehicle Security Alarm will give you a false alarm. If one
of the previously described arming sequences has occurred, the Vehicle Security
Alarm will arm regardless of whether you are in the vehicle or not. If you remain in the
vehicle and open a door, the alarm will sound. If this occurs, disarm the Vehicle
Security Alarm.
If the Vehicle Security Alarm is armed and the battery becomes disconnected, the
Vehicle Security Alarm will remain armed when the battery is reconnected. The
exterior lights will flash, and the horn will sound. If this occurs, disarm the Vehicle
Security Alarm.
GETTING STARTED
13
Page 37 of 220
Automatic Lighting — If Equipped
Light Sensor
The light sensor is equipped with an infrared LED, located on the windshield. It
detects changes in light intensity outside the vehicle, based on the sensitivity of light
set by using the Menu on the display or on the Uconnect®system.
The higher the sensitivity, the lesser the amount of external light required for
controlling the lighting.
Automatic Headlights
Turn the headlight switch to the AUTO position.
When the automatic headlights are enabled, the headlight time delay is active. After
the ignition switch is placed in the STOP/OFF position, the headlights will automati-
cally turn off after approximately 90 seconds depending on the settings of the
feature.
The timing of the headlights is adjustable between 0, 30, 60 and 90 seconds.
NOTE:
The engine must be running before the headlights will come on in the automatic
mode.
Daytime Running Lights (DRL) — If Equipped
The Daytime Running Lights (DRLs) will turn on when the engine is started and
remain on unless the headlights are turned on, the electronic parking brake is
applied, or the engine is shut off.
The DRLs will be disabled during turn signal operation and resume operation when
the turn signal operation has ended.
Front Fog Lights — If Equipped
The front fog light switch is built into the headlight switch.
To activate the front fog lights, turn on the parking lights or the low beam headlights
and push the headlight switch. To turn off the front fog lights, push the headlight
switch a second time or turn off the headlight switch.
An indicator light in the instrument cluster illuminates when the fog lights are turned
on.
NOTE:
The fog lights will operate with the low beam headlights or parking lights on.
Selecting the high beam headlights will turn off the fog lights.
Parking Lights
Rotate the headlight switch to the first position to turn on the parking lights. The
parking light indicator in the cluster will illuminate.
OPERATING YOUR VEHICLE
35
Page 38 of 220
Headlight Time Delay
This feature provides the safety of headlight illumination for up to 90 seconds when
leaving your vehicle in an unlit area.
The time delay of the headlights is programmable between 0, 30, 60 and 90
seconds.
Headlight Delay Activation
To activate the delay feature, place the ignition in the STOP/OFF position while theheadlights are still on. Then, turn off the headlights within two minutes. The delayinterval begins when the headlight switch is turned off.
Headlight Delay Disable
The feature is disabled by turning on the headlights, the parking lights or by placing
the ignition in the MAR/RUN position.
If you shut off the lights before the ignition is turned on, they will turn off in the
normal manner.
NOTE:
The lights must be turned off within two minutes of placing the ignition in the
STOP/OFF position to activate this feature.
Flash-To-Pass
You can signal another vehicle with your headlights by lightly pulling the multifunc-
tion lever toward you. This will cause the headlights to turn on at high beam and
remain on until the lever is released.
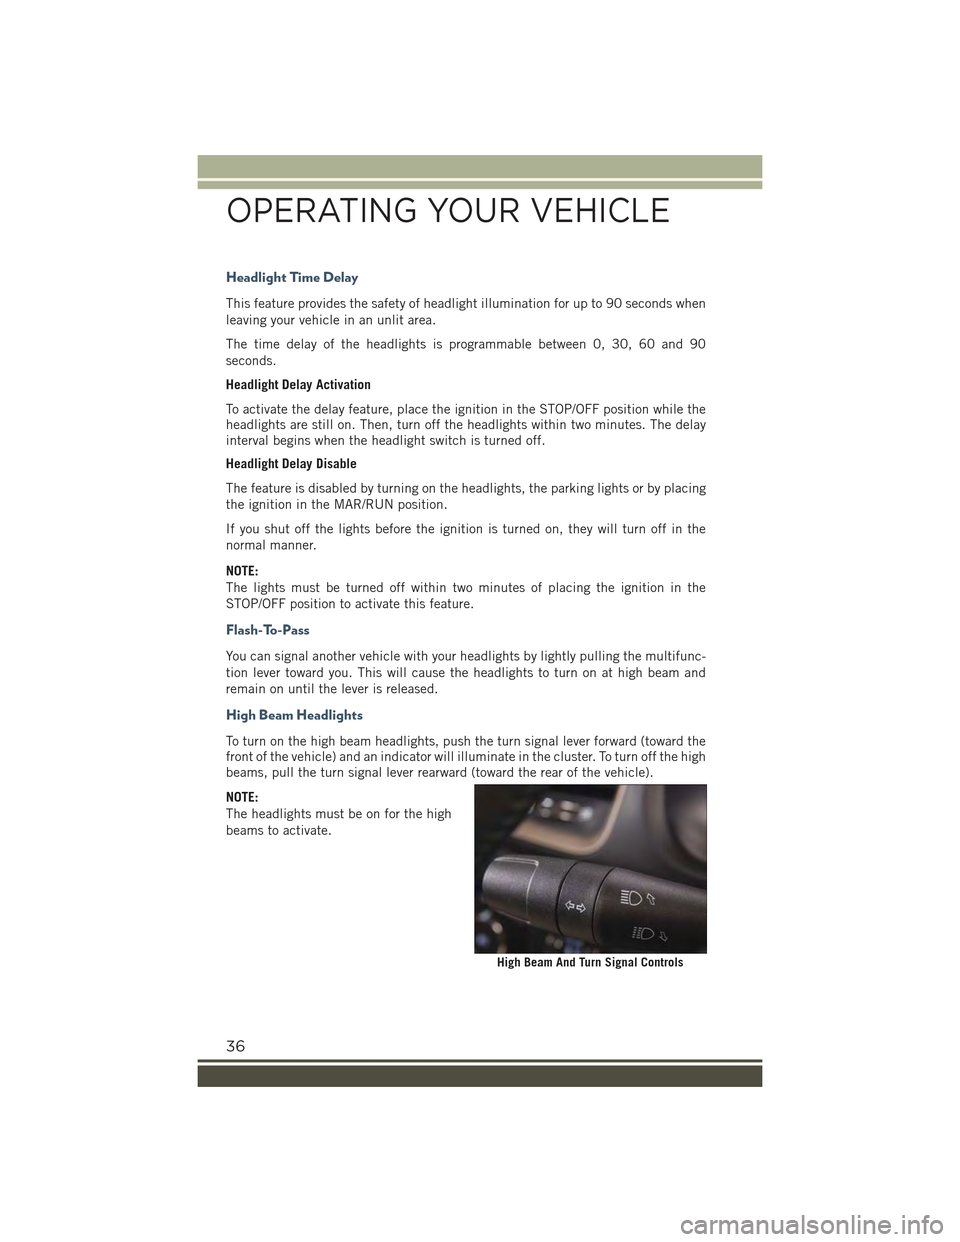
High Beam Headlights
To turn on the high beam headlights, push the turn signal lever forward (toward thefront of the vehicle) and an indicator will illuminate in the cluster. To turn off the highbeams, pull the turn signal lever rearward (toward the rear of the vehicle).
NOTE:
The headlights must be on for the high
beams to activate.
High Beam And Turn Signal Controls
OPERATING YOUR VEHICLE
36
Page 39 of 220
Turn Signals
Move the multifunction lever up or down and the arrows on each side of the
instrument cluster flash to show proper operation of the front and rear turn signal
lights.
• A “Turn Signal On” message will appear in the instrument cluster and a
continuous chime will sound if the vehicle is driven more than 1 mile (1.6 km) with
either turn signal on.
• When the Daytime Running Lights are on and a turn signal is activated, the
Daytime Running Lamp will turn off on the side of the vehicle in which the turn
signal is flashing. The Daytime Running Lamp will turn back on when the turn
signal is turned off.
WINDSHIELD WIPER/WASHER
The windshield wiper/washer controls are located on the lever on the right side of the
steering column. The front wipers are operated by rotating a switch, located on the
end of the lever.
CAUTION!
Always remove any buildup of snow that prevents the windshield wiper blades
from returning to the “park” position. If the windshield wiper switch is turned off,
and the blades cannot return to the “park” position, damage to the wiper motor
may occur.
Windshield Wiper Operation
Rotate the windshield wiper knob to one of the two detent positions for intermittent
settings, the third detent for low wiper operation and the fourth for high wiper
operation.
Windshield Washer Operation
To use the washer, pull the lever toward you and hold while spray is desired. If the
lever is pulled while in the intermittent setting, the wipers will turn on and operate for
several wipe cycles after the lever is released, and then resume the intermittent
interval previously selected.
If the lever is pulled while the wipers are in the off position, the wipers will operate
for several wipe cycles, then turn off.
WARNING!
Sudden loss of visibility through the windshield could lead to a collision. You
might not see other vehicles or other obstacles. To avoid sudden icing of the
windshield during freezing weather, warm the windshield with the defroster before
and during windshield washer use.
OPERATING YOUR VEHICLE
37
Page 51 of 220
WARNING!
The Blind Spot Monitoring system is only an aid to help detect objects in the blind
spot zones. The BSM system is not designed to detect pedestrians, bicyclists, or
animals. Even if your vehicle is equipped with the BSM system, always check your
vehicles mirrors, glance over your shoulder, and use your turn signal before
changing lanes. Failure to do so can result in serious injury or death.
Rear Cross Path (RCP)
The Rear Cross Path (RCP) feature is intended to aid the driver when backing out of
parking spaces where their vision of oncoming vehicles may be blocked. Proceed
slowly and cautiously out of the parking space until the rear end of the vehicle is
exposed. The RCP system will then have a clear view of the cross traffic and if an
oncoming vehicle is detected, alert the driver.
RCP monitors the rear detection zones on both sides of the vehicle, for objects that
are moving toward the side of the vehicle with a minimum speed of approximately
1 mph (2 km/h), to objects moving a maximum of approximately 22 mph (35 km/h),
such as in parking lot situations.
NOTE:
In a parking lot situation, oncoming vehicles can be obscured by vehicles parked on
either side. If the sensors are blocked by other structures or vehicles, the system will
not be able to alert the driver.
When RCP is on and the vehicle is in REVERSE, the driver is alerted using both the
visual and audible alarms, including reducing the radio volume.
WARNING!
RCP is not a Back Up Aid system. It is intended to be used to help a driver detect
an oncoming vehicle in a parking lot situation. Drivers must be careful when
backing up, even when using RCP. Always check carefully behind your vehicle,
look behind you, and be sure to check for pedestrians, animals, other vehicles,
obstructions, and blind spots before backing up. Failure to do so can result in
serious injury or death.
OPERATING YOUR VEHICLE
49
Page 52 of 220
Mode Of Operation
Three selectable modes of operation are available in the Uconnect®System. Refer to
“Uconnect®Settings” in “Multimedia” in your Owner’s Manual on the DVD for
further information.
Blind Spot Alert Lights Only
When operating in Blind Spot Alert mode, the BSM system will provide a visual alert
in the appropriate side view mirror based on a detected object. However, when the
system is operating in Rear Cross Path (RCP) mode, the system will respond with
both visual and audible alerts when a detected object is present. Whenever an
audible alert is requested, the radio is muted.
Blind Spot Alert Lights/Chime
When operating in Blind Spot Alert Lights/Chime mode, the BSM system will provide a
visual alert in the appropriate side view mirror based on a detected object. If the turn
signal is then activated, and it corresponds to an alert present on that side of the vehicle,
an audible chime will also be sounded. Whenever a turn signal and detected object are
present on the same side at the same time, both the visual and audible alerts will be
issued. In addition to the audible alert, the radio (if on) will also be muted.
NOTE:
Whenever an audible alert is requested by the BSM system, the radio is also muted.
When the system is in RCP, the system will respond with both visual and audiblealerts when a detected object is present. Whenever an audible alert is requested, theradio is also muted. Turn/hazard signal status is ignored; the RCP state alwaysrequests the chime.
Blind Spot Alert Off
When the BSM system is turned off, there will be no visual or audible alerts from
either the BSM or RCP systems.
NOTE:
The BSM system will store the current operating mode when the vehicle is shut off.
Each time the vehicle is started the previously stored mode will be recalled and used.
Blind Spot Monitoring Fault Warnings
Sensor Blinded
In the case of a sensor blinded:
• BSM Mirror Warning Lights are turned on continuously.
• A chime will turn on.
• A instrument cluster message will display“Blind Spot Monitoring Unavailable - Wipe
Rear Bumper Corners.”
NOTE:
The rear bumper must be clean and free of any obstructing debris.
OPERATING YOUR VEHICLE
50
Page 57 of 220
Small Vehicles And/Or Not Aligned To The Lane
The system is not able to detect the presence of vehicles that are in front of the car
but placed outside the field of action of the radar sensor and could therefore not react
in the presence of small vehicles such as bicycles or motorcycles.
Lane Changing Of Other Vehicles
Vehicles that suddenly change lane, while standing in the traffic lane of their car and
inside the field of action of the radar sensor may cause the intervention of the system.
Passing Of Vehicles In An Oncoming Intersection
The system could temporarily react to a vehicle that crossed the range of the radar
sensor, in an oncoming intersection.
LANESENSE
LaneSense Operation
The LaneSense system is operational at speeds above 37 mph (60 km/h) and below
112 mph (180 km/h). The LaneSense system uses a forward looking camera to
detect lane markings and measure vehicle position within the lane boundaries.
When both lane markings are detected and the driver unintentionally drifts out of the
lane (no turn signal applied), the LaneSense system provides a haptic warning in the
form of torque applied to the steering wheel to prompt the driver to remain within the
lane boundaries. If the driver continues to unintentionally drift out of the lane, the
LaneSense system provides a visual warning through the Electronic Vehicle Informa-
tion Center (EVIC) or Driver Information Display (DID) to prompt the driver to remain
within the lane boundaries.
The driver may manually override the haptic warning by applying torque into the
steering wheel at any time.
When only a single lane marking is detected and the driver unintentionally drifts
across the lane marking (no turn signal applied), the LaneSense system provides a
visual warning through the EVIC/DID to prompt the driver to remain within the lane.
When only a single lane marking is detected, a haptic (torque) warning will not be
provided.
NOTE:
When operating conditions have been met, the LaneSense system will monitor if the
driver’s hands are on the steering wheel and provides an audible warning to the driver
when the driver’s hands are not detected on the steering wheel. The system will
cancel if the driver does not return their hands to the wheel.
OPERATING YOUR VEHICLE
55
Page 60 of 220
• When the LaneSense system senses the lane has been approached and is in a lane
departure situation, the left thick lane line flashes yellow (on/off) and the left thin
line remains solid yellow. The LaneSense indicator changes from solid yellow to
flashing yellow. At this time torque is applied to the steering wheel in the opposite
direction of the lane boundary.
For example: If approaching the left side of the lane the steering wheel will turn to the
right.
NOTE:
The LaneSense system operates with the similar behavior for a right lane departure.
Changing LaneSense Status
The LaneSense system has settings to adjust the intensity of the torque warning and
the warning zone sensitivity (early/late) that you can configure through the
Uconnect®system screen.
NOTE:
• When enabled the system operates above 37 mph (60 km/h) and below 112 mph
(180 km/h).
• Use of the turn signal suppresses the warnings.
• The system will not apply torque to the steering wheel whenever a safety system
engages. (anti-lock brakes, traction control system, electronic stability control,
forward collision warning, etc.).
PARKSENSE® REAR PARK ASSIST
The ParkSense®Rear Park Assist system provides visual and audible indications of
the distance between the rear fascia and a detected obstacle when backing up, e.g.
during a parking maneuver.
ParkSense®will retain the last system state (enabled or disabled) from the last
ignition cycle when the ignition is changed to the MAR/RUN position.
ParkSense®can be active only when the shift lever/gear selector is in REVERSE. If
ParkSense®is enabled at this shift lever position, the system will remain active until
the vehicle speed is increased to approximately 7 mph (11 km/h) or above. When in
REVERSE and above the system's operating speed, a warning will appear within the
Electronic Vehicle Information Center (EVIC) or Driver Information Display (DID).
OPERATING YOUR VEHICLE
58
Page 61 of 220
ParkSense® Sensors
The four ParkSense®sensors, located in the rear fascia/bumper, monitor the area
behind the vehicle that is within the sensors’ field of view. The sensors can detect
obstacles from approximately 12 in (30 cm) up to 59 in (150 cm) from the rear
fascia/bumper in the horizontal direction, depending on the location, type and
orientation of the obstacle.
Chime
By shifting the vehicle in REVERSE and in the case of the presence of a rear obstacle,
an acoustic signal that varies with the distance of the obstacle from the bumper is
activated.
The frequency of the acoustic signal:
• Increases with the distance between car and object decreases.
• Becomes continuous when the distance that separates the car from the obstacle
is less than approximately 12 inches (30 cm), while terminates immediately if the
distance to the obstacle increases.
• Remains constant if the distance between car and obstacle remains unchanged.
If this situation occurs for the side sensors, the signal is stopped after approxi-
mately three seconds to avoid, for example, it activates in case of maneuver along
a wall.
When the system emits a beeping sound, the volume of the Uconnect®system, if
turned on, is automatically lowered by ParkSense.
Detection Distances
If the sensors detect more obstacles, it is taken into account only what is the shorter
distance.
Instrument Cluster Display
ParkSense is displayed on the instrument cluster only if you have selected the item
"beep and display" inside the "Settings" menu of the Uconnect®system.
If an obstacle is detected in the center rear region, the display will show a single solid
arc in the center rear region and will produce a one-half second tone. As the vehicle
moves closer to the obstacle, the display will show the single arc moving closer to the
vehicle and the sound tone will change from slow, to fast, to continuous.
If an obstacle is detected in the left and/or right rear region, the display will show a
single flashing arc in the left and/or right rear region and will produce a fast sound
tone. As the vehicle moves closer to the obstacle, the display will show the single arc
moving closer to the vehicle and the tone will change from fast to continuous.
In general, the car is closest to the obstacle when the display shows only a flashing
arc and the chime becomes continuous.
The color on the display depends on the distance and location of the obstacle.
OPERATING YOUR VEHICLE
59