light JEEP RENEGADE LATITUDE 2017 Service Manual
[x] Cancel search | Manufacturer: JEEP, Model Year: 2017, Model line: RENEGADE LATITUDE, Model: JEEP RENEGADE LATITUDE 2017Pages: 516, PDF Size: 5.3 MB
Page 176 of 516
Partial Off – Two Wheel Drive Vehicles And Four Wheel
Drive Vehicles In 2WD And 4WD High Range
The “Partial Off” mode is intended for driving in deep
snow, sand, or gravel. This mode raises the threshold for
TCS and ESC activation, which allows for more wheel spin
than what ESC normally allows.
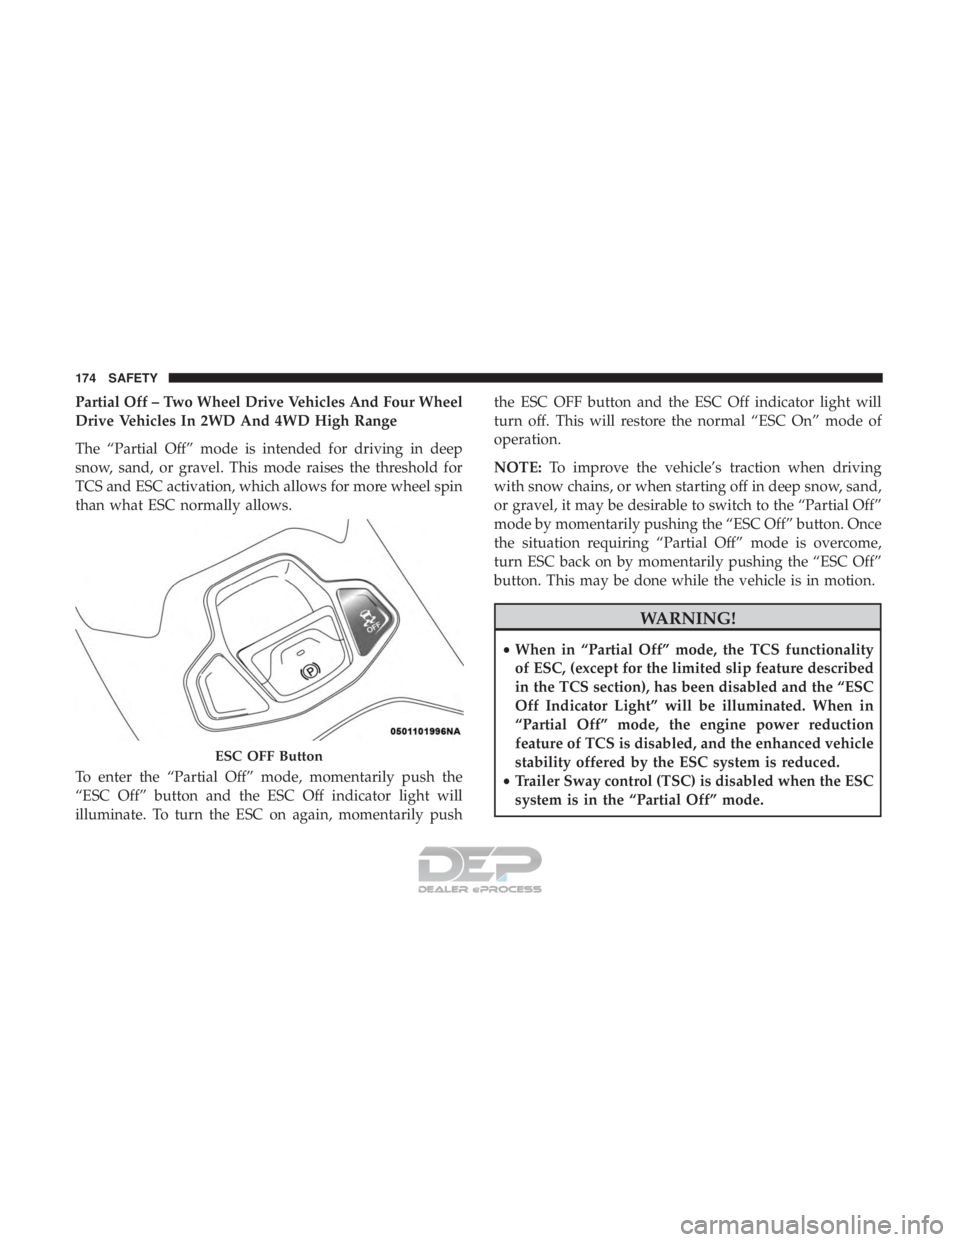
To enter the “Partial Off” mode, momentarily push the
“ESC Off” button and the ESC Off indicator light will
illuminate. To turn the ESC on again, momentarily pushthe ESC OFF button and the ESC Off indicator light will
turn off. This will restore the normal “ESC On” mode of
operation.
NOTE:
To improve the vehicle’s traction when driving
with snow chains, or when starting off in deep snow, sand,
or gravel, it may be desirable to switch to the “Partial Off”
mode by momentarily pushing the “ESC Off” button. Once
the situation requiring “Partial Off” mode is overcome,
turn ESC back on by momentarily pushing the “ESC Off”
button. This may be done while the vehicle is in motion.
ESC OFF Button
174 SAFETY
Page 208 of 516
pets be restrained in the rear seat (if equipped) in pet
harnesses or pet carriers that are secured by seat belts, and
cargo is properly stowed.
BeltAlert can be activated or deactivated by your autho-
rized dealer. FCA US LLC does not recommend deactivat-
ing BeltAlert.
NOTE:If BeltAlert has been deactivated and the driver or
outboard front seat passenger (if equipped with outboard
front passenger seat BeltAlert) is unbuckled the Seat Belt
Reminder Light will turn on and remain on until the driver
and outboard front seat passenger seat belts are buckled.
Lap/Shoulder Belts
All seating positions in your vehicle are equipped with
lap/shoulder belts.
The seat belt webbing retractor will lock only during very
sudden stops or collisions. This feature allows the shoulder
part of the seat belt to move freely with you under normal
conditions. However, in a collision the seat belt will lock
and reduce your risk of striking the inside of the vehicle or
being thrown out of the vehicle.
Page 216 of 516

WARNING!
•The seat belt assembly must be replaced if the
switchable Automatic Locking Retractor (ALR) fea-
ture or any other seat belt function is not working
properly when checked according to the procedures
in the Service Manual.
• Failure to replace the seat belt assembly could in-
crease the risk of injury in collisions.
• Do not use the Automatic Locking Mode to restrain
occupants who are wearing the seat belt or children
who are using booster seats. The locked mode is only
used to install rear-facing or forward-facing child
restraints that have a harness for restraining the
child.
Supplemental Restraint Systems (SRS)
Some of the safety features described in this section may be
standard equipment on some models, or may be optional
equipment on others. If you are not sure, ask your autho-
rized dealer. The air bag system must be ready to protect you in a
collision. The Occupant Restraint Controller (ORC) moni-
tors the internal circuits and interconnecting wiring asso-
ciated with the electrical Air Bag System Components.
Your vehicle may be equipped with the following Air Bag
System Components:
Air Bag System Components
•
Occupant Restraint Controller (ORC)
• Air Bag Warning Light
Page 217 of 516
Air Bag Warning Light
The ORC monitors the readiness of the electronic parts of
the air bag system whenever the ignition switch is in the
AVV/START or MAR/ACC/ON/RUN position. If the
ignition switch is in the STOP/OFF/LOCK position the air
bag system is not on and the air bags will not inflate.
The ORC contains a backup power supply system that may
deploy the air bag system even if the battery loses power or
it becomes disconnected prior to deployment.
The ORC turns on the Air Bag Warning Light in the
instrument panel for approximately four to eight seconds
for a self-check when the ignition switch is in the MAR/
ACC/ON/RUN position. After the self-check, the Air Bag
Warning Light will turn off. If the ORC detects a malfunc-
tion in any part of the system, it turns on the Air Bag
Warning Light, either momentarily or continuously. A
single chime will sound to alert you if the light comes on
again after initial startup.
The ORC also includes diagnostics that will illuminate the
instrument panel Air Bag Warning Light if a malfunction is
detected that could affect the air bag system. The diagnos-
tics also record the nature of the malfunction. While the airbag system is designed to be maintenance free, if any of the
following occurs, have an authorized dealer service the air
bag system immediately.
•
The Air Bag Warning Light does not come on during the
four to eight seconds when the ignition switch is first in
the MAR/ACC/ON/RUN position.
• The Air Bag Warning Light remains on after the four to
eight-second interval.
• The Air Bag Warning Light comes on intermittently or
remains on while driving.
NOTE: If the speedometer, tachometer, or any engine
related gauges are not working, the Occupant Restraint
Controller (ORC) may also be disabled. In this condition
the air bags may not be ready to inflate for your protection.
Have an authorized dealer service the air bag system
immediately.
Page 218 of 516
WARNING!(Continued)
stays on after you start the vehicle, or if it comes on as
you drive, have an authorized dealer service the air bag
system immediately.
Redundant Air Bag Warning Light
If a fault with the Air Bag Warning Light is
detected, which could affect the Supplemental
Restraint System (SRS), the Redundant Air Bag
Warning Light will illuminate on the instrument
panel. The Redundant Air Bag Warning Light will stay on
until the fault is cleared. In addition, a single chime will
sound to alert you that the Redundant Air Bag Warning
Light has come on and a fault has been detected. If the
Redundant Air Bag Warning Light comes on intermittently
or remains on while driving have an authorized dealer
service the vehicle immediately. For additional information
regarding the Redundant Air Bag Warning Light, refer to
“Warning/Indicator Lights And Messages” in “Getting To
Know Your Instrument Panel” section of this manual.
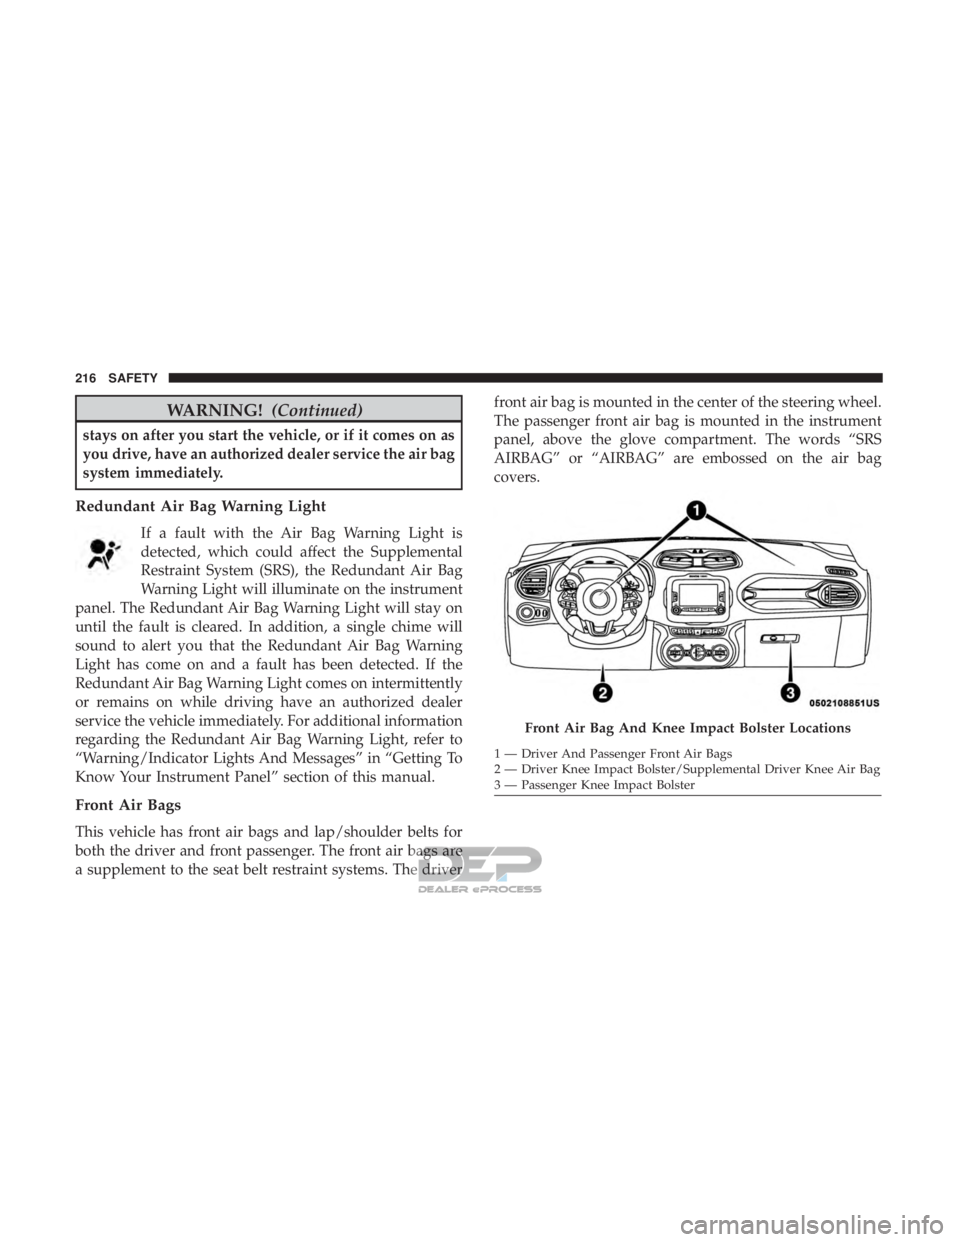
Front Air Bags
This vehicle has front air bags and lap/shoulder belts for
both the driver and front passenger. The front air bags are
a supplement to the seat belt restraint systems. The driver front air bag is mounted in the center of the steering wheel.
The passenger front air bag is mounted in the instrument
panel, above the glove compartment. The words “SRS
AIRBAG” or “AIRBAG” are embossed on the air bag
covers.
Page 221 of 516
WARNING!
•Do not drill, cut, or tamper with the knee impact
bolsters in any way.
• Do not mount any accessories to the knee impact
bolsters such as alarm lights, stereos, citizen band
radios, etc.
Supplemental Driver Knee Air Bag
This vehicle is equipped with a Supplemental Driver Knee
Air Bag mounted in the instrument panel below the
steering column. The Supplemental Driver Knee Air Bag
provides enhanced protection during a frontal impact by
working together with the seat belts, pretensioners, and
front air bags.
Supplemental Side Air Bags
Your vehicle is equipped with two types of side air bags:
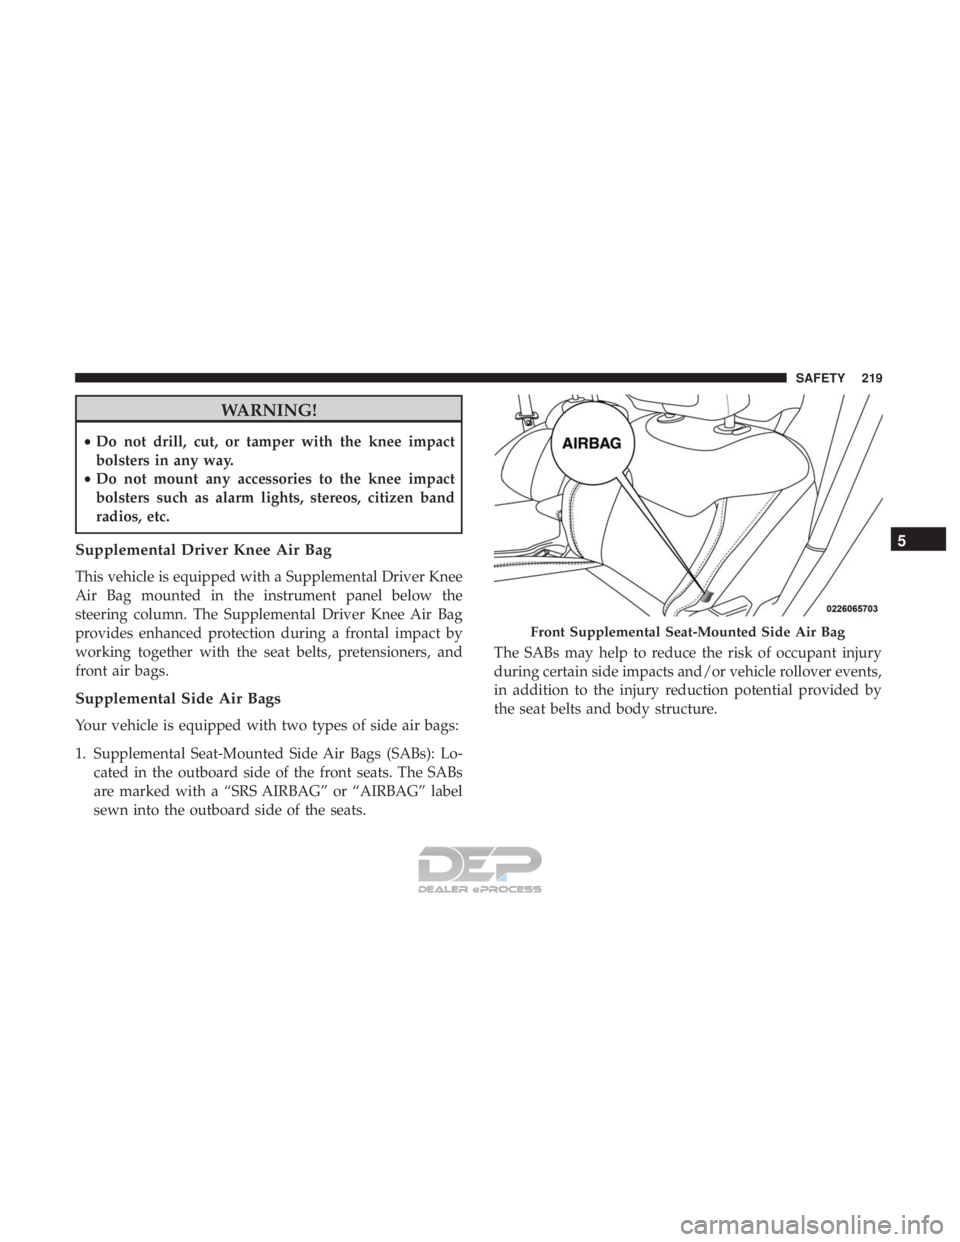
1. Supplemental Seat-Mounted Side Air Bags (SABs): Lo-
cated in the outboard side of the front seats. The SABs
are marked with a “SRS AIRBAG” or “AIRBAG” label
sewn into the outboard side of the seats. The SABs may help to reduce the risk of occupant injury
during certain side impacts and/or vehicle rollover events,
in addition to the injury reduction potential provided by
the seat belts and body structure.
Page 228 of 516
Customer ActionCustomer Will See
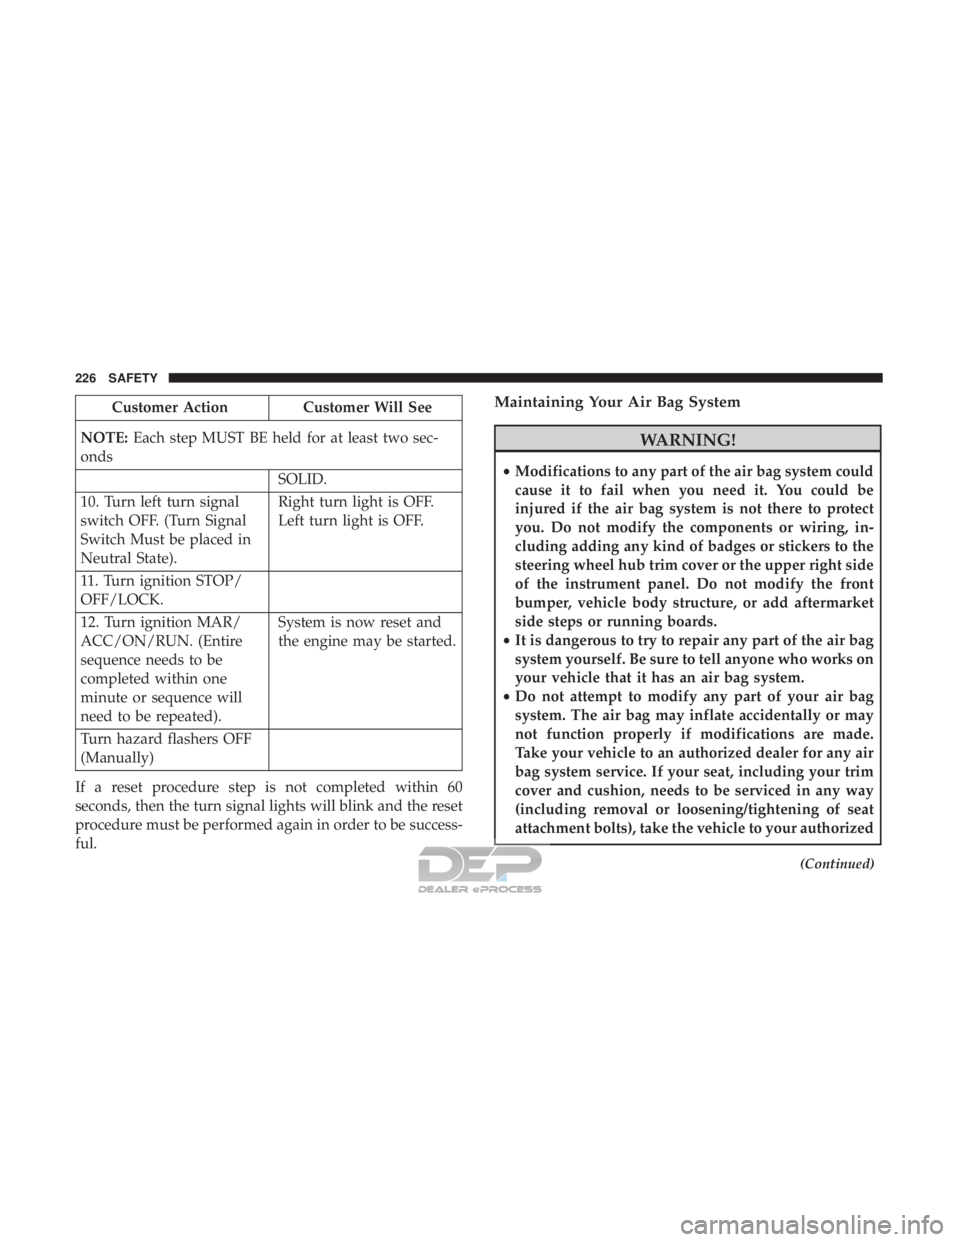
NOTE: Each step MUST BE held for at least two sec-
onds
SOLID.
10. Turn left turn signal
switch OFF. (Turn Signal
Switch Must be placed in
Neutral State). Right turn light is OFF.
Left turn light is OFF.
11. Turn ignition STOP/
OFF/LOCK.
12. Turn ignition MAR/
ACC/ON/RUN. (Entire
sequence needs to be
completed within one
minute or sequence will
need to be repeated). System is now reset and
the engine may be started.
Turn hazard flashers OFF
(Manually)
If a reset procedure step is not completed within 60
seconds, then the turn signal lights will blink and the reset
procedure must be performed again in order to be success-
ful.Maintaining Your Air Bag System
WARNING!
• Modifications to any part of the air bag system could
cause it to fail when you need it. You could be
injured if the air bag system is not there to protect
you. Do not modify the components or wiring, in-
cluding adding any kind of badges or stickers to the
steering wheel hub trim cover or the upper right side
of the instrument panel. Do not modify the front
bumper, vehicle body structure, or add aftermarket
side steps or running boards.
• It is dangerous to try to repair any part of the air bag
system yourself. Be sure to tell anyone who works on
your vehicle that it has an air bag system.
• Do not attempt to modify any part of your air bag
system. The air bag may inflate accidentally or may
not function properly if modifications are made.
Take your vehicle to an authorized dealer for any air
bag system service. If your seat, including your trim
cover and cushion, needs to be serviced in any way
(including removal or loosening/tightening of seat
attachment bolts), take the vehicle to your authorized
(Continued)
226 SAFETY
Page 247 of 516
Air Bag Warning Light
The Air Bag warning lightwill turn on for four to
eight seconds as a bulb check when the ignition switch
is first turned to ON/RUN. If the light is either not on
during starting, stays on, or turns on while driving,
have the system inspected at an authorized dealer as
soon as possible. This light will illuminate with a single
chime when a fault with the Air Bag Warning Light has
been detected, it will stay on until the fault is cleared. If
the light comes on intermittently or remains on while
driving, have an authorized dealer service the vehicle
immediately. Refer to “Occupant Restraints” in “Safety”
for further information.
Defroster
Check operation by selecting the defrost mode and place
the blower control on high speed. You should be able to
feel the air directed against the windshield. See your
authorized dealer for service if your defroster is inoper-
able.
Floor Mat Safety Information
Always use floor mats designed to fit the footwell of your
vehicle. Use only floor mats that leave the pedal area
unobstructed and that are firmly secured so that they cannot slip out of position and interfere with the pedals or
impair safe operation of your vehicle in other ways.
your floor mat using
the floor mat fasteners. DO NOT install your floor
mat upside down or turn your floor mat over.
Lightly pull to confirm mat is secured using the
floor mat fasteners on a regular basis.
• ALWAYS REMOVE THE EXISTING FLOOR MAT
FROM THE VEHICLE
before installing any
other floor mat. NEVER install or stack an addi-
tional floor mat on top of an existing floor mat.
•ONLY install floor mats designed to fit your vehicle.
NEVER install a floor mat that cannot be properly
attached and secured to your vehicle. If a floor mat
needs to be replaced, only use a FCA approved floor mat
for the specific make, model, and year of your vehicle.
(Continued)
5
SAFETY 245
Page 259 of 516
WARNING!
•When leaving the vehicle, always remove the key fob
from the ignition and lock your vehicle.
• Never leave children alone in a vehicle, or with
access to an unlocked vehicle. Allowing children to
be in a vehicle unattended is dangerous for a number
of reasons. A child or others could be seriously or
fatally injured. Children should be warned not to
touch the parking brake, brake pedal or the trans-
mission gear selector.
• Do not leave the key fob in or near the vehicle (or in
a location accessible to children), and do not leave
the ignition in the ON or RUN mode. A child could
operate power windows, other controls, or move the
vehicle.
• Be sure the parking brake is fully disengaged before
driving; failure to do so can lead to brake failure and
a collision.
• Always fully apply the parking brake when leaving
your vehicle, or it may roll and cause damage or
injury. Also be certain to leave the transmission in
PARK. Failure to do so may allow the vehicle to roll
and cause damage or injury.
CAUTION!
If the Brake System Warning Light remains on with the
parking brake released, a brake system malfunction is
indicated. Have the brake system serviced by an au-
thorized dealer immediately.
If exceptional circumstances should make it necessary to
engage the EPB while the vehicle is in motion, maintain
upward pressure on the EPB switch for as long as engage-
ment is desired. The brake warning lamp could illuminate
in case of the hydraulic system is not available. The rear
stop lamps will also be illuminated automatically while the
vehicle remains in motion.
To disengage the EPB while the vehicle is in motion, release
the switch. If the vehicle is brought to a complete stop
using the EPB, when the vehicle reaches approximately
1.9 mph (3 km/h) the EPB will remain engaged.
Page 275 of 516
NOTE:
•In order to ensure proper operation, the Speed Control
System has been designed to shut down if multiple
Speed Control functions are operated at the same time. If
this occurs, the Speed Control System can be reactivated
by pushing the Speed Control on/off button and reset-
ting the desired vehicle set speed.
• The Speed Control function will not work in 4WD Low
Range.
Activation
Push the on/off button to activate the Speed Control. The
Cruise Indicator Light in the instrument cluster display
will illuminate. To turn the system off, push the on/off
button a second time. The Cruise Indicator Light will turn
off. The system should be turned off when not in use.