heating JEEP WRANGLER 2004 TJ / 2.G Owners Manual
[x] Cancel search | Manufacturer: JEEP, Model Year: 2004, Model line: WRANGLER, Model: JEEP WRANGLER 2004 TJ / 2.GPages: 299, PDF Size: 6.82 MB
Page 149 of 299

CD/DVD DISC MAINTENANCE
To keep the CD/DVD discs in good condition, take the
following precautions:
1. Handle the disc by its edge; avoid touching the
surface.
2. If the disc is stained, clean the surface with a soft cloth,
wiping from center to edge.
3. Do not apply paper, paper CD labels, or tape to the
disc; avoid scratching the disc.
4. Do not use solvents such as benzine, thinner, cleaners,
or antistatic sprays.
5. Store the disc in its case after playing.
6. Do not expose the disc to direct sunlight.
7. Do not store the disc where temperatures may become
too high.
RADIO OPERATION AND CELLULAR PHONES
Under certain conditions, the cellular phone being On in
your vehicle can cause erratic or noisy performance from
your radio. This condition may be lessened or eliminated
by relocating the cellular phone antenna. This condition
is not harmful to the radio. If your radio performance
does not satisfactorily ªclearº by the repositioning of the
antenna, it is recommended that the radio volume be
turned down or off during cellular phone operation.
CLIMATE CONTROLS
The controls for the heating and ventilation system in this
vehicle consist of three rotary control knobs. These com-
fort controls can be set to obtain desired interior condi-
tions.
NOTE:For the HVAC to operate efficiently and reduce
the possibility of fog build up on the interior of the
windows, the air exhausters should be kept clear at all
times. The air exhausters are the slots located on the rear
tailgate.
UNDERSTANDING YOUR INSTRUMENT PANEL 149
4
Page 154 of 299

NOTE:For improved safety, the A/C compressor is
activated when ªMixº or ªDefrostº modes are selected.
This is done to assist in drying the air and it will help in
keeping the windshield from fogging.
Operating Tips
Summer Operation
The engine cooling system in air conditioned vehicles
must be protected with a high-quality antifreeze coolant
to provide proper corrosion protection and to protect
against engine overheating. A 50% solution of ethylene
glycol antifreeze coolant in water is recommended.
Winter Operation
The air from the heater system will heat faster in cold
weather if you use lower blower speeds until the engine
warms up.
REAR WINDOW FEATURES Ð HARD TOP ONLY
Rear Window Defogger
To turn the rear window defogger on, press the
rocker switch. If you press the switch a second
time, you will turn the defogger off. A light on the rocker
switch will indicate the defogger is on.
The defogger will automatically turn off after about ten
minutes. For five more minutes of operation, depress the
top of the switch to turn the defogger on again. To
prevent excessive battery drain use the defogger only
when the engine is operating.
154 UNDERSTANDING YOUR INSTRUMENT PANEL
Page 155 of 299

CAUTION!
Use care when washing the inside of the rear win-
dow to prevent damage to heating elements. Use a
soft cloth and a mild washing solution, wiping
parallel to the heating elements. Also, keep all
objects a safe distance from the window to prevent
damaging the heating elements.
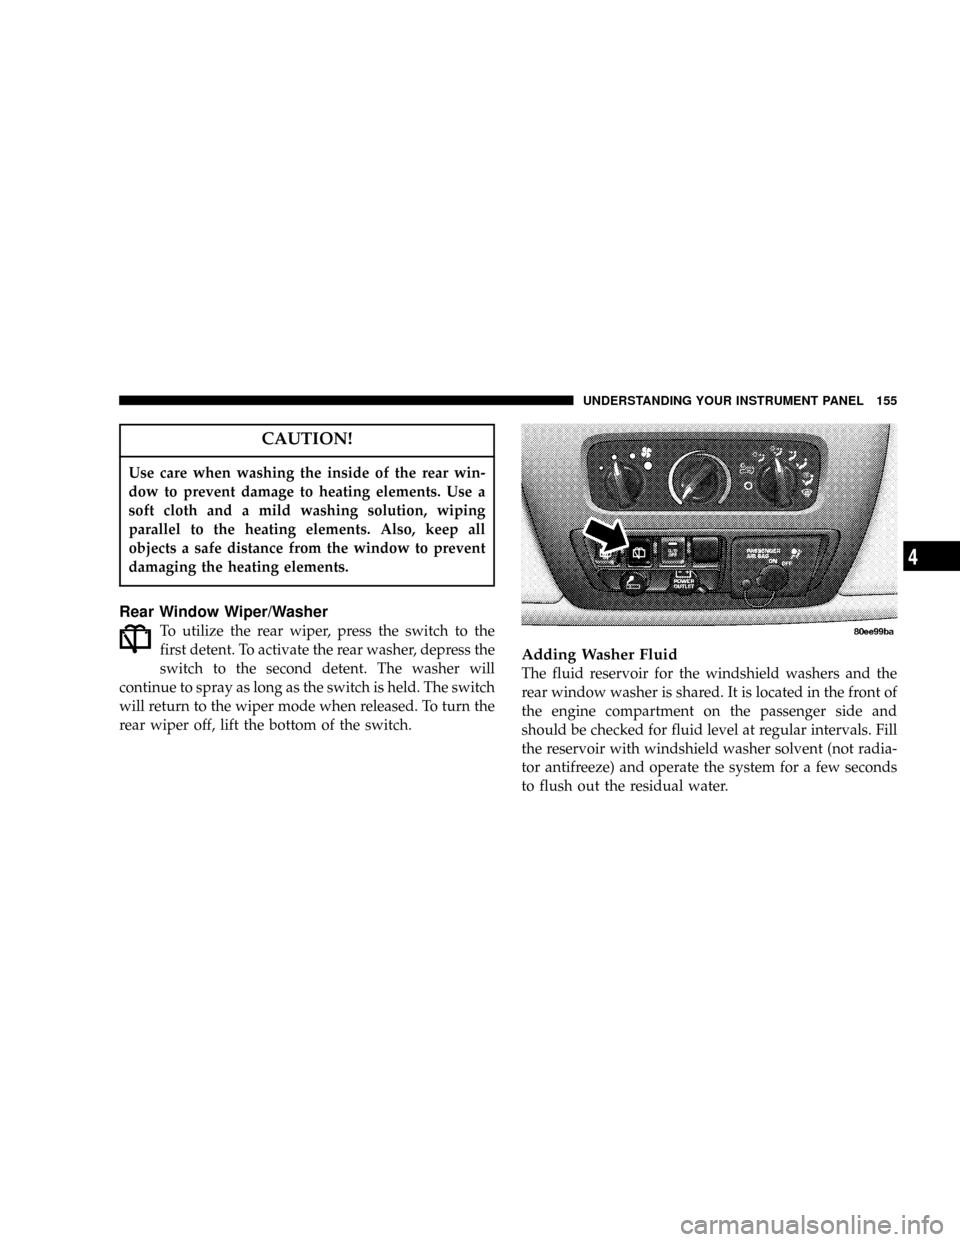
Rear Window Wiper/Washer
To utilize the rear wiper, press the switch to the
first detent. To activate the rear washer, depress the
switch to the second detent. The washer will
continue to spray as long as the switch is held. The switch
will return to the wiper mode when released. To turn the
rear wiper off, lift the bottom of the switch.
Adding Washer Fluid
The fluid reservoir for the windshield washers and the
rear window washer is shared. It is located in the front of
the engine compartment on the passenger side and
should be checked for fluid level at regular intervals. Fill
the reservoir with windshield washer solvent (not radia-
tor antifreeze) and operate the system for a few seconds
to flush out the residual water.
UNDERSTANDING YOUR INSTRUMENT PANEL 155
4
Page 203 of 299

²The weight of any other type of cargo or equipment
put in or on your vehicle.
Remember that everything put in or on the trailer adds to
the load on your vehicle.
Warranty Requirements
The manufacturer's warranty will apply to vehicles used
to tow trailers for noncommercial use, however the
following conditions must be met:
²The ªDº Overdrive range can be selected when tow-
ing. However, if frequent shifting occurs move the
shift lever to the next lower position to eliminate
excessive automatic transmission shifting. This action
will also reduce the possibility of transmission over-
heating and provide better engine braking. Refer to
ªTransmission Shiftingº in this section for additional
information.
²A load equalizing hitch is recommended for loaded
trailer weights above 1,000 lbs (454 kg).
CAUTION!
If the trailer weighs more than 1,000 lbs (454 kg)
loaded, it should have its own brakes and they
should be of adequate capacity. Failure to do this
could lead to accelerated brake lining wear, higher
brake pedal effort, and longer stopping distances.
WARNING!
Connecting trailer brakes to your vehicle's hydraulic
brake lines can overload your brake system and
cause it to fail. You might not have brakes when you
need them and could have an accident.
²Whenever you pull a trailer, regardless of the trailer
size, stop lights and turn signals on the trailer are
mandatory for motoring safety.
²Follow the maintenance intervals in schedule ªBº for
changing the automatic transmission fluid and filter, if
you REGULARLY tow a trailer for more than 45
minutes of continuous operation.
STARTING AND OPERATING 203
5
Page 210 of 299

HAZARD WARNING FLASHER
The flasher switch is on top of the steering column, just
behind the steering wheel. Depress the switch and both
cluster indicators and all front and rear directional sig-
nals will flash. Depress the switch again to turn Hazard
Warning Flashers off.Do not use this emergency warning system when the
vehicle is in motion. Use it when your vehicle is disabled
and is creating a safety hazard for other motorists.
If it is necessary to leave the vehicle to go for service, the
flasher system will continue to operate with the ignition
key removed and the vehicle locked.
NOTE:With extended use, the flasher may wear down
your battery.
IF YOUR ENGINE OVERHEATS
In any of the following situations, you can reduce the
potential for overheating by taking the appropriate ac-
tion.
²On the highways Ð Slow down.
²In city traffic Ð While stopped, put transmission in N
(Neutral), but do not increase engine idle speed.
NOTE:There are steps that you can take to slow down
an impending overheat condition. If your air conditioner
is on, turn it off. The air conditioning system adds heat to
the engine cooling system and turning off the A/C
removes this heat. You can also turn the Temperature
210 WHAT TO DO IN EMERGENCIES
Page 233 of 299

WARNING!
A hot exhaust system can start a fire if you park over
materials that can burn. Such materials might be
grass or leaves coming into contact with your ex-
haust system. Do not park or operate your vehicle in
areas where your exhaust system can contact any-
thing that can burn.
In unusual situations involving grossly malfunctioning
engine operation, a scorching odor may suggest severe
and abnormal catalyst overheating. If this occurs, stop
the vehicle, turn off the engine and allow it to cool.
Service, including a tune up to manufacturer's specifica-
tions, should be obtained immediately.
To minimize the possibility of catalytic converter dam-
age:
²Do not shut off the engine or interrupt the ignition
when the transmission is in gear and the vehicle is in
motion.
²Do not try to start the engine by pushing or towing the
vehicle.
²Do not idle the engine with any spark plug wires
disconnected or removed, such as when diagnostic
testing.
²Do not idle the engine for prolonged periods during
very rough idle or malfunctioning operating condi-
tions.
²Do not allow vehicle to run out of fuel.
NOTE:Intentional tampering with emissions control
systems can result in civil penalties being assessed
against you.
Engine Timing Belt Ð 2.4L Engine
Replace the engine timing belt at the intervals described
in the appropriate maintenance schedule.
Ignition Wiring System Ð 2.4L Engine
Replace the ignition cables at the intervals described in
the appropriate maintenance schedule.
MAINTAINING YOUR VEHICLE 233
7
Page 291 of 299

Coolant Temperature Gauge............. 118
Engine Oil Pressure Gauge.............. 117
Jacking............................. 211
Jump Starting........................ 216
Emission Control System Maintenance....226,262
Engine
Air Cleaner.......................... 234
Block Heater......................... 162
Break-In Recommendations............... 39
Compartment........................ 224
Exhaust Gas Caution................... 40
Fails to Start......................... 161
Flooded, Starting..................... 161
Fuel Requirements.................197,258
Jump Starting........................ 216
Oil .............................228,258
Oil Disposal......................... 231
Oil Filter............................ 231
Oil Pressure Gauge.................... 117
Oil Selection......................... 258
Overheating......................... 210
Starting............................ 160
Temperature Gauge.................... 118Engine Oil Viscosity Chart................ 230
Entry System, Illuminated................. 15
Exhaust Gas Caution..................... 40
Exhaust System........................ 238
Extender, Seat Belt....................... 21
Exterior Finish Care..................... 249
Fabric Care........................250,252
Fabric Top............................ 250
Filters
Air Cleaner.......................... 234
Engine Fuel......................... 234
Engine Oil.......................... 231
Finish Care........................... 249
Flashers
Hazard Warning...................... 210
Turn Signal.......................... 116
Flooded Engine Starting.................. 161
Fluid Capacities........................ 258
Fluid Level Checks...................... 248
Automatic Transmission................ 245
Engine Oil.......................... 228
Manual Transmission.................. 247
INDEX 291
10
Page 295 of 299

Mopar Parts........................227,284
Multi-Function Control Lever............... 56
New Vehicle Break-In Period............... 39
Occupant Restraints...................... 16
Octane Rating, Gasoline.................. 197
Odometer............................. 119
Trip ............................... 119
Off-Pavement Driving................... 181
Off-Road Driving....................... 181
Oil, Engine........................... 228
Capacity............................ 258
Dipstick............................ 228
Filter.............................. 231
Identification Logo.................... 230
Materials Added to.................... 231
Recommendation..................230,258
Viscosity............................ 258
Onboard Diagnostic System............225,226
Outside Rearview Mirrors................. 49
Overheating, Engine..................... 210
Owner's Manual....................... 285Paint Care............................ 248
Paint Damage......................... 248
Parking Brake......................... 175
Passenger Airbag On/Off Switch............ 26
Passing Light........................... 57
PCV Valve............................ 234
Pets.................................. 39
Pets, Transporting....................... 39
Placard, Tire and Loading Information....... 188
Polishing and Waxing................... 249
Power
Distribution Center.................... 256
Steering............................ 236
Pregnant Women and Seat Belts............. 21
Preparation for Jacking................... 213
Pressure Gauge, Oil..................... 117
Radial Ply Tires........................ 193
Radio.......................122,130,135,140
Radio Broadcast Signals.................. 121
Radio Operation..................130,135,149
Radio, Satellite......................... 145
Rear Axle............................. 248
INDEX 295
10