check engine JEEP WRANGLER 2008 JK / 3.G Owner's Manual
[x] Cancel search | Manufacturer: JEEP, Model Year: 2008, Model line: WRANGLER, Model: JEEP WRANGLER 2008 JK / 3.GPages: 466, PDF Size: 8.97 MB
Page 398 of 466
The cap should be inspected and cleaned if there is any
accumulation of foreign material on the sealing surfaces.
WARNING!
The warning words DO NOT OPEN HOT on the
cooling system pressure cap are a safety precaution.
Never add antifreeze/coolant when the engine is
overheated. Do not loosen or remove the cap to cool
an overheated engine. Heat causes pressure to build
up in the cooling system. To prevent scalding or
injury, do not remove the pressure cap while the
system is hot or under pressure.
Disposal of Used Engine Coolant
Used ethylene glycol based antifreeze/coolant is a regu-
lated substance requiring proper disposal. Check with
your local authorities to determine the disposal rules for
your community. To prevent ingestion by animals orchildren, do not store ethylene glycol based antifreeze/
coolant in open containers or allow it to remain in
puddles on the ground. If ingested by a child, contact a
physician immediately. Clean up any ground spills im-
mediately.
Engine Coolant Level
The coolant bottle provides a quick visual method for
determining that the coolant level is adequate. With the
engine idling, and warm to normal operating tempera-
ture, the level of the antifreeze/coolant in the bottle
should be between the ranges indicated on the bottle.
The radiator normally remains completely full, so there is
no need to remove the radiator cap unless checking for
antifreeze/coolant freeze point or replacing antifreeze/
coolant. Advise your service attendant of this. As long as
the engine operating temperature is satisfactory, the
coolant bottle need only be checked once a month.
MAINTAINING YOUR VEHICLE 397
7
Page 399 of 466
When additional antifreeze/coolant is needed to main-
tain the proper level, it should be added to the coolant
bottle. Do not overfill.
Points To Remember
NOTE:When the vehicle is stopped after a few miles of
operation, you may observe vapor coming from the front
of the engine compartment. This is normally a result of
moisture from rain, snow, or high humidity accumulat-
ing on the radiator and being vaporized when the
thermostat opens, allowing hot antifreeze/coolant to
enter the radiator.
If an examination of your engine compartment shows no
evidence of radiator or hose leaks, the vehicle may be
safely driven. The vapor will soon dissipate.
•Do not overfill the coolant bottle.
•Check antifreeze/coolant freeze point in the radiator
and in the coolant recovery bottle. If antifreeze/ coolant needs to be added, contents of coolant recov-
ery bottle must also be protected against freezing.
•If frequent antifreeze/coolant additions are required,
or if the level in the recovery bottle does not drop
when the engine cools, the cooling system should be
pressure-tested for leaks.
•Maintain antifreeze/coolant concentration at 50%
HOAT antifreeze/coolant (minimum) and distilled
water for proper corrosion protection of your engine
which contains aluminum components.
•Make sure that the radiator and coolant recovery
bottle hoses are not kinked or obstructed.
•Keep the front of the radiator clean. If your vehicle is
equipped with air conditioning, keep the front of the
condenser clean, also.
•Do not change the thermostat for summer or winter
operation. If replacement is ever necessary, install
398 MAINTAINING YOUR VEHICLE
Page 401 of 466
Brake and Power Steering System Hoses
When servicing the vehicle for scheduled maintenance,
inspect surface of hoses for evidence of heat and me-
chanical damage. Hard and brittle rubber, cracking, tears,
cuts, abrasion, and excessive swelling suggest deteriora-
tion of the rubber. Particular attention should be made to
examining those hose surfaces nearest to high heat
sources, such as the exhaust manifold.
Inspect all hose clamps and couplings to make sure they
are secure and no leaks are present.
NOTE:Inspection of brake hoses should be done when-
ever the brake system is serviced and every engine oil
change.WARNING!
Worn brake hoses can burst and cause brake failure.
You could have an accident. If you see any signs of
cracking, scuffing, or worn spots, have the brake
hoses replaced immediately.
Brake Master Cylinder — Brake Fluid Level Check
Refer to Fluids, Lubricants, and Genuine Parts in this
section for the correct fluid type.
WARNING!
Use of a brake fluid that may have a lower initial
boiling point, or is unidentified as to specification,
may result in sudden brake failure during hard
prolonged braking. You could have an accident.
400 MAINTAINING YOUR VEHICLE
Page 403 of 466
To properly check the automatic transmission fluid level,
the following procedure must be used:
1. Operate the engine at idle speed and normal operating
temperature.
2. The vehicle must be on level ground.
3. Fully apply parking brake.
4. Place the gear selector momentarily in each gear
position ending with the lever in PARK.
5. Remove the dipstick, wipe it clean and reinsert it until
seated.
6. Remove the dipstick again and note the fluid level on
both sides. The fluid level should be between the HOT
(upper) reference holes on the dipstick at normal operat-
ing temperature. Verify that a solid coating of oil is seen
on both sides of the dipstick. If the fluid is low, add as
required into the dipstick tube.Do not overfill.Afteradding any quantity of oil through the dipstick tube, wait
a minimum of two minutes for the oil to fully drain into
the transmission before rechecking the fluid level.
NOTE:
If it is necessary to check the transmission below
the operating temperature, the fluid level should be
between the two cold (lower) holes on the dipstick with
the fluid at approximately 70° F (21° C) (room tempera-
ture). If the fluid level is correctly established at room
temperature, it should be between the HOT (upper)
reference holes when the transmission reaches 180° F (21°
C). Remember it is best to check the level at the normal
operating temperature.
402 MAINTAINING YOUR VEHICLE
Page 404 of 466
CAUTION!
Be aware that if the fluid temperature is below 50° F
(10° C), it may not register on the dipstick. Do not add
fluid until the temperature is elevated enough to
produce an accurate reading.
7. Check for leaks. Release the parking brake.
NOTE: To prevent dirt and water from entering the
transmission after checking or replenishing fluid, make
certain that the dipstick cap is properly reseated. It is
normal for the dipstick cap to spring back slightly from
its fully seated positions, as long as its seal remains
engaged in the dipstick tube.
Special Additives
Automatic Transmission Fluid (ATF) is an engineered
product and its performance may be impaired by supple-
mental additives. Therefore, do not add any fluid addi-
tives to the transmission. The only exception to this
policy is the use of special dyes to aid in detecting fluid
leaks. In addition, avoid using transmission sealers as
they may adversely affect seals.
Hydraulic Clutch Fluid — Manual Transmission
The clutch hydraulic system is a sealed maintenance free
system. In the event of leakage or other malfunction, the
system must be replaced.
Manual Transmission
Selection of Lubricant
Use only manufacturer’s recommended manual trans-
mission fluid. Refer to Fluids, Lubricants, and Genuine
Parts in this section for the correct fluid type.
MAINTAINING YOUR VEHICLE 403
7
Page 407 of 466
Following off-road usage, completely inspect the under-
body of your vehicle. Check tires, body structure, steer-
ing, suspension and exhaust system for damage. Check
threaded fasteners for looseness, particularly on the
chassis, drivetrain components, steering and suspension.
Retighten, if required, to torque values specified in the
Service Manual. Also check for accumulations of vegeta-
tion or brush that could become a fire hazard, or conceal
damage to fuel lines, brake hoses, axle pinion seals, and
propeller shafts. Check air conditioning drain tube on the
lower dash wall in the engine compartment for mud or
debris, and clean as required. A plugged tube will
adversely affect air conditioning performance.CAUTION!
Under frequent heavy-duty driving conditions,
change all lubricants, and lubricate body compo-
nents more often than in normal service to prevent
excessive wear.
Appearance Care And Protection From Corrosion
Protection Of Body And Paint From Corrosion
Vehicle body care requirements vary according to geo-
graphic locations and usage. Chemicals that make roads
passable in snow and ice, and those that are sprayed on
trees and road surfaces during other seasons, are highly
corrosive to the metal in your vehicle. Outside parking,
which exposes your vehicle to airborne contaminants,
road surfaces on which the vehicle is operated, extreme
406 MAINTAINING YOUR VEHICLE
Page 430 of 466
•Change your engine oil more often if you drive your
vehicle off-road for an extended period of time.
•Under no circumstances should oil change intervals
exceed 6,000 mi (10,000 km) or 6 months, whichever
comes first.
Your dealer will reset the oil change indicator message
after completing the scheduled oil change. If this sched-
uled oil change is performed by someone other than your
dealer the message can be reset by referring to the steps
described under “Odometer/Trip Odometer” in the “In-
strument Cluster Description” section of this manual.
At Each Stop for Fuel
•Check the engine oil level about 5 minutes after a fully
warmed engine is shut off. Checking the oil level while
the vehicle is on level ground will improve the accu-
racy of the oil level reading. Add oil only when the
level is at or below the ADD or MIN mark.
•Check the windshield washer solvent and add if
required.
Once a Month
•Check tire pressure and look for unusual wear or
damage.
•Inspect the battery and clean and tighten the terminals
as required.
•Check the fluid levels of coolant reservoir, brake
master cylinder, power steering and transmission and
add as needed.
•Check all lights and other electrical items for correct
operation.
MAINTENANCE SCHEDULES 429
8
M A I
N T
E
N A
N CE
S
C
H E
D
U L
E
S
Page 431 of 466
At Each Oil Change
•Change the engine oil filter.
•Inspect the brake hoses and lines.
•Check the manual transmission fluid level.
CAUTION!
Failure to perform the required maintenance items
may result in damage to the vehicle.
430 MAINTENANCE SCHEDULES
8
MA I
N T
E
N A
N CE
S
C
H E
D
U L
E
S
Page 447 of 466
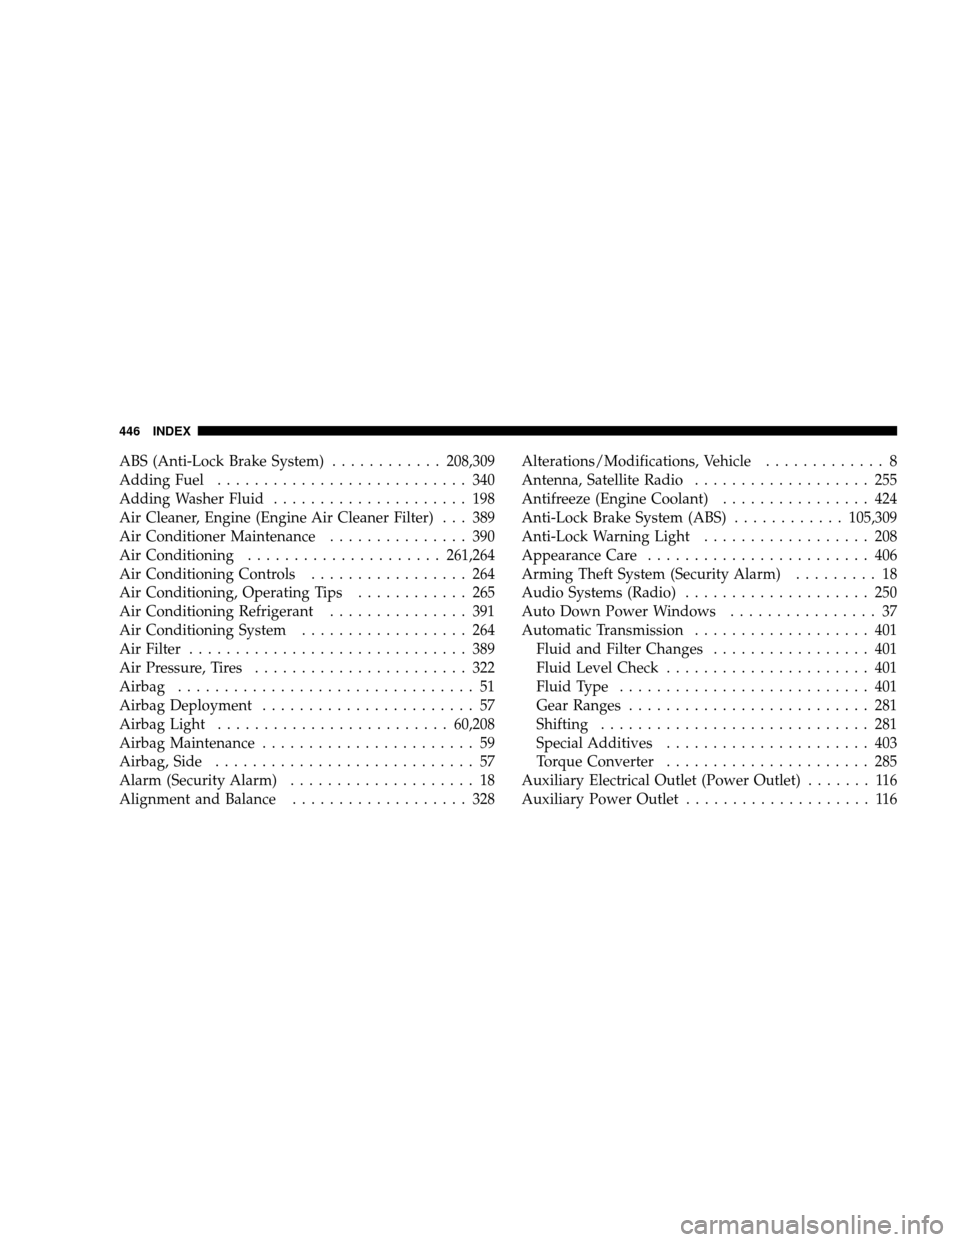
ABS (Anti-Lock Brake System)............208,309
Adding Fuel ........................... 340
Adding Washer Fluid ..................... 198
Air Cleaner, Engine (Engine Air Cleaner Filter) . . . 389
Air Conditioner Maintenance ............... 390
Air Conditioning ..................... 261,264
Air Conditioning Controls ................. 264
Air Conditioning, Operating Tips ............ 265
Air Conditioning Refrigerant ............... 391
Air Conditioning System .................. 264
Air Filter .............................. 389
Air Pressure, Tires ....................... 322
Airbag ................................ 51
Airbag Deployment ....................... 57
Airbag Light ......................... 60,208
Airbag Maintenance ....................... 59
Airbag, Side ............................ 57
Alarm (Security Alarm) .................... 18
Alignment and Balance ................... 328 Alterations/Modifications, Vehicle
............. 8
Antenna, Satellite Radio ................... 255
Antifreeze (Engine Coolant) ................ 424
Anti-Lock Brake System (ABS) ............105,309
Anti-Lock Warning Light .................. 208
Appearance Care ........................ 406
Arming Theft System (Security Alarm) ......... 18
Audio Systems (Radio) .................... 250
Auto Down Power Windows ................ 37
Automatic Transmission ................... 401
Fluid and Filter Changes ................. 401
Fluid Level Check ...................... 401
Fluid Type ........................... 401
Gear Ranges .......................... 281
Shifting ............................. 281
Special Additives ...................... 403
Torque Converter ...................... 285
Auxiliary Electrical Outlet (Power Outlet) ....... 116
Auxiliary Power Outlet .................... 116
446 INDEX
Page 449 of 466
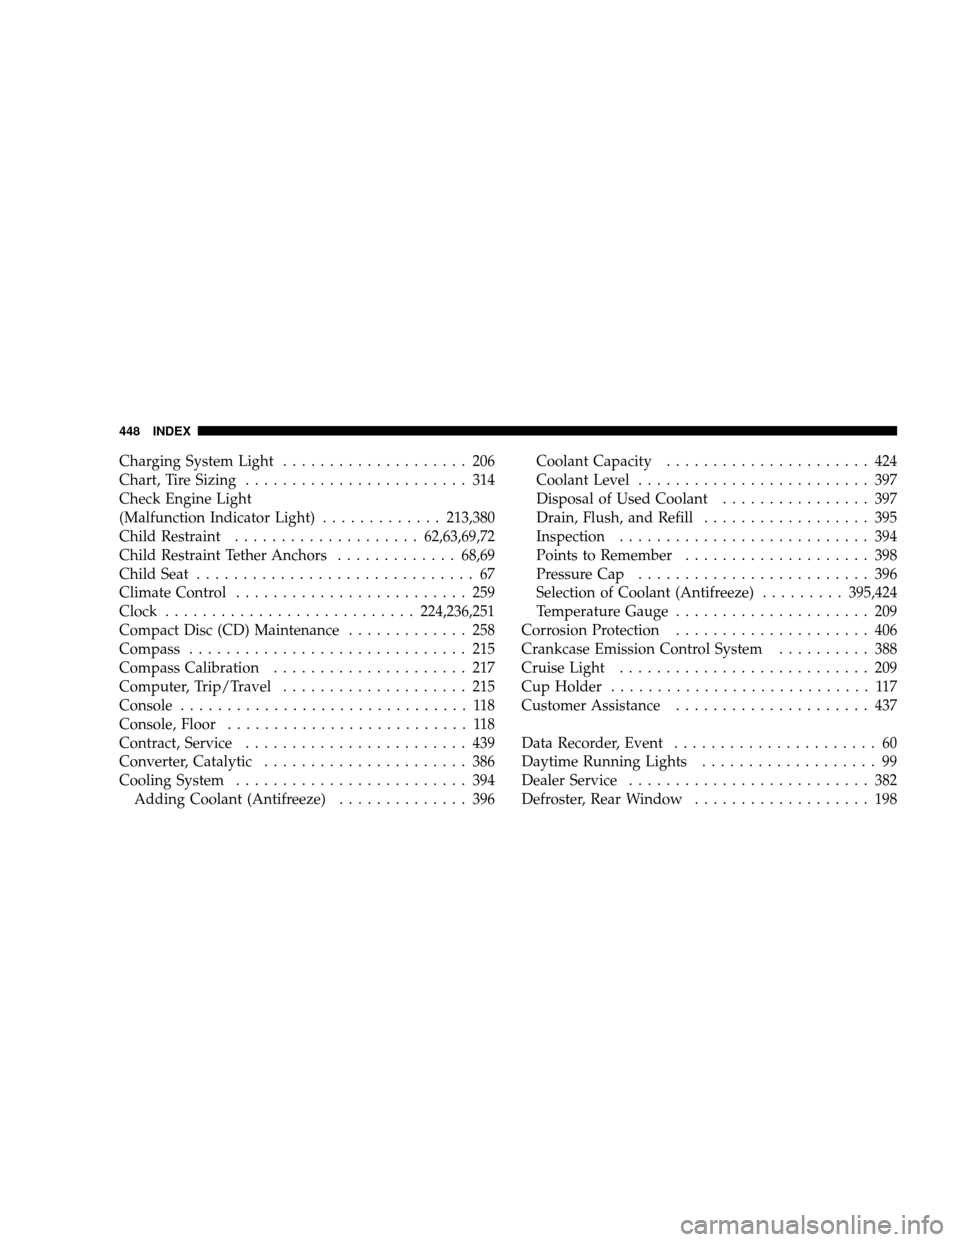
Charging System Light.................... 206
Chart, Tire Sizing ........................ 314
Check Engine Light
(Malfunction Indicator Light) .............213,380
Child Restraint .................... 62,63,69,72
Child Restraint Tether Anchors .............68,69
Child Seat .............................. 67
Climate Control ......................... 259
Clock ........................... 224,236,251
Compact Disc (CD) Maintenance ............. 258
Compass .............................. 215
Compass Calibration ..................... 217
Computer, Trip/Travel .................... 215
Console ............................... 118
Console, Floor .......................... 118
Contract, Service ........................ 439
Converter, Catalytic ...................... 386
Cooling System ......................... 394
Adding Coolant (Antifreeze) .............. 396Coolant Capacity
...................... 424
Coolant Level ......................... 397
Disposal of Used Coolant ................ 397
Drain, Flush, and Refill .................. 395
Inspection ........................... 394
Points to Remember .................... 398
Pressure Cap ......................... 396
Selection of Coolant (Antifreeze) .........395,424
Temperature Gauge ..................... 209
Corrosion Protection ..................... 406
Crankcase Emission Control System .......... 388
Cruise Light ........................... 209
Cup Holder ............................ 117
Customer Assistance ..................... 437
Data Recorder, Event ...................... 60
Daytime Running Lights ................... 99
Dealer Service .......................... 382
Defroster, Rear Window ................... 198
448 INDEX