belt JEEP WRANGLER 2010 JK / 3.G Service Manual
[x] Cancel search | Manufacturer: JEEP, Model Year: 2010, Model line: WRANGLER, Model: JEEP WRANGLER 2010 JK / 3.GPages: 554, PDF Size: 10.76 MB
Page 134 of 554

3. Fold the rear seat forward following steps 1 through 3
under “Fold and Tumble Rear Seat” in this section.
4. Press down on the release bar on each side, and pull
the seat out and away from the lower bracket.
5. Remove the seat from the vehicle.Replacing the Rear Seat — Two Door Models
Reverse the steps for removing the seat.
WARNING!
•To help protect against personal injury, passengers
should not be seated in the rear cargo area with the
rear seat folded down or removed from the ve-
hicle.
•The rear cargo space is intended for load carrying
purposes only, not for passengers who should sit
in seats and use seat belts.
60/40 Split Folding Rear Seat — Four Door
Models
To provide additional storage area, each rear seat can be
folded flat to allow for extended cargo space and still
maintain some rear seating room.
Release Bar Location
3
UNDERSTANDING THE FEATURES OF YOUR VEHICLE 133
Page 135 of 554
NOTE:
•Prior to folding the rear seat, it may be necessary to
reposition the front seat to its mid-track position.
•Be sure that the front seats are fully upright and
positioned forward. This will allow the rear seat to
fold down easily.
WARNING!
•It is extremely dangerous to ride in a cargo area,
inside or outside of a vehicle. In a collision, people
riding in these areas are more likely to be seri-
ously injured or killed.
•Do not allow people to ride in any area of your
vehicle that is not equipped with seats and seat
belts.
•Be sure everyone in your vehicle is in a seat and
using a seat belt properly.
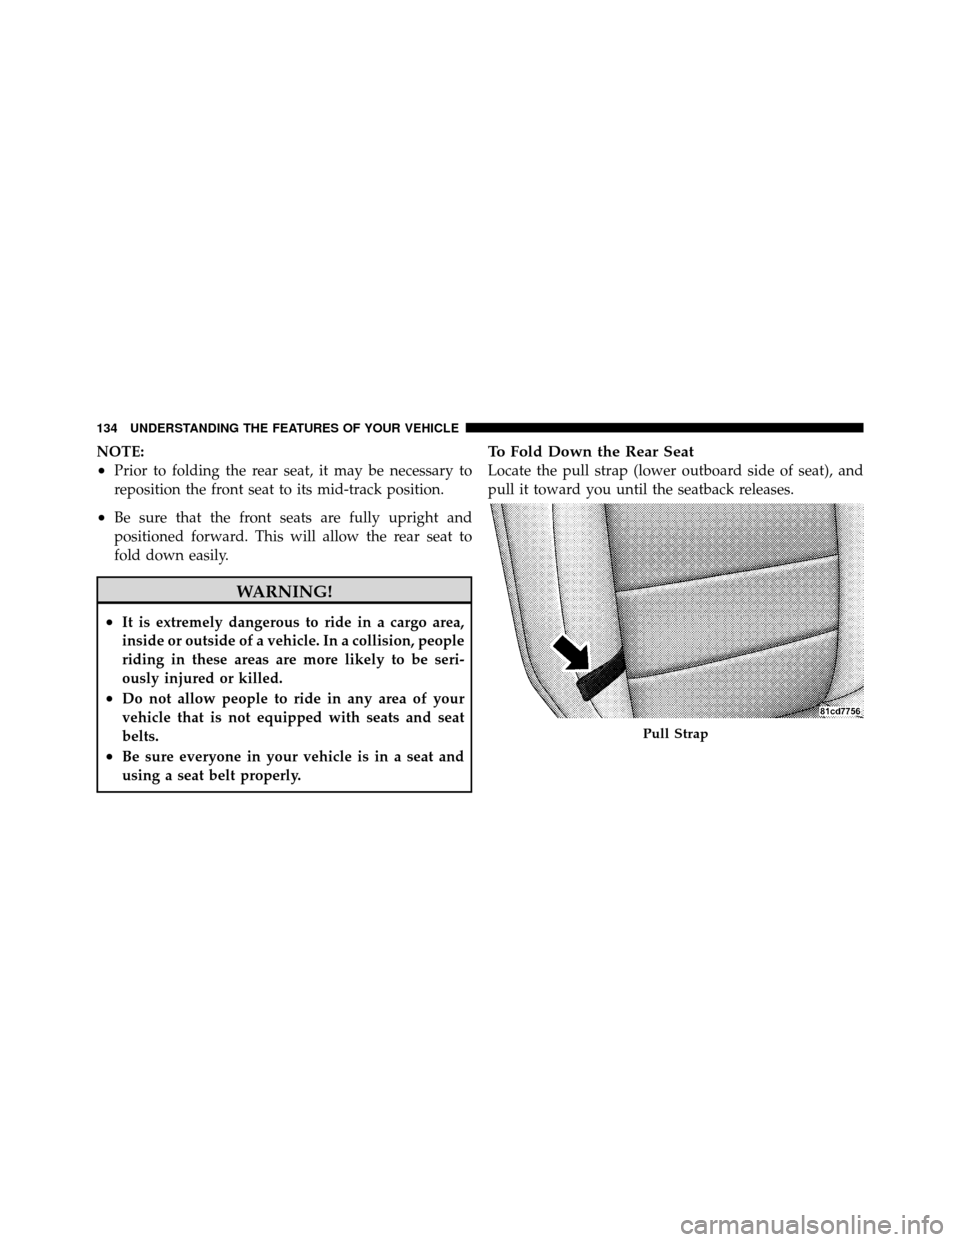
To Fold Down the Rear Seat
Locate the pull strap (lower outboard side of seat), and
pull it toward you until the seatback releases.
Pull Strap
134 UNDERSTANDING THE FEATURES OF YOUR VEHICLE
Page 136 of 554

To Raise the Rear Seat
Raise the seatback and lock it into place. If interference
from the cargo area prevents the seatback from fully
locking, you will have difficulty returning the seat to its
proper position.
NOTE:If the rear seatback is not fully latched, the
center shoulder belt will not be able to be extended for
use. If you cannot extend the center shoulder belt, make
sure your seatback is fully latched.
WARNING!
Be certain that the seatback is securely locked into
position. If the seatback in not securely locked into
position the seat will not provide the proper stability
for child seats and/or passengers. An improperly
latched seat could cause serious injury.
TO OPEN AND CLOSE THE HOOD
Release both the hood latches.
Raise the hood and locate the safety latch, located in the
middle of the hood opening. Push the latch to the left side
of the vehicle, to open the hood. You may have to push
down slightly on the hood before pushing the safety
latch. Insert the support rod into the slot on the hood.
Hood Latch
3
UNDERSTANDING THE FEATURES OF YOUR VEHICLE 135
Page 163 of 554

4. Turn the rear L-shaped lock (located above the shoul-
der belt anchorage).
5. Unlatch the header panel latch located at the top of the
windshield.6. Remove the left-hand panel.
To remove the right panel, follow the steps above
except for Step 3.
162 UNDERSTANDING THE FEATURES OF YOUR VEHICLE
Page 182 of 554
CAUTION! (Continued)
•Refer to “Appearance Care for Fabric Top Models”
in “Maintaining Your Vehicle” for further infor-
mation. It contains important information on
cleaning and caring for your vehicle’s fabric top.
•Do not use any tools (screwdrivers, etc.) to pry or
force any of the clamps, clips, or retainers securing
the soft top. Do not force or pry the soft top
framework when opening or closing. Damage to
the top may result.
WARNING!
•Do not drive the vehicle with the rear window
curtain up unless the side curtains are also re-
moved. Dangerous exhaust gases could enter the
vehicle causing harm to the driver and passengers.(Continued)
WARNING! (Continued)
•The fabric upper doors and fabric top are designed
only for protection against the elements. Do not
rely on them to contain occupants within the
vehicle or to protect against injury during an
accident. Remember, always wear seat belts.
CAUTION!
Failure to follow these cautions may cause interior
water damage, stains or mildew on the top material:
•It is recommended that the top be free of water
prior to opening it. Operating the top, opening a
door or lowering a window while the top is wet
may allow water to drip into the vehicle’s interior.(Continued)
3
UNDERSTANDING THE FEATURES OF YOUR VEHICLE 181
Page 206 of 554
CAUTION! (Continued)
•Refer to “Appearance Care for Fabric Top Models”
in “Maintaining Your Vehicle” for further infor-
mation. It contains important information on
cleaning and caring for your vehicle’s fabric top.
•Do not use any tools (screwdrivers, etc.) to pry or
force any of the clamps, clips, or retainers securing
the soft top. Do not force or pry the soft top
framework when opening or closing. Damage to
the top may result.
WARNING!
•Do not drive the vehicle with the rear window
curtain up unless the side curtains are also open.
Dangerous exhaust gases which can kill could
enter the vehicle.(Continued)
WARNING! (Continued)
•The fabric upper doors and fabric top are designed
only for protection against the elements. Do not
rely on them to contain occupants within the
vehicle or to protect against injury during an
accident. Remember, always wear seat belts.
CAUTION!
Failure to follow these cautions may cause interior
water damage, stains or mildew on the top material:
•It is recommended that the top be free of water
prior to opening it. Operating the top, opening a
door or lowering a window while the top is wet
may allow water to drip into the vehicle’s interior.(Continued)
3
UNDERSTANDING THE FEATURES OF YOUR VEHICLE 205
Page 248 of 554
7. Seat Belt Reminder LightA warning chime and an indicator light will alert
you to buckle the seat belts. When the belt is
buckled, the chime will stop, but the light will stay
on for about six seconds, until it times out. Refer to
“Occupant Restraints” in “Things To Know Before Start-
ing Your Vehicle” for further information.
8. Turn Signal Indicators The arrows will flash with the exterior turn signals
when the turn signal lever is operated. A tone will
chime if the turn signals are left on for more than 1 mile
(1.6 km).
9. Oil Pressure Warning Light This light indicates low engine oil pressure. The
light should turn on momentarily when the engine
is started, if the bulb does not come on, have the system
checked by an authorized dealer. If the light turns on while driving, stop the vehicle and shut off the engine as
soon as possible. A chime will sound when this light
turns on.
Do not operate the vehicle until the cause is corrected.
This light does not indicate how much oil is in the engine.
The engine oil level must be checked under the hood.
10. High Beam Indicator
This indicator shows that the high beam head-
lights are on. Push the multifunction control lever
away from you to switch the headlights to high beam.
Pull the lever towards you to switch the headlights back
to low beam. If the driver’s door is open, and the
headlights or park lights are left on, the high beam
indicator light will remain illuminated and a chime will
sound.
4
UNDERSTANDING YOUR INSTRUMENT PANEL 247
Page 332 of 554

STARTING PROCEDURES
Before starting your vehicle, adjust your seat, adjust both
inside and outside mirrors, and fasten your seat belts.
WARNING!
Never leave children in the vehicle alone. Leaving
unintended children in a vehicle is dangerous for a
number of reasons. The child or others could be
seriously or fatally injured. The child could operate
power windows, other controls or move the vehicle.
Manual Transmission – If Equipped
Apply the parking brake, place the shift lever in NEU-
TRAL, and press the clutch pedal before starting the
vehicle. This vehicle is equipped with a clutch interlock-
ing ignition system. It will not start unless the clutch
pedal is pressed to the floor.Four-Wheel Drive Models Only
In 4L mode, this vehicle will start regardless of whether
or not the clutch pedal is pressed to the floor. This feature
enhances off-road performance by allowing the vehicle to
start when in 4L without having to press the clutch pedal.
The “4WD Indicator Light” will illuminate when the
transfer case has been shifted into this mode.
Automatic Transmission – If Equipped
Start the vehicle with the shift lever in the PARK position
(vehicle can also be started in NEUTRAL). Apply the
brake before shifting to any driving range.
Normal Starting
NOTE:
Normal starting of either a cold or a warm
engine is obtained without pumping or pressing the
accelerator pedal.
5
STARTING AND OPERATING 331
Page 357 of 554

The Basics of Off-Road Driving
You will encounter many types of terrain driving off-
road. You should be familiar with the terrain and area
before proceeding. There are many types of surface
conditions: hard-packed dirt, gravel, rocks, grass, sand,
mud, snow and ice. Every surface has a different effect on
your vehicle’s steering, handling and traction. Control-
ling your vehicle is one of the keys to successful off-road
driving, so always keep a firm grip on the steering wheel
and maintain a good driving posture. Avoid sudden
accelerations, turns or braking. In most cases, there are no
road signs, posted speed limits or signal lights. Therefore,
you will need to use your own good judgment on what is
safe and what is not. When on a trail, you should always
be looking ahead for surface obstacles and changes in
terrain. The key is to plan your future driving route while
remembering what you are currently driving over.CAUTION!
Never park your vehicle over dry grass or other
combustible materials. The heat from your vehicle
exhaust system could cause a fire.
WARNING!
Always wear your seat belt and firmly tie down
cargo. Unsecured cargo can become projectiles in an
off-road situation.
When to Use 4L (Low) Range
When off-road driving, shift into 4L (Low) for additional
traction and control on slippery or difficult terrain,
ascending or descending steep hills, and to increase low
speed pulling power. This range should be limited to
extreme situations such as deep snow, mud, steep in-
clines, or sand where additional low speed pulling power
356 STARTING AND OPERATING
Page 466 of 554
Air Conditioner Maintenance
For best possible performance, your air conditioner
should be checked and serviced by an authorized dealer
at the start of each warm season. This service should
include cleaning of the condenser fins and a performance
test. Drive belt tension should also be checked at this
time.
CAUTION!
Do not use chemical flushes in your air conditioning
system as the chemicals can damage your air condi-
tioning components. Such damage is not covered by
the New Vehicle Limited Warranty.
WARNING!
•Use only refrigerants and compressor lubricants
approved by the manufacturer for your air condi-
tioning system. Some unapproved refrigerants are
flammable and can explode, injuring you. Other
unapproved refrigerants or lubricants can cause
the system to fail, requiring costly repairs. Refer to
Warranty Information Book, located on the DVD,
for further warranty information.
•The air conditioning system contains refrigerant
under high pressure. To avoid risk of personal
injury or damage to the system, adding refrigerant
or any repair requiring lines to be disconnected
should be done by an experienced repairman.
NOTE: Use only manufacturer approved A/C System
Sealers, Stop Leak Products, Seal Conditioners, Compres-
sor Oil, and Refrigerants.
7
MAINTAINING YOUR VEHICLE 465