light JEEP WRANGLER 2010 JK / 3.G Owner's Manual
[x] Cancel search | Manufacturer: JEEP, Model Year: 2010, Model line: WRANGLER, Model: JEEP WRANGLER 2010 JK / 3.GPages: 72, PDF Size: 16.2 MB
Page 46 of 72
Fuel Cap/Loose Gas Cap Message
• If a “gas cap” message (shown as gASCAP) appears, tighten the gas cap until a “clicking”sound is heard.
• Press the odometer reset button to turn the message off.
• If the message continues to appear for more than three days after tightening the gas cap, see your authorized dealer.
Oil Change Indicator
Message
• If an “oil change” message (shown as CHAngE OIL) appears and a single chime sounds,it is time for your next required oil change.
Resetting The Light After Servicing
• Turn the ignition switch to the ON/RUN position (do not start engine).
• Fully depress the accelerator pedal three times within 10 seconds.
• Turn the ignition switch to the OFF/LOCK position.
IF YOUR ENGINE OVERHEATS
• In any of the following situations, you can reduce the potential for overheating by takingthe appropriate action.
• On the highways — slow down.
• In city traffic — while stopped, shift transmission into NEUTRAL, but do not increase engine idle speed.
NOTE: There are steps that you can take to slow down an impending overheat condition:
• If your air conditioner (A/C) is on, turn it off. The A/C system adds heat to the engine cooling system and turning the A/C off can help remove this heat.
• You can also turn the Temperature Control to maximum heat, the Mode Control to floor and the Fan Control to high. This allows the heater core to act as a supplement to the
radiator and aids in removing heat from the engine cooling system.
• If the temperature reading does not return to normal, turn the engine off immediately.
• We recommend that you do not operate the vehicle or engine damage will occur. Have the vehicle serviced immediately.
CAUTION!
Driving with a hot cooling system could damage your vehicle. If the temperature
gauge reads HOT (H), pull over and stop the vehicle. Idle the vehicle with the air
conditioner turned off until the pointer drops back into the normal range. If the
pointer remains on HOT (H), and you hear continuous chimes, turn the engine off
immediately and call for service.
WHAT TO DO IN EMERGENCIES
44
Page 49 of 72
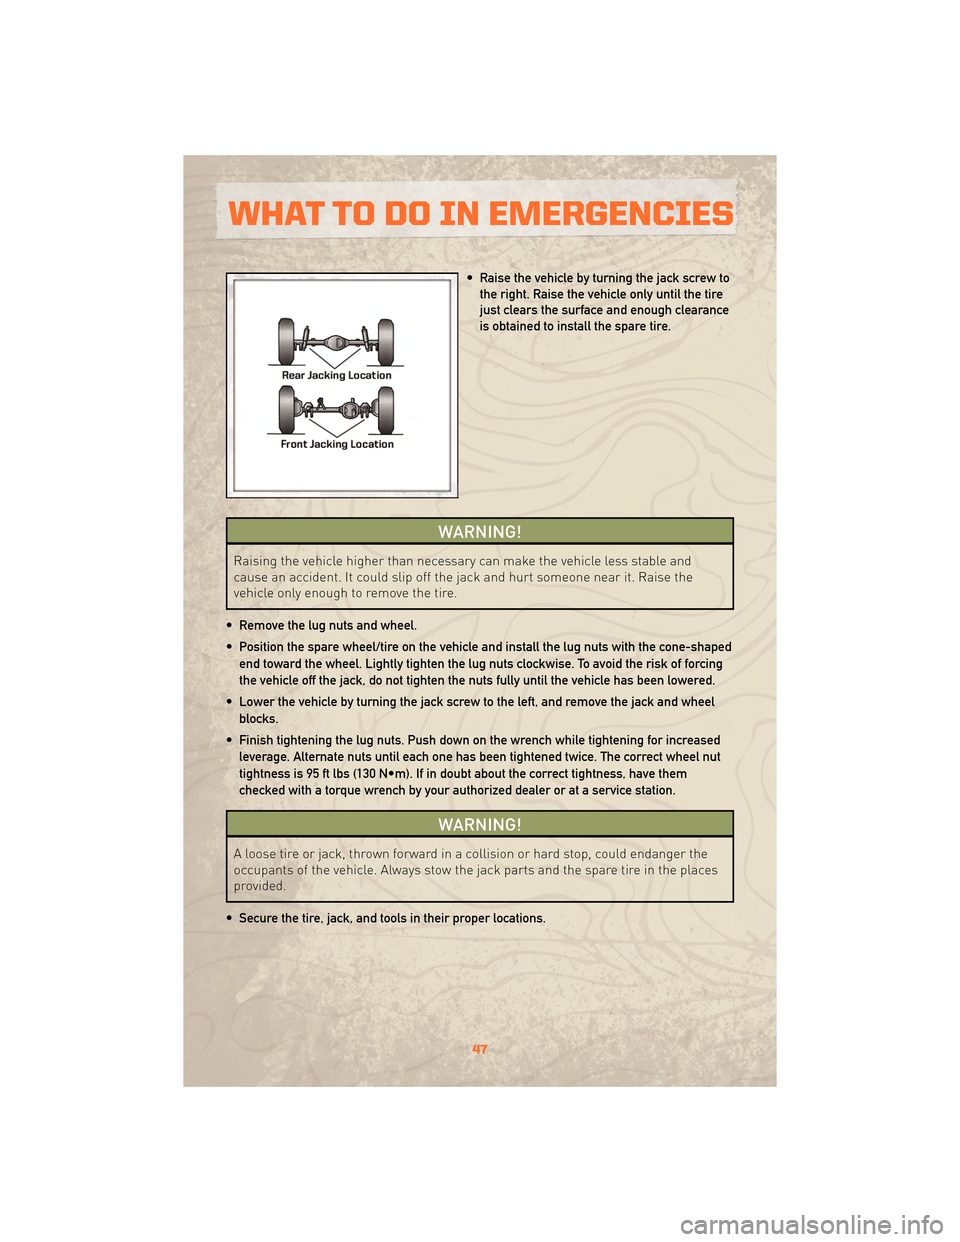
• Raise the vehicle by turning the jack screw tothe right. Raise the vehicle only until the tire
just clears the surface and enough clearance
is obtained to install the spare tire.
WARNING!
Raising the vehicle higher than necessary can make the vehicle less stable and
cause an accident. It could slip off the jack and hurt someone near it. Raise the
vehicle only enough to remove the tire.
• Remove the lug nuts and wheel.
• Position the spare wheel/tire on the vehicle and install the lug nuts with the cone-shaped end toward the wheel. Lightly tighten the lug nuts clockwise. To avoid the risk of forcing
the vehicle off the jack, do not tighten the nuts fully until the vehicle has been lowered.
• Lower the vehicle by turning the jack screw to the left, and remove the jack and wheel blocks.
• Finish tightening the lug nuts. Push down on the wrench while tightening for increased leverage. Alternate nuts until each one has been tightened twice. The correct wheel nut
tightness is 95 ft lbs (130 N•m). If in doubt about the correct tightness, have them
checked with a torque wrench by your authorized dealer or at a service station.
WARNING!
A loose tire or jack, thrown forward in a collision or hard stop, could endanger the
occupants of the vehicle. Always stow the jack parts and the spare tire in the places
provided.
• Secure the tire, jack, and tools in their proper locations.
47
WHAT TO DO IN EMERGENCIES
Page 50 of 72
JUMP-STARTING
• If your vehicle has a discharged battery it can be jumpstarted using a set of jumpercables and a battery in another vehicle or by using a portable battery booster pack.
• Jump-starting can be dangerous if done improperly so please follow the procedures in this section carefully.
NOTE: When using a portable battery booster pack follow the manufacturer’s operating
instructions and precautions.
CAUTION!
Do not use a portable battery booster pack or any other booster source with a
system voltage greater than 12 Volts or damage to the battery, starter motor,
alternator or electrical system may occur.
WARNING!
When temperatures are below the freezing point, electrolyte in a discharged battery
may freeze. Do not attempt jump-starting because the battery could rupture or
explode and cause personal injury. Battery temperature must be brought above
freezing point before attempting a jump-start.
Preparations for Jump-Start
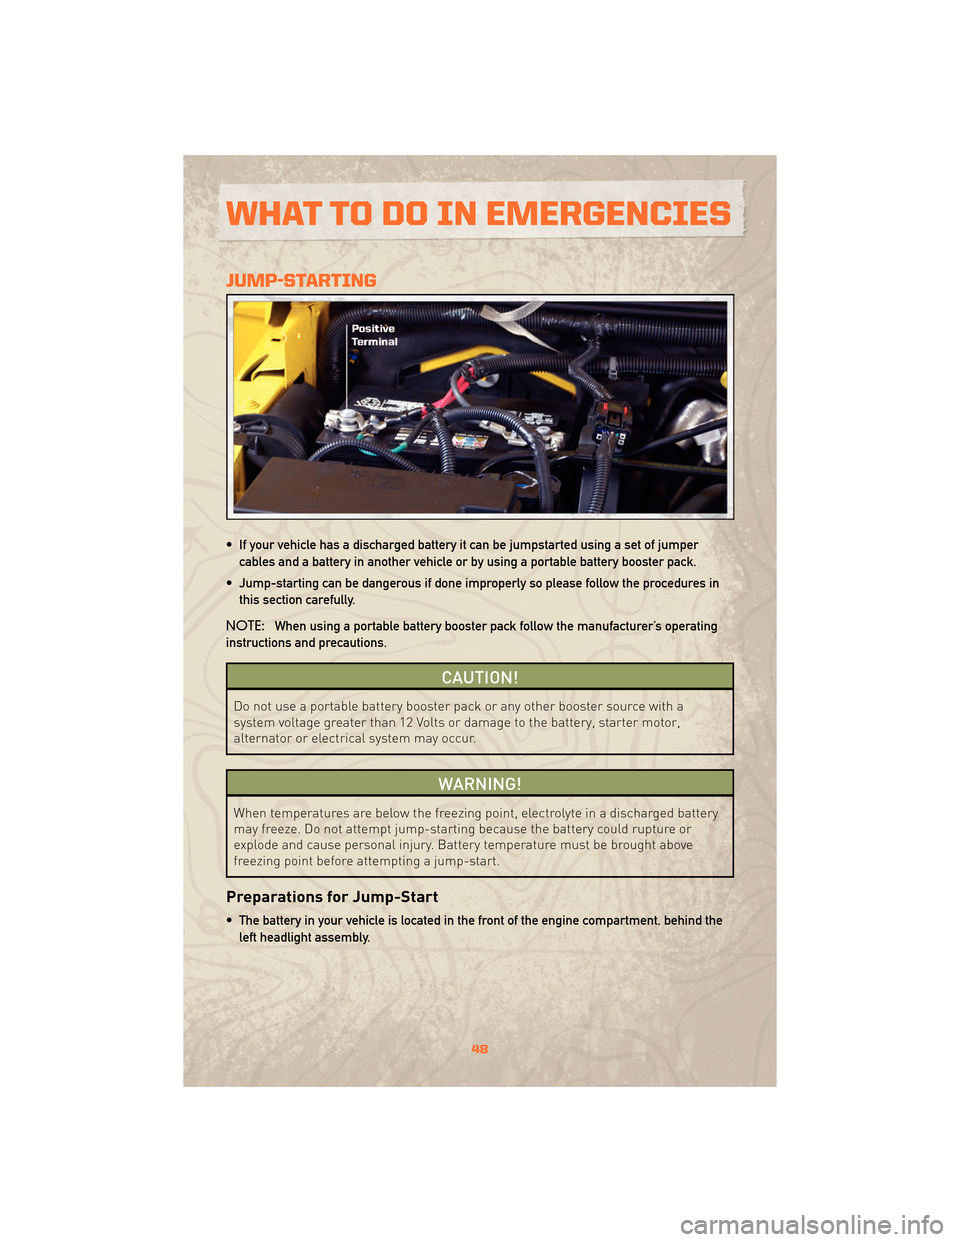
• The battery in your vehicle is located in the front of the engine compartment, behind the left headlight assembly.
WHAT TO DO IN EMERGENCIES
48
Page 54 of 72
OPENING THE HOOD
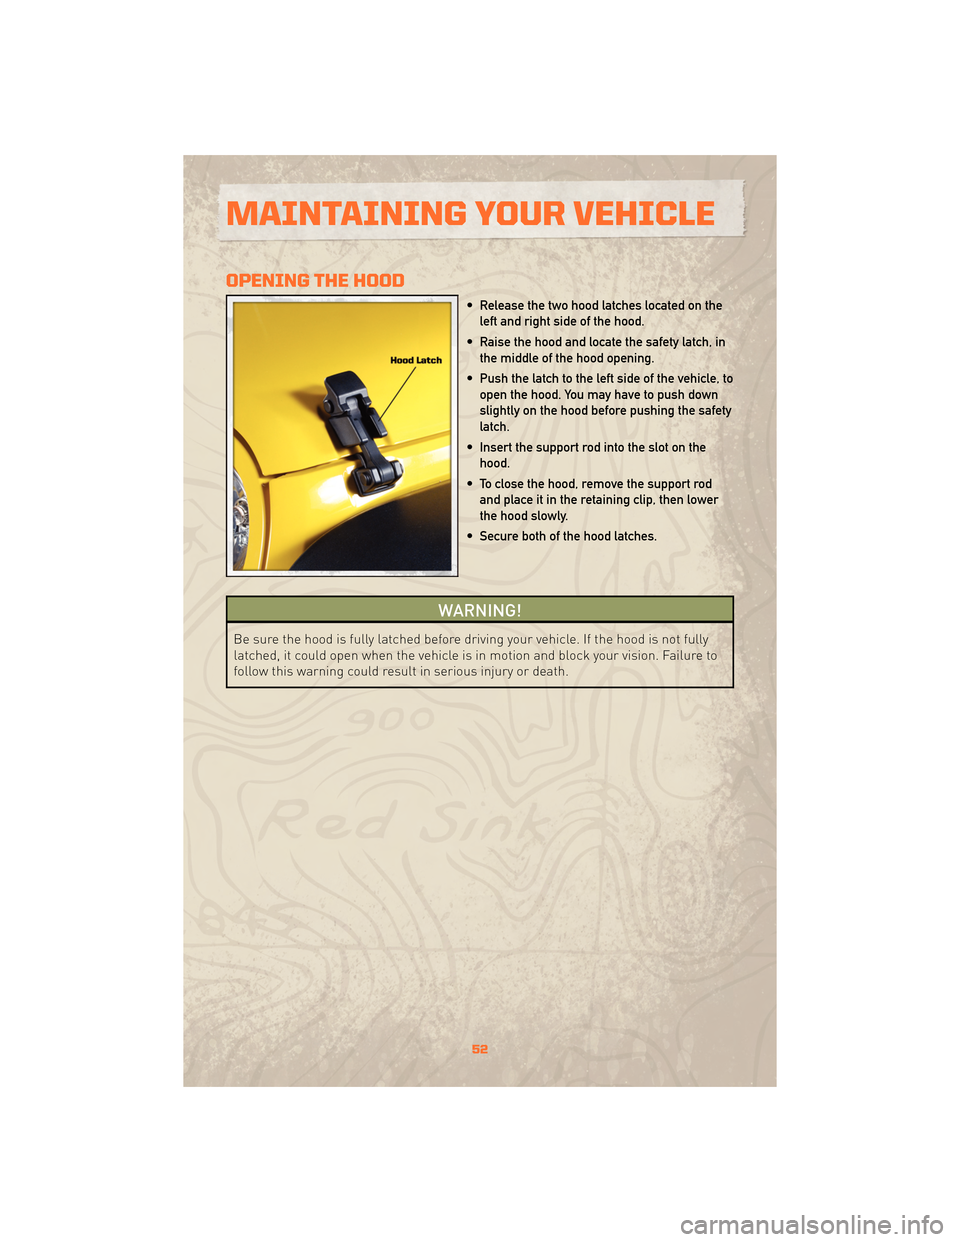
• Release the two hood latches located on theleft and right side of the hood.
• Raise the hood and locate the safety latch, in the middle of the hood opening.
• Push the latch to the left side of the vehicle, to open the hood. You may have to push down
slightly on the hood before pushing the safety
latch.
• Insert the support rod into the slot on the hood.
• To close the hood, remove the support rod and place it in the retaining clip, then lower
the hood slowly.
• Secure both of the hood latches.
WARNING!
Be sure the hood is fully latched before driving your vehicle. If the hood is not fully
latched, it could open when the vehicle is in motion and block your vision. Failure to
follow this warning could result in serious injury or death.
MAINTAINING YOUR VEHICLE
52
Page 61 of 72
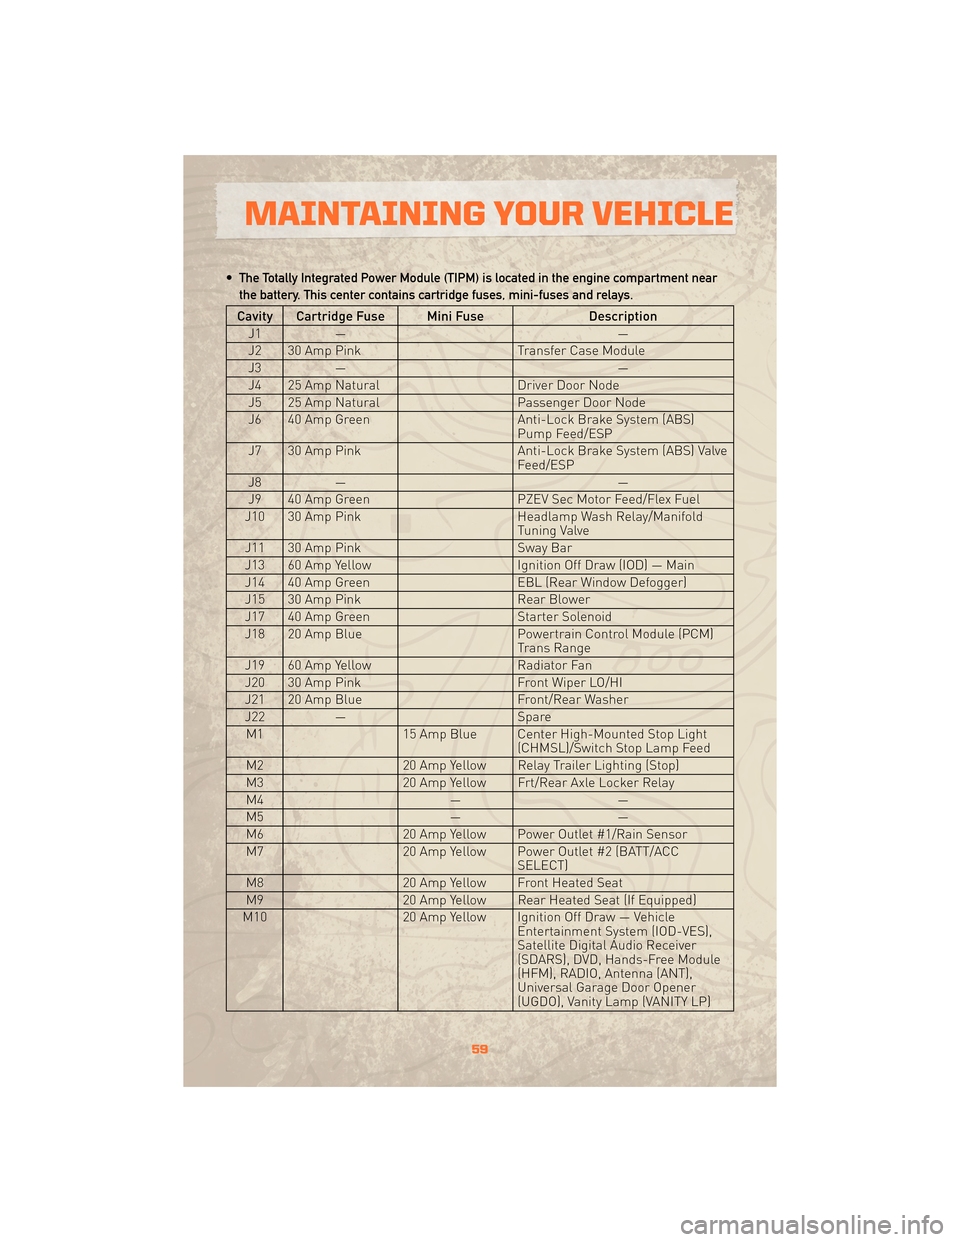
• The Totally Integrated Power Module (TIPM) is located in the engine compartment nearthe battery. This center contains cartridge fuses, mini-fuses and relays.
Cavity Cartridge Fuse Mini Fuse Description
J1 — —
J2 30 Amp Pink Transfer Case Module
J3 — —
J4 25 Amp Natural Driver Door Node
J5 25 Amp Natural Passenger Door Node
J6 40 Amp Green Anti-Lock Brake System (ABS)
Pump Feed/ESP
J7 30 Amp Pink Anti-Lock Brake System (ABS) Valve
Feed/ESP
J8 — —
J9 40 Amp Green PZEV Sec Motor Feed/Flex Fuel
J10 30 Amp Pink Headlamp Wash Relay/Manifold
Tuning Valve
J11 30 Amp Pink Sway Bar
J13 60 Amp Yellow Ignition Off Draw (IOD) — Main
J14 40 Amp Green EBL (Rear Window Defogger)
J15 30 Amp Pink Rear Blower
J17 40 Amp Green Starter Solenoid
J18 20 Amp Blue Powertrain Control Module (PCM)
Trans Range
J19 60 Amp Yellow Radiator Fan
J20 30 Amp Pink Front Wiper LO/HI
J21 20 Amp Blue Front/Rear Washer
J22 — Spare
M1 15 Amp Blue Center High-Mounted Stop Light
(CHMSL)/Switch Stop Lamp Feed
M2 20 Amp Yellow Relay Trailer Lighting (Stop)
M3 20 Amp Yellow Frt/Rear Axle Locker Relay
M4 ——
M5 ——
M6 20 Amp Yellow Power Outlet #1/Rain Sensor
M7 20 Amp Yellow Power Outlet #2 (BATT/ACC
SELECT)
M8 20 Amp Yellow Front Heated Seat
M9 20 Amp Yellow Rear Heated Seat (If Equipped)
M10 20 Amp Yellow Ignition Off Draw — Vehicle
Entertainment System (IOD-VES),
Satellite Digital Audio Receiver
(SDARS), DVD, Hands-Free Module
(HFM), RADIO, Antenna (ANT),
Universal Garage Door Opener
(UGDO), Vanity Lamp (VANITY LP)
59
MAINTAINING YOUR VEHICLE
Page 62 of 72
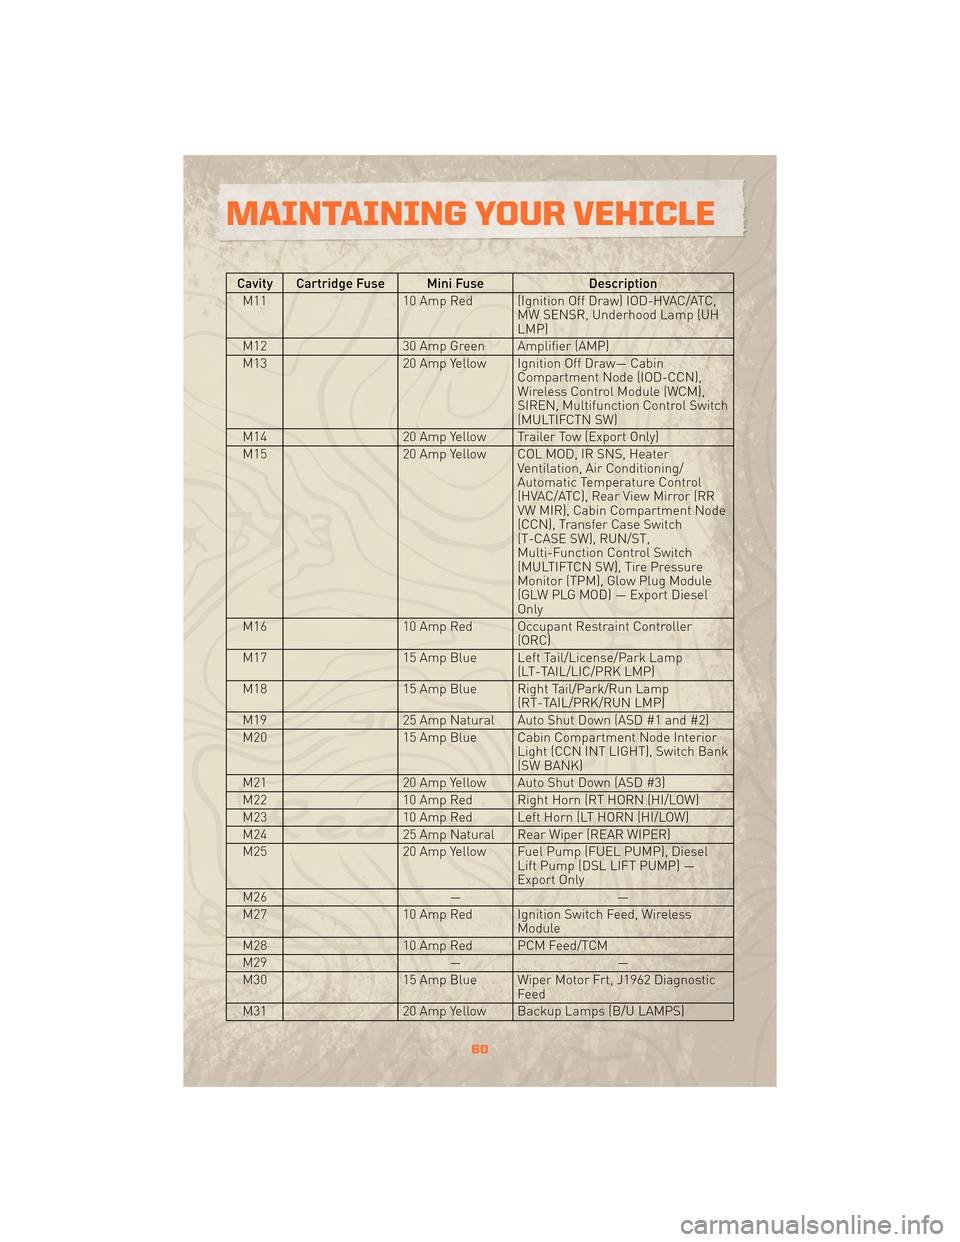
Cavity Cartridge Fuse Mini FuseDescription
M11 10 Amp Red (Ignition Off Draw) IOD-HVAC/ATC,
MW SENSR, Underhood Lamp (UH
LMP)
M12 30 Amp Green Amplifier (AMP)
M13 20 Amp Yellow Ignition Off Draw— Cabin
Compartment Node (IOD-CCN),
Wireless Control Module (WCM),
SIREN, Multifunction Control Switch
(MULTIFCTN SW)
M14 20 Amp Yellow Trailer Tow (Export Only)
M15 20 Amp Yellow COL MOD, IR SNS, Heater
Ventilation, Air Conditioning/
Automatic Temperature Control
(HVAC/ATC), Rear View Mirror (RR
VW MIR), Cabin Compartment Node
(CCN), Transfer Case Switch
(T-CASE SW), RUN/ST,
Multi-Function Control Switch
(MULTIFTCN SW), Tire Pressure
Monitor (TPM), Glow Plug Module
(GLW PLG MOD) — Export Diesel
Only
M16 10 Amp Red Occupant Restraint Controller
(ORC)
M17 15 Amp Blue Left Tail/License/Park Lamp
(LT-TAIL/LIC/PRK LMP)
M18 15 Amp Blue Right Tail/Park/Run Lamp
(RT-TAIL/PRK/RUN LMP)
M19 25 Amp Natural Auto Shut Down (ASD #1 and #2)
M20 15 Amp Blue Cabin Compartment Node Interior
Light (CCN INT LIGHT), Switch Bank
(SW BANK)
M21 20 Amp Yellow Auto Shut Down (ASD #3)
M22 10 Amp Red Right Horn (RT HORN (HI/LOW)
M23 10 Amp Red Left Horn (LT HORN (HI/LOW)
M24 25 Amp Natural Rear Wiper (REAR WIPER)
M25 20 Amp Yellow Fuel Pump (FUEL PUMP), Diesel
Lift Pump (DSL LIFT PUMP) —
Export Only
M26 ——
M27 10 Amp Red Ignition Switch Feed, Wireless
Module
M28 10 Amp Red PCM Feed/TCM
M29 ——
M30 15 Amp Blue Wiper Motor Frt, J1962 Diagnostic
Feed
M31 20 Amp Yellow Backup Lamps (B/U LAMPS)
MAINTAINING YOUR VEHICLE
60
Page 64 of 72
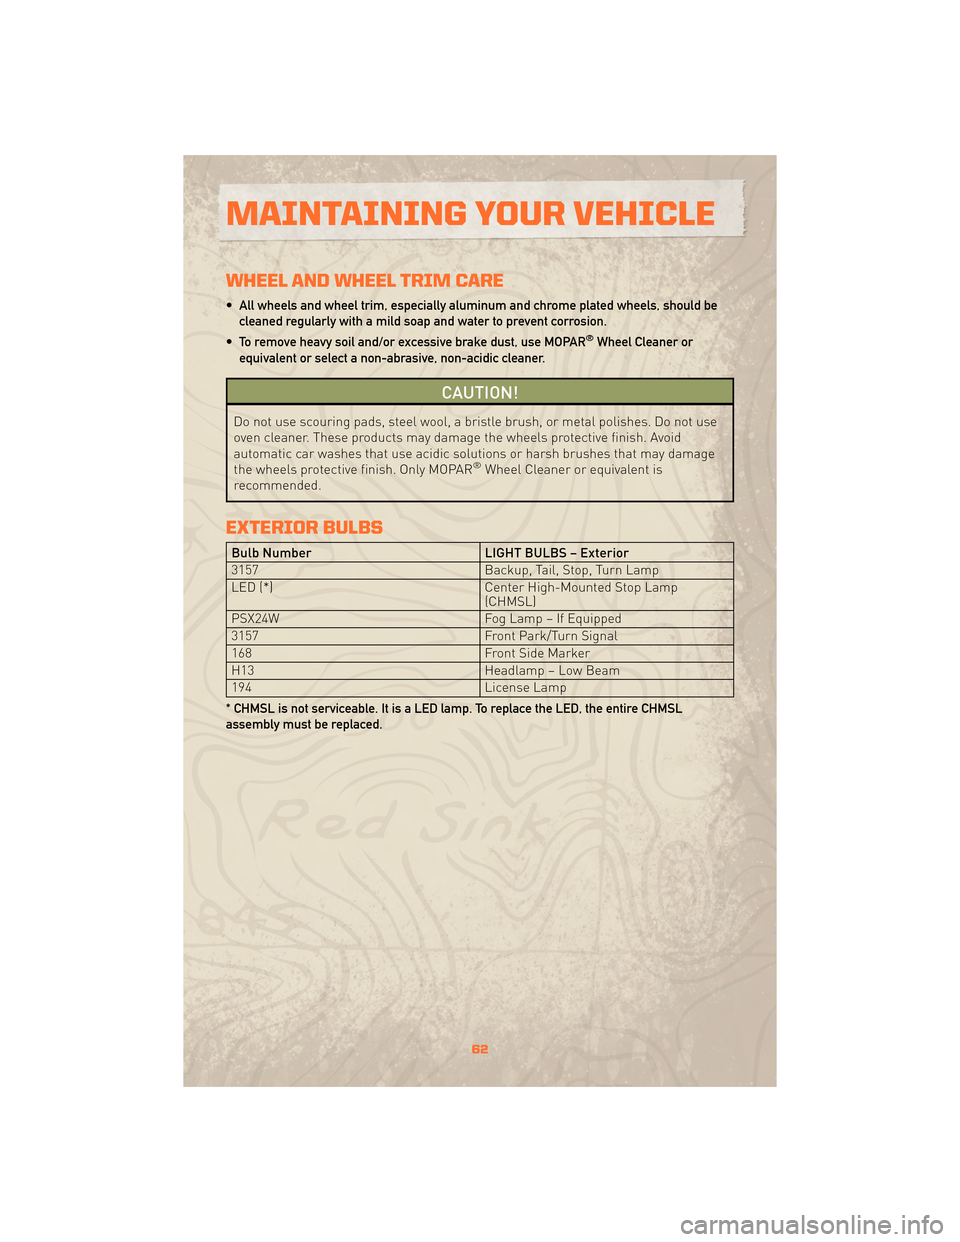
WHEEL AND WHEEL TRIM CARE
• All wheels and wheel trim, especially aluminum and chrome plated wheels, should becleaned regularly with a mild soap and water to prevent corrosion.
• To remove heavy soil and/or excessive brake dust, use MOPAR
®Wheel Cleaner or
equivalent or select a non-abrasive, non-acidic cleaner.
CAUTION!
Do not use scouring pads, steel wool, a bristle brush, or metal polishes. Do not use
oven cleaner. These products may damage the wheels protective finish. Avoid
automatic car washes that use acidic solutions or harsh brushes that may damage
the wheels protective finish. Only MOPAR
®Wheel Cleaner or equivalent is
recommended.
EXTERIOR BULBS
Bulb Number LIGHT BULBS – Exterior
3157 Backup, Tail, Stop, Turn Lamp
LED (*) Center High-Mounted Stop Lamp
(CHMSL)
PSX24W Fog Lamp – If Equipped
3157 Front Park/Turn Signal
168 Front Side Marker
H13 Headlamp – Low Beam
194 License Lamp
* CHMSL is not serviceable. It is a LED lamp. To replace the LED, the entire CHMSL
assembly must be replaced.
MAINTAINING YOUR VEHICLE
62
Page 68 of 72
Using Lift Kits
• Use of lift kits with some vehicle/tirecombinations can cause instability or
loss of control. When changing tire
sizes, always consult an installer for
optimum rim width and carefully check
vehicle/tire clearances.
Check Your Tires For Damage
• Frequent (at least monthly) inspectionof your tires for signs of damage,
uneven tread wear and their general
condition is important for safety.
Impacts, penetrations, cracks, knots,
bulges or air loss always require tire
removal and expert inspection.
Tire Service Life
• The service life of a tire is dependentupon varying factors including, but not
limited to, your driving style, tire
pressure and distance driven.
WARNING!
Tires and the spare tire should be
replaced after six years, regardless
of the remaining tread. Failure to
follow this warning can result in
sudden tire failure. You could lose
control and have an accident
resulting in serious injury or death.
• Keep dismounted tires in a cool, dry place with as little exposure to the light
as possible.
• Protect tires from contact with oil, grease, and gasoline.
NOTE: All tire warranties are made by
the tire manufacturer. Tires are not
covered under your Chrysler New Vehicle
Limited Warranty.
CONSUMER ASSISTANCE
66
Page 69 of 72
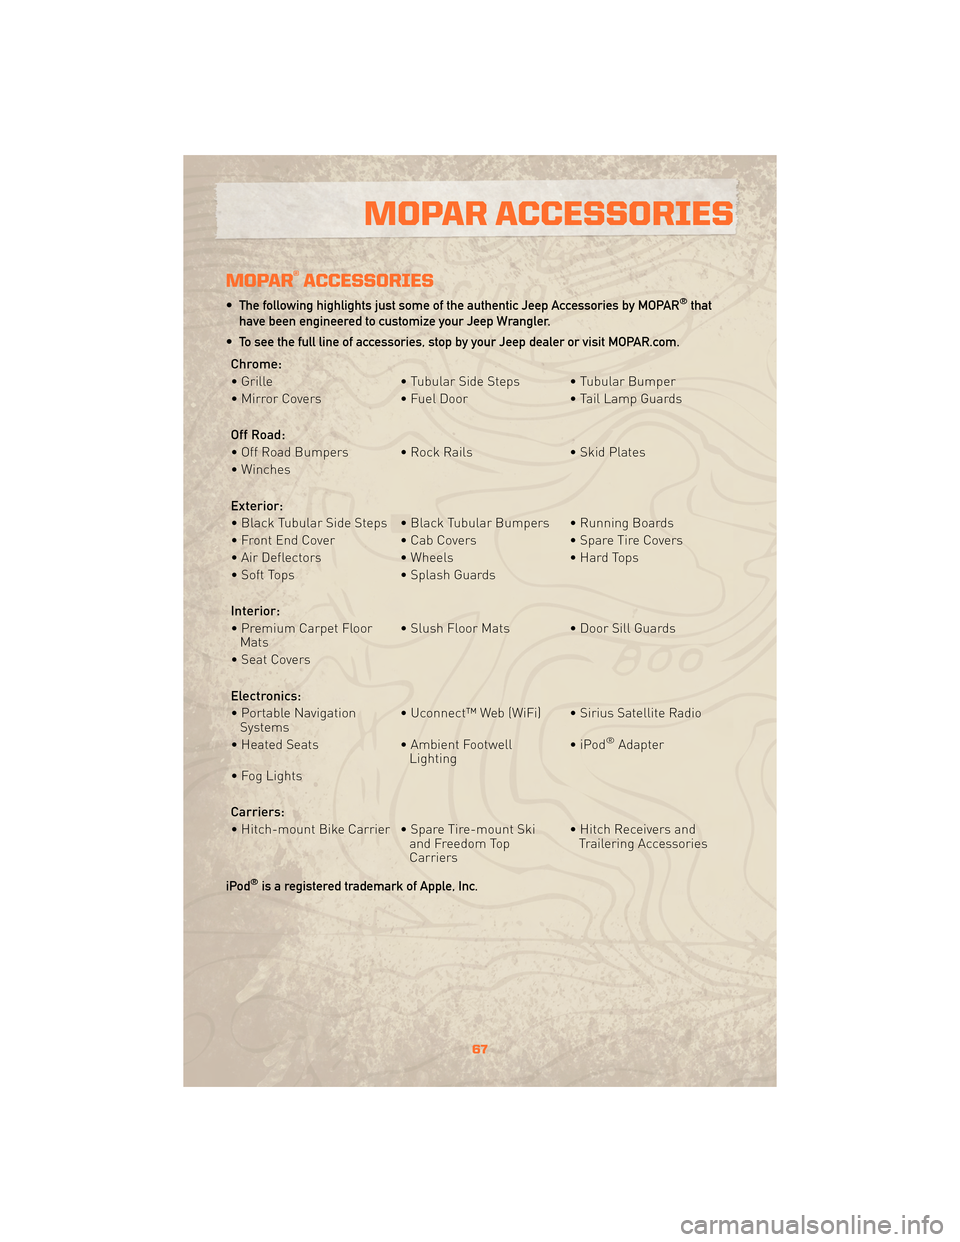
MOPAR®ACCESSORIES
• The following highlights just some of the authentic Jeep Accessories by MOPAR®that
have been engineered to customize your Jeep Wrangler.
• To see the full line of accessories, stop by your Jeep dealer or visit MOPAR.com.
Chrome:
• Grille • Tubular Side Steps • Tubular Bumper
• Mirror Covers • Fuel Door • Tail Lamp Guards
Off Road:
• Off Road Bumpers • Rock Rails • Skid Plates
• Winches
Exterior:
• Black Tubular Side Steps • Black Tubular Bumpers • Running Boards
• Front End Cover • Cab Covers • Spare Tire Covers
• Air Deflectors • Wheels • Hard Tops
• Soft Tops • Splash Guards
Interior:
• Premium Carpet Floor Mats • Slush Floor Mats • Door Sill Guards
• Seat Covers
Electronics:
• Portable Navigation Systems • Uconnect™ Web (WiFi) • Sirius Satellite Radio
• Heated Seats • Ambient Footwell
Lighting •iPod
®Adapter
• Fog Lights
Carriers:
• Hitch-mount Bike Carrier • Spare Tire-mount Ski and Freedom Top
Carriers• Hitch Receivers and
Trailering Accessories
iPod
®is a registered trademark of Apple, Inc.
67
MOPAR ACCESSORIES