reset JEEP WRANGLER 2010 Owners Manual
[x] Cancel search | Manufacturer: JEEP, Model Year: 2010, Model line: WRANGLER, Model: JEEP WRANGLER 2010Pages: 554, PDF Size: 10.16 MB
Page 45 of 554
Rear Center Lap/Shoulder Belt Retractor Lockout
(Four-Door Models Only)
This feature is designed to lock the retractor whenever
the 60% rear seatback is not fully latched. This prevents
someone from wearing the rear center lap/shoulder belt
when the rear seatback is not fully latched.
NOTE:
•If the rear center lap/shoulder belt cannot be pulled
out, check that the rear seatback is fully latched.
•If the rear seatback is properly latched and the rear
center lap/shoulder belt still cannot be pulled out, the
Automatic-Locking Retractor (ALR) system may be
activated. To reset this feature you must let all of the
belt webbing return into the retractor. You will not be
able to pull out more webbing until all of the webbing
has been returned back into the retractor.
Page 113 of 554
List of Preset Messages:
1. Yes
2. No
3. Where are you?
4. I need more direction.
5. L O L
6. Why
7. I love you
8. Call me
9. Call me later
10. Thanks11. See You in 15 minutes
12. Iamonmyway
13. I’ll be late
14. Are you there yet?
15. Where are we meeting?
16. Can this wait?
17. Bye for now
18. When can we meet
19. Send number to call
20. Start without me
112 UNDERSTANDING THE FEATURES OF YOUR VEHICLE
Page 253 of 554
21. Odometer / Trip Odometer / ECO (Fuel Saver
Indicator) Button
Press this button to change the display from odometer to
either of the two trip odometer settings or the “ECO”
display. Trip A or Trip B will appear when in the trip
odometer mode. Press and hold the button for two
seconds to reset the trip odometer to 0 miles or kilome-
ters. The odometer must be in trip mode to reset.
22. Shift Lever Indicator
The Shift Lever Indicator is self-contained within the
instrument cluster. It displays the gear position of the
automatic transmission.
23. Tire Pressure Monitoring Telltale LightEach tire, including the spare (if provided),
should be checked monthly, when cold and
inflated to the inflation pressure recommended
by the vehicle manufacturer on the vehicle
placard or tire inflation pressure label. (If your vehicle has tires of a different size than the size indicated on the
vehicle placard or tire inflation pressure label, you should
determine the proper tire inflation pressure for those
tires.)
As an added safety feature, your vehicle has been
equipped with a Tire Pressure Monitoring System
(TPMS) that illuminates a low tire pressure telltale when
one or more of your tires is significantly under-inflated.
Accordingly, when the low tire pressure telltale illumi-
nates, you should stop and check your tires as soon as
possible, and inflate them to the proper pressure. Driving
on a significantly under-inflated tire causes the tire to
overheat and can lead to tire failure. Under-inflation also
reduces fuel efficiency and tire tread life, and may affect
the vehicle’s handling and stopping ability.
Please note that the TPMS is not a substitute for proper
tire maintenance, and it is the driver ’s responsibility to
Page 255 of 554
24. Odometer / Trip Odometer Display Area
The odometer shows the total distance the vehicle has
been driven. The trip odometer shows individual trip
mileage. Refer to “Odometer / Trip Odometer / ECO
(Fuel Saver Indicator) Button” for additional information.
U.S. Federal regulations require that upon transfer of
vehicle ownership, the seller certify to the purchaser the
correct mileage that the vehicle has been driven. If your
odometer needs to be repaired or serviced, the repair
technician should leave the odometer reading the same
as it was before the repair or service. If s/he cannot do so,
then the odometer must be set at zero, and a sticker must
be placed in the door jamb stating what the mileage was
before the repair or service. It is a good idea for you to
make a record of the odometer reading before the repair/
service, so that you can be sure that it is properly reset, or
that the door jamb sticker is accurate if the odometer
must be reset at zero.Vehicle Odometer Messages
When the appropriate conditions exist, the following
odometer messages will display:
ECO
................... Fuel Saver Indicator Off
ECO-ON ................ Fuel Saver Indicator On
door ............................. Door Ajar
gATE ........................... Liftgate Ajar
LoW tirE ..................... LowTirePr essure
HOTOIL ............ Tr ansmission Oil Temperature
Above Normal Limits
gASCAP ....................... Fuel Cap Fault
noFUSE .......................... Fuse Fault
CHAngE OIL ............... Oil Change Required
ESPOFF ...................... ESP Deactivated
ECO / ECO-ON (Fuel Saver Indicator) — If Equipped
The ECO-ON indicator will illuminate when you are
driving in a fuel efficient manner and can be used to
modify driving habits in order to increase fuel economy.
254 UNDERSTANDING YOUR INSTRUMENT PANEL
Page 257 of 554
gASCAP
If the vehicle diagnostic system determines that the fuel
filler cap is loose, improperly installed, or damaged, a
“gASCAP” message will display in the odometer display
area. Tighten the fuel filler cap properly and press the
TRIP ODOMETER button to turn off the message. If the
problem continues, the message will appear the next time
the vehicle is started.
noFUSE
If the vehicle diagnostic system determines that the
Ignition Off Draw (IOD) fuse is improperly installed, or
damaged, a “noFUSE” message will display in the odom-
eter display area. For further information on fuses and
fuse locations refer to “Fuses” in “Maintaining Your
Vehicle”.CHAngE OIL Message
Your vehicle is equipped with an engine oil change
indicator system. The “CHANgE OIL” message will flash
in the instrument cluster odometer for approximately
12 seconds after a single chime has sounded to indicate
the next scheduled oil change interval. The engine oil
change indicator system is duty-cycle based, which
means the engine oil change interval may fluctuate
dependent upon your personal driving style.
Unless reset, this message will continue to display each
time you turn the ignition switch to the ON/RUN
position. To turn off the message temporarily, press and
release the Trip Odometer button on the instrument
cluster. To reset the oil change indicator system (after
performing the scheduled maintenance), refer to the
following procedure:
256 UNDERSTANDING YOUR INSTRUMENT PANEL
Page 263 of 554
displayed temperature, therefore temperature readings
are not updated when the vehicle is not moving.
Press and release the left button (on the instrument
cluster) to access the computer displays.
Press and hold the left button (on the instrument cluster)
for two to three seconds to switch from English to Metric
displays.
Reset / Change Display
Press and hold the left button (on the instrument cluster)
while function is being displayed to reset or change the
display.
The following trip displays can be reset or changed:
•AVG ECO (changes to present fuel economy)
•ET (will reset display)
Trip Conditions
Average Fuel Economy (AVG ECO)
This display shows the average fuel economy.
Estimated Range (DTE)
This display shows the estimated distance that can be
traveled with the fuel remaining in the tank. This esti-
mated distance is based on the most recent trip informa-
tion: (Average Fuel Economy) x (Fuel Remaining).
This display cannot be reset.
Elapsed Time (ET)
This display shows the accumulated ignition ON time
since the last reset.
262 UNDERSTANDING YOUR INSTRUMENT PANEL
Page 273 of 554
If a preset button is activated while in the Music Type
(Program Type) mode, the Music Type mode will be
exited and the radio will tune to the preset station.
SETUP Button
Pressing the SETUP button allows you to select between
the following items:
NOTE:Turn the TUNE/SCROLL control knob to scroll
through the entries. Push the AUDIO/SELECT button to
select an entry and make changes.
•DVD Enter - When the disc is in DVD Menu mode,
selecting DVD Enter will allow you to play the current
highlighted selection. Use the remote control to scroll
up and down the menu (if equipped).
•DISC Play/Pause - You can toggle between
playing the DVD and pausing the DVD by
pushing the SELECT button (if equipped).
•DVD Play Options - Selecting the DVD Play Options
will display the following:
•Subtitle – Repeatedly pressing SELECT will switch
subtitles to different subtitle languages that are
available on the disc (if equipped).
•Audio Stream – Repeatedly pressing SELECT will
switch to different audio languages (if supported on
the disc) (if equipped).
•Angle – Repeatedly pressing SELECT will change
the viewing angle if supported by the DVD disc (if
equipped).
NOTE:
•The available selections for each of the above entries
varies depending upon the disc.
•These selections can only be made while playing a
DVD.
Page 291 of 554
You may add a second station to each pushbutton by
repeating the above procedure with this exception: Press
the SET/RND button twice and SET 2 will show in the
display window. Each button can be set for SET 1 and
SET 2 in both AM and FM. This allows a total of 12 AM
and 12 FM stations to be stored into pushbutton memory.
The stations stored in SET 2 memory can be selected by
pressing the pushbutton twice.
Every time a preset button is used, a corresponding
button number will display.
Buttons1-6
These buttons tune the radio to the stations that you
commit to pushbutton memory (12 AM and 12 FM
stations).
DISC Button
Pressing the DISC button will allow you to switch from
AM/FM modes to Disc modes.
Operation Instructions — CD MODE For CD And
MP3 Audio Play
NOTE:
•The ignition switch must be in the ON/RUN or ACC
position to operate the radio.
•This radio is capable of playing compact discs (CD),
recordable compact discs (CD-R), rewritable compact
discs (CD-RW), compact discs with MP3 tracks and
multisession compact discs with CD and MP3 tracks.
Inserting Compact Disc(s)
Gently insert one CD into the CD player with the CD
label facing up. The CD will automatically be pulled into
the CD player and the CD icon will illuminate on the
radio display. If a CD does not go into the slot more than
1.0 in (2.5 cm), a disc may already be loaded and must be
ejected before a new disc can be loaded.
290 UNDERSTANDING YOUR INSTRUMENT PANEL
Page 301 of 554
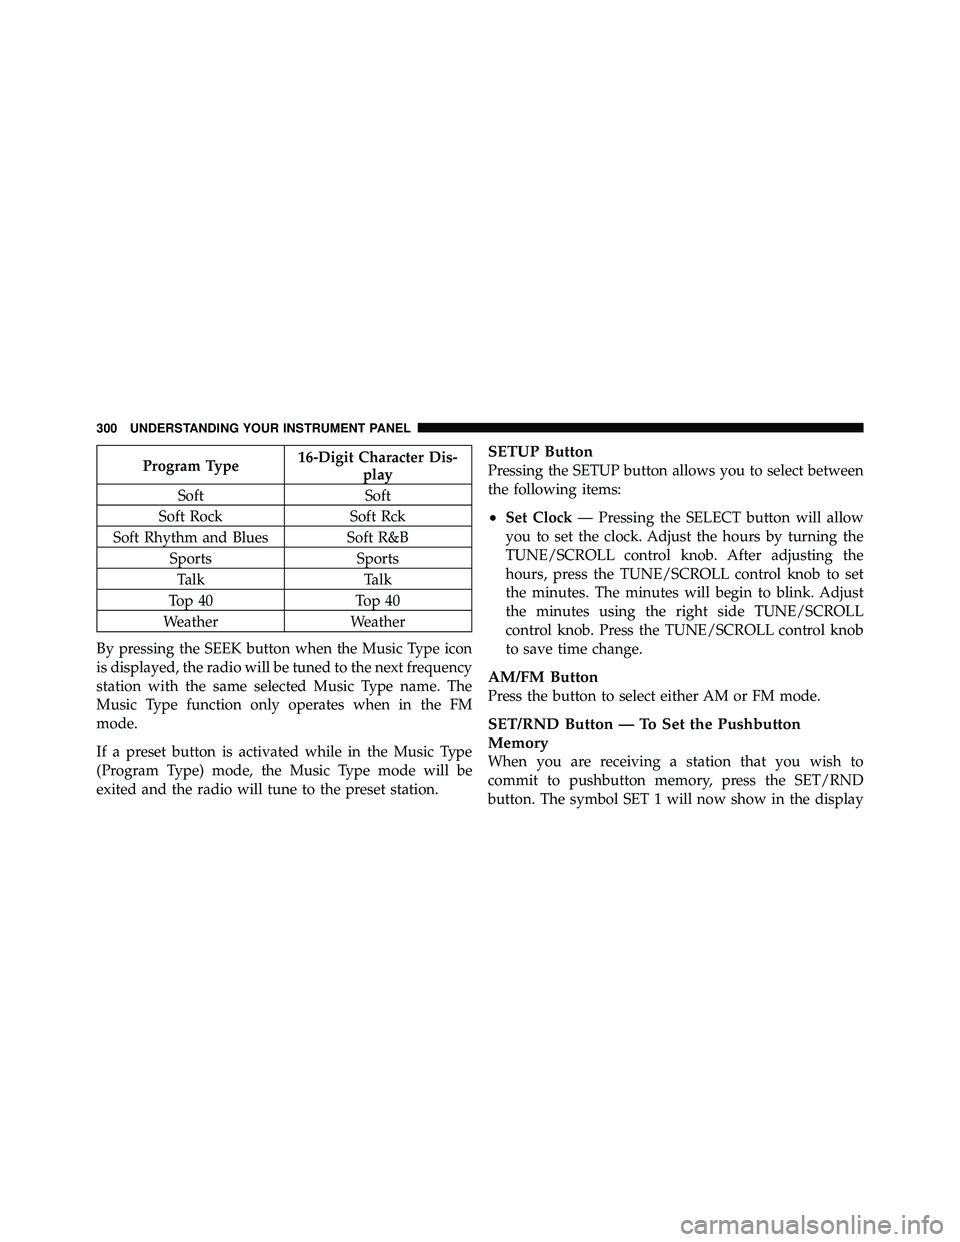
Program Type16-Digit Character Dis-
play
Soft Soft
Soft Rock Soft Rck
Soft Rhythm and Blues Soft R&B
Sports Sports
Talk Talk
Top 40 Top 40
Weather Weather
By pressing the SEEK button when the Music Type icon
is displayed, the radio will be tuned to the next frequency
station with the same selected Music Type name. The
Music Type function only operates when in the FM
mode.
If a preset button is activated while in the Music Type
(Program Type) mode, the Music Type mode will be
exited and the radio will tune to the preset station.SETUP Button
Pressing the SETUP button allows you to select between
the following items:
•Set Clock — Pressing the SELECT button will allow
you to set the clock. Adjust the hours by turning the
TUNE/SCROLL control knob. After adjusting the
hours, press the TUNE/SCROLL control knob to set
the minutes. The minutes will begin to blink. Adjust
the minutes using the right side TUNE/SCROLL
control knob. Press the TUNE/SCROLL control knob
to save time change.
AM/FM Button
Press the button to select either AM or FM mode.
SET/RND Button — To Set the Pushbutton
Memory
When you are receiving a station that you wish to
commit to pushbutton memory, press the SET/RND
button. The symbol SET 1 will now show in the display
300 UNDERSTANDING YOUR INSTRUMENT PANEL
Page 311 of 554
additional three seconds will make the radio display the
Song Title all of the time (press and hold again to return
to normal display).
RW/FF
Pressing the RW (Rewind) or FF (Fast Forward) buttons
causes the tuner to search for the next channel in the
direction of the arrows.
TUNE Control (Rotary)
Turn the rotary TUNE/SCROLL control knob clockwise
to increase or counterclockwise to decrease the channel.
MUSIC TYPE Button
Pressing this button once will turn on the Music Type
mode for five seconds. Pressing the MUSIC TYPE button
or turning the TUNE/SCROLL control knob within five
seconds will allow the program format type to be se-
lected.Toggle the MUSIC TYPE button again to select the music
type.
By pressing the SEEK button when the Music Type
function is active, the radio will be tuned to the next
channel with the same selected Music Type name.
If a preset button is activated while in the Music Type
(Program Type) mode, the Music Type mode will be
exited and the radio will tune to the preset channel.
SETUP Button
Pressing the SETUP button allows you to select the
following items:
•Display Sirius ID number — Press the AUDIO/
SELECT button to display the Sirius ID number. This
number is used to activate, deactivate, or change the
Sirius subscription.
310 UNDERSTANDING YOUR INSTRUMENT PANEL