ad blue JEEP WRANGLER 2011 JK / 3.G User Guide
[x] Cancel search | Manufacturer: JEEP, Model Year: 2011, Model line: WRANGLER, Model: JEEP WRANGLER 2011 JK / 3.GPages: 88, PDF Size: 3.52 MB
Page 44 of 88
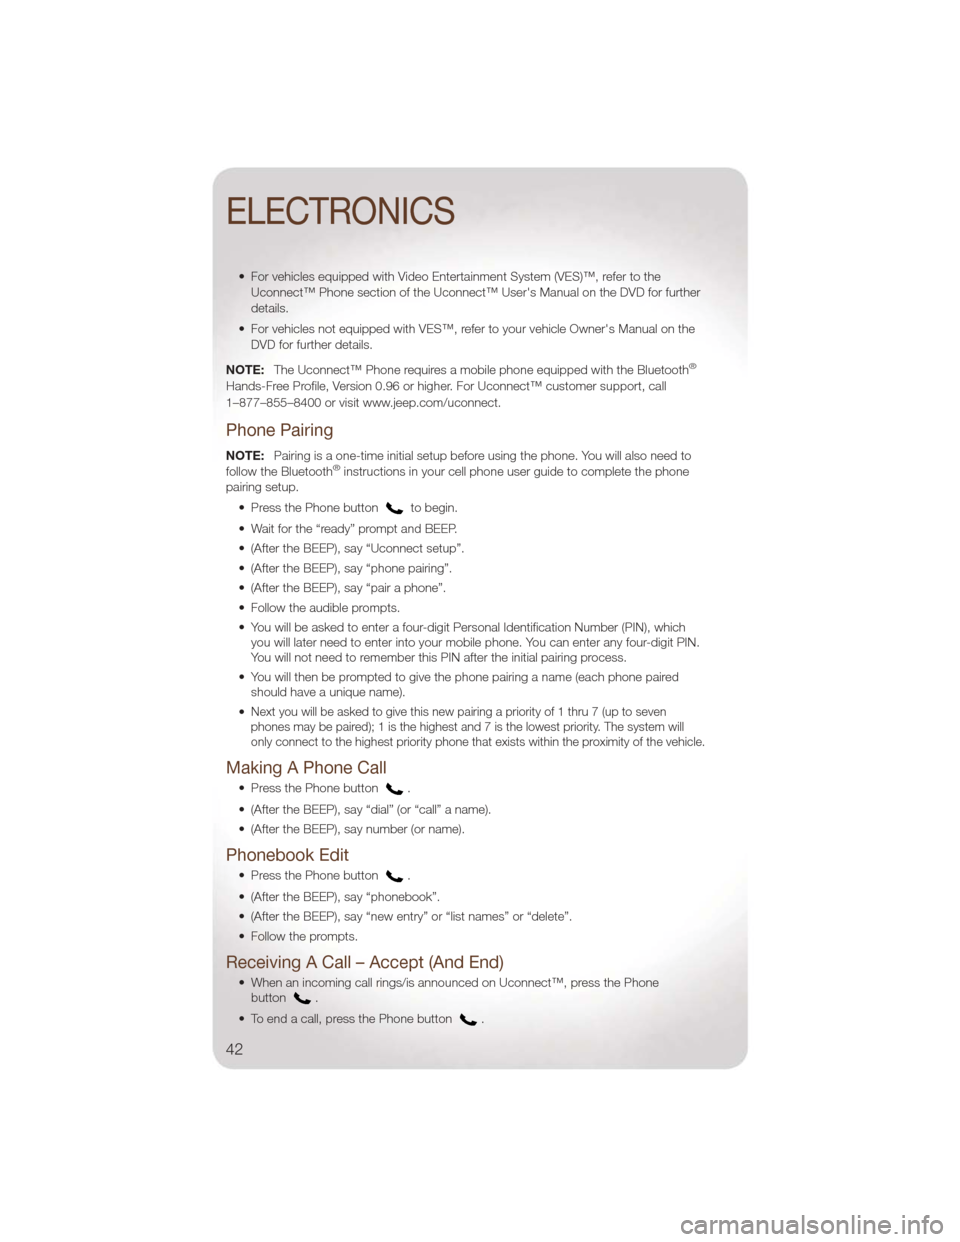
• For vehicles equipped with Video Entertainment System (VES)™, refer to theUconnect™ Phone section of the Uconnect™ User's Manual on the DVD for further
details.
• For vehicles not equipped with VES™, refer to your vehicle Owner's Manual on the DVD for further details.
NOTE: The Uconnect™ Phone requires a mobile phone equipped with the Bluetooth
®
Hands-Free Profile, Version 0.96 or higher. For Uconnect™ customer support, call
1–877–855–8400 or visit www.jeep.com/uconnect.
Phone Pairing
NOTE:Pairing is a one-time initial setup before using the phone. You will also need to
follow the Bluetooth®instructions in your cell phone user guide to complete the phone
pairing setup.
• Press the Phone button
to begin.
• Wait for the “ready” prompt and BEEP.
• (After the BEEP), say “Uconnect setup”.
• (After the BEEP), say “phone pairing”.
• (After the BEEP), say “pair a phone”.
• Follow the audible prompts.
• You will be asked to enter a four-digit Personal Identification Number (PIN), which you will later need to enter into your mobile phone. You can enter any four-digit PIN.
You will not need to remember this PIN after the initial pairing process.
• You will then be prompted to give the phone pairing a name (each phone paired should have a unique name).
•
Next you will be asked to give this new pairing a priority of 1 thru 7 (up to seven
phones may be paired); 1 is the highest and 7 is the lowest priority. The system will
only connect to the highest priority phone that exists within the proximity of the vehicle.
Making A Phone Call
• Press the Phone button.
• (After the BEEP), say “dial” (or “call” a name).
• (After the BEEP), say number (or name).
Phonebook Edit
• Press the Phone button.
• (After the BEEP), say “phonebook”.
• (After the BEEP), say “new entry” or “list names” or “delete”.
• Follow the prompts.
Receiving A Call – Accept (And End)
• When an incoming call rings/is announced on Uconnect™, press the Phone button.
• To end a call, press the Phone button
.
ELECTRONICS
42
Page 46 of 88
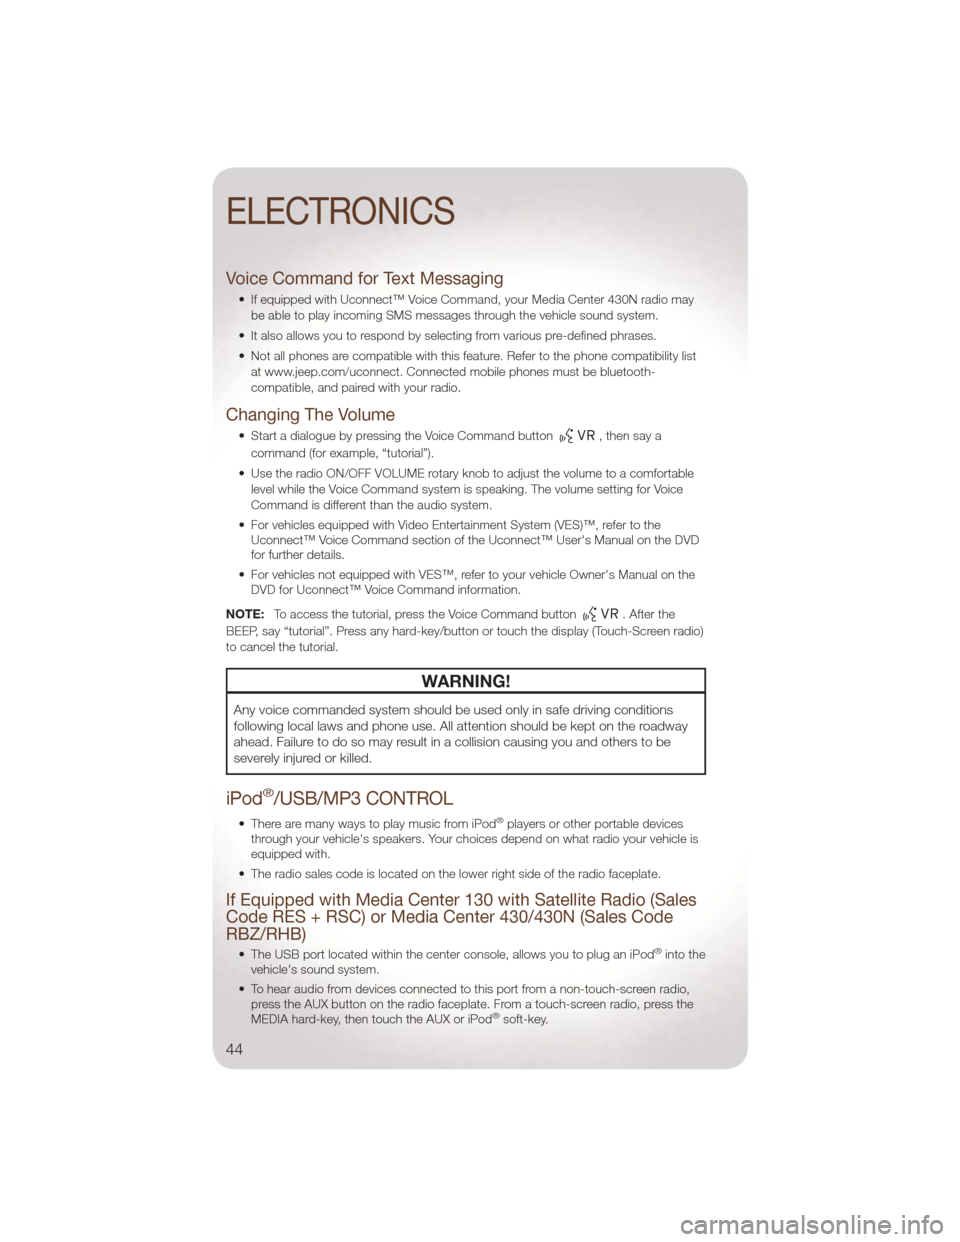
Voice Command for Text Messaging
• If equipped with Uconnect™ Voice Command, your Media Center 430N radio maybe able to play incoming SMS messages through the vehicle sound system.
• It also allows you to respond by selecting from various pre-defined phrases.
• Not all phones are compatible with this feature. Refer to the phone compatibility list at www.jeep.com/uconnect. Connected mobile phones must be bluetooth-
compatible, and paired with your radio.
Changing The Volume
• Start a dialogue by pressing the Voice Command button,thensaya
command (for example, “tutorial”).
• Use the radio ON/OFF VOLUME rotary knob to adjust the volume to a comfortable level while the Voice Command system is speaking. The volume setting for Voice
Command is different than the audio system.
• For vehicles equipped with Video Entertainment System (VES)™, refer to the Uconnect™ Voice Command section of the Uconnect™ User's Manual on the DVD
for further details.
• For vehicles not equipped with VES™, refer to your vehicle Owner's Manual on the DVD for Uconnect™ Voice Command information.
NOTE: To access the tutorial, press the Voice Command button
. After the
BEEP, say “tutorial”. Press any hard-key/button or touch the display (Touch-Screen radio)
to cancel the tutorial.
WARNING!
Any voice commanded system should be used only in safe driving conditions
following local laws and phone use. All attention should be kept on the roadway
ahead. Failure to do so may result in a collision causing you and others to be
severely injured or killed.
iPod®/USB/MP3 CONTROL
• There are many ways to play music from iPod®players or other portable devices
through your vehicle's speakers. Your choices depend on what radio your vehicle is
equipped with.
• The radio sales code is located on the lower right side of the radio faceplate.
If Equipped with Media Center 130 with Satellite Radio (Sales
Code RES + RSC) or Media Center 430/430N (Sales Code
RBZ/RHB)
• The USB port located within the center console, allows you to plug an iPod®into the
vehicle's sound system.
• To hear audio from devices connected to this port from a non-touch-screen radio, press the AUX button on the radio faceplate. From a touch-screen radio, press the
MEDIA hard-key, then touch the AUX or iPod
®soft-key.
ELECTRONICS
44
Page 47 of 88
• When connected to this feature:• The iPod®can be controlled using the radio buttons to Play, Browse, and List the
iPod®or external devices contents. Refer to the Owner's Manual on the DVD for
details.
• The iPod
®battery charges when plugged into the USB port (if supported by the
specific audio device).
• Compatible iPod
®devices may also be controllable using voice commands
(Media Center 430/430N with Uconnect™ Phone required). Refer to the Owner's
Manual on the DVD for details.
NOTE:
• The USB port supports certain Mini, Classic, Nano, Touch, and iPhone
®devices. The
USB port also supports playing music from compatible external USB Mass Storage
Class memory devices. For supported audio file formats, refer to the USB Port section
in the Owner's Manual on the DVD. Refer to www.jeep.com/uconnect website for a list
of tested iPod
®s. Some iPod®software versions may not fully support the USB port
features. Please visit Apple’s website for iPod®software updates.
Bluetooth®Streaming Audio
If equipped with Uconnect™ Voice Command, your bluetooth-equipped iPod®devices,
cellphones or other media players, may also be able to stream music to your vehicle's
speakers. Your connected device must be bluetooth-compatible, and paired with your
Media Center radio (see Uconnect™ Phone for pairing instructions). Press the AUX
button on the radio faceplate until "BT" is displayed on the radio screen.
WARNING!
Do not plug in or remove the iPod®or external device while driving. Failure to
follow this warning could result in a collision.
ELECTRONIC VEHICLE INFORMATION CENTER (EVIC)
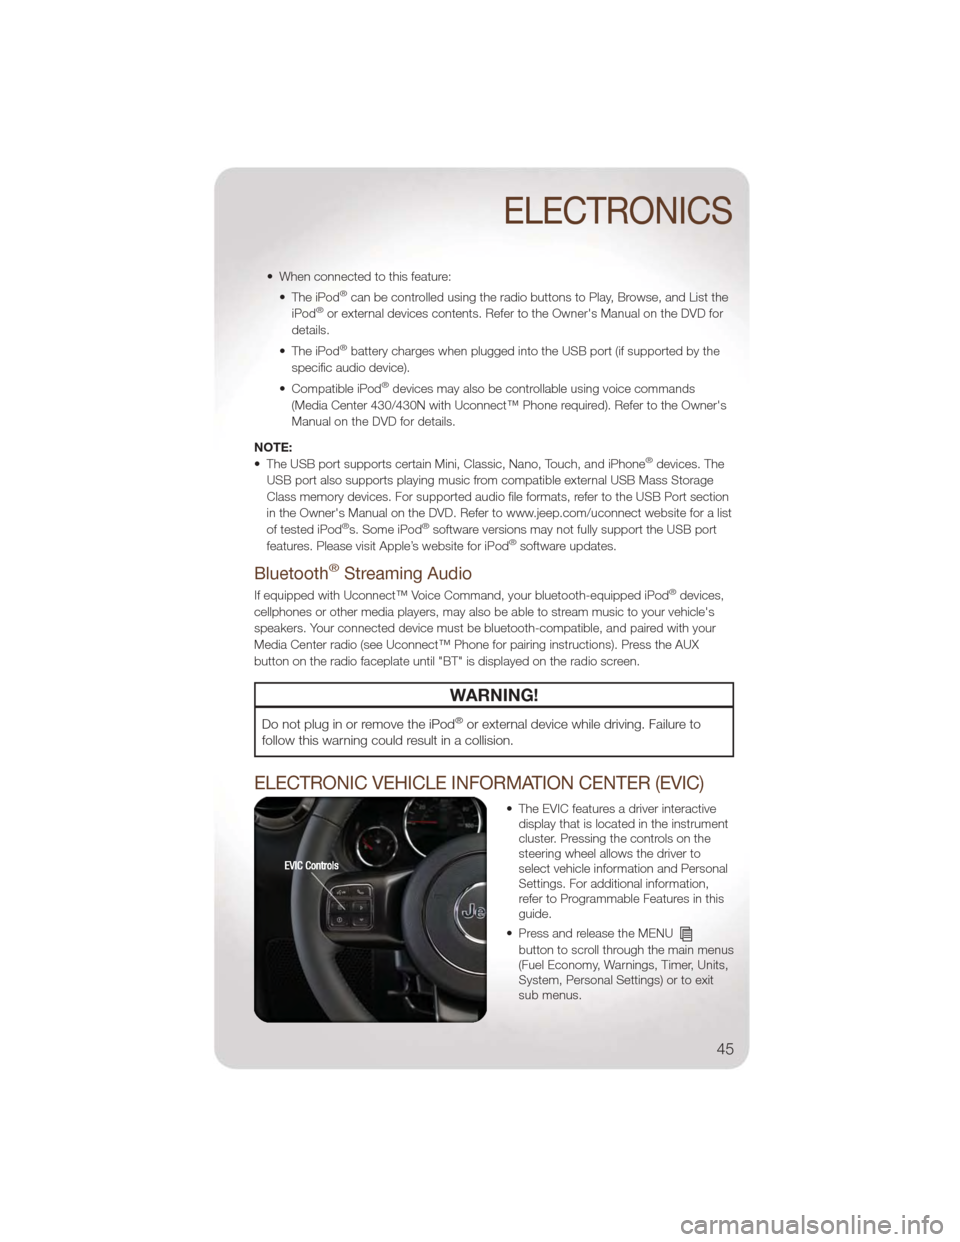
• The EVIC features a driver interactive display that is located in the instrument
cluster. Pressing the controls on the
steering wheel allows the driver to
select vehicle information and Personal
Settings. For additional information,
refer to Programmable Features in this
guide.
• Press and release the MENU
button to scroll through the main menus
(Fuel Economy, Warnings, Timer, Units,
System, Personal Settings) or to exit
sub menus.
ELECTRONICS
45
Page 76 of 88
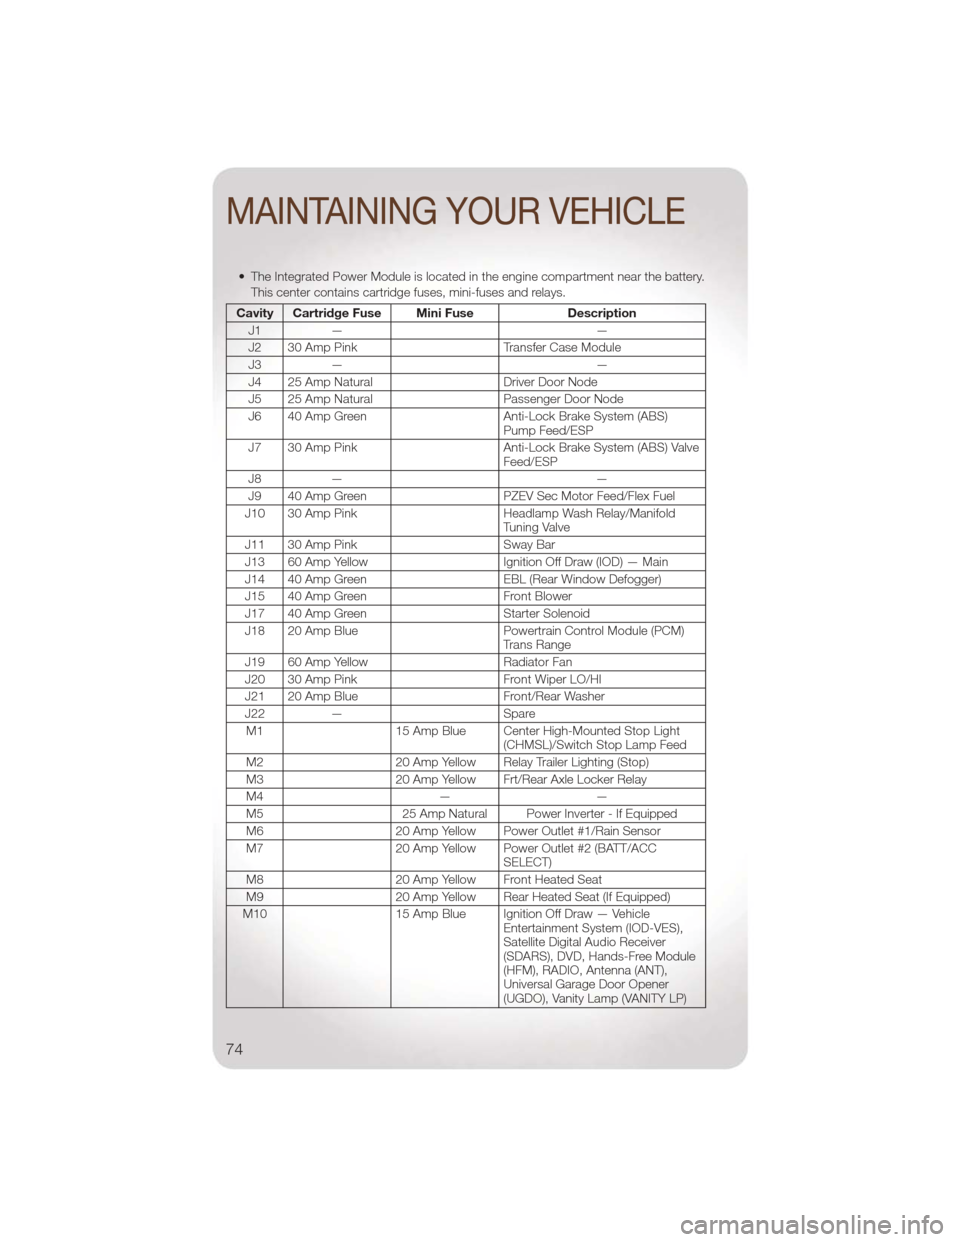
• The Integrated Power Module is located in the engine compartment near the battery.This center contains cartridge fuses, mini-fuses and relays.
Cavity Cartridge Fuse Mini Fuse Description
J1 — —
J2 30 Amp Pink Transfer Case Module
J3 — —
J4 25 Amp Natural Driver Door Node
J5 25 Amp Natural Passenger Door Node
J6 40 Amp Green Anti-Lock Brake System (ABS)
Pump Feed/ESP
J7 30 Amp Pink Anti-Lock Brake System (ABS) Valve
Feed/ESP
J8 — —
J9 40 Amp Green PZEV Sec Motor Feed/Flex Fuel
J10 30 Amp Pink Headlamp Wash Relay/Manifold
Tuning Valve
J11 30 Amp Pink Sway Bar
J13 60 Amp Yellow Ignition Off Draw (IOD) — Main
J14 40 Amp Green EBL (Rear Window Defogger)
J15 40 Amp Green Front Blower
J17 40 Amp Green Starter Solenoid
J18 20 Amp Blue Powertrain Control Module (PCM)
Trans Range
J19 60 Amp Yellow Radiator Fan
J20 30 Amp Pink Front Wiper LO/HI
J21 20 Amp Blue Front/Rear Washer
J22 — Spare
M1 15 Amp Blue Center High-Mounted Stop Light
(CHMSL)/Switch Stop Lamp Feed
M2 20 Amp Yellow Relay Trailer Lighting (Stop)
M3 20 Amp Yellow Frt/Rear Axle Locker Relay
M4 ——
M5 25 Amp Natural Power Inverter - If Equipped
M6 20 Amp Yellow Power Outlet #1/Rain Sensor
M7 20 Amp Yellow Power Outlet #2 (BATT/ACC
SELECT)
M8 20 Amp Yellow Front Heated Seat
M9 20 Amp Yellow Rear Heated Seat (If Equipped)
M10 15 Amp Blue Ignition Off Draw — Vehicle
Entertainment System (IOD-VES),
Satellite Digital Audio Receiver
(SDARS), DVD, Hands-Free Module
(HFM), RADIO, Antenna (ANT),
Universal Garage Door Opener
(UGDO), Vanity Lamp (VANITY LP)
MAINTAINING YOUR VEHICLE
74
Page 77 of 88
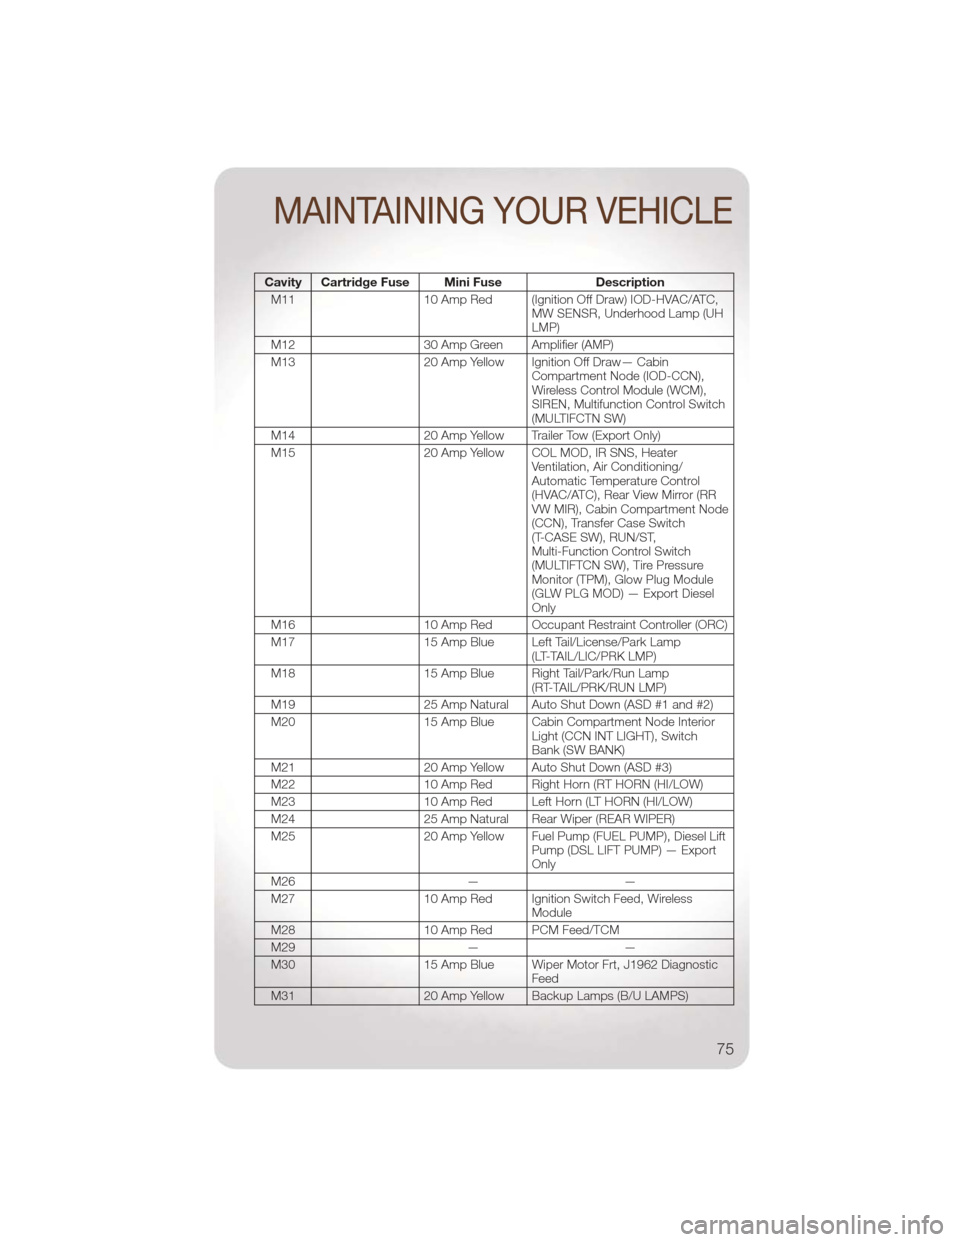
Cavity Cartridge Fuse Mini FuseDescription
M11 10 Amp Red (Ignition Off Draw) IOD-HVAC/ATC,
MW SENSR, Underhood Lamp (UH
LMP)
M12 30 Amp Green Amplifier (AMP)
M13 20 Amp Yellow Ignition Off Draw— Cabin
Compartment Node (IOD-CCN),
Wireless Control Module (WCM),
SIREN, Multifunction Control Switch
(MULTIFCTN SW)
M14 20 Amp Yellow Trailer Tow (Export Only)
M15 20 Amp Yellow COL MOD, IR SNS, Heater
Ventilation, Air Conditioning/
Automatic Temperature Control
(HVAC/ATC), Rear View Mirror (RR
VW MIR), Cabin Compartment Node
(CCN), Transfer Case Switch
(T-CASE SW), RUN/ST,
Multi-Function Control Switch
(MULTIFTCN SW), Tire Pressure
Monitor (TPM), Glow Plug Module
(GLW PLG MOD) — Export Diesel
Only
M16 10 Amp Red Occupant Restraint Controller (ORC)
M17 15 Amp Blue Left Tail/License/Park Lamp
(LT-TAIL/LIC/PRK LMP)
M18 15 Amp Blue Right Tail/Park/Run Lamp
(RT-TAIL/PRK/RUN LMP)
M19 25 Amp Natural Auto Shut Down (ASD #1 and #2)
M20 15 Amp Blue Cabin Compartment Node Interior
Light (CCN INT LIGHT), Switch
Bank (SW BANK)
M21 20 Amp Yellow Auto Shut Down (ASD #3)
M22 10 Amp Red Right Horn (RT HORN (HI/LOW)
M23 10 Amp Red Left Horn (LT HORN (HI/LOW)
M24 25 Amp Natural Rear Wiper (REAR WIPER)
M25 20 Amp Yellow Fuel Pump (FUEL PUMP), Diesel Lift
Pump (DSL LIFT PUMP) — Export
Only
M26 ——
M27 10 Amp Red Ignition Switch Feed, Wireless
Module
M28 10 Amp Red PCM Feed/TCM
M29 ——
M30 15 Amp Blue Wiper Motor Frt, J1962 Diagnostic
Feed
M31 20 Amp Yellow Backup Lamps (B/U LAMPS)
MAINTAINING YOUR VEHICLE
75