automatic transmission JEEP WRANGLER 2011 JK / 3.G User Guide
[x] Cancel search | Manufacturer: JEEP, Model Year: 2011, Model line: WRANGLER, Model: JEEP WRANGLER 2011 JK / 3.GPages: 88, PDF Size: 3.52 MB
Page 51 of 88
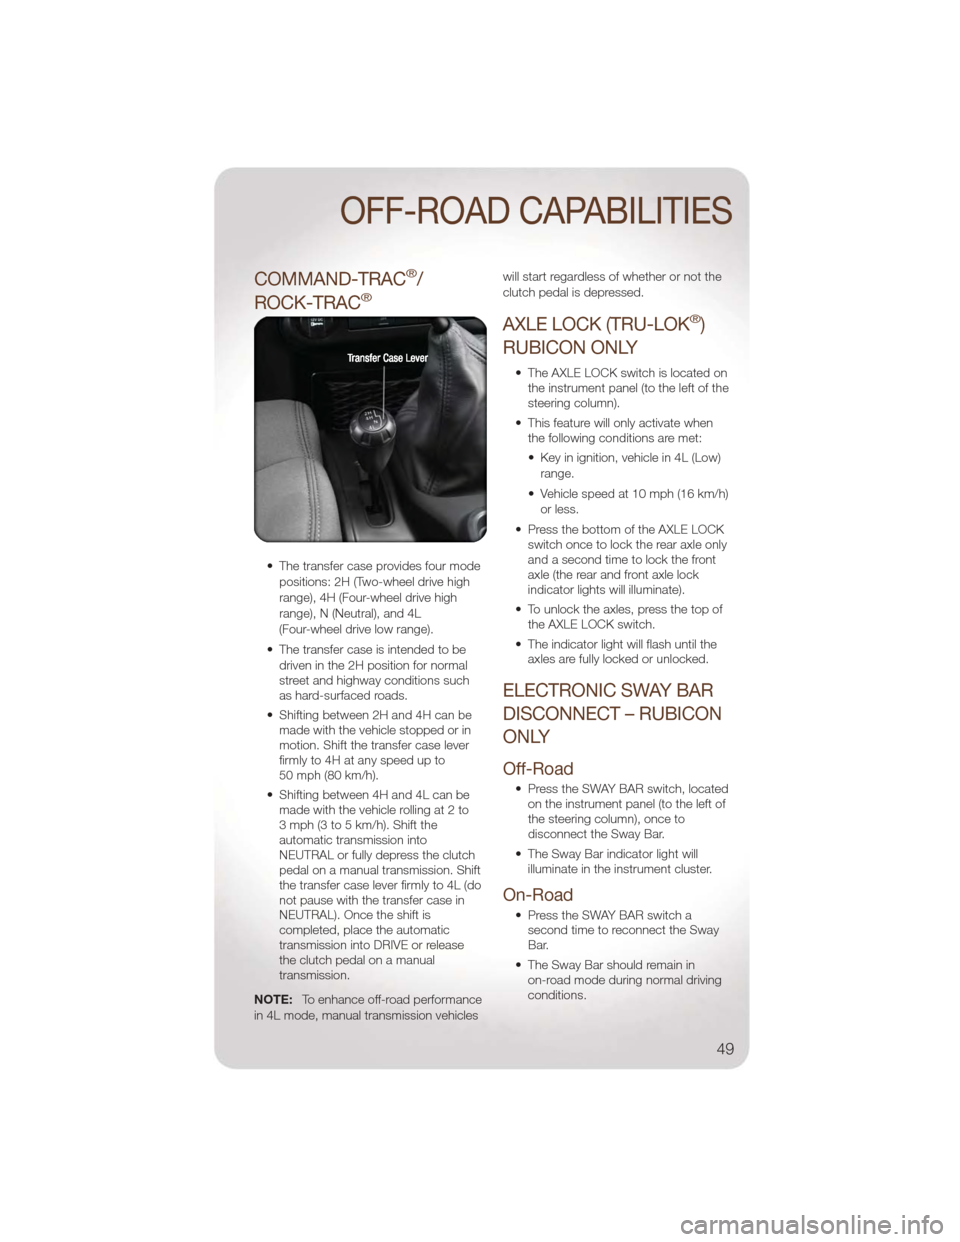
COMMAND-TRAC®/
ROCK-TRAC
®
• The transfer case provides four mode positions: 2H (Two-wheel drive high
range), 4H (Four-wheel drive high
range), N (Neutral), and 4L
(Four-wheel drive low range).
• The transfer case is intended to be driven in the 2H position for normal
street and highway conditions such
as hard-surfaced roads.
• Shifting between 2H and 4H can be made with the vehicle stopped or in
motion. Shift the transfer case lever
firmly to 4H at any speed up to
50 mph (80 km/h).
• Shifting between 4H and 4L can be made with the vehicle rolling at 2 to
3 mph (3 to 5 km/h). Shift the
automatic transmission into
NEUTRAL or fully depress the clutch
pedal on a manual transmission. Shift
the transfer case lever firmly to 4L (do
not pause with the transfer case in
NEUTRAL). Once the shift is
completed, place the automatic
transmission into DRIVE or release
the clutch pedal on a manual
transmission.
NOTE: To enhance off-road performance
in 4L mode, manual transmission vehicles will start regardless of whether or not the
clutch pedal is depressed.
AXLE LOCK (TRU-LOK®)
RUBICON ONLY
• The AXLE LOCK switch is located on the instrument panel (to the left of the
steering column).
• This feature will only activate when the following conditions are met:
• Key in ignition, vehicle in 4L (Low)
range.
• Vehicle speed at 10 mph (16 km/h) or less.
• Press the bottom of the AXLE LOCK switch once to lock the rear axle only
and a second time to lock the front
axle (the rear and front axle lock
indicator lights will illuminate).
• To unlock the axles, press the top of the AXLE LOCK switch.
• The indicator light will flash until the axles are fully locked or unlocked.
ELECTRONIC SWAY BAR
DISCONNECT – RUBICON
ONLY
Off-Road
• Press the SWAY BAR switch, locatedon the instrument panel (to the left of
the steering column), once to
disconnect the Sway Bar.
• The Sway Bar indicator light will illuminate in the instrument cluster.
On-Road
• Press the SWAY BAR switch asecond time to reconnect the Sway
Bar.
• The Sway Bar should remain in on-road mode during normal driving
conditions.
OFF-ROAD CAPABILITIES
49
Page 52 of 88
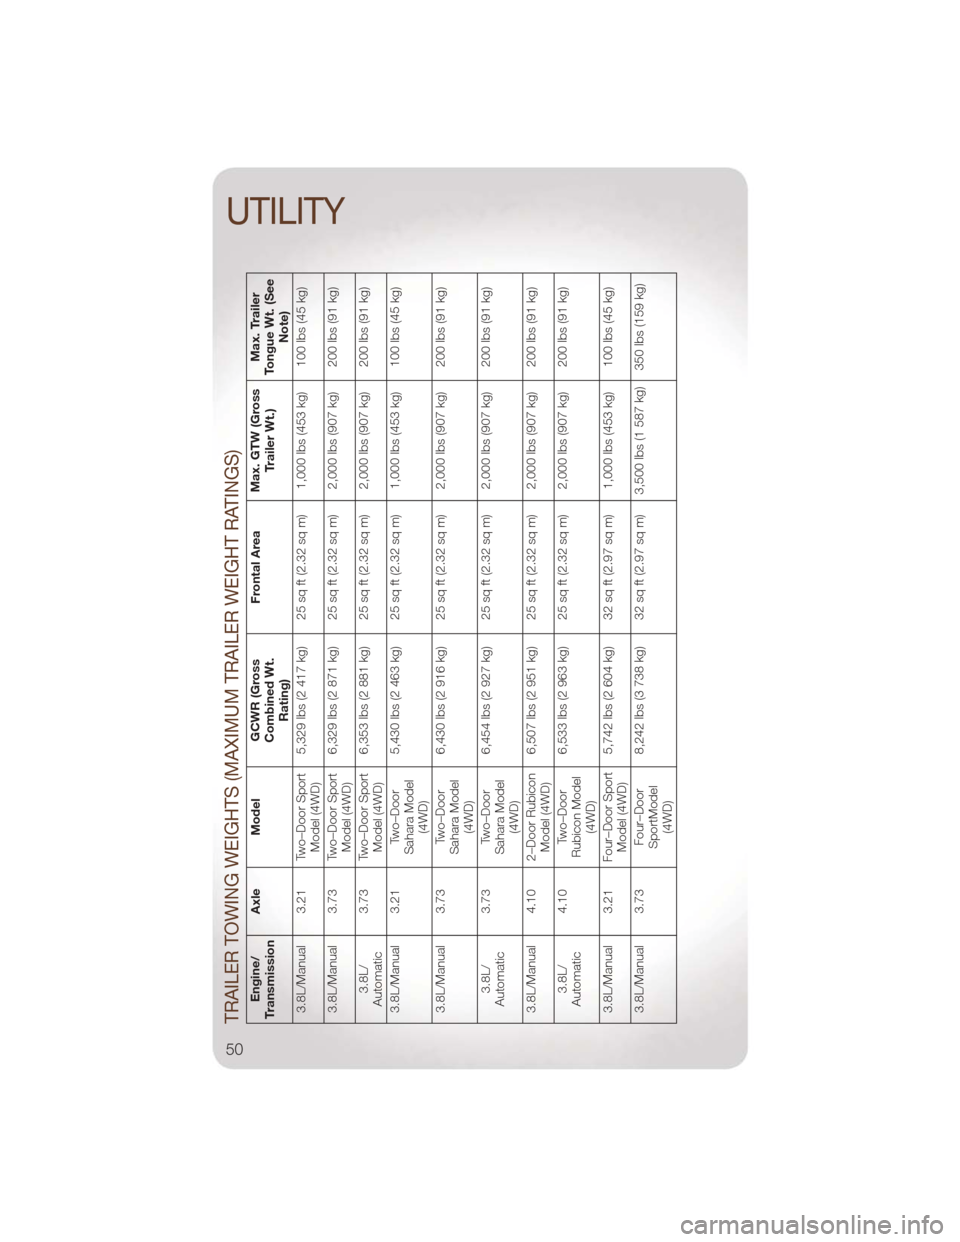
TRAILER TOWING WEIGHTS (MAXIMUM TRAILER WEIGHT RATINGS)
Engine/
Transmission Axle Model
GCWR (Gross
Combined Wt.
Rating) Frontal Area
Max. GTW (Gross
Trailer Wt.) Max. Trailer
Tongue Wt. (See
Note)
3.8L/Manual 3.21 Two–Door Sport Model (4WD)5,329 lbs (2 417 kg) 25 sq ft (2.32 sq m) 1,000 lbs (453 kg) 100 lbs (45 kg)
3.8L/Manual 3.73 Two–Door Sport Model (4WD)6,329 lbs (2 871 kg) 25 sq ft (2.32 sq m) 2,000 lbs (907 kg) 200 lbs (91 kg)
3.8L/
Automatic 3.73 Two–Door Sport
Model (4WD) 6,353 lbs (2 881 kg) 25 sq ft (2.32 sq m) 2,000 lbs (907 kg) 200 lbs (91 kg)
3.8L/Manual 3.21 Two–Door Sahara Model(4WD) 5,430 lbs (2 463 kg) 25 sq ft (2.32 sq m) 1,000 lbs (453 kg) 100 lbs (45 kg)
3.8L/Manual 3.73 Two–Door Sahara Model(4WD) 6,430 lbs (2 916 kg) 25 sq ft (2.32 sq m) 2,000 lbs (907 kg) 200 lbs (91 kg)
3.8L/
Automatic 3.73 Two–Door
Sahara Model(4WD) 6,454 lbs (2 927 kg) 25 sq ft (2.32 sq m) 2,000 lbs (907 kg) 200 lbs (91 kg)
3.8L/Manual 4.10 2–Door Rubicon Model (4WD)6,507 lbs (2 951 kg) 25 sq ft (2.32 sq m) 2,000 lbs (907 kg) 200 lbs (91 kg)
3.8L/
Automatic 4.10 Two–Door
Rubicon Model(4WD) 6,533 lbs (2 963 kg) 25 sq ft (2.32 sq m) 2,000 lbs (907 kg) 200 lbs (91 kg)
3.8L/Manual 3.21 Four–Door Sport Model (4WD)5,742 lbs (2 604 kg) 32 sq ft (2.97 sq m) 1,000 lbs (453 kg) 100 lbs (45 kg)
3.8L/Manual 3.73 Four–Door SportModel(4WD) 8,242 lbs (3 738 kg) 32 sq ft (2.97 sq m) 3,500 lbs (1 587 kg) 350 lbs (159 kg)
UTILITY
50
Page 53 of 88
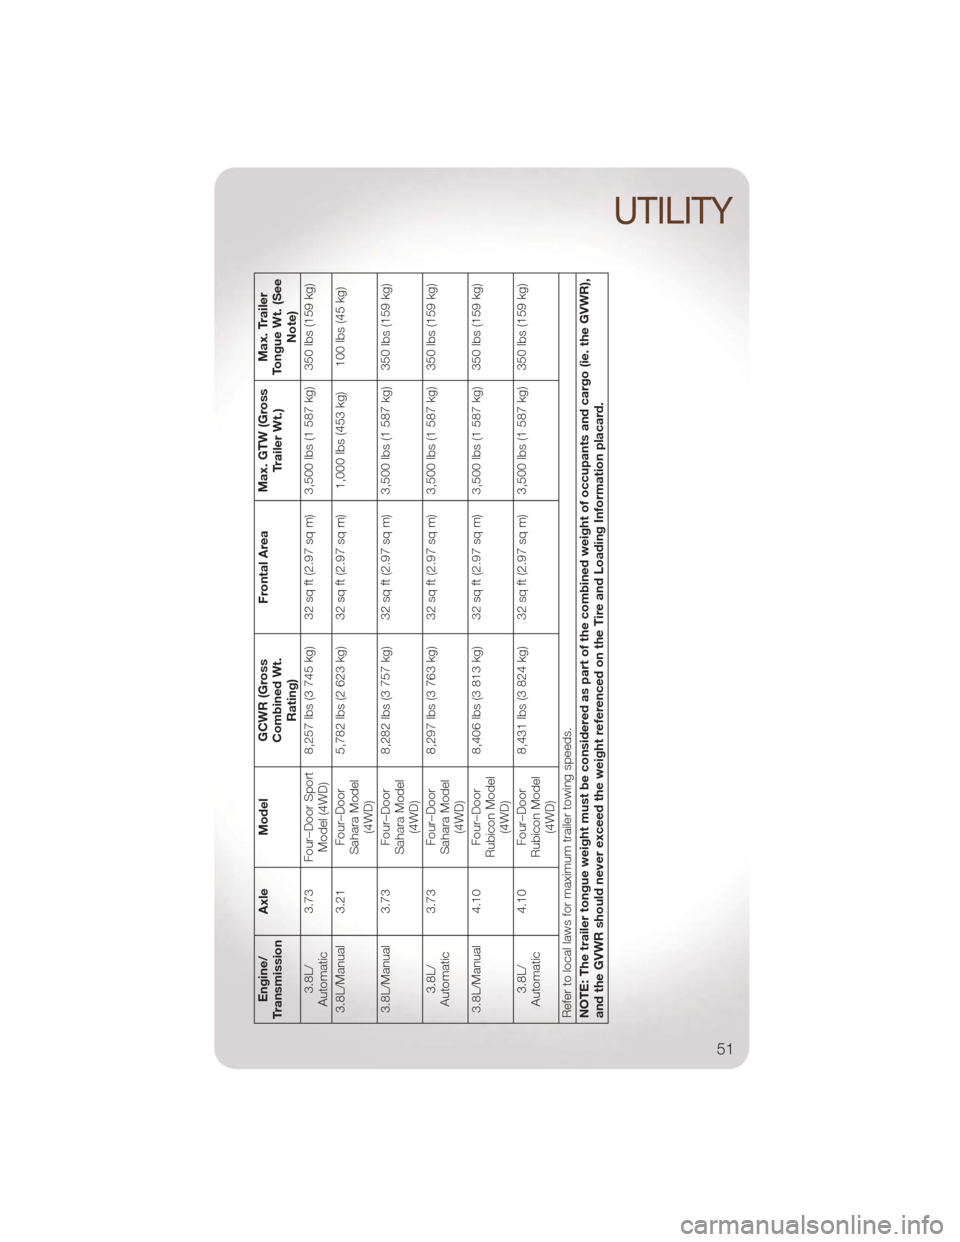
Engine/
Transmission Axle Model
GCWR (Gross
Combined Wt.
Rating) Frontal Area
Max. GTW (Gross
Trailer Wt.) Max. Trailer
Tongue Wt. (See
Note)
3.8L/
Automatic 3.73 Four–Door Sport
Model (4WD) 8,257 lbs (3 745 kg) 32 sq ft (2.97 sq m) 3,500 lbs (1 587 kg) 350 lbs (159 kg)
3.8L/Manual 3.21 Four–Door Sahara Model(4WD) 5,782 lbs (2 623 kg) 32 sq ft (2.97 sq m) 1,000 lbs (453 kg) 100 lbs (45 kg)
3.8L/Manual 3.73 Four–Door Sahara Model(4WD) 8,282 lbs (3 757 kg) 32 sq ft (2.97 sq m) 3,500 lbs (1 587 kg) 350 lbs (159 kg)
3.8L/
Automatic 3.73 Four–Door
Sahara Model(4WD) 8,297 lbs (3 763 kg) 32 sq ft (2.97 sq m) 3,500 lbs (1 587 kg) 350 lbs (159 kg)
3.8L/Manual 4.10 Four–Door Rubicon Model(4WD) 8,406 lbs (3 813 kg) 32 sq ft (2.97 sq m) 3,500 lbs (1 587 kg) 350 lbs (159 kg)
3.8L/
Automatic 4.10 Four–Door
Rubicon Model(4WD) 8,431 lbs (3 824 kg) 32 sq ft (2.97 sq m) 3,500 lbs (1 587 kg) 350 lbs (159 kg)
Refer to local laws for maximum trailer towing speeds.
NOTE: The trailer tongue weight must be considered as part of the combined weight of occupants and cargo (ie. the GVWR),
and the GVWR should never exceed the weight referenced on the Tire and Loading Information placard.
UTILITY
51
Page 54 of 88
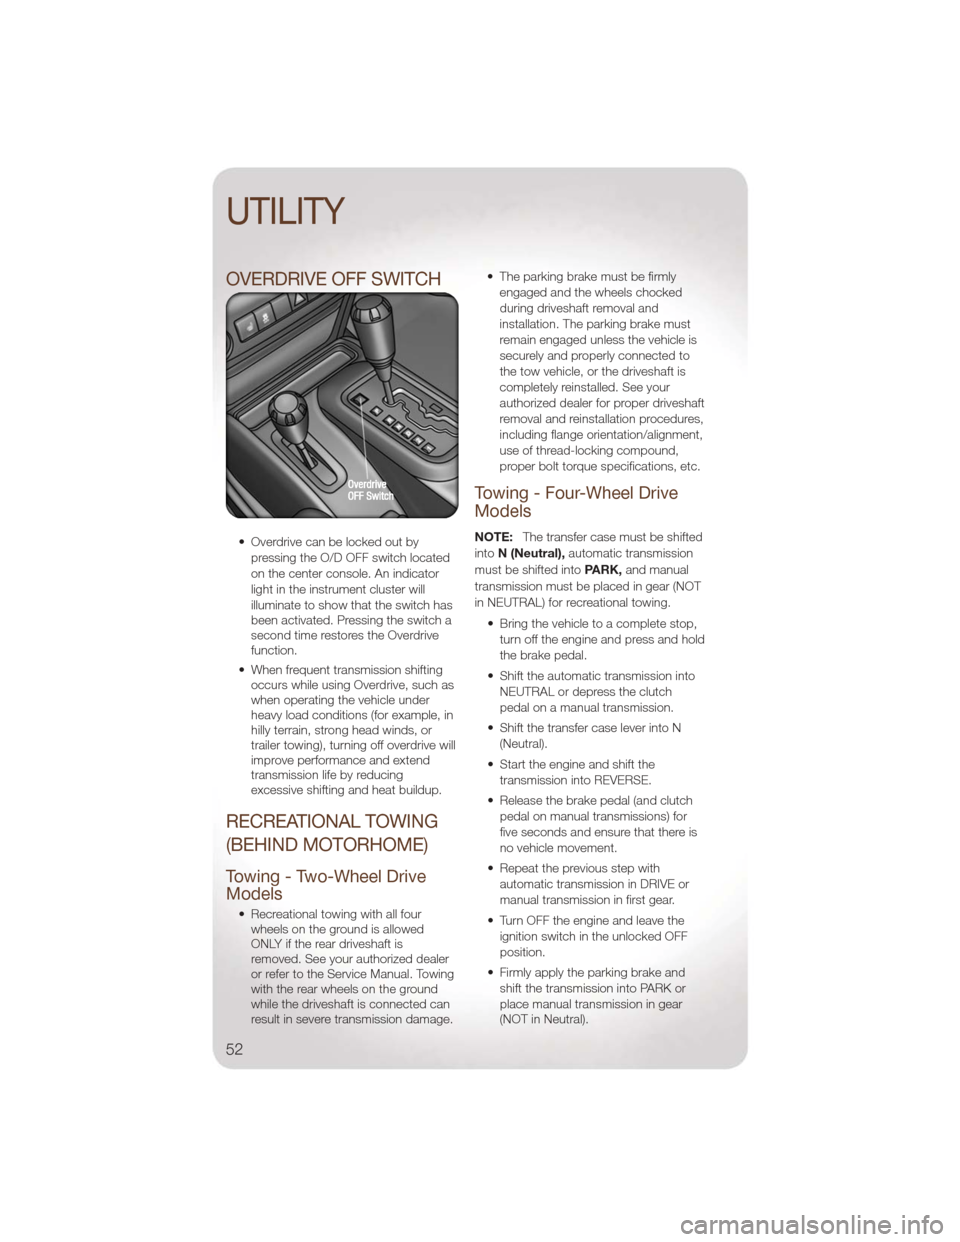
OVERDRIVE OFF SWITCH
• Overdrive can be locked out bypressing the O/D OFF switch located
on the center console. An indicator
light in the instrument cluster will
illuminate to show that the switch has
been activated. Pressing the switch a
second time restores the Overdrive
function.
• When frequent transmission shifting occurs while using Overdrive, such as
when operating the vehicle under
heavy load conditions (for example, in
hilly terrain, strong head winds, or
trailer towing), turning off overdrive will
improve performance and extend
transmission life by reducing
excessive shifting and heat buildup.
RECREATIONAL TOWING
(BEHIND MOTORHOME)
Towing - Two-Wheel Drive
Models
• Recreational towing with all fourwheels on the ground is allowed
ONLY if the rear driveshaft is
removed. See your authorized dealer
or refer to the Service Manual. Towing
with the rear wheels on the ground
while the driveshaft is connected can
result in severe transmission damage. • The parking brake must be firmly
engaged and the wheels chocked
during driveshaft removal and
installation. The parking brake must
remain engaged unless the vehicle is
securely and properly connected to
the tow vehicle, or the driveshaft is
completely reinstalled. See your
authorized dealer for proper driveshaft
removal and reinstallation procedures,
including flange orientation/alignment,
use of thread-locking compound,
proper bolt torque specifications, etc.
Towing - Four-Wheel Drive
Models
NOTE: The transfer case must be shifted
into N (Neutral), automatic transmission
must be shifted into PARK,and manual
transmission must be placed in gear (NOT
in NEUTRAL) for recreational towing.
• Bring the vehicle to a complete stop,turn off the engine and press and hold
the brake pedal.
• Shift the automatic transmission into NEUTRAL or depress the clutch
pedal on a manual transmission.
• Shift the transfer case lever into N (Neutral).
• Start the engine and shift the transmission into REVERSE.
• Release the brake pedal (and clutch pedal on manual transmissions) for
five seconds and ensure that there is
no vehicle movement.
• Repeat the previous step with automatic transmission in DRIVE or
manual transmission in first gear.
• Turn OFF the engine and leave the ignition switch in the unlocked OFF
position.
• Firmly apply the parking brake and shift the transmission into PARK or
place manual transmission in gear
(NOT in Neutral).
UTILITY
52
Page 55 of 88
• Attach the vehicle to the tow vehicleusing a suitable tow bar and release
the parking brake.
• Disconnect the negative battery cable, and secure it away from the
negative battery post.
• Refer to your Owner's Manual on the DVD for further details.
CAUTION!
• Front or rear wheel lifts should notbe used. Internal damage to the
transmission or transfer case will
occur if a front or rear wheel lift is
used when recreational towing.
• Tow only in the forward direction. Towing this vehicle backwards can
cause severe damage to the
transfer case.
• Automatic transmissions must be placed in the PARK position for
recreational towing.
• Manual transmissions must be placed in gear (not in Neutral) for
recreational towing.
• Before recreational towing, perform the procedure outlined under
“Shifting Into NEUTRAL” to be
certain that the transfer case is
fully in NEUTRAL. Otherwise,
internal damage will result.
(Continued)
CAUTION!(Continued)
• Towing this vehicle in violation ofthe above requirements can cause
severe transmission and/or transfer
case damage. Damage from
improper towing is not covered
under the New Vehicle Limited
Warranty.
• Do not use a bumper-mounted clamp-on tow bar on your vehicle.
The bumper face bar will be
damaged.
• It is necessary to follow these steps to be certain that the transfer
case is fully in N (Neutral) before
recreational towing to prevent
damage to internal parts.
WARNING!
• You or others could be injured ifyou leave the vehicle unattended
with the transfer case in the N
(Neutral) position without first fully
engaging the parking brake. The
transfer case N (Neutral) position
disengages both the front and rear
driveshafts from the powertrain
and will allow the vehicle to move,
even if the transmission is in PARK.
The parking brake should always
be applied when the driver is not in
the vehicle.
UTILITY
53
Page 61 of 88
WARNING!
You or others can be badly burned by hot engine coolant (antifreeze) or steam
from your radiator. If you see or hear steam coming from under the hood, do not
open the hood until the radiator has had time to cool. Never try to open a cooling
system pressure cap when the radiator or coolant bottle is hot.
JACKING AND TIRE CHANGING
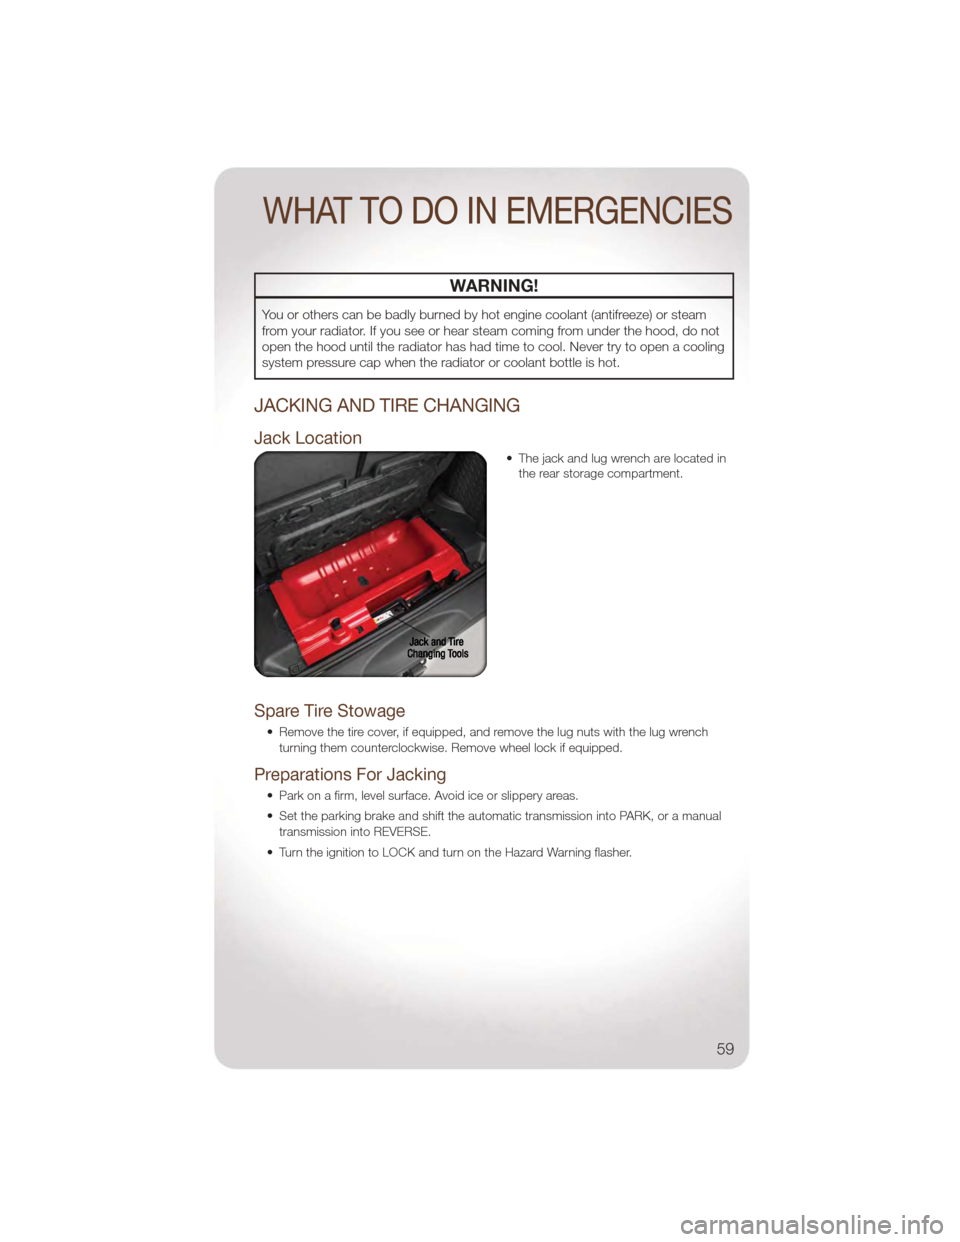
Jack Location
• The jack and lug wrench are located inthe rear storage compartment.
Spare Tire Stowage
• Remove the tire cover, if equipped, and remove the lug nuts with the lug wrench
turning them counterclockwise. Remove wheel lock if equipped.
Preparations For Jacking
• Park on a firm, level surface. Avoid ice or slippery areas.
• Set the parking brake and shift the automatic transmission into PARK, or a manualtransmission into REVERSE.
• Turn the ignition to LOCK and turn on the Hazard Warning flasher.
WHAT TO DO IN EMERGENCIES
59
Page 64 of 88
JUMP-STARTING
• If your vehicle has a discharged battery it can be jump-started using a set of jumpercables and a battery in another vehicle or by using a portable battery booster pack.
• Jump-starting can be dangerous if done improperly so please follow the procedures in this section carefully.
NOTE: When using a portable battery booster pack follow the manufacturer’s operating
instructions and precautions.
Preparations for Jump-Start
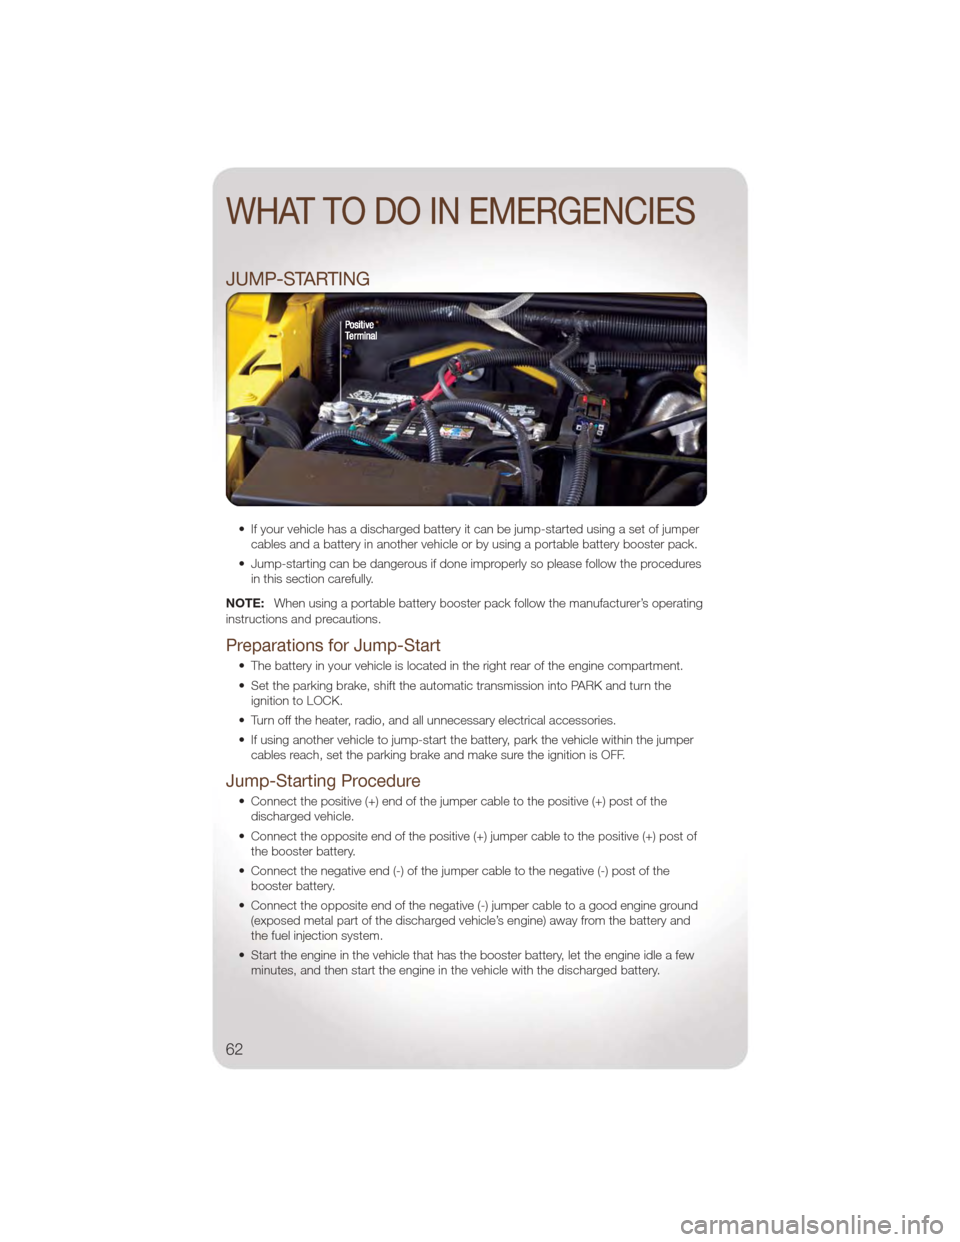
• The battery in your vehicle is located in the right rear of the engine compartment.
• Set the parking brake, shift the automatic transmission into PARK and turn the ignition to LOCK.
• Turn off the heater, radio, and all unnecessary electrical accessories.
• If using another vehicle to jump-start the battery, park the vehicle within the jumper cables reach, set the parking brake and make sure the ignition is OFF.
Jump-Starting Procedure
• Connect the positive (+) end of the jumper cable to the positive (+) post of thedischarged vehicle.
• Connect the opposite end of the positive (+) jumper cable to the positive (+) post of the booster battery.
• Connect the negative end (-) of the jumper cable to the negative (-) post of the booster battery.
• Connect the opposite end of the negative (-) jumper cable to a good engine ground (exposed metal part of the discharged vehicle’s engine) away from the battery and
the fuel injection system.
• Start the engine in the vehicle that has the booster battery, let the engine idle a few minutes, and then start the engine in the vehicle with the discharged battery.
WHAT TO DO IN EMERGENCIES
62
Page 71 of 88
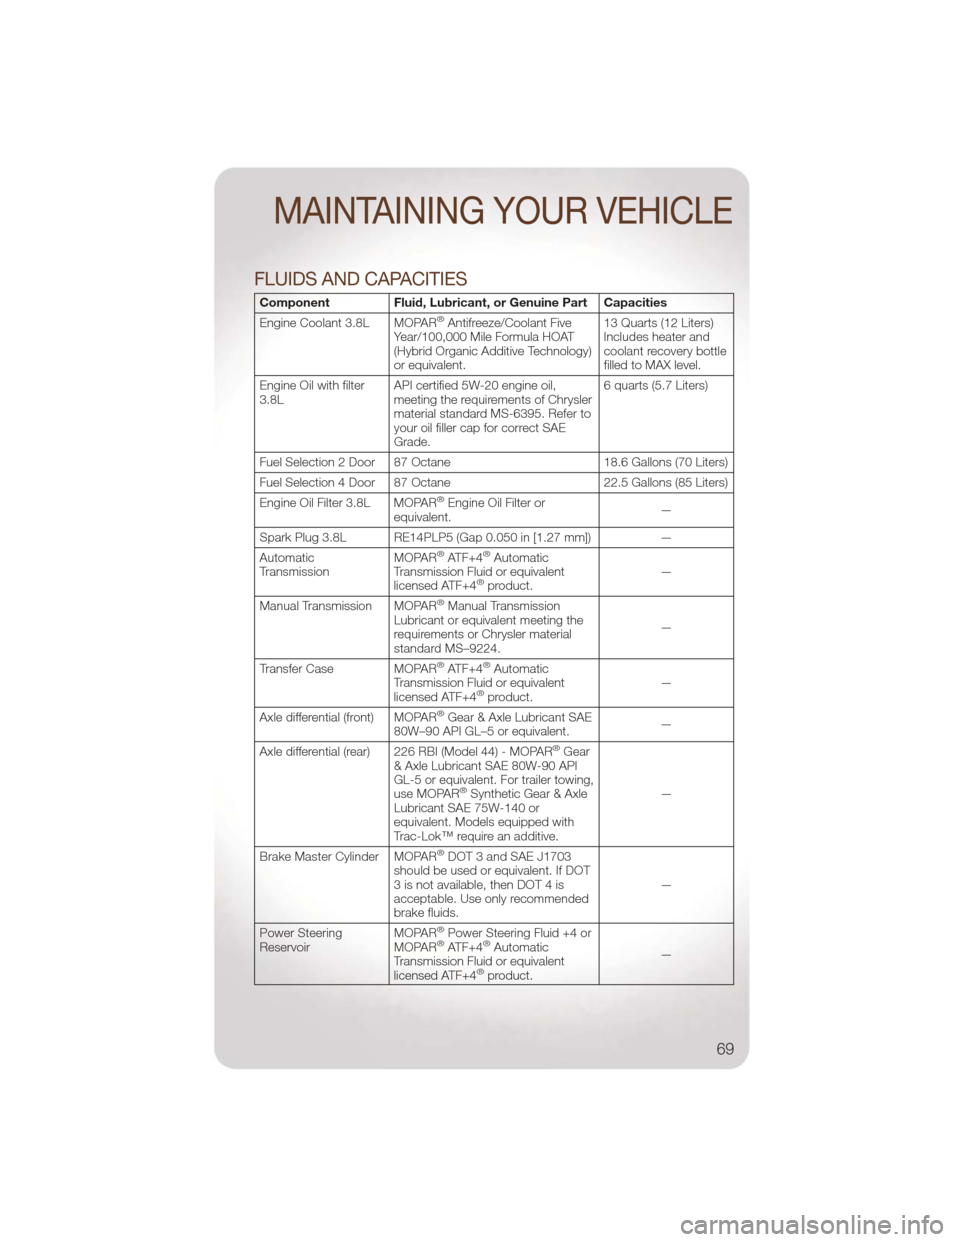
FLUIDS AND CAPACITIES
ComponentFluid, Lubricant, or Genuine Part Capacities
Engine Coolant 3.8L MOPAR®Antifreeze/Coolant Five
Year/100,000 Mile Formula HOAT
(Hybrid Organic Additive Technology)
or equivalent. 13 Quarts (12 Liters)
Includes heater and
coolant recovery bottle
filled to MAX level.
Engine Oil with filter
3.8L API certified 5W-20 engine oil,
meeting the requirements of Chrysler
material standard MS-6395. Refer to
your oil filler cap for correct SAE
Grade. 6 quarts (5.7 Liters)
Fuel Selection 2 Door 87 Octane 18.6 Gallons (70 Liters)
Fuel Selection 4 Door 87 Octane 22.5 Gallons (85 Liters)
Engine Oil Filter 3.8L MOPAR
®Engine Oil Filter or
equivalent. —
Spark Plug 3.8L RE14PLP5 (Gap 0.050 in [1.27 mm]) —
Automatic
Transmission MOPAR
®ATF+4®Automatic
Transmission Fluid or equivalent
licensed ATF+4
®product. —
Manual Transmission MOPAR®Manual Transmission
Lubricant or equivalent meeting the
requirements or Chrysler material
standard MS–9224. —
Transfer Case MOPAR
®ATF+4®Automatic
Transmission Fluid or equivalent
licensed ATF+4
®product. —
Axle differential (front) MOPAR®Gear & Axle Lubricant SAE
80W–90 API GL–5 or equivalent. —
Axle differential (rear) 226 RBI (Model 44) - MOPAR
®Gear
& Axle Lubricant SAE 80W-90 API
GL-5 or equivalent. For trailer towing,
use MOPAR
®Synthetic Gear & Axle
Lubricant SAE 75W-140 or
equivalent. Models equipped with
Trac-Lok™ require an additive. —
Brake Master Cylinder MOPAR
®DOT 3 and SAE J1703
should be used or equivalent. If DOT
3 is not available, then DOT 4 is
acceptable. Use only recommended
brake fluids. —
Power Steering
Reservoir MOPAR
®Power Steering Fluid +4 or
MOPAR®ATF+4®Automatic
Transmission Fluid or equivalent
licensed ATF+4
®product. —
MAINTAINING YOUR VEHICLE
69
Page 72 of 88
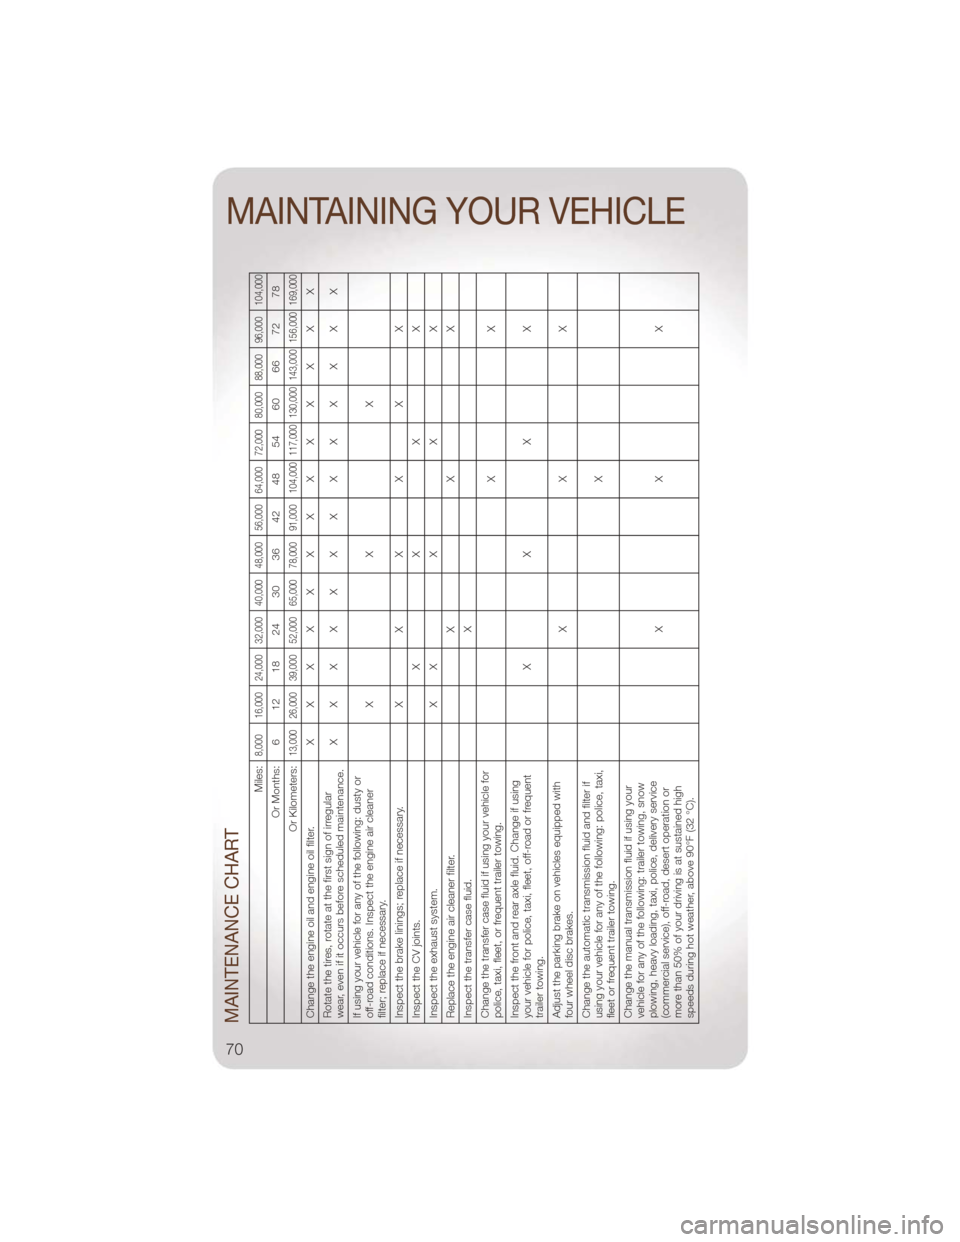
MAINTENANCE CHART
Miles:
8,000 16,000 24,000 32,000 40,000 48,000 56,000 64,000 72,000 80,000 88,000 96,000 104,000
Or Months: 6 12 18 24 30 36 42 48 54 60 66 72 78
Or Kilometers:
13,000 26,000 39,000 52,000 65,000 78,000 91,000 104,000 117,000 130,000 143,000 156,000 169,000
Change the engine oil and engine oil filter. XXXXXXXXXXXXX
Rotate the tires, rotate at the first sign of irregular
wear, even if it occurs before scheduled maintenance. XXXXXXXXXXXXX
If using your vehicle for any of the following: dusty or
off-road conditions. Inspect the engine air cleaner
filter; replace if necessary. XXX
Inspect the brake linings; replace if necessary. X X X X X X
Inspect the CV joints. XXXX
Inspect the exhaust system. X XXXX
Replace the engine air cleaner filter. X X X
Inspect the transfer case fluid. X
Change the transfer case fluid if using your vehicle for
police, taxi, fleet, or frequent trailer towing. XX
Inspect the front and rear axle fluid. Change if using
your vehicle for police, taxi, fleet, off-road or frequent
trailer towing. XXXX
Adjust the parking brake on vehicles equipped with
four wheel disc brakes. XXX
Change the automatic transmission fluid and filter if
using your vehicle for any of the following: police, taxi,
fleet or frequent trailer towing. X
Change the manual transmission fluid if using your
vehicle for any of the following: trailer towing, snow
plowing, heavy loading, taxi, police, delivery service
(commercial service), off-road, desert operation or
more than 50% of your driving is at sustained high
speeds during hot weather, above 90°F (32 °C). XXX
MAINTAINING YOUR VEHICLE
70
Page 83 of 88
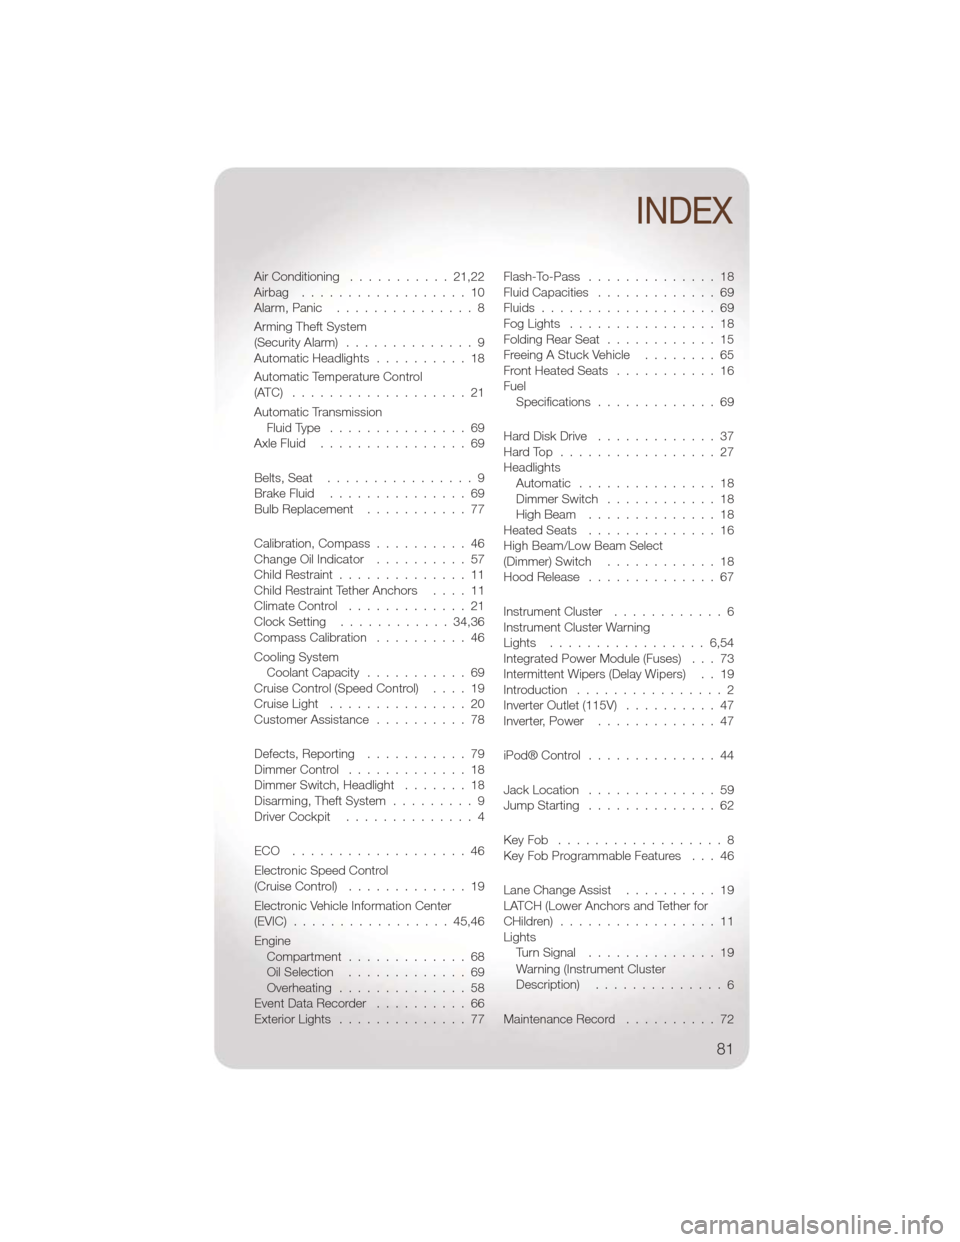
Air Conditioning...........21,22
Airbag ..................10
Alarm,Panic ...............8
Arming Theft System
(Security Alarm) ..............9
AutomaticHeadlights ..........18
Automatic Temperature Control
(ATC) ...................21
Automatic Transmission FluidType ...............69
AxleFluid ................69
Belts, Seat ................9
BrakeFluid ...............69
Bulb Replacement ...........77
Calibration, Compass ..........46
Change Oil Indicator ..........57
Child Restraint ..............11
Child Restraint Tether Anchors ....11
Climate Control .............21
Clock Setting ............34,36
Compass Calibration ..........46
Cooling System Coolant Capacity ...........69
Cruise Control (Speed Control) ....19
CruiseLight ...............20
Customer Assistance ..........78
Defects, Reporting ...........79
Dimmer Control .............18
Dimmer Switch, Headlight .......18
Disarming, Theft System .........9
Driver Cockpit ..............4
ECO ...................46
Electronic Speed Control
(Cruise Control) .............19
Electronic Vehicle Information Center
(EVIC) .................45,46
Engine Compartment .............68
OilSelection .............69
Overheating ..............58
Event Data Recorder ..........66
ExteriorLights ..............77 Flash-To-Pass ..............18
Fluid Capacities
.............69
Fluids ...................69
FogLights ................18
Folding Rear Seat ............15
Freeing A Stuck Vehicle ........65
Front Heated Seats ...........16
Fuel Specifications .............69
Hard Disk Drive .............37
HardTop .................27
Headlights Automatic ...............18
Dimmer Switch ............18
High Beam ..............18
HeatedSeats ..............16
High Beam/Low Beam Select
(Dimmer)Switch ............18
Hood Release ..............67
Instrument Cluster ............6
Instrument Cluster Warning
Lights .................6,54
Integrated Power Module (Fuses) . . . 73
Intermittent Wipers (Delay Wipers) . . 19
Introduction ................2
Inverter Outlet (115V) ..........47
Inverter, Power .............47
iPod® Control ..............44
Jack Location ..............59
Jump Starting ..............62
KeyFob ..................8
Key Fob Programmable Features . . . 46
Lane Change Assist ..........19
LATCH (Lower Anchors and Tether for
CHildren) .................11
Lights TurnSignal ..............19
Warning (Instrument Cluster
Description) ..............
6
Maintenance Record ..........72
INDEX
81