light JEEP WRANGLER 2011 JK / 3.G User Guide
[x] Cancel search | Manufacturer: JEEP, Model Year: 2011, Model line: WRANGLER, Model: JEEP WRANGLER 2011 JK / 3.GPages: 88, PDF Size: 3.52 MB
Page 3 of 88
INTRODUCTION/WELCOME
Welcome From Chrysler Group LLC....2
CONTROLS AT A GLANCE
Driver Cockpit................4
Instrument Cluster .............6
GETTING STARTED
KeyFOB ..................8
Remote Start................8
Theft Alarm .................9
Seat Belt ..................9
Supplemental Restraint System (SRS) —
Airbags .................. 10
Child Restraints .............. 11
Front Seats ................ 13
Rear Seats ................ 15
Tilt Steering Column ........... 16
Heated Seats ............... 16
OPERATING YOUR VEHICLETurn Signal/Lights Lever ......... 18
Wiper/Washer Lever ........... 19
Speed Control .............. 19
Manual Climate Controls ......... 21
Automatic Temperature Controls (ATC) . . 21
Soft Top And Sunrider
®.......... 23
Hard Top And Freedom Top®....... 27
Wind Buffeting .............. 29
ELECTRONICSYour Vehicle's Sound System ...... 30
Non-Touch-Screen Radios ........ 32
Touch-Screen Radio ........... 35
Steering Wheel Audio Controls ...... 41
Uconnect™ Phone ............ 41
Uconnect™ Voice Command ...... 43
iPod
®/USB/MP3 Control ......... 44
Electronic Vehicle Information Center
(EVIC) ................... 45
Programmable Features ......... 46
Power Inverter .............. 47
Power Outlets ............... 48
OFF-ROAD CAPABILITIESCommand-Trac®/Rock-Trac®...... 49 Axle Lock (Tru-Lok
®) Rubicon Only
.... 49
Electronic Sway Bar Disconnect –
Rubicon Only ............... 49
UTILITYTrailer Towing Weights (Maximum Trailer
Weight Ratings) .............. 50
Overdrive Off Switch ........... 52
Recreational Towing (Behind
Motorhome) ................ 52
WHAT TO DO IN EMERGENCIES24-Hour Towing Assistance ....... 54
Instrument Cluster Warning Lights .... 54
If Your Engine Overheats ......... 58
Jacking And Tire Changing ........ 59
Jump-Starting .............. 62
Emergency Tow Hooks .......... 64
Shift Lever Override ............ 64
Towing A Disabled Vehicle ........ 65
Freeing A Stuck Vehicle .......... 65
Event Data Recorder (EDR) ........ 66
MAINTAINING YOUR VEHICLEOpening The Hood............ 67
Engine Compartment ........... 68
Fluids And Capacities ........... 69
Maintenance Chart ............ 70
Fuses ................... 73
Tire Pressures ............... 76
Wheel And Wheel Trim Care ....... 77
Exterior Bulbs ............... 77
CONSUMER ASSISTANCEChrysler Group LLC Customer Center . . 78
Chrysler Canada Inc. Customer
Center................... 78
Assistance For The Hearing Impaired . . 78
Publications Ordering ........... 78
Reporting Safety Defects In The
50 United States And
Washington, D.C. ............. 79
MOPAR ACCESSORIESAuthentic Accessories By MOPAR®... 80
INDEX.................. 81
TABLE OF CONTENTS
Page 8 of 88
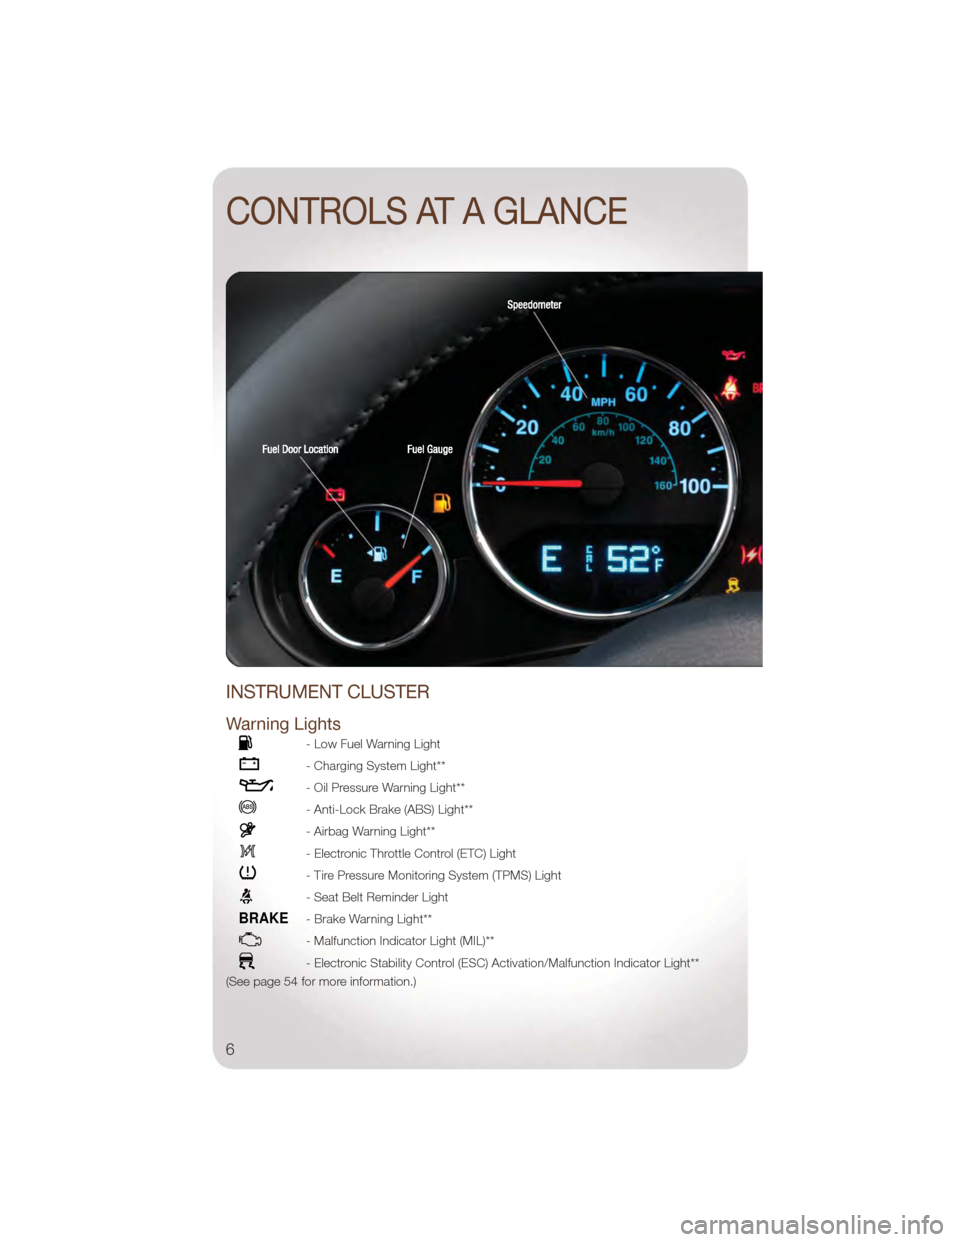
INSTRUMENT CLUSTER
Warning Lights
- Low Fuel Warning Light
- Charging System Light**
- Oil Pressure Warning Light**
- Anti-Lock Brake (ABS) Light**
- Airbag Warning Light**
- Electronic Throttle Control (ETC) Light
- Tire Pressure Monitoring System (TPMS) Light
- Seat Belt Reminder Light
BRAKE- Brake Warning Light**
- Malfunction Indicator Light (MIL)**
- Electronic Stability Control (ESC) Activation/Malfunction Indicator Light**
(See page 54 for more information.)
CONTROLS AT A GLANCE
6
Page 9 of 88
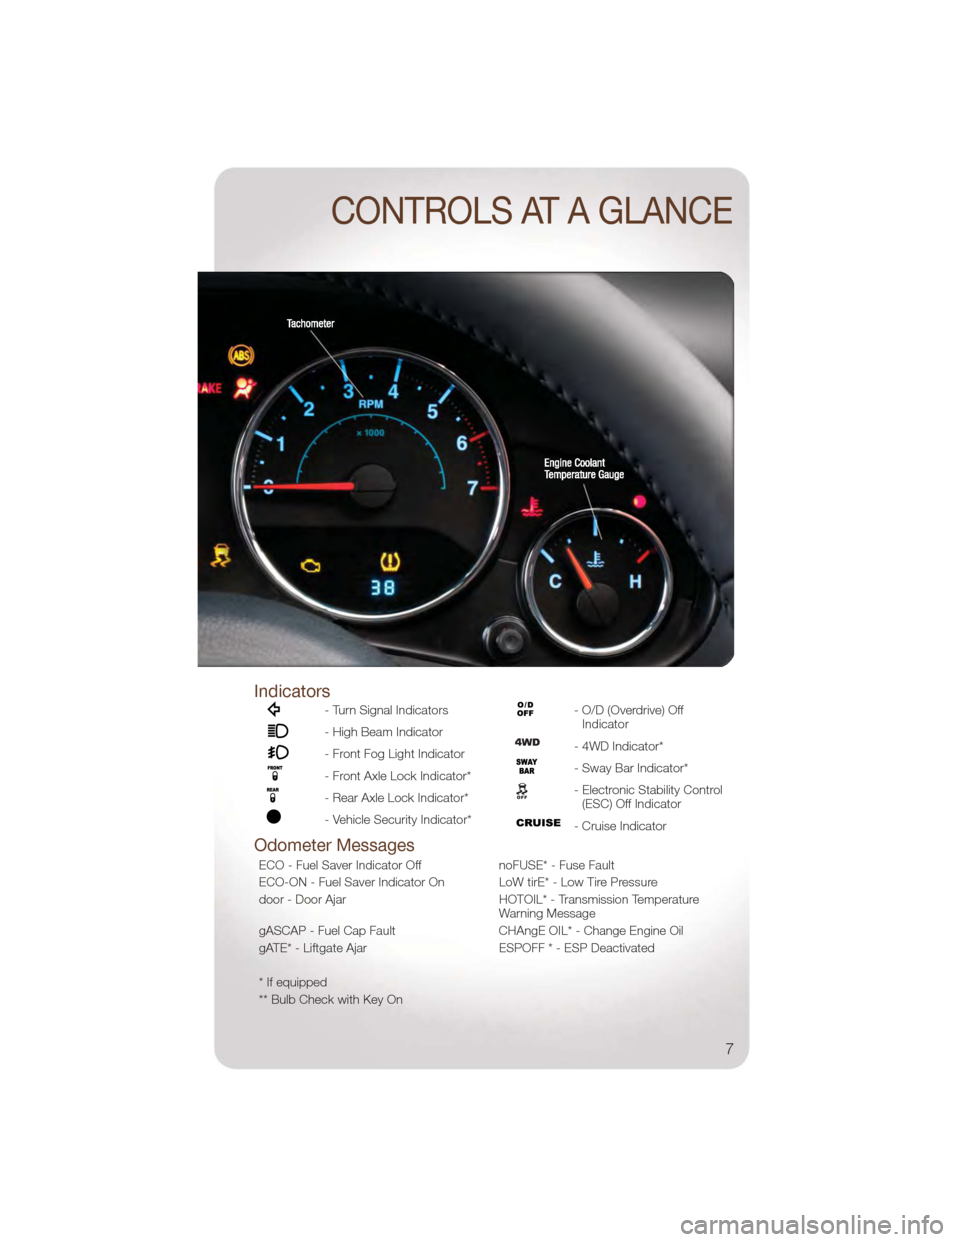
Indicators
- Turn Signal Indicators
- High Beam Indicator
- Front Fog Light Indicator
- Front Axle Lock Indicator*
- Rear Axle Lock Indicator*
- Vehicle Security Indicator*
- O/D (Overdrive) OffIndicator
- 4WD Indicator*
- Sway Bar Indicator*
- Electronic Stability Control(ESC) Off Indicator
- Cruise Indicator
Odometer Messages
ECO - Fuel Saver Indicator Off noFUSE* - Fuse Fault
ECO-ON - Fuel Saver Indicator On LoW tirE* - Low Tire Pressure
door - Door Ajar HOTOIL* - Transmission Temperature
Warning Message
gASCAP - Fuel Cap Fault CHAngE OIL* - Change Engine Oil
gATE* - Liftgate Ajar ESPOFF * - ESP Deactivated
* If equipped
** Bulb Check with Key On
CONTROLS AT A GLANCE
7
Page 12 of 88
WARNING!
In a collision, you and your passengers can suffer much greater injuries if you are
not buckled up properly. You can strike the interior of your vehicle or other
passengers, or you can be thrown out of the vehicle. Always be sure you and
others in your vehicle are buckled up properly.
SUPPLEMENTAL RESTRAINT SYSTEM (SRS) — AIRBAGS
• This vehicle has Advanced Front Airbags for both the driver and right frontpassenger as a supplement to the seat belt restraint system. The Advanced Front
Airbags will not deploy in every type of collision.
• Advanced Front Airbags are designed to provide additional protection by supplementing the seat belts in certain frontal collisions depending on the severity
and type of collision. Advanced Front Airbags are not expected to reduce the risk of
injury in rear, side, or rollover collisions.
• This vehicle may be equipped with Supplemental Seat-Mounted Side Airbags to provide enhanced protection to help protect an occupant during a side impact.
• If the Airbag Warning Light
is not on during starting, stays on, or turns on while
driving, have the vehicle serviced by an authorized service center immediately.
• Refer to the Owner's Manual on the DVD for further details regarding the Supplemental Restraint System (SRS).
WARNING!
• Relying on the airbags alone could lead to more severe injuries in a collision.The airbags work with your seat belt to restrain you properly. In some
collisions, the airbags won't deploy at all. Always wear your seat belts even
though you have airbags.
• Being too close to the steering wheel or instrument panel during Advanced Front Airbag deployment could cause serious injury, including death. Airbags
need room to inflate. Sit back, comfortably extending your arms to reach the
steering wheel or instrument panel.
• Supplemental Seat-Mounted Side Airbags need room to inflate. Do not lean against the door or window. Sit upright in the center of the seat.
• Being too close to the Seat-Mounted Side Airbag during deployment could cause you to be severely injured or killed.
• Do not drive your vehicle after the airbags have deployed. If you are involved in another collision, the airbags will not be in place to protect you.
• After any collision, the vehicle should be taken to an authorized dealer immediately.
GETTING STARTED
10
Page 20 of 88
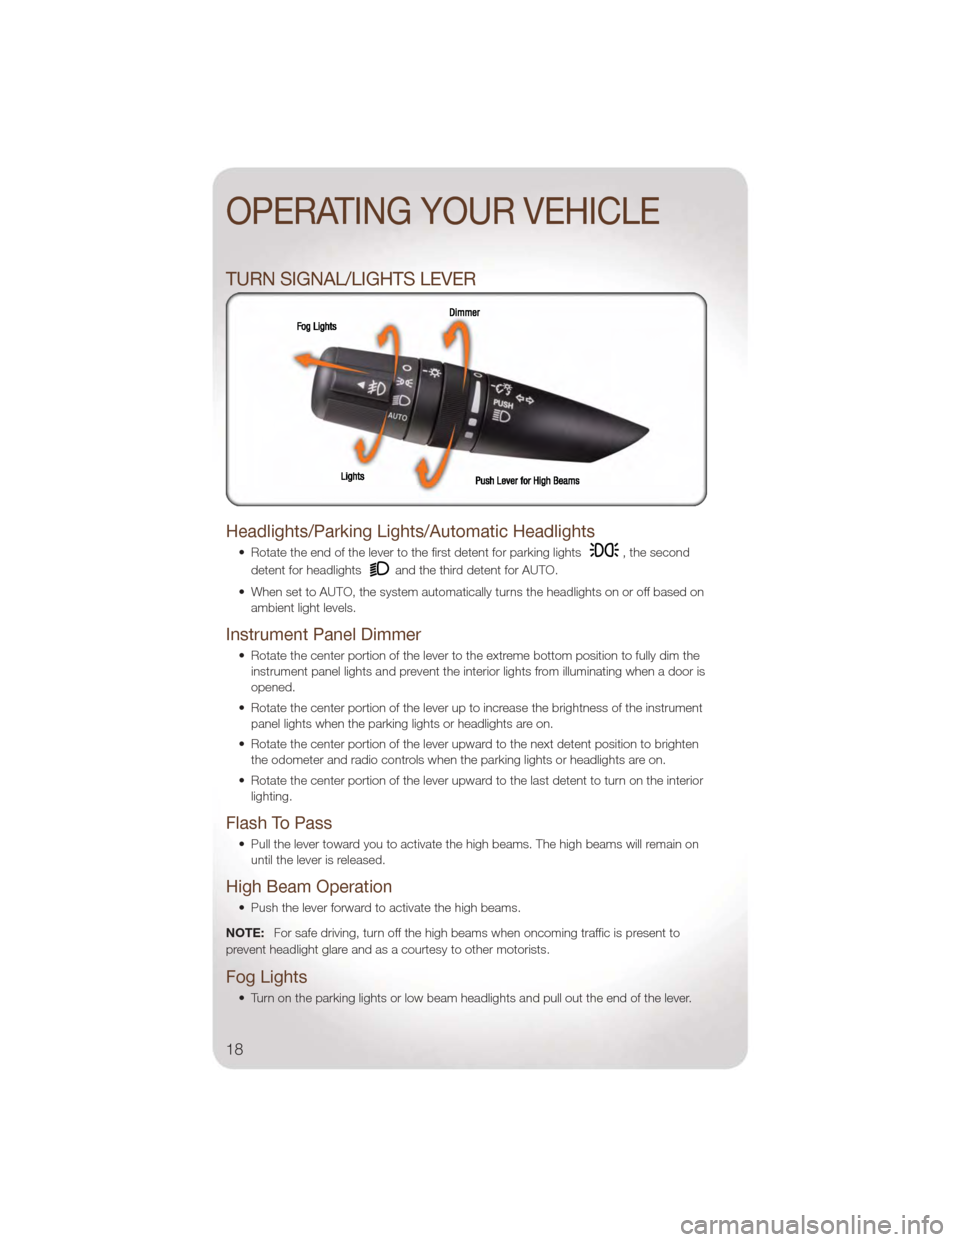
TURN SIGNAL/LIGHTS LEVER
Headlights/Parking Lights/Automatic Headlights
• Rotate the end of the lever to the first detent for parking lights, the second
detent for headlights
and the third detent for AUTO.
• When set to AUTO, the system automatically turns the headlights on or off based on ambient light levels.
Instrument Panel Dimmer
• Rotate the center portion of the lever to the extreme bottom position to fully dim theinstrument panel lights and prevent the interior lights from illuminating when a door is
opened.
• Rotate the center portion of the lever up to increase the brightness of the instrument panel lights when the parking lights or headlights are on.
• Rotate the center portion of the lever upward to the next detent position to brighten the odometer and radio controls when the parking lights or headlights are on.
• Rotate the center portion of the lever upward to the last detent to turn on the interior lighting.
Flash To Pass
• Pull the lever toward you to activate the high beams. The high beams will remain onuntil the lever is released.
High Beam Operation
• Push the lever forward to activate the high beams.
NOTE: For safe driving, turn off the high beams when oncoming traffic is present to
prevent headlight glare and as a courtesy to other motorists.
Fog Lights
• Turn on the parking lights or low beam headlights and pull out the end of the lever.
OPERATING YOUR VEHICLE
18
Page 24 of 88
Air Conditioning (A/C)
• If the air conditioning button is pressed while in the AUTO mode, the indicator lightmay flash three times to indicate the cabin air is being controlled automatically.
Air Recirculation
• Use recirculation for maximum A/C operation.
• For window defogging, turn the air recirculation button off.
• If the recirculation button is pressed while in the AUTO mode, the indicator light mayflash three times to indicate the cabin air is being controlled automatically.
OPERATING YOUR VEHICLE
22
Page 48 of 88
• Press and release the SELECTbutton for access to main menus, sub menus or
to select a personal setting in the setup menu.
• Press and release the COMPASS
button to display one of eight compass
readings and the outside temperature or to exit sub menus.
• Press and release the DOWN
button to scroll downward through the sub
menus.
Compass Calibration
• This compass is self-calibrating, which eliminates the need to set the compass manually. When the vehicle is new, the compass may appear erratic and the EVIC
will display “CAL” until the compass is calibrated.
• You may also calibrate the compass by completing one or more 360 degree turns (in an area free from large metal or metallic objects) until the “CAL” message displayed
in the EVIC turns off. The compass will now function normally.
ECO
• The ECO message will appear in your EVIC display whenever you are driving in a fuelefficient manner.
• This feature allows you to monitor when you are driving in a fuel efficient manner, and it can be used to modify driving habits in order to increase fuel economy.
PROGRAMMABLE FEATURES
Electronic Vehicle Information Center (EVIC) – If Equipped
• The EVIC can be used to program the following Personal Settings. Press and releasethe MENU buttonuntil Personal Settings displays, then press the DOWN
button
to scroll through the settings. Press the SELECT buttonto change
the setting.
• Language • Headlamp Off Delay
• Auto Door Locks • Key-Off Power Delay
• Auto UNLK On Exit • Illumination Approach
• RKE Unlock • Display Units of Measure In
• Sound Horn With RKE Lock • Hill Start Assist (HSA) — If Equipped
• Flash Lights with Remote Key Lock • Display Fuel Saver — If Equipped
Key Fob Programmable Features
• The following features may also be programmed by using the Key Fob transmitter or the ignition switch and driver's door lock switch.
NOTE: Pressing the LOCK button while you are inside the vehicle will activate the
Vehicle Security Alarm. Opening a door with the Vehicle Security Alarm activated will
cause the alarm to sound. Press the UNLOCK button to deactivate the Vehicle Security
Alarm.
ELECTRONICS
46
Page 49 of 88
Flashing Lights With Lock• The turn signal lights flashing, when the doors are locked or unlocked, feature can be turned on or off. To turn this feature on or off:
• Press and hold the UNLOCK button for at least 4 seconds, but no longer than
10 seconds. Then, press and hold the LOCK button while still holding the
UNLOCK button.
• Release both buttons at the same time.
POWER INVERTER
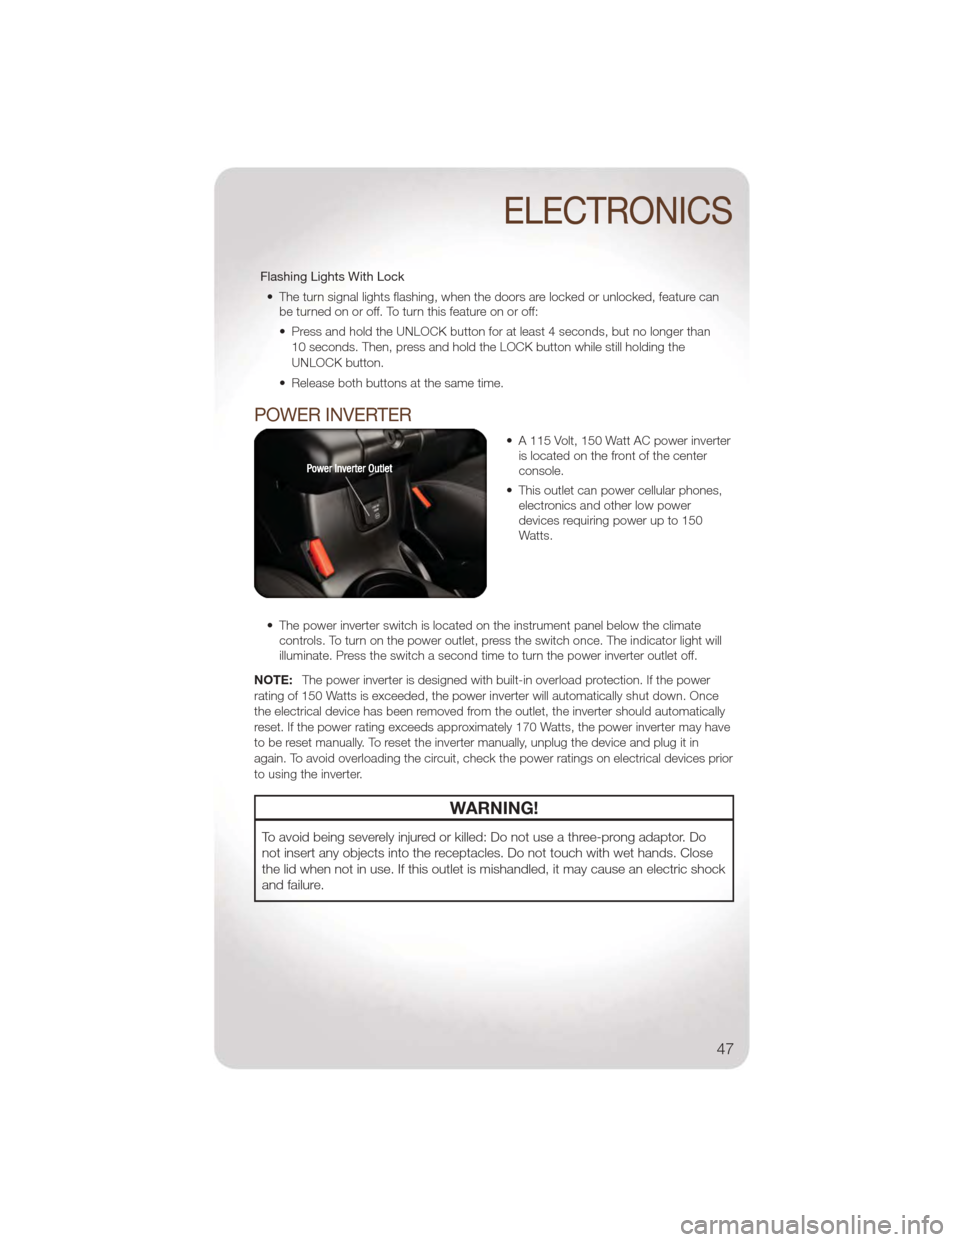
• A 115 Volt, 150 Watt AC power inverter is located on the front of the center
console.
• This outlet can power cellular phones, electronics and other low power
devices requiring power up to 150
Watts.
• The power inverter switch is located on the instrument panel below the climate controls. To turn on the power outlet, press the switch once. The indicator light will
illuminate. Press the switch a second time to turn the power inverter outlet off.
NOTE: The power inverter is designed with built-in overload protection. If the power
rating of 150 Watts is exceeded, the power inverter will automatically shut down. Once
the electrical device has been removed from the outlet, the inverter should automatically
reset. If the power rating exceeds approximately 170 Watts, the power inverter may have
to be reset manually. To reset the inverter manually, unplug the device and plug it in
again. To avoid overloading the circuit, check the power ratings on electrical devices prior
to using the inverter.
WARNING!
To avoid being severely injured or killed: Do not use a three-prong adaptor. Do
not insert any objects into the receptacles. Do not touch with wet hands. Close
the lid when not in use. If this outlet is mishandled, it may cause an electric shock
and failure.
ELECTRONICS
47
Page 51 of 88
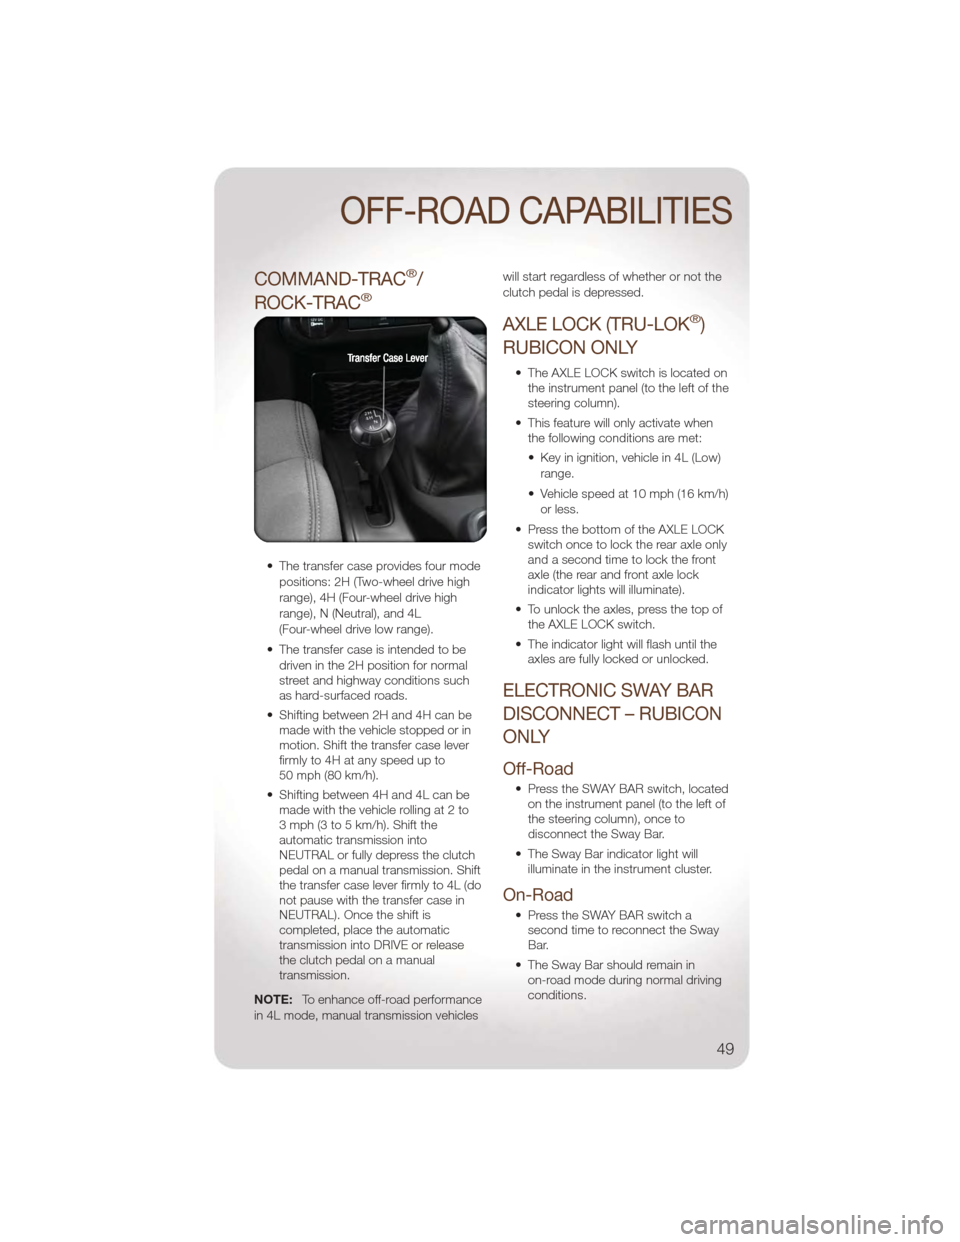
COMMAND-TRAC®/
ROCK-TRAC
®
• The transfer case provides four mode positions: 2H (Two-wheel drive high
range), 4H (Four-wheel drive high
range), N (Neutral), and 4L
(Four-wheel drive low range).
• The transfer case is intended to be driven in the 2H position for normal
street and highway conditions such
as hard-surfaced roads.
• Shifting between 2H and 4H can be made with the vehicle stopped or in
motion. Shift the transfer case lever
firmly to 4H at any speed up to
50 mph (80 km/h).
• Shifting between 4H and 4L can be made with the vehicle rolling at 2 to
3 mph (3 to 5 km/h). Shift the
automatic transmission into
NEUTRAL or fully depress the clutch
pedal on a manual transmission. Shift
the transfer case lever firmly to 4L (do
not pause with the transfer case in
NEUTRAL). Once the shift is
completed, place the automatic
transmission into DRIVE or release
the clutch pedal on a manual
transmission.
NOTE: To enhance off-road performance
in 4L mode, manual transmission vehicles will start regardless of whether or not the
clutch pedal is depressed.
AXLE LOCK (TRU-LOK®)
RUBICON ONLY
• The AXLE LOCK switch is located on the instrument panel (to the left of the
steering column).
• This feature will only activate when the following conditions are met:
• Key in ignition, vehicle in 4L (Low)
range.
• Vehicle speed at 10 mph (16 km/h) or less.
• Press the bottom of the AXLE LOCK switch once to lock the rear axle only
and a second time to lock the front
axle (the rear and front axle lock
indicator lights will illuminate).
• To unlock the axles, press the top of the AXLE LOCK switch.
• The indicator light will flash until the axles are fully locked or unlocked.
ELECTRONIC SWAY BAR
DISCONNECT – RUBICON
ONLY
Off-Road
• Press the SWAY BAR switch, locatedon the instrument panel (to the left of
the steering column), once to
disconnect the Sway Bar.
• The Sway Bar indicator light will illuminate in the instrument cluster.
On-Road
• Press the SWAY BAR switch asecond time to reconnect the Sway
Bar.
• The Sway Bar should remain in on-road mode during normal driving
conditions.
OFF-ROAD CAPABILITIES
49
Page 54 of 88
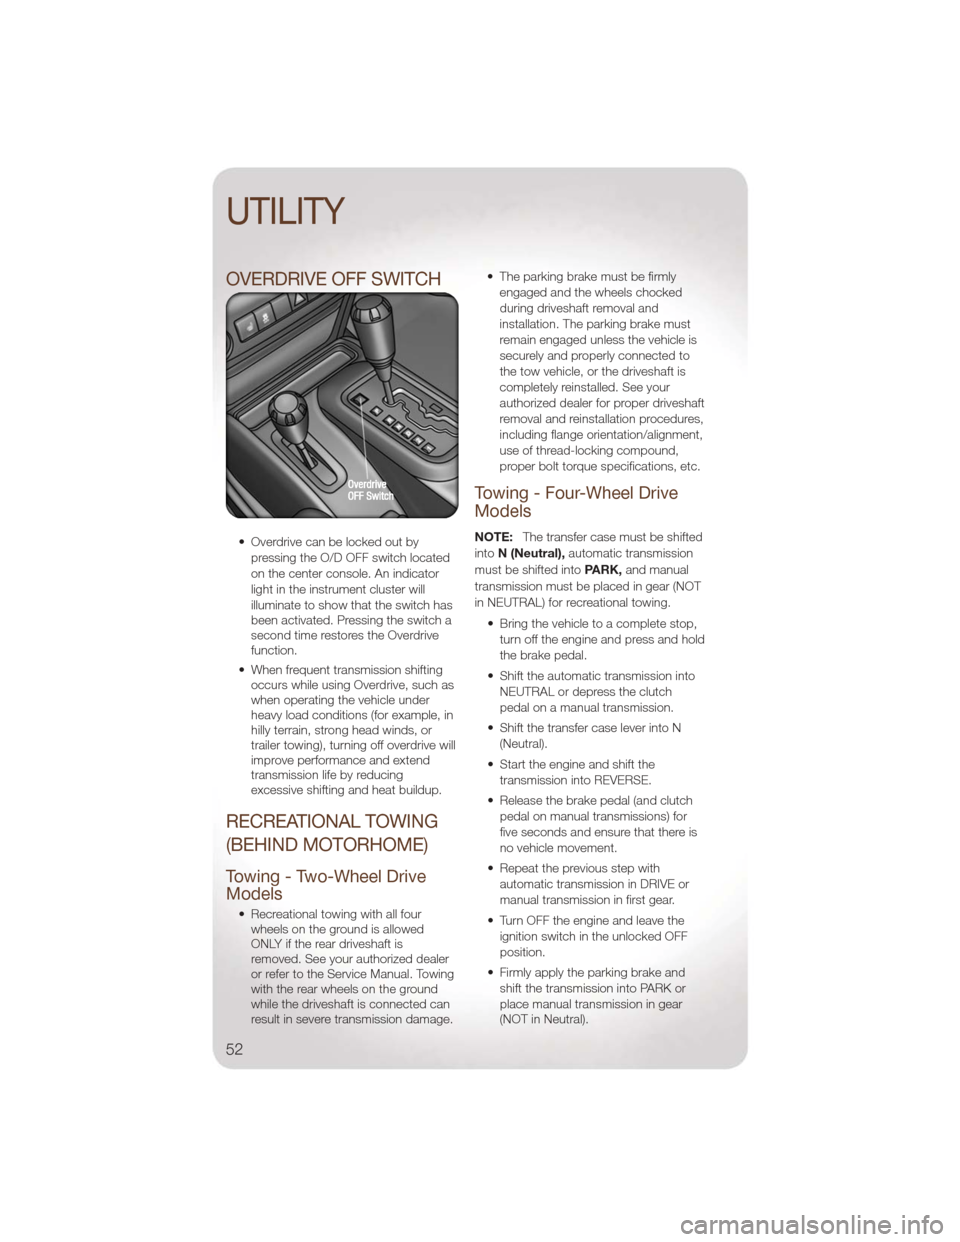
OVERDRIVE OFF SWITCH
• Overdrive can be locked out bypressing the O/D OFF switch located
on the center console. An indicator
light in the instrument cluster will
illuminate to show that the switch has
been activated. Pressing the switch a
second time restores the Overdrive
function.
• When frequent transmission shifting occurs while using Overdrive, such as
when operating the vehicle under
heavy load conditions (for example, in
hilly terrain, strong head winds, or
trailer towing), turning off overdrive will
improve performance and extend
transmission life by reducing
excessive shifting and heat buildup.
RECREATIONAL TOWING
(BEHIND MOTORHOME)
Towing - Two-Wheel Drive
Models
• Recreational towing with all fourwheels on the ground is allowed
ONLY if the rear driveshaft is
removed. See your authorized dealer
or refer to the Service Manual. Towing
with the rear wheels on the ground
while the driveshaft is connected can
result in severe transmission damage. • The parking brake must be firmly
engaged and the wheels chocked
during driveshaft removal and
installation. The parking brake must
remain engaged unless the vehicle is
securely and properly connected to
the tow vehicle, or the driveshaft is
completely reinstalled. See your
authorized dealer for proper driveshaft
removal and reinstallation procedures,
including flange orientation/alignment,
use of thread-locking compound,
proper bolt torque specifications, etc.
Towing - Four-Wheel Drive
Models
NOTE: The transfer case must be shifted
into N (Neutral), automatic transmission
must be shifted into PARK,and manual
transmission must be placed in gear (NOT
in NEUTRAL) for recreational towing.
• Bring the vehicle to a complete stop,turn off the engine and press and hold
the brake pedal.
• Shift the automatic transmission into NEUTRAL or depress the clutch
pedal on a manual transmission.
• Shift the transfer case lever into N (Neutral).
• Start the engine and shift the transmission into REVERSE.
• Release the brake pedal (and clutch pedal on manual transmissions) for
five seconds and ensure that there is
no vehicle movement.
• Repeat the previous step with automatic transmission in DRIVE or
manual transmission in first gear.
• Turn OFF the engine and leave the ignition switch in the unlocked OFF
position.
• Firmly apply the parking brake and shift the transmission into PARK or
place manual transmission in gear
(NOT in Neutral).
UTILITY
52