automatic transmission JEEP WRANGLER 2012 JK / 3.G User Guide
[x] Cancel search | Manufacturer: JEEP, Model Year: 2012, Model line: WRANGLER, Model: JEEP WRANGLER 2012 JK / 3.GPages: 124, PDF Size: 5.48 MB
Page 79 of 124
COMMAND-TRAC®/ROCK-TRAC®
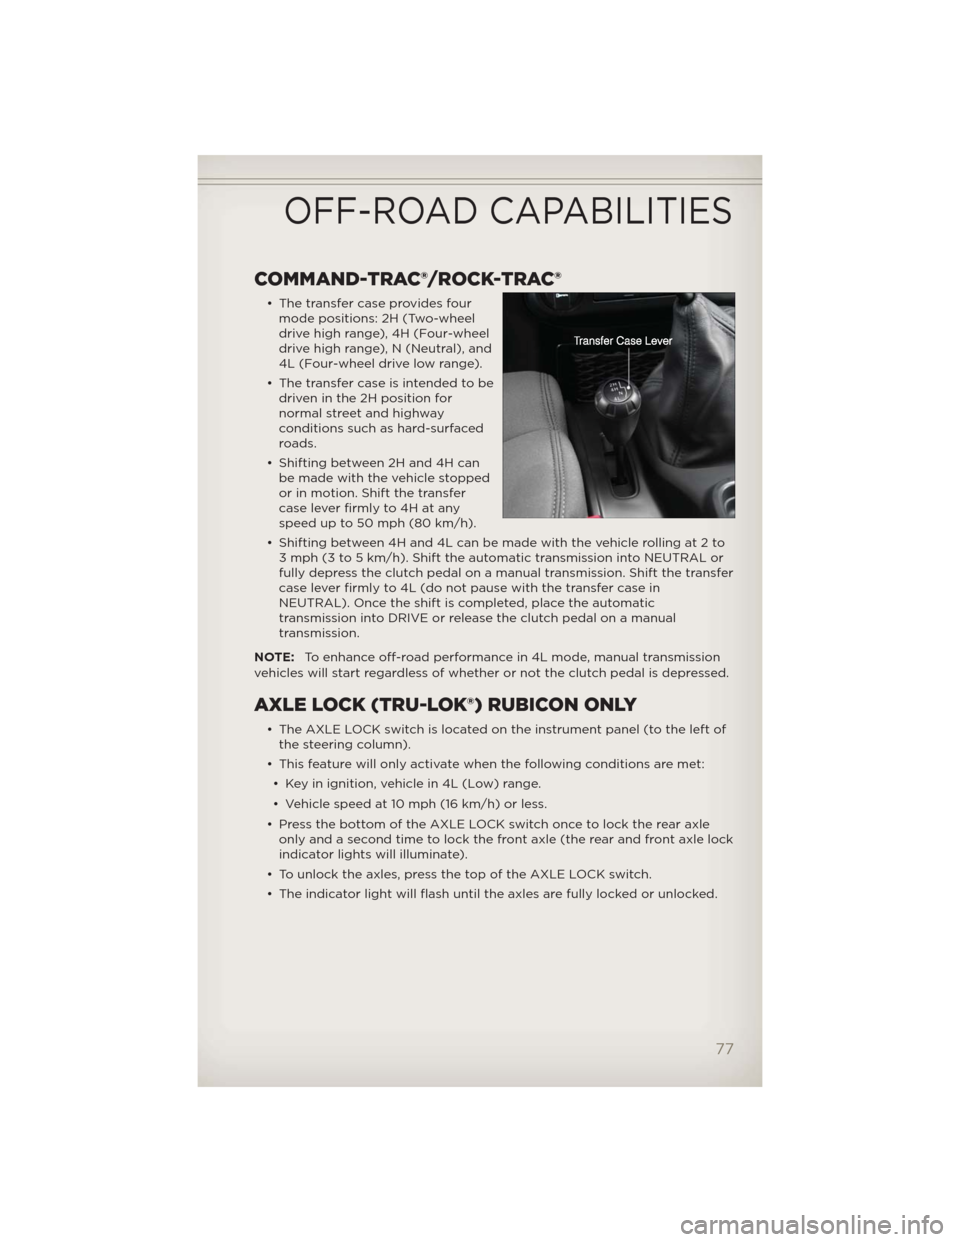
• The transfer case provides four
mode positions: 2H (Two-wheel
drive high range), 4H (Four-wheel
drive high range), N (Neutral), and
4L (Four-wheel drive low range).
• The transfer case is intended to be
driven in the 2H position for
normal street and highway
conditions such as hard-surfaced
roads.
• Shifting between 2H and 4H can
be made with the vehicle stopped
or in motion. Shift the transfer
case lever firmly to 4H at any
speed up to 50 mph (80 km/h).
• Shifting between 4H and 4L can be made with the vehicle rolling at 2 to
3 mph (3 to 5 km/h). Shift the automatic transmission into NEUTRAL or
fully depress the clutch pedal on a manual transmission. Shift the transfer
case lever firmly to 4L (do not pause with the transfer case in
NEUTRAL). Once the shift is completed, place the automatic
transmission into DRIVE or release the clutch pedal on a manual
transmission.
NOTE:To enhance off-road performance in 4L mode, manual transmission
vehicles will start regardless of whether or not the clutch pedal is depressed.
AXLE LOCK (TRU-LOK®) RUBICON ONLY
• The AXLE LOCK switch is located on the instrument panel (to the left of
the steering column).
• This feature will only activate when the following conditions are met:
• Key in ignition, vehicle in 4L (Low) range.
• Vehicle speed at 10 mph (16 km/h) or less.
• Press the bottom of the AXLE LOCK switch once to lock the rear axle
only and a second time to lock the front axle (the rear and front axle lock
indicator lights will illuminate).
• To unlock the axles, press the top of the AXLE LOCK switch.
• The indicator light will flash until the axles are fully locked or unlocked.
OFF-ROAD CAPABILITIES
77
Page 81 of 124
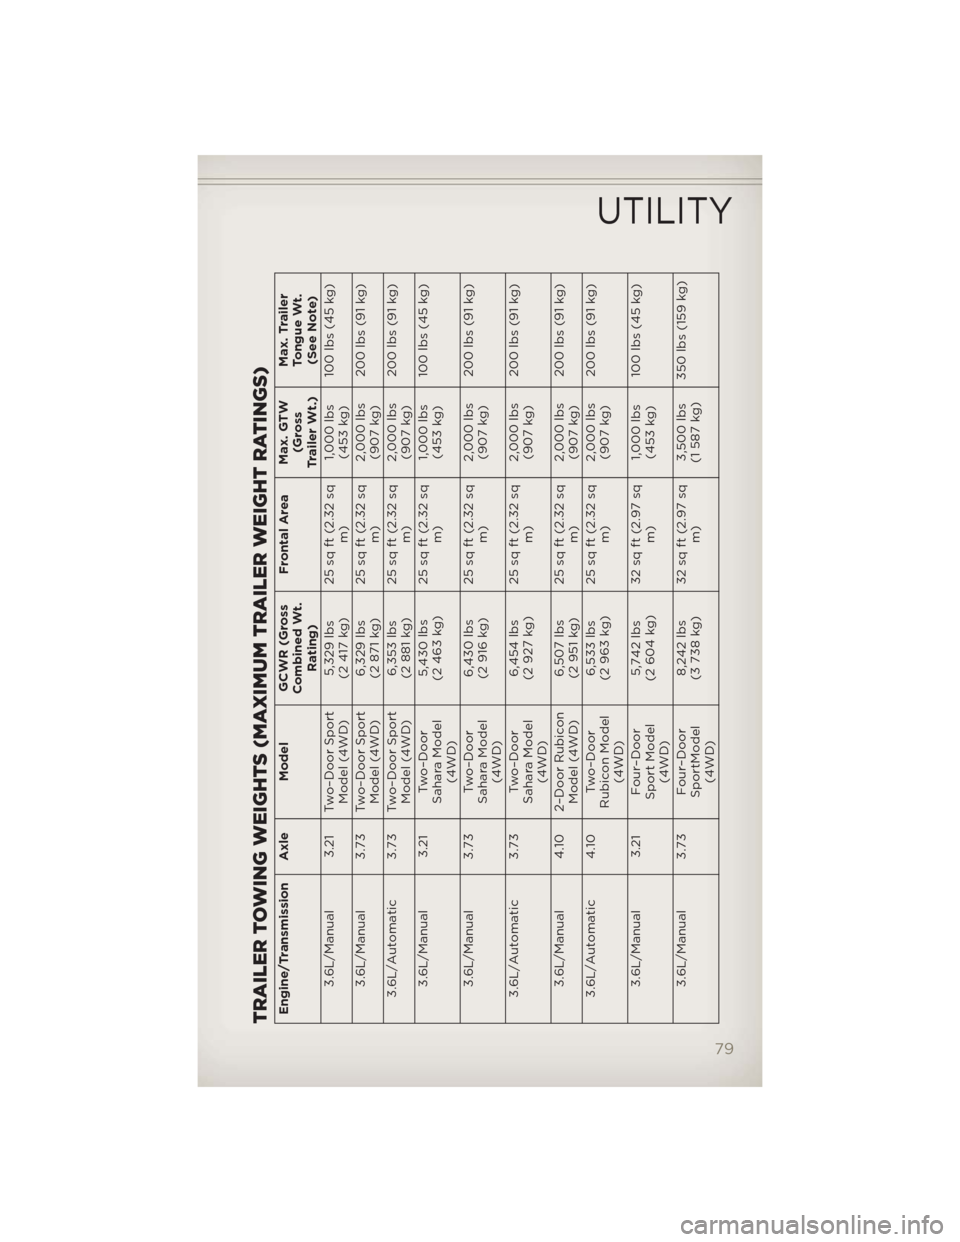
TRAILER TOWING WEIGHTS (MAXIMUM TRAILER WEIGHT RATINGS)Engine/Transmission Axle ModelGCWR (Gross
Combined Wt.
Rating)Frontal AreaMax. GTW
(Gross
Trailer Wt.)Max. Trailer
Tongue Wt.
(See Note)
3.6L/Manual 3.21 Two–Door Sport
Model (4WD)5,329 lbs
(2 417 kg)25 sq ft (2.32 sq
m)1,000 lbs
(453 kg)100 lbs (45 kg)
3.6L/Manual 3.73 Two–Door Sport
Model (4WD)6,329 lbs
(2 871 kg)25 sq ft (2.32 sq
m)2,000 lbs
(907 kg)200 lbs (91 kg)
3.6L/Automatic 3.73 Two–Door Sport
Model (4WD)6,353 lbs
(2 881 kg)25 sq ft (2.32 sq
m)2,000 lbs
(907 kg)200 lbs (91 kg)
3.6L/Manual 3.21 Two–Door
Sahara Model
(4WD)5,430 lbs
(2 463 kg)25 sq ft (2.32 sq
m)1,000 lbs
(453 kg)100 lbs (45 kg)
3.6L/Manual 3.73 Two–Door
Sahara Model
(4WD)6,430 lbs
(2 916 kg)25 sq ft (2.32 sq
m)2,000 lbs
(907 kg)200 lbs (91 kg)
3.6L/Automatic 3.73 Two–Door
Sahara Model
(4WD)6,454 lbs
(2 927 kg)25 sq ft (2.32 sq
m)2,000 lbs
(907 kg)200 lbs (91 kg)
3.6L/Manual 4.10 2–Door Rubicon
Model (4WD)6,507 lbs
(2 951 kg)25 sq ft (2.32 sq
m)2,000 lbs
(907 kg)200 lbs (91 kg)
3.6L/Automatic 4.10 Two–Door
Rubicon Model
(4WD)6,533 lbs
(2 963 kg)25 sq ft (2.32 sq
m)2,000 lbs
(907 kg)200 lbs (91 kg)
3.6L/Manual 3.21 Four–Door
Sport Model
(4WD)5,742 lbs
(2 604 kg)32 sq ft (2.97 sq
m)1,000 lbs
(453 kg)100 lbs (45 kg)
3.6L/Manual 3.73 Four–Door
SportModel
(4WD)8,242 lbs
(3 738 kg)32 sq ft (2.97 sq
m)3,500 lbs
(1 587 kg)350 lbs (159 kg)
UTILITY
79
Page 82 of 124
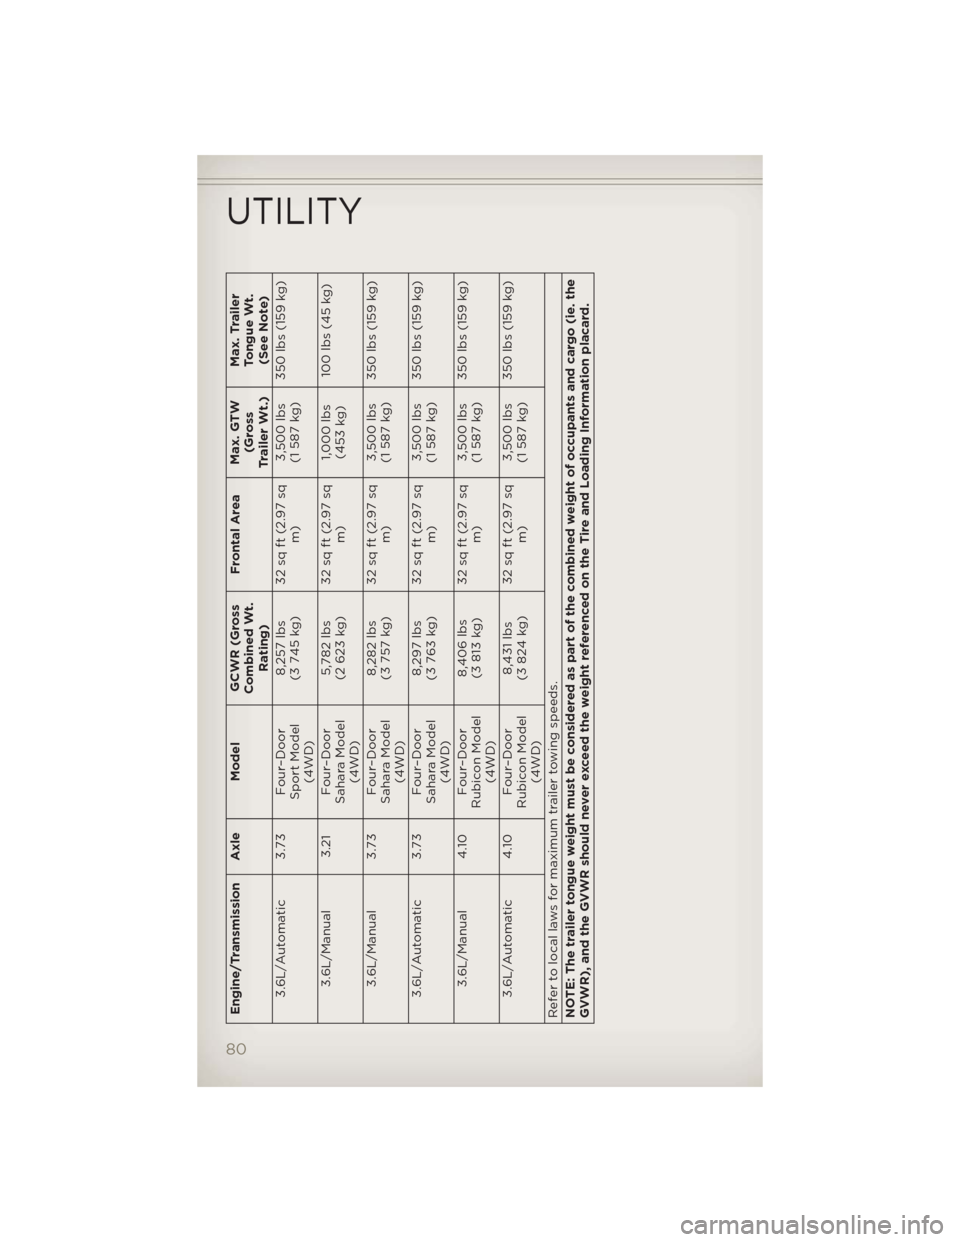
Engine/Transmission Axle ModelGCWR (Gross
Combined Wt.
Rating)Frontal AreaMax. GTW
(Gross
Trailer Wt.)Max. Trailer
Tongue Wt.
(See Note)
3.6L/Automatic 3.73 Four–Door
Sport Model
(4WD)8,257 lbs
(3 745 kg)32 sq ft (2.97 sq
m)3,500 lbs
(1 587 kg)350 lbs (159 kg)
3.6L/Manual 3.21 Four–Door
Sahara Model
(4WD)5,782 lbs
(2 623 kg)32 sq ft (2.97 sq
m)1,000 lbs
(453 kg)100 lbs (45 kg)
3.6L/Manual 3.73 Four–Door
Sahara Model
(4WD)8,282 lbs
(3 757 kg)32 sq ft (2.97 sq
m)3,500 lbs
(1 587 kg)350 lbs (159 kg)
3.6L/Automatic 3.73 Four–Door
Sahara Model
(4WD)8,297 lbs
(3 763 kg)32 sq ft (2.97 sq
m)3,500 lbs
(1 587 kg)350 lbs (159 kg)
3.6L/Manual 4.10 Four–Door
Rubicon Model
(4WD)8,406 lbs
(3 813 kg)32 sq ft (2.97 sq
m)3,500 lbs
(1 587 kg)350 lbs (159 kg)
3.6L/Automatic 4.10 Four–Door
Rubicon Model
(4WD)8,431 lbs
(3 824 kg)32 sq ft (2.97 sq
m)3,500 lbs
(1 587 kg)350 lbs (159 kg)
Refer to local laws for maximum trailer towing speeds.
NOTE: The trailer tongue weight must be considered as part of the combined weight of occupants and cargo (ie. the
GVWR), and the GVWR should never exceed the weight referenced on the Tire and Loading Information placard.
UTILITY
80
Page 83 of 124
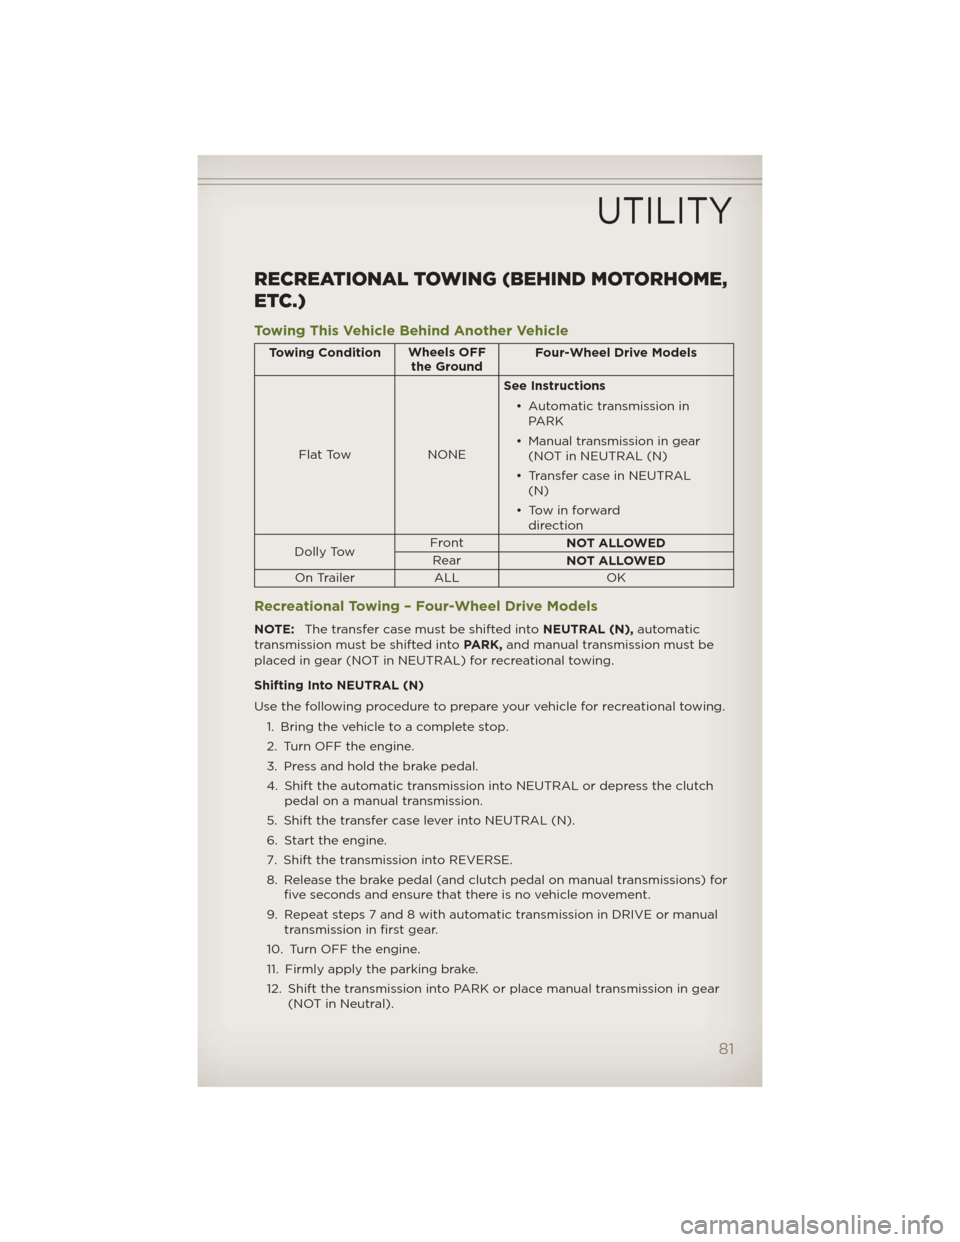
RECREATIONAL TOWING (BEHIND MOTORHOME,
ETC.)
Towing This Vehicle Behind Another Vehicle
Towing ConditionWheels OFF
the GroundFour-Wheel Drive Models
Flat Tow NONESee Instructions
• Automatic transmission in
PARK
• Manual transmission in gear
(NOT in NEUTRAL (N)
• Transfer case in NEUTRAL
(N)
• Tow in forward
direction
Dolly TowFront
NOT ALLOWED
Rear
NOT ALLOWED
On Trailer ALL OK
Recreational Towing – Four-Wheel Drive Models
NOTE:The transfer case must be shifted intoNEUTRAL (N),automatic
transmission must be shifted intoPARK,and manual transmission must be
placed in gear (NOT in NEUTRAL) for recreational towing.
Shifting Into NEUTRAL (N)
Use the following procedure to prepare your vehicle for recreational towing.
1. Bring the vehicle to a complete stop.
2. Turn OFF the engine.
3. Press and hold the brake pedal.
4. Shift the automatic transmission into NEUTRAL or depress the clutch
pedal on a manual transmission.
5. Shift the transfer case lever into NEUTRAL (N).
6. Start the engine.
7. Shift the transmission into REVERSE.
8. Release the brake pedal (and clutch pedal on manual transmissions) for
five seconds and ensure that there is no vehicle movement.
9. Repeat steps 7 and 8 with automatic transmission in DRIVE or manual
transmission in first gear.
10. Turn OFF the engine.
11. Firmly apply the parking brake.
12. Shift the transmission into PARK or place manual transmission in gear
(NOT in Neutral).
UTILITY
81
Page 84 of 124
13. Attach the vehicle to the tow vehicle using a suitable tow bar.
14. Release the parking brake.
Shifting Out of NEUTRAL (N)
Use the following procedure to prepare your vehicle for normal usage.
1. Bring the vehicle to a complete stop, leaving it connected to the tow
vehicle.
2. Firmly apply the parking brake.
3. Turn the ignition switch to the ON/RUN position, but do not start the
engine.
4. Press and hold the brake pedal.
5. Shift the transmission into NEUTRAL.
6. Shift the transfer case lever to the desired position.
NOTE:When shifting out of transfer case NEUTRAL (N), turning the engine
OFF may be required to avoid gear clash.
7. Shift the automatic transmission into PARK, or place manual
transmission in Neutral.
8. Release the brake pedal.
9. Disconnect vehicle from the tow vehicle.
10. Start the engine.
11. Press and hold the brake pedal.
12. Release the parking brake.
13. Shift the transmission into gear, release the brake pedal (and clutch
pedal on manual transmissions), and check that the vehicle operates
normally.
CAUTION!
• It is necessary to follow these steps to be certain that the transfer
case is fully in NEUTRAL (N) before recreational towing to prevent
damage to internal parts.
• Damage to the transmission may occur if the transmission is shifted
into PARK with the transfer case in NEUTRAL (N) and the engine
running. With the transfer case in NEUTRAL (N) ensure that the
engine is OFF prior to shifting the transmission into PARK.
• Front or rear wheel lifts should not be used. Internal damage to the
transmission or transfer case will occur if a front or rear wheel lift is
used when recreational towing.
• Tow only in the forward direction. Towing this vehicle backwards
can cause severe damage to the transfer case.
• Automatic transmissions must be placed in the PARK position for
recreational towing.
(Continued)
UTILITY
82
Page 92 of 124
Preparations For Jacking
1. Park on a firm, level surface. Avoid ice or slippery areas.
2. Turn on the Hazard Warning flasher.
3. Set the parking brake.
4. Shift the automatic transmission into PARK, or a manual transmission
into REVERSE.
5. Turn the ignition to LOCK.
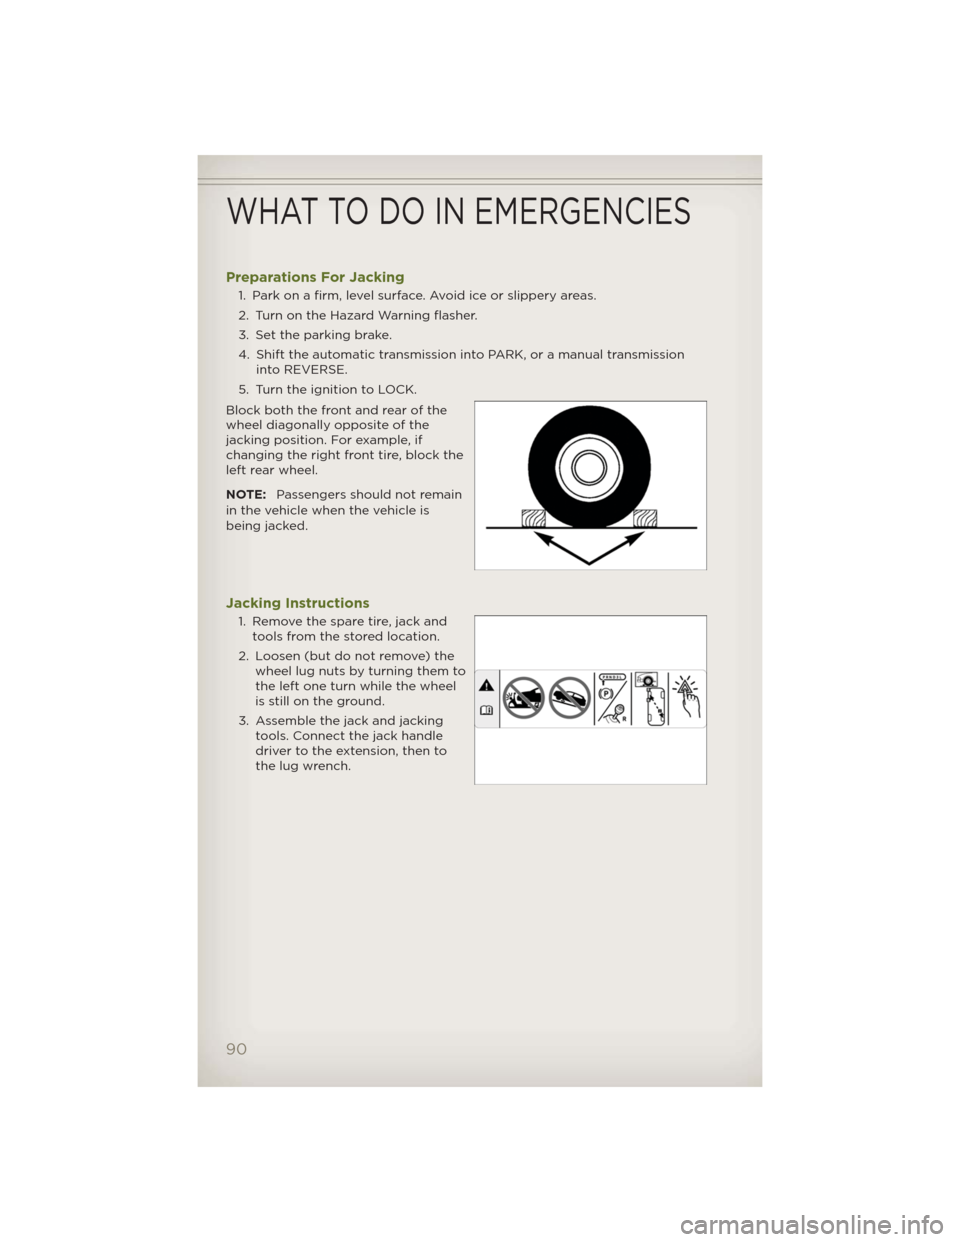
Block both the front and rear of the
wheel diagonally opposite of the
jacking position. For example, if
changing the right front tire, block the
left rear wheel.
NOTE:Passengers should not remain
in the vehicle when the vehicle is
being jacked.
Jacking Instructions
1. Remove the spare tire, jack and
tools from the stored location.
2. Loosen (but do not remove) the
wheel lug nuts by turning them to
the left one turn while the wheel
is still on the ground.
3. Assemble the jack and jacking
tools. Connect the jack handle
driver to the extension, then to
the lug wrench.
WHAT TO DO IN EMERGENCIES
90
Page 94 of 124
4. Finish tightening the lug nuts. Push down on the wrench while at the
end of the handle for increased leverage. Tighten the lug nuts in a star
pattern until each nut has been tightened twice. The correct tightness of
each lug nut is 95 ft/lbs (130 N·m). If in doubt about the correct
tightness, have them checked with a torque wrench by your authorized
dealer or service station.
5. After 25 miles (40 km) check the lug nut torque with a torque wrench to
ensure that all lug nuts are properly seated against the wheel.
CAUTION!
Do not attempt to raise the vehicle by jacking on locations other than
those indicated in the Jacking Instructions for this vehicle.
WARNING!
• Do not attempt to change a tire on the side of the vehicle close to
moving traffic. Pull far enough off the road to avoid the danger of
being hit when operating the jack or changing the wheel.
• Being under a jacked-up vehicle is dangerous. The vehicle could slip
off the jack and fall on you. You could be crushed. Never put any
part of your body under a vehicle that is on a jack. If you need to
get under a raised vehicle, take it to a service center where it can be
raised on a lift.
• Never start or run the engine while the vehicle is on a jack.
• The jack is designed to be used as a tool for changing tires only. The
jack should not be used to lift the vehicle for service purposes. The
vehicle should be jacked on a firm level surface only. Avoid ice or
slippery areas.
• Carefully follow these tire changing warnings to help prevent
personal injury or damage to your vehicle:
• Alwayspark on a firm, level surface as far from the edge of the
roadway as possible before raising the vehicle.
• Turn on the Hazard Warning flasher.
• Block the wheel diagonally opposite the wheel to be raised.
• Set the parking brake firmly and set an automatic transmission in
PARK; a manual transmission in REVERSE.
• Do not let anyone sit in the vehicle when it is on a jack.
• Do not get under the vehicle when it is on a jack.
• Only use the jack in the positions indicated and for lifting this
vehicle during a tire change.
• If working on or near a roadway, be extremely careful of motor
traffic.
(Continued)
WHAT TO DO IN EMERGENCIES
92
Page 95 of 124
WARNING!(Continued)
• To assure that spare tires, flat or inflated, are securely stowed,
spares must be stowed with the valve stem facing the ground.
• Raising the vehicle higher than necessary can make the vehicle less
stable and cause a collision. It could slip off the jack and hurt
someone near it. Raise the vehicle only enough to remove the tire.
• To avoid the risk of forcing the vehicle off the jack, do not tighten
the wheel nuts fully until the vehicle has been lowered.
• A loose tire or jack, thrown forward in a collision or hard stop, could
endanger the occupants of the vehicle. Always stow thejack parts
and the spare tire in the places provided.
• To avoid the risk of forcing the vehicle off the jack, do not tighten
the lug nuts fully until the vehicle is lowered to the ground.
JUMP-STARTING
• If your vehicle has a discharged
battery it can be jump-started
using a set of jumper cables and a
battery in another vehicle or by
using a portable battery booster
pack.
• Jump-starting can be dangerous if
done improperly so please follow
the procedures in this section
carefully.
NOTE:When using a portable
battery booster pack follow the
manufacturer’s operating instructions
and precautions.
Preparations for Jump-Start
• The battery in your vehicle is located in the right rear of the engine
compartment.
• Set the parking brake, shift the automatic transmission into PARK and
turn the ignition to LOCK.
• Turn off the heater, radio, and all unnecessary electrical accessories.
• If using another vehicle to jump-start the battery, park the vehicle within
the jumper cables reach, set the parking brake and make sure the
ignition is OFF.
Jump-Starting Procedure
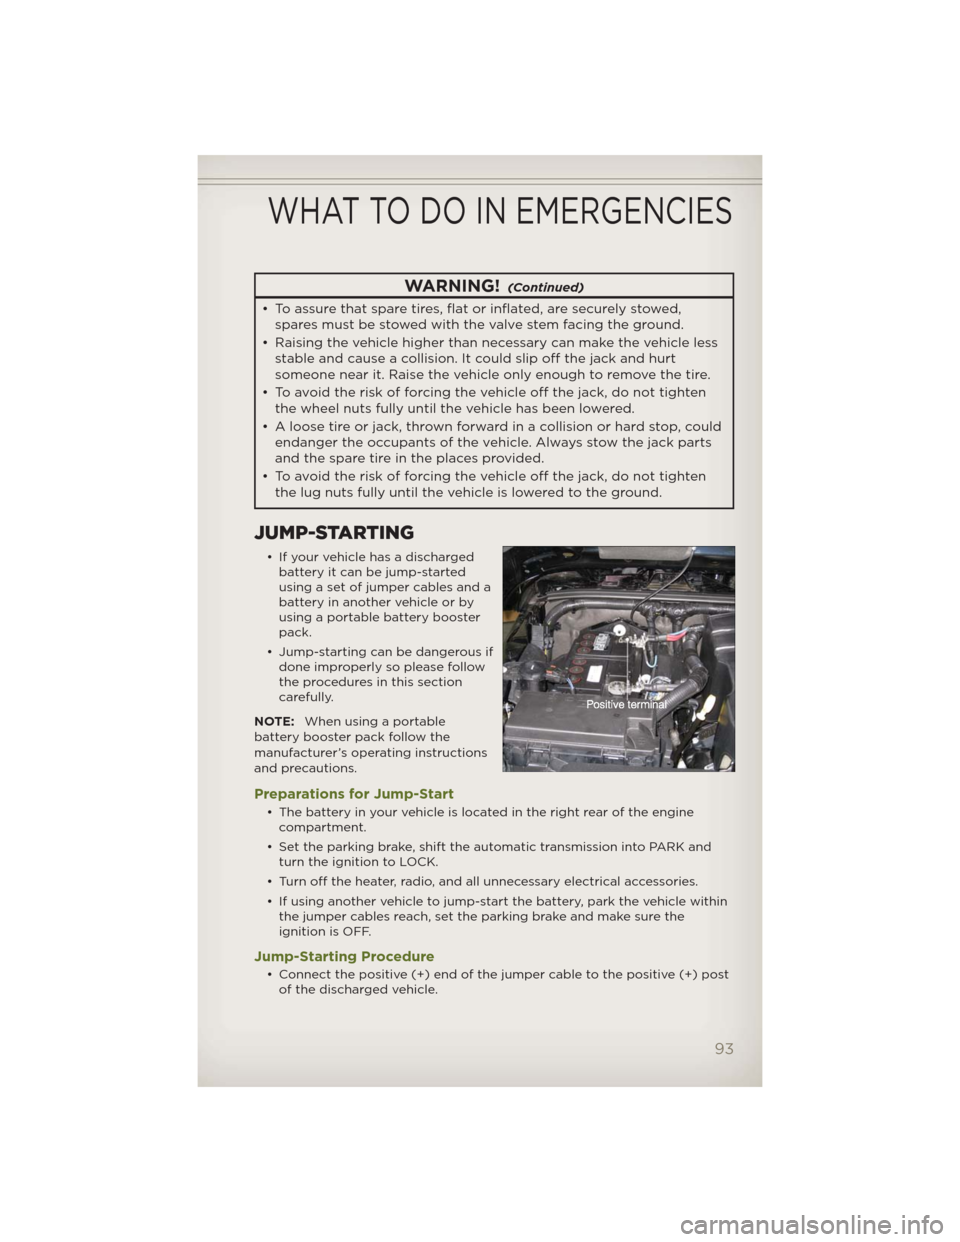
• Connect the positive (+) end of the jumper cable to the positive (+) post
of the discharged vehicle.
WHAT TO DO IN EMERGENCIES
93
Page 103 of 124
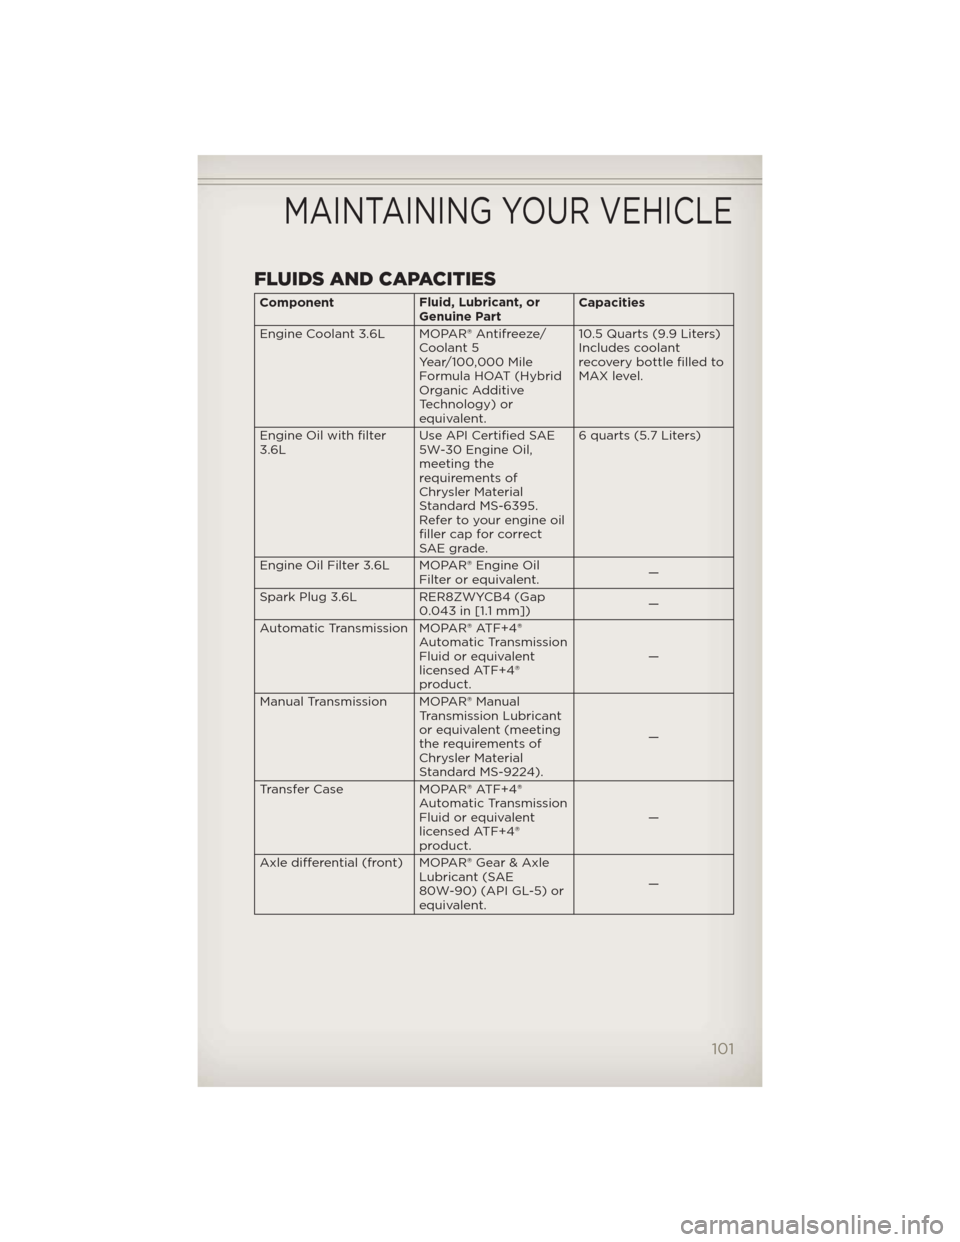
FLUIDS AND CAPACITIES
ComponentFluid, Lubricant, or
Genuine PartCapacities
Engine Coolant 3.6L MOPAR® Antifreeze/
Coolant 5
Year/100,000 Mile
Formula HOAT (Hybrid
Organic Additive
Technology) or
equivalent.10.5 Quarts (9.9 Liters)
Includes coolant
recovery bottle filled to
MAX level.
Engine Oil with filter
3.6LUse API Certified SAE
5W-30 Engine Oil,
meeting the
requirements of
Chrysler Material
Standard MS-6395.
Refer to your engine oil
filler cap for correct
SAE grade.6 quarts (5.7 Liters)
Engine Oil Filter 3.6L MOPAR® Engine Oil
Filter or equivalent.—
Spark Plug 3.6L RER8ZWYCB4 (Gap
0.043 in [1.1 mm])—
Automatic Transmission MOPAR® ATF+4®
Automatic Transmission
Fluid or equivalent
licensed ATF+4®
product.—
Manual Transmission MOPAR® Manual
Transmission Lubricant
or equivalent (meeting
the requirements of
Chrysler Material
Standard MS-9224).—
Transfer Case MOPAR® ATF+4®
Automatic Transmission
Fluid or equivalent
licensed ATF+4®
product.—
Axle differential (front) MOPAR® Gear & Axle
Lubricant (SAE
80W-90) (API GL-5) or
equivalent.—
MAINTAINING YOUR VEHICLE
101
Page 104 of 124
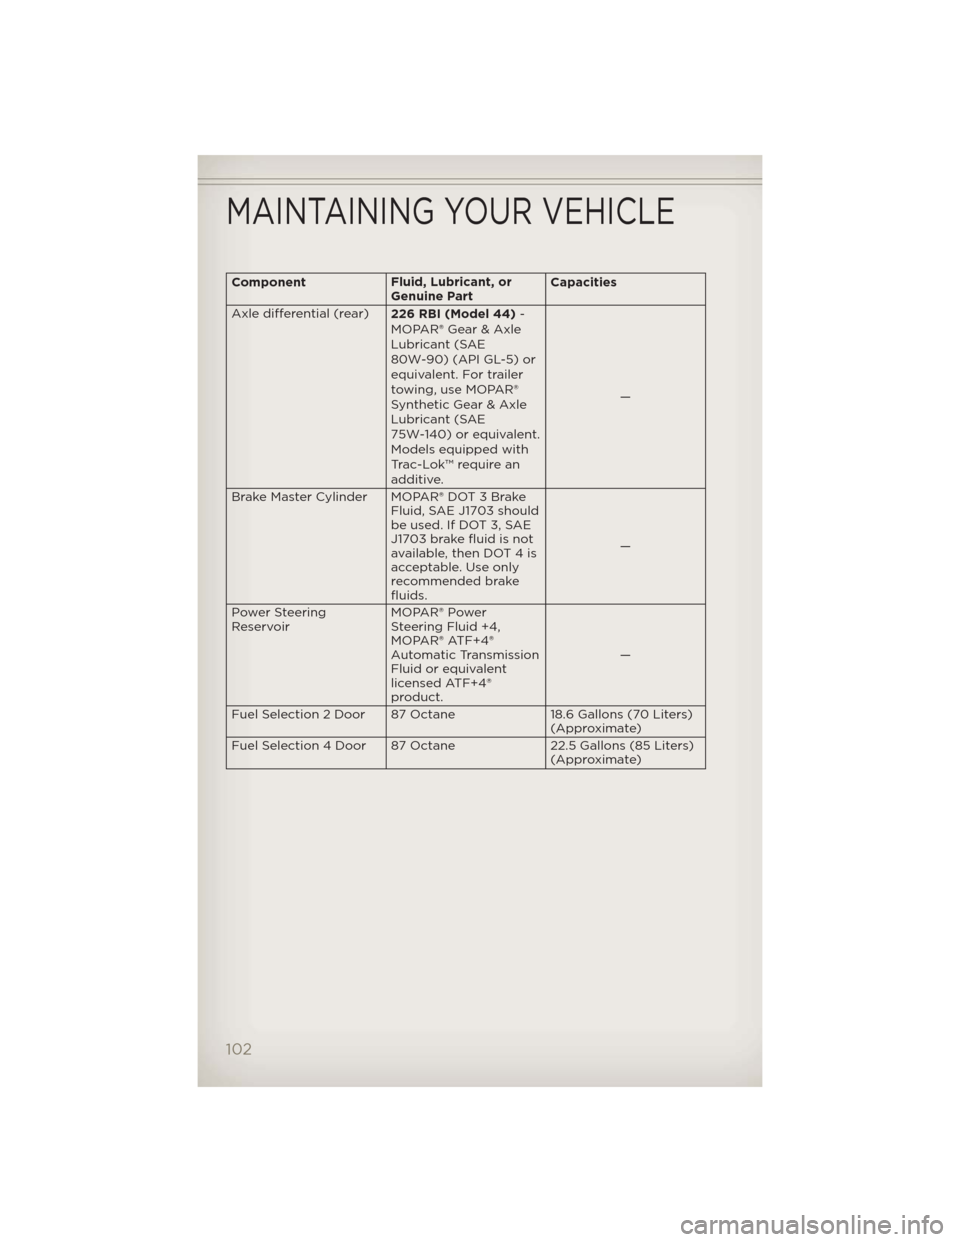
ComponentFluid, Lubricant, or
Genuine PartCapacities
Axle differential (rear)
226 RBI (Model 44)-
MOPAR® Gear & Axle
Lubricant (SAE
80W-90) (API GL-5) or
equivalent. For trailer
towing, use MOPAR®
Synthetic Gear & Axle
Lubricant (SAE
75W-140) or equivalent.
Models equipped with
Trac-Lok™ require an
additive.—
Brake Master Cylinder MOPAR® DOT 3 Brake
Fluid, SAE J1703 should
be used. If DOT 3, SAE
J1703 brake fluid is not
available, then DOT 4 is
acceptable. Use only
recommended brake
fluids.—
Power Steering
ReservoirMOPAR® Power
Steering Fluid +4,
MOPAR® ATF+4®
Automatic Transmission
Fluid or equivalent
licensed ATF+4®
product.—
Fuel Selection 2 Door 87 Octane 18.6 Gallons (70 Liters)
(Approximate)
Fuel Selection 4 Door 87 Octane 22.5 Gallons (85 Liters)
(Approximate)
MAINTAINING YOUR VEHICLE
102