tow JEEP WRANGLER 2012 JK / 3.G User Guide
[x] Cancel search | Manufacturer: JEEP, Model Year: 2012, Model line: WRANGLER, Model: JEEP WRANGLER 2012 JK / 3.GPages: 124, PDF Size: 5.48 MB
Page 2 of 124
W\fRNING\b
Driving \ffter drinking c\fn le\fd\W to \f collision. Your perceptions \fre
less sh\frp, your reflexes \fre slower, \fnd your judgment is imp\W\fired
when you h\fve been drinking. Ne\Wver drink \fnd then d\Wrive.
Important:
This User Guide is \Wintended to f\fmili\frize you with the import\W\fnt fe\ftures
of your vehicle. The DVD enclosed cont\fins your Owner’s M\fnu\fl,
N\fvig\ftion/Medi\f Center M\fnu\fls, W\frr\fnty Booklets, Tire W\frr\fnty
\fnd 24-Hour Towing Assist\fnce (new vehicles purch\fsed in the U.S.) or
Ro\fdside Assist\fnce (new vehicles purch\fsed in C\fn\fd\f) in\W electronic
form\ft. We hope you find it useful. R\Wepl\fcement DVD kits m\fy be
purch\fsed by visiting www.tech\futhority.com. Jeep
® is \f registered
tr\fdem\frk of Chrysler Group LLC. Copyright 2012 Chrysler Group LLC.
If you are the first registered retail owner of your
\fehicle, you may o\btain a complimentary printed
copy of the Owner’s Manual, Na\figation/Media
Center Manuals or Warranty Booklet \by calling
1-877-426-5337 (U.S.) or 1-800-387-1143 (Canada)
or \by contacting your dealer.
The driver’s prim\fry responsibility
is the s\ffe oper\ftion of the
vehicle. Driving while dis\Wtr\fcted
c\fn result in loss of vehicle
control, resulting in \f collision \fnd
person\fl injury. Chrysler Group
LLC strongly recommends th\ft
the driver use extreme c\fution
when using \fny device or fe\fture
th\ft m\fy t\fke their \fttention off
the ro\fd. Use of \fny electric\fl
devices such \fs cell phones,
computers, port\fble r\fdios,
vehicle n\fvig\ftion or other
devices by the driver while the vehicle is moving is d\fngerous
\fnd could le\fd to \f serious
collision. Texting while driving \Wis
\flso d\fngerous \fnd should never
be done while the v\Wehicle is
moving. \bf you find yourself
un\fble to devote your full
\fttention to vehicle oper\ftion,
pull off the ro\fd to \f s\ffe loc\ftion
\fnd stop your vehicle. Some
St\ftes or Provinces prohibit the
use of cellul\fr telephones or
texting while driving.\W \bt is \flw\fys
the driver’s responsibility to
comply with \fll loc\fl l\fws.
Driving and \flcohol:
Drunken driving is one o\Wf the most frequent c\fuses of collisions. Your
driving \fbility c\fn b\We seriously imp\fired with blood \flcohol levels f\fr below
the leg\fl minimum. \bf\W you \fre drinking, don’t d\Wrive. Ride with \f desig\Wn\fted
non-drinking driver, c\fll \f c\fb, \f friend, or use \Wpublic tr\fnsport\ftion.
This guide h\fs been \Wprep\fred to help you get quickly
\fcqu\finted with your new Jeep \fnd to provide \f convenient
reference source for common questions. However, it is not \f
substitute for your Owner’s M\fnu\fl.
For complete oper\ftion\fl instructions, m\finten\fnce procedures
\fnd import\fnt s\ffety mess\fges, ple\fse consult your Owner’s
M\fnu\fl, N\fvig\ftion/Medi\f Center M\fnu\fls \fnd other\W W\frning
L\fbels in your vehicle.
Not \fll fe\ftures shown in this guide m\f\Wy \fpply to your vehicle.
For \fddition\fl inform\ftion on \fccessories to help person\flize
your vehicle, visit www.mop\fr.com or your loc\fl Jeep de\fler\W.
919041_12d_Wrangler_UserGuide_011612.indd 21/16/12 1:19 PM
Page 3 of 124
INTRODUCTION/WELCOMEWelcome From Chrysler
GroupLLC ................2
CONTROLS AT A GLANCEDriver Cockpit..............6
Instrument Cluster............8
GETTING STARTEDKeyFob ................. 10
Remote Start.............. 10
Theft Alarm................11
Seat Belt..................11
Supplemental Restraint System
(SRS) — Air Bags............12
Child Restraints.............13
FrontSeats ............... 16
RearSeats.................17
Tilt Steering Column......... 19
HeatedSeats ..............20
OPERATING YOUR VEHICLEEngine Break-In Recommendations..21
Turn Signal/Lights Lever.......22
Wiper/Washer Lever.........23
Speed Control.............24
Manual Climate Controls.......25
Automatic Temperature
Controls (ATC).............26
Soft Top And Sunrider®........ 27
Hard Top And Freedom Top®.....31
Dual Top — If Equipped........33
Wind Buffeting.............33
ELECTRONICSYour Vehicle's Sound System....34
Media Center 130 (Sales Code
RES)...................36
Media Center 130 With Satellite
Radio (Sales Code RES + RSC) . . . 38
Media Center 230 (Sales Code
REQ)................... 41
Media Center 430/430N (Sales Code
RBZ/RHB)................44
Media Center 730N (Sales Code
RHR)...................53
Sirius XM™ Satellite Radio/
Travel Link................63
Steering Wheel Audio Controls . . . 67
iPod®/USB/MP3 Control.......67
Uconnect™ Phone...........68
Uconnect™ Voice Command......71
Bluetooth® Streaming Audio.....73
Electronic Vehicle Information
Center (EVIC).............73
Programmable Features.......74PowerInverter .............75
Power Outlets.............76
OFF-ROAD CAPABILITIESCommand-Trac®/Rock-Trac®..... 77
Axle Lock (Tru-Lok®)
Rubicon Only.............. 77
Electronic Sway Bar Disconnect –
Rubicon Only..............78
UTILITYTrailer Towing Weights (Maximum
Trailer Weight Ratings)........79
Recreational Towing (Behind
Motorhome, Etc.)............81
WHAT TO DO IN EMERGENCIES24-Hour Towing Assistance.....84
Instrument Cluster Warning
Lights..................84
If Your Engine Overheats.......88
Jacking And Tire Changing.....89
Jump-Starting.............93
Emergency Tow Hooks........95
Shift Lever Override..........96
Towing A Disabled Vehicle......96
Freeing A Stuck Vehicle.......97
Event Data Recorder (EDR).....98
MAINTAINING YOUR VEHICLEOpening The Hood..........99
Engine Compartment.........100
Fluids And Capacities.........101
Maintenance Chart..........103
Fuses...................106
TirePressures..............110
Wheel And Wheel Trim Care..... 111
Exterior Bulbs............. 111
CONSUMER ASSISTANCEChrysler Group LLC
Customer Center............112
Chrysler Canada Inc.
Customer Center............112
Assistance For The Hearing
Impaired.................112
Publications Ordering.........112
Reporting Safety Defects In
The 50 United States
And Washington, D.C..........113
MOPAR ACCESSORIESAuthentic Accessories By
MOPAR®.................114
INDEX.................115
FAQ(HowTo?)Frequently Asked Questions.....118
TABLE OF CONTENTS
Page 18 of 124
FRONT SEATS
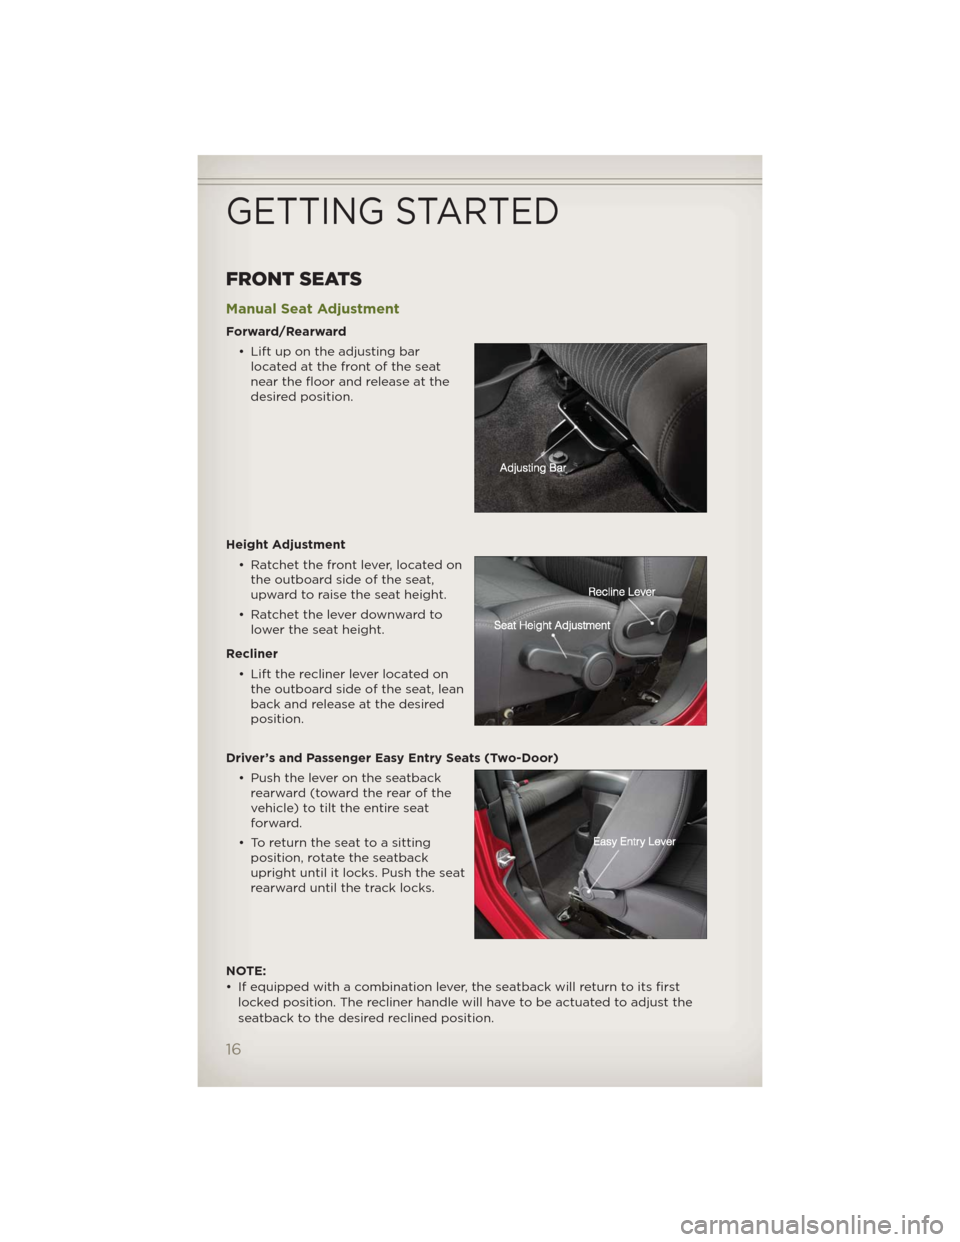
Manual Seat Adjustment
Forward/Rearward
• Lift up on the adjusting bar
located at the front of the seat
near the floor and release at the
desired position.
Height Adjustment
• Ratchet the front lever, located on
the outboard side of the seat,
upward to raise the seat height.
• Ratchet the lever downward to
lower the seat height.
Recliner
• Lift the recliner lever located on
the outboard side of the seat, lean
back and release at the desired
position.
Driver’s and Passenger Easy Entry Seats (Two-Door)
• Push the lever on the seatback
rearward (toward the rear of the
vehicle) to tilt the entire seat
forward.
• To return the seat to a sitting
position, rotate the seatback
upright until it locks. Push the seat
rearward until the track locks.
NOTE:
• If equipped with a combination lever, the seatback will return to its first
locked position. The recliner handle will have to be actuated to adjust the
seatback to the desired reclined position.
GETTING STARTED
16
Page 20 of 124
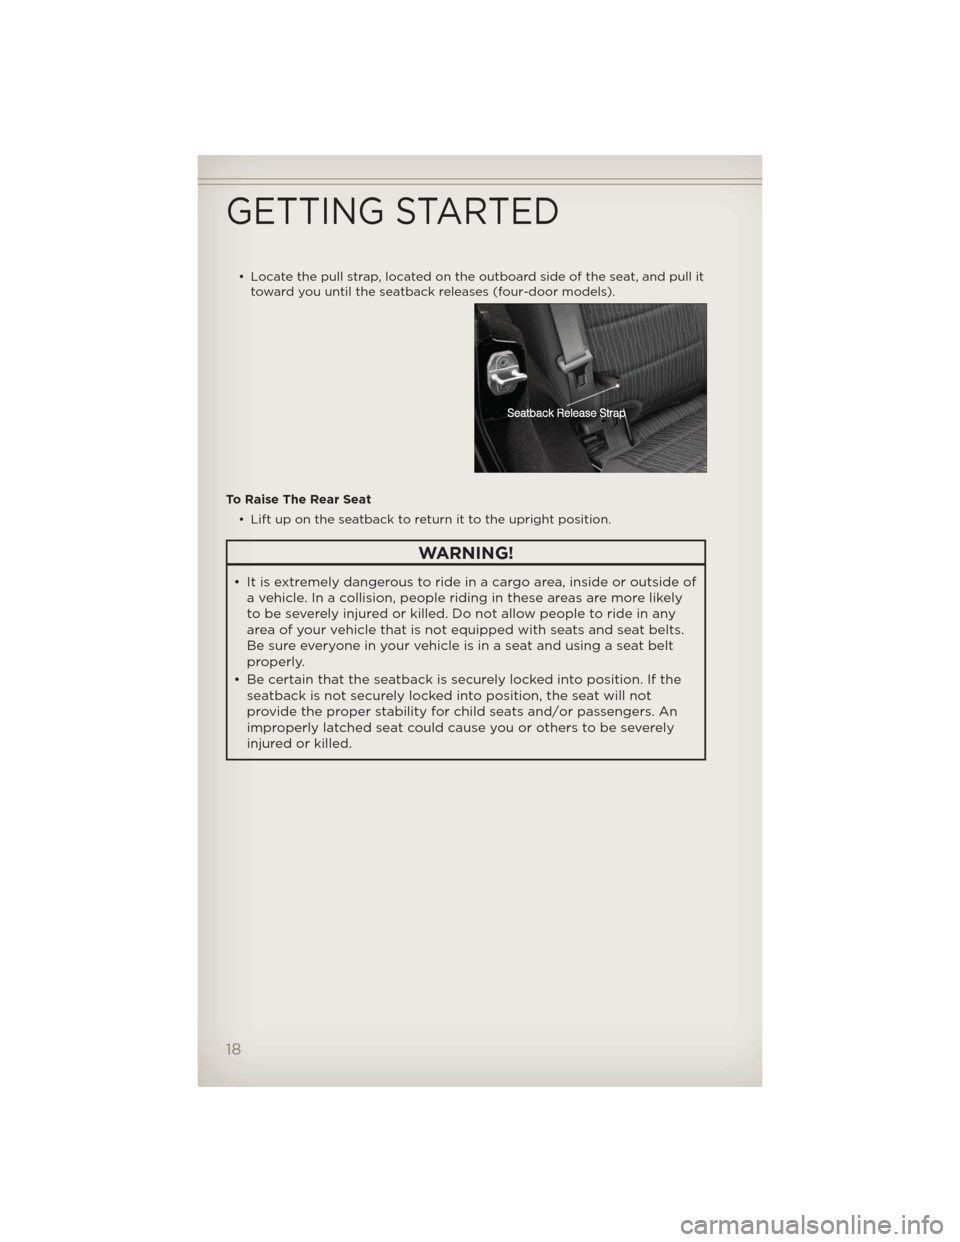
• Locate the pull strap, located on the outboard side of the seat, and pull it
toward you until the seatback releases (four-door models).
To Raise The Rear Seat
• Lift up on the seatback to return it to the upright position.
WARNING!
• It is extremely dangerous to ride in a cargo area, inside or outside of
a vehicle. In a collision, people riding in these areas are more likely
to be severely injured or killed. Do not allow people to ride in any
area of your vehicle that is not equipped with seats and seat belts.
Be sure everyone in your vehicle is in a seat and using a seat belt
properly.
• Be certain that the seatback is securely locked into position. If the
seatback is not securely locked into position, the seat will not
provide the proper stability for child seats and/or passengers. An
improperly latched seat could cause you or others to be severely
injured or killed.
GETTING STARTED
18
Page 24 of 124
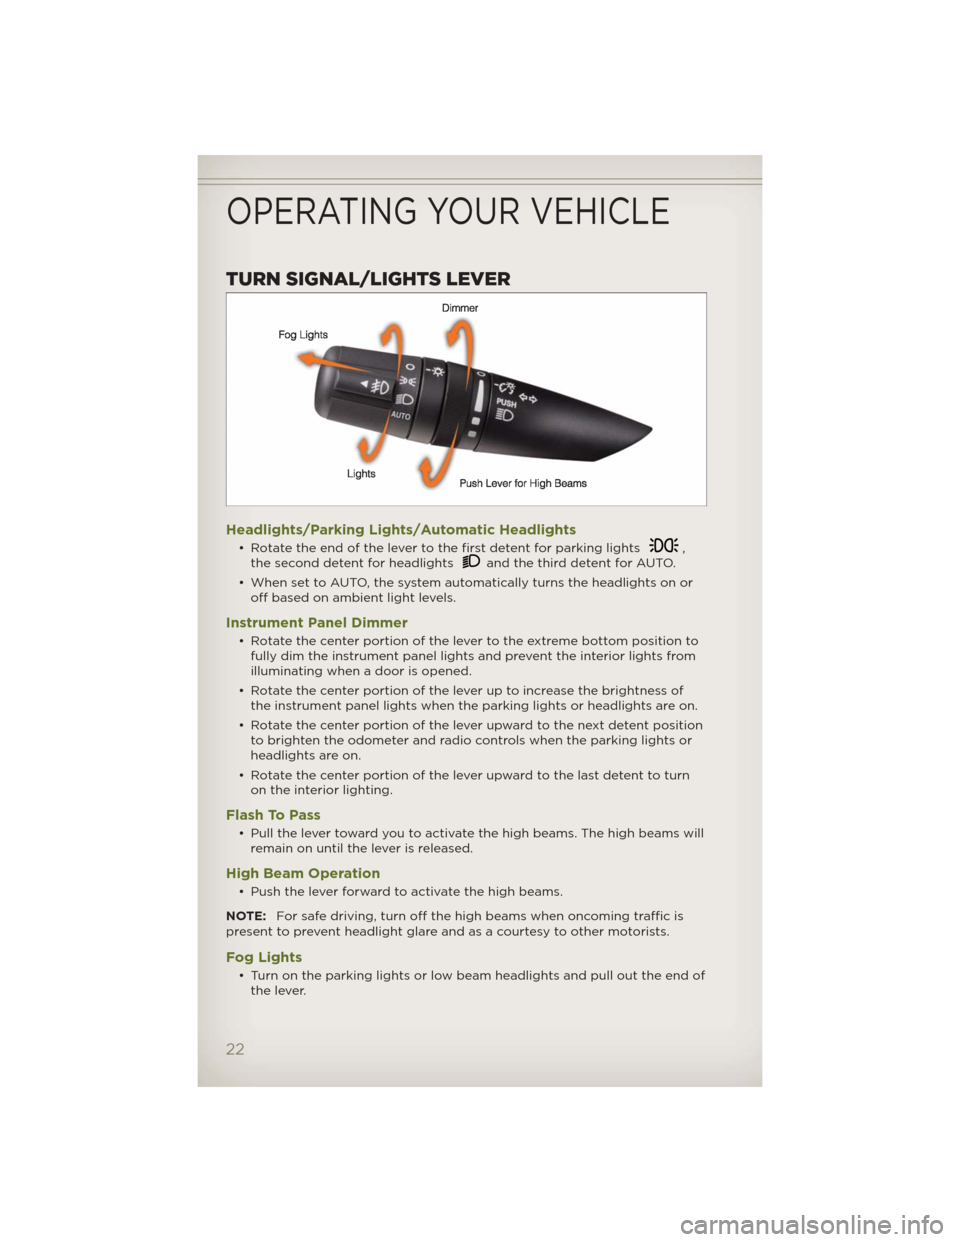
TURN SIGNAL/LIGHTS LEVER
Headlights/Parking Lights/Automatic Headlights
• Rotate the end of the lever to the first detent for parking lights,
the second detent for headlightsand the third detent for AUTO.
• When set to AUTO, the system automatically turns the headlights on or
off based on ambient light levels.
Instrument Panel Dimmer
• Rotate the center portion of the lever to the extreme bottom position to
fully dim the instrument panel lights and prevent the interior lights from
illuminating when a door is opened.
• Rotate the center portion of the lever up to increase the brightness of
the instrument panel lights when the parking lights or headlights are on.
• Rotate the center portion of the lever upward to the next detent position
to brighten the odometer and radio controls when the parking lights or
headlights are on.
• Rotate the center portion of the lever upward to the last detent to turn
on the interior lighting.
Flash To Pass
• Pull the lever toward you to activate the high beams. The high beams will
remain on until the lever is released.
High Beam Operation
• Push the lever forward to activate the high beams.
NOTE:For safe driving, turn off the high beams when oncoming traffic is
present to prevent headlight glare and as a courtesy to other motorists.
Fog Lights
• Turn on the parking lights or low beam headlights and pull out the end of
the lever.
OPERATING YOUR VEHICLE
22
Page 25 of 124
Turn Signals/Lane Change Assist
• Tap the lever up or down once and the turn signal (right or left) will flash
three times and automatically turn off.
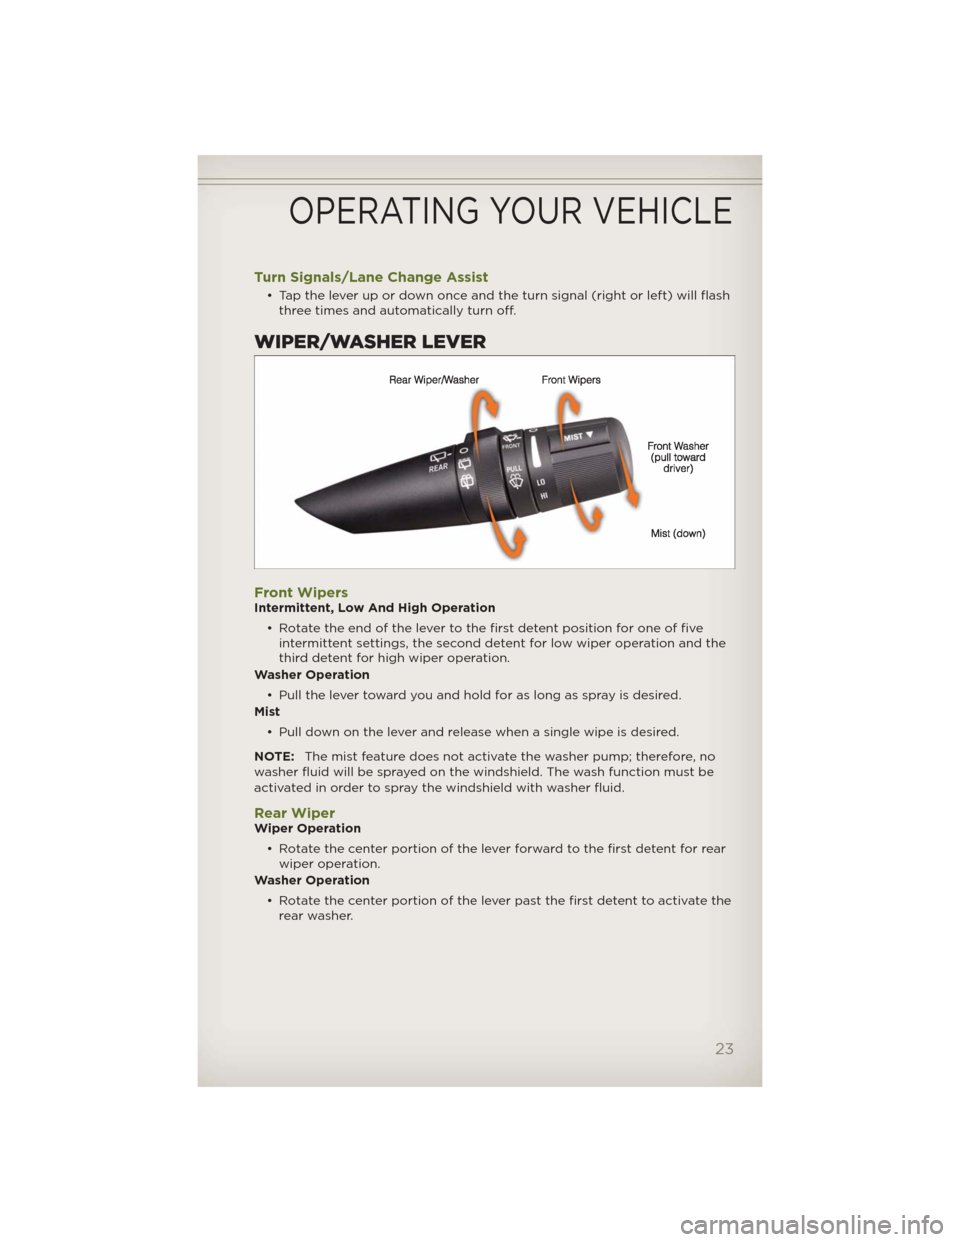
WIPER/WASHER LEVER
Front WipersIntermittent, Low And High Operation
• Rotate the end of the lever to the first detent position for one of five
intermittent settings, the second detent for low wiper operation and the
third detent for high wiper operation.
Washer Operation
• Pull the lever toward you and hold for as long as spray is desired.
Mist
• Pull down on the lever and release when a single wipe is desired.
NOTE:The mist feature does not activate the washer pump; therefore, no
washer fluid will be sprayed on the windshield. The wash function must be
activated in order to spray the windshield with washer fluid.
Rear WiperWiper Operation
• Rotate the center portion of the lever forward to the first detent for rear
wiper operation.
Washer Operation
• Rotate the center portion of the lever past the first detent to activate the
rear washer.
OPERATING YOUR VEHICLE
23
Page 81 of 124
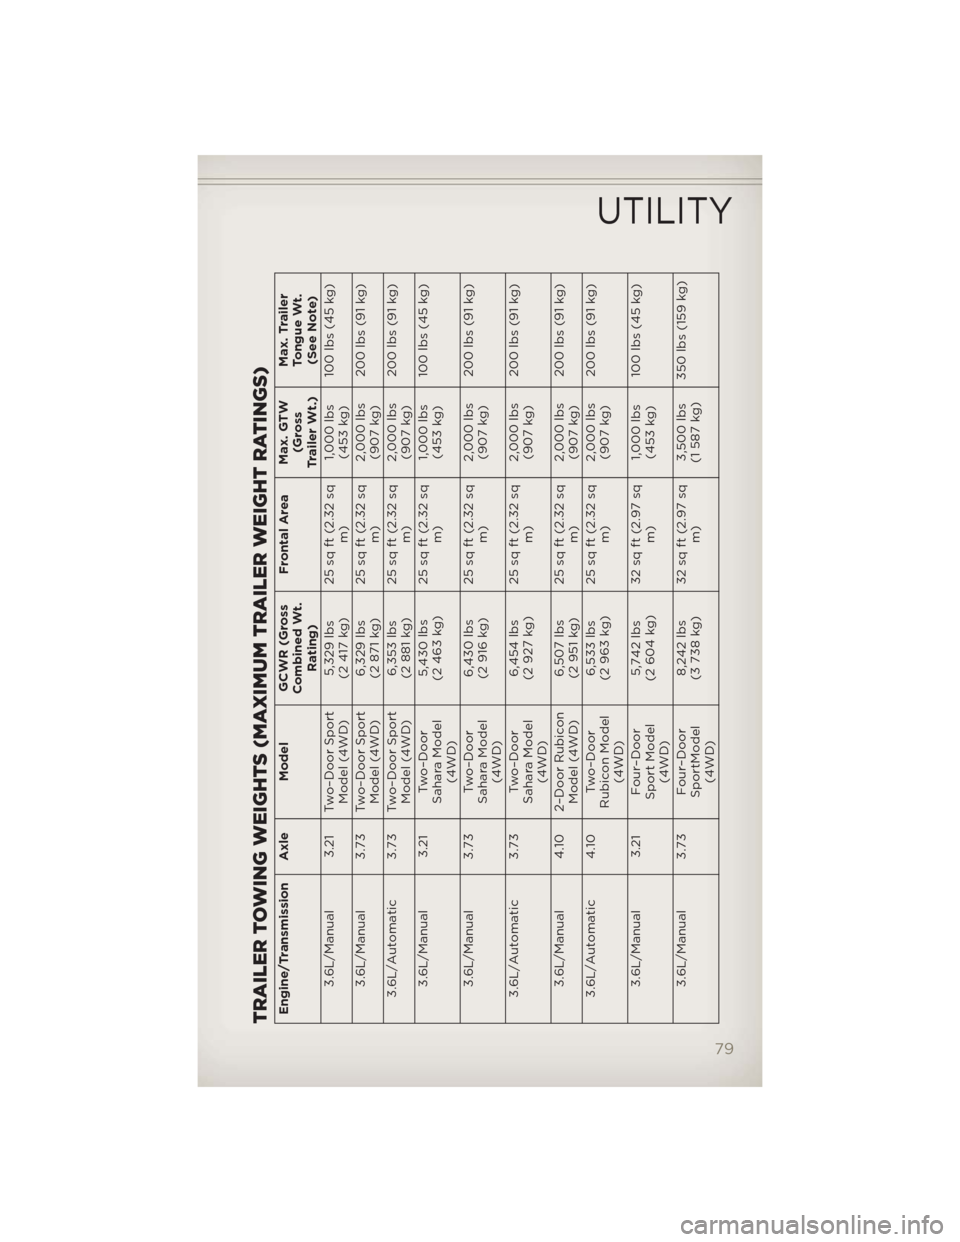
TRAILER TOWING WEIGHTS (MAXIMUM TRAILER WEIGHT RATINGS)Engine/Transmission Axle ModelGCWR (Gross
Combined Wt.
Rating)Frontal AreaMax. GTW
(Gross
Trailer Wt.)Max. Trailer
Tongue Wt.
(See Note)
3.6L/Manual 3.21 Two–Door Sport
Model (4WD)5,329 lbs
(2 417 kg)25 sq ft (2.32 sq
m)1,000 lbs
(453 kg)100 lbs (45 kg)
3.6L/Manual 3.73 Two–Door Sport
Model (4WD)6,329 lbs
(2 871 kg)25 sq ft (2.32 sq
m)2,000 lbs
(907 kg)200 lbs (91 kg)
3.6L/Automatic 3.73 Two–Door Sport
Model (4WD)6,353 lbs
(2 881 kg)25 sq ft (2.32 sq
m)2,000 lbs
(907 kg)200 lbs (91 kg)
3.6L/Manual 3.21 Two–Door
Sahara Model
(4WD)5,430 lbs
(2 463 kg)25 sq ft (2.32 sq
m)1,000 lbs
(453 kg)100 lbs (45 kg)
3.6L/Manual 3.73 Two–Door
Sahara Model
(4WD)6,430 lbs
(2 916 kg)25 sq ft (2.32 sq
m)2,000 lbs
(907 kg)200 lbs (91 kg)
3.6L/Automatic 3.73 Two–Door
Sahara Model
(4WD)6,454 lbs
(2 927 kg)25 sq ft (2.32 sq
m)2,000 lbs
(907 kg)200 lbs (91 kg)
3.6L/Manual 4.10 2–Door Rubicon
Model (4WD)6,507 lbs
(2 951 kg)25 sq ft (2.32 sq
m)2,000 lbs
(907 kg)200 lbs (91 kg)
3.6L/Automatic 4.10 Two–Door
Rubicon Model
(4WD)6,533 lbs
(2 963 kg)25 sq ft (2.32 sq
m)2,000 lbs
(907 kg)200 lbs (91 kg)
3.6L/Manual 3.21 Four–Door
Sport Model
(4WD)5,742 lbs
(2 604 kg)32 sq ft (2.97 sq
m)1,000 lbs
(453 kg)100 lbs (45 kg)
3.6L/Manual 3.73 Four–Door
SportModel
(4WD)8,242 lbs
(3 738 kg)32 sq ft (2.97 sq
m)3,500 lbs
(1 587 kg)350 lbs (159 kg)
UTILITY
79
Page 82 of 124
Engine/Transmission Axle ModelGCWR (Gross
Combined Wt.
Rating)Frontal AreaMax. GTW
(Gross
Trailer Wt.)Max. Trailer
Tongue Wt.
(See Note)
3.6L/Automatic 3.73 Four–Door
Sport Model
(4WD)8,257 lbs
(3 745 kg)32 sq ft (2.97 sq
m)3,500 lbs
(1 587 kg)350 lbs (159 kg)
3.6L/Manual 3.21 Four–Door
Sahara Model
(4WD)5,782 lbs
(2 623 kg)32 sq ft (2.97 sq
m)1,000 lbs
(453 kg)100 lbs (45 kg)
3.6L/Manual 3.73 Four–Door
Sahara Model
(4WD)8,282 lbs
(3 757 kg)32 sq ft (2.97 sq
m)3,500 lbs
(1 587 kg)350 lbs (159 kg)
3.6L/Automatic 3.73 Four–Door
Sahara Model
(4WD)8,297 lbs
(3 763 kg)32 sq ft (2.97 sq
m)3,500 lbs
(1 587 kg)350 lbs (159 kg)
3.6L/Manual 4.10 Four–Door
Rubicon Model
(4WD)8,406 lbs
(3 813 kg)32 sq ft (2.97 sq
m)3,500 lbs
(1 587 kg)350 lbs (159 kg)
3.6L/Automatic 4.10 Four–Door
Rubicon Model
(4WD)8,431 lbs
(3 824 kg)32 sq ft (2.97 sq
m)3,500 lbs
(1 587 kg)350 lbs (159 kg)
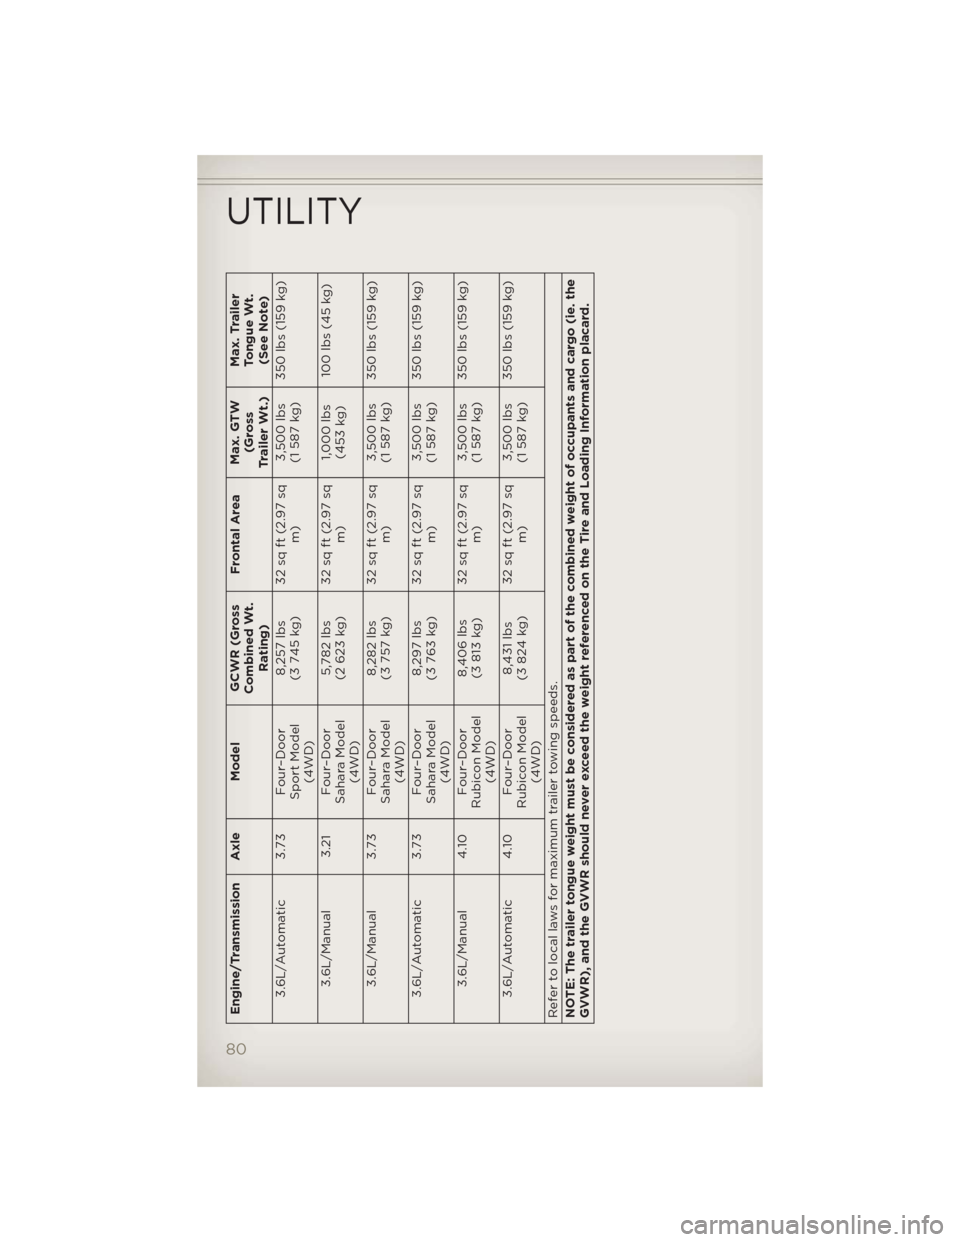
Refer to local laws for maximum trailer towing speeds.
NOTE: The trailer tongue weight must be considered as part of the combined weight of occupants and cargo (ie. the
GVWR), and the GVWR should never exceed the weight referenced on the Tire and Loading Information placard.
UTILITY
80
Page 83 of 124
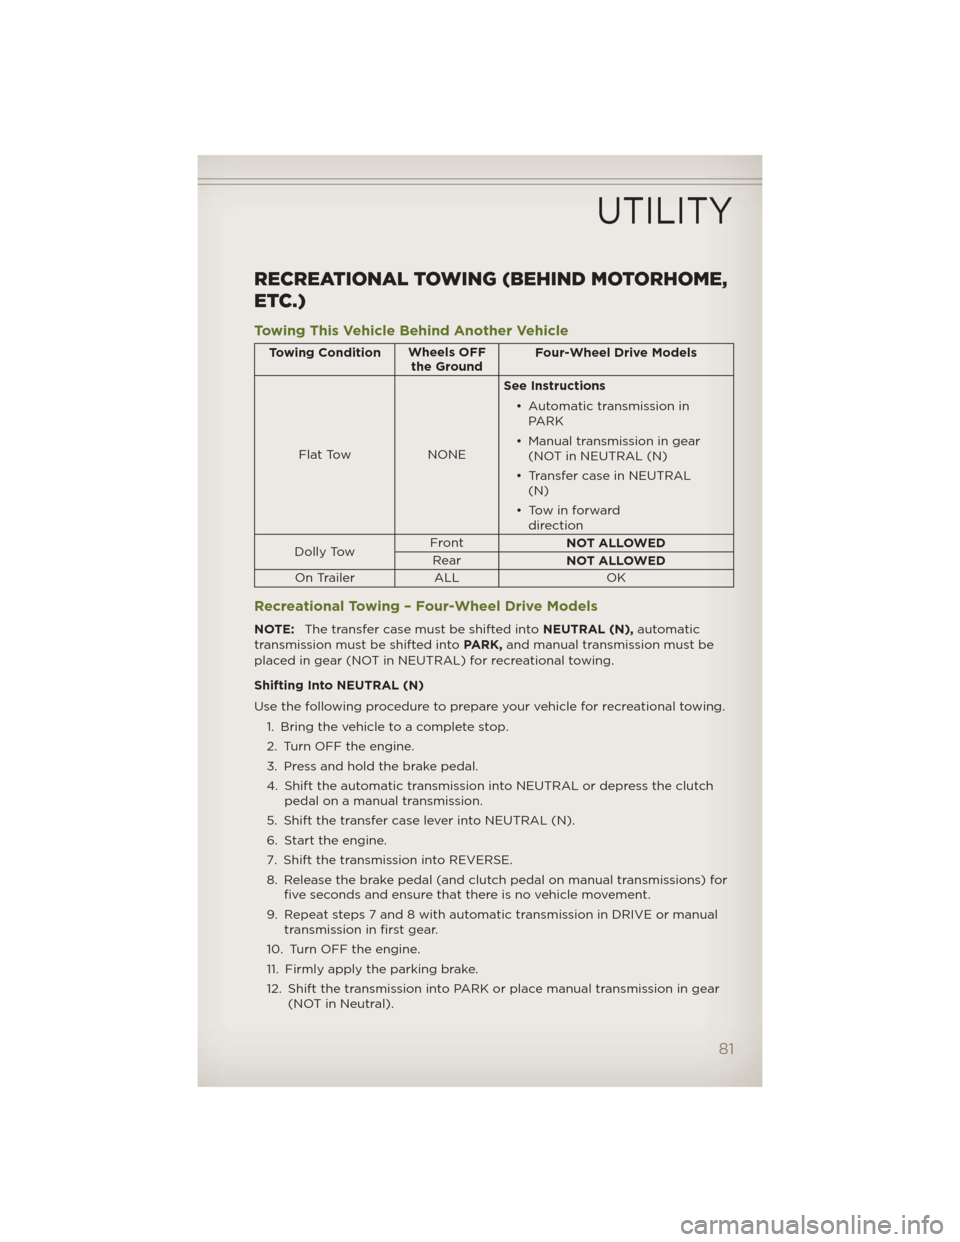
RECREATIONAL TOWING (BEHIND MOTORHOME,
ETC.)
Towing This Vehicle Behind Another Vehicle
Towing ConditionWheels OFF
the GroundFour-Wheel Drive Models
Flat Tow NONESee Instructions
• Automatic transmission in
PARK
• Manual transmission in gear
(NOT in NEUTRAL (N)
• Transfer case in NEUTRAL
(N)
• Tow in forward
direction
Dolly TowFront
NOT ALLOWED
Rear
NOT ALLOWED
On Trailer ALL OK
Recreational Towing – Four-Wheel Drive Models
NOTE:The transfer case must be shifted intoNEUTRAL (N),automatic
transmission must be shifted intoPARK,and manual transmission must be
placed in gear (NOT in NEUTRAL) for recreational towing.
Shifting Into NEUTRAL (N)
Use the following procedure to prepare your vehicle for recreational towing.
1. Bring the vehicle to a complete stop.
2. Turn OFF the engine.
3. Press and hold the brake pedal.
4. Shift the automatic transmission into NEUTRAL or depress the clutch
pedal on a manual transmission.
5. Shift the transfer case lever into NEUTRAL (N).
6. Start the engine.
7. Shift the transmission into REVERSE.
8. Release the brake pedal (and clutch pedal on manual transmissions) for
five seconds and ensure that there is no vehicle movement.
9. Repeat steps 7 and 8 with automatic transmission in DRIVE or manual
transmission in first gear.
10. Turn OFF the engine.
11. Firmly apply the parking brake.
12. Shift the transmission into PARK or place manual transmission in gear
(NOT in Neutral).
UTILITY
81
Page 84 of 124
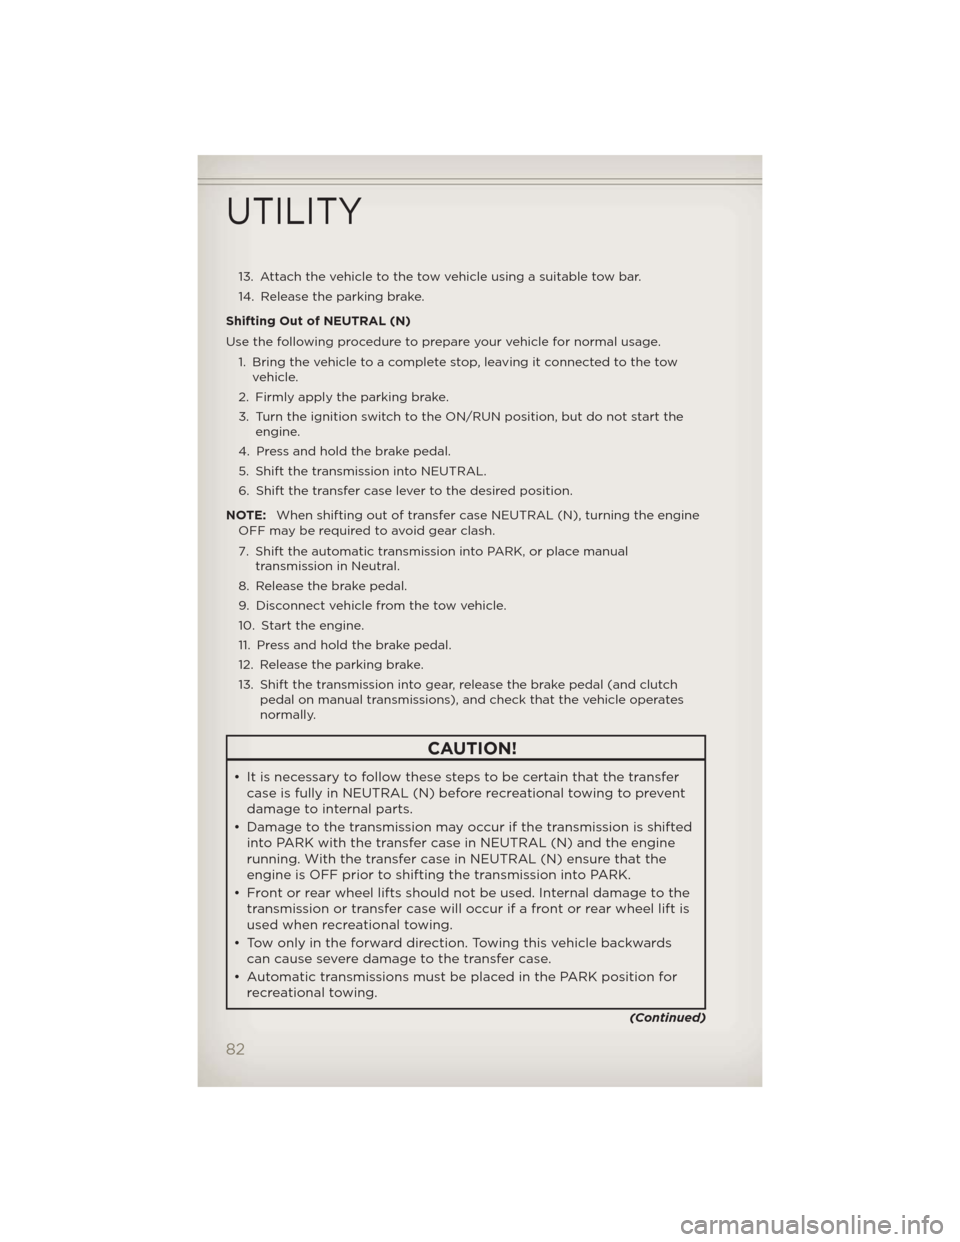
13. Attach the vehicle to the tow vehicle using a suitable tow bar.
14. Release the parking brake.
Shifting Out of NEUTRAL (N)
Use the following procedure to prepare your vehicle for normal usage.
1. Bring the vehicle to a complete stop, leaving it connected to the tow
vehicle.
2. Firmly apply the parking brake.
3. Turn the ignition switch to the ON/RUN position, but do not start the
engine.
4. Press and hold the brake pedal.
5. Shift the transmission into NEUTRAL.
6. Shift the transfer case lever to the desired position.
NOTE:When shifting out of transfer case NEUTRAL (N), turning the engine
OFF may be required to avoid gear clash.
7. Shift the automatic transmission into PARK, or place manual
transmission in Neutral.
8. Release the brake pedal.
9. Disconnect vehicle from the tow vehicle.
10. Start the engine.
11. Press and hold the brake pedal.
12. Release the parking brake.
13. Shift the transmission into gear, release the brake pedal (and clutch
pedal on manual transmissions), and check that the vehicle operates
normally.
CAUTION!
• It is necessary to follow these steps to be certain that the transfer
case is fully in NEUTRAL (N) before recreational towing to prevent
damage to internal parts.
• Damage to the transmission may occur if the transmission is shifted
into PARK with the transfer case in NEUTRAL (N) and the engine
running. With the transfer case in NEUTRAL (N) ensure that the
engine is OFF prior to shifting the transmission into PARK.
• Front or rear wheel lifts should not be used. Internal damage to the
transmission or transfer case will occur if a front or rear wheel lift is
used when recreational towing.
• Tow only in the forward direction. Towing this vehicle backwards
can cause severe damage to the transfer case.
• Automatic transmissions must be placed in the PARK position for
recreational towing.
(Continued)
UTILITY
82