automatic transmission JEEP WRANGLER 2014 JK / 3.G User Guide
[x] Cancel search | Manufacturer: JEEP, Model Year: 2014, Model line: WRANGLER, Model: JEEP WRANGLER 2014 JK / 3.GPages: 148, PDF Size: 12.93 MB
Page 26 of 148
ENGINE BREAK-IN RECOMMENDATIONS
A long break-in period is not required for the engine and drivetrain (transmission and
axle) in your vehicle.
Drive moderately during the first 300 miles (500 km). After the initial 60 miles
(100 km), speeds up to 50 or 55 mph (80 or 90 km/h) are desirable.
While cruising, brief full-throttle acceleration within the limits of local traffic laws
contributes to a good break-in. Wide-open throttle acceleration in low gear can be
detrimental and should be avoided.
The engine oil installed in the engine at the factory is a high-quality energy
conserving type lubricant. Oil changes should be consistent with anticipated climate
conditions under which vehicle operations will occur. For the recommended viscosity
and quality grades, refer to “Maintaining Your Vehicle.”
NOTE:
A new engine may consume some oil during its first few thousand miles (kilometers)
of operation. This should be considered a normal part of the break-in and not
interpreted as an indication of an engine problem or malfunction.
CAUTION!
Never use Non-Detergent Oil or Straight Mineral Oil in the engine or damage may
result.
TURN SIGNAL/LIGHTS LEVER
Headlights/Parking Lights/Automatic
Headlights
• Rotate the end of the lever to the firstdetent for parking lights
, the
second detent for headlights
, and
the third detent for AUTO.
• When set to AUTO, the system auto- matically turns the headlights on or off
based on ambient light levels.
OPERATING YOUR VEHICLE
24
Page 91 of 148
EVIC Main Menu
• To step to each main menu feature press and release the MENU button once foreach step. A step from the last item in the list will cause the first item in the
feature list to be displayed. The following features are in the Main menu:• Compass, Outside Temperature, and ECO display
• Digital Speedometer
• Average Fuel Economy
• Distance to Empty
• Elapsed Time
• Vehicle Information
• Coolant Temp
• Oil Pressure
• Transmission Temp
• Oil Life Remaining (Automatic Oil Change Indicator)
• EVIC Units Selection
• System Status
• Personal Settings
• Tire PSI
Compass Calibration
This compass is self-calibrating, which eliminates the need to set the compass
manually. When the vehicle is new, the compass may appear erratic and the EVIC will
display “CAL” until the compass is calibrated.
You may also calibrate the compass by completing one or more 360 degree turns (in
an area free from large metal or metallic objects) until the “CAL” message displayed
in the EVIC turns off. The compass will now function normally.
ECO
• The ECO message will appear in your EVIC display whenever you are driving in a fuel efficient manner.
• This feature allows you to monitor when you are driving in a fuel efficient manner, and it can be used to modify driving habits in order to increase fuel economy.
ELECTRONICS
89
Page 95 of 148
COMMAND-TRAC®/ROCK-TRAC®
•The transfer case provides four mode
positions: 2H (Two-wheel drive high
range), 4H (Four-wheel drive high
range), N (Neutral), and 4L (Four-wheel
drive low range).
• The transfer case is intended to be driven in the 2H position for normal
street and highway conditions such as
hard-surfaced roads.
Shifting Between 2H And 4H
• Shifting between 2H and 4H can be made with the vehicle stopped or in
motion. Shift the transfer case lever
firmly to 4H at any speed up to 50 mph
(80 km/h).
Shifting Between 4H And 4L (Automatic Transmission)
• Shifting between 4H and 4L should be made with the vehicle rolling at 2 to 3 mph (3 to 5 km/h). Shift the automatic transmission into NEUTRAL then shift the
transfer case lever firmly to 4L (do not pause with the transfer case in NEUTRAL).
Once the shift is completed, place the automatic transmission into DRIVE.
Shifting Between 4H And 4L (Manual Transmission)
• Shifting between 4H and 4L should be made with the vehicle rolling at 2 to 3 mph (3 to 5 km/h). Fully depress the clutch pedal and shift the transfer case lever firmly
to 4L (do not pause with the transfer case in NEUTRAL). Once the shift is
completed, release the clutch pedal.
NOTE:
To enhance off-road performance in 4L mode, manual transmission vehicles will start
regardless of whether or not the clutch pedal is depressed.
OFF-ROAD CAPABILITIES (4WD OPERATION)
93
Page 97 of 148
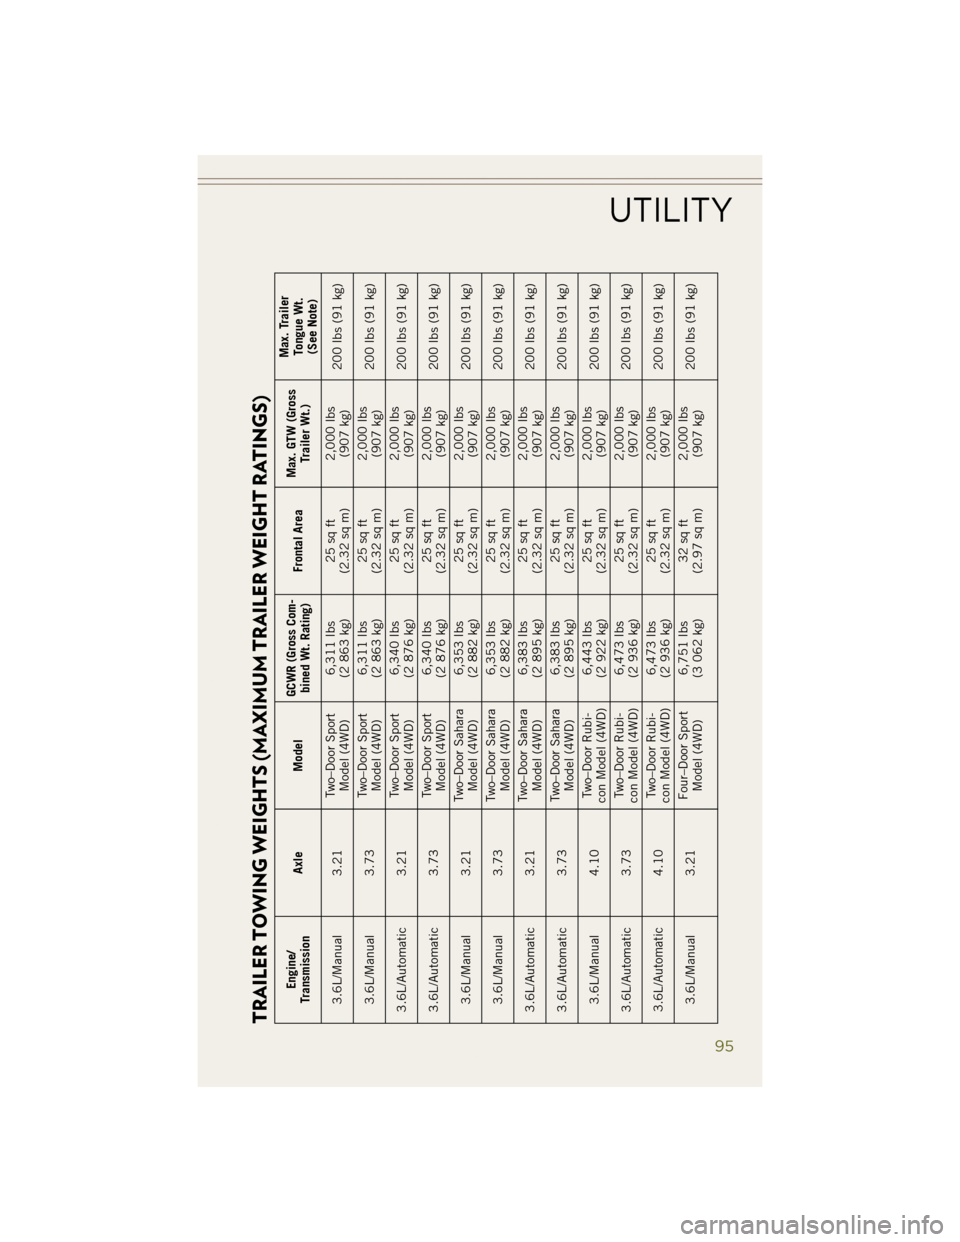
TRAILER TOWING WEIGHTS (MAXIMUM TRAILER WEIGHT RATINGS)
Engine/
Transmission Axle Model GCWR (Gross Com-
bined Wt. Rating) Frontal AreaMax. GTW (Gross
Trailer Wt.) Max. Trailer
Tongue Wt.(See Note)
3.6L/Manual 3.21 Two–Door Sport
Model (4WD) 6,311 lbs
(2 863 kg) 25 sq ft
(2.32 sq m) 2,000 lbs
(907 kg) 200 lbs (91 kg)
3.6L/Manual 3.73 Two–Door Sport
Model (4WD) 6,311 lbs
(2 863 kg) 25 sq ft
(2.32 sq m) 2,000 lbs
(907 kg) 200 lbs (91 kg)
3.6L/Automatic 3.21 Two–Door Sport
Model (4WD) 6,340 lbs
(2 876 kg) 25 sq ft
(2.32 sq m) 2,000 lbs
(907 kg) 200 lbs (91 kg)
3.6L/Automatic 3.73 Two–Door Sport
Model (4WD) 6,340 lbs
(2 876 kg) 25 sq ft
(2.32 sq m) 2,000 lbs
(907 kg) 200 lbs (91 kg)
3.6L/Manual 3.21 Two–Door Sahara
Model (4WD) 6,353 lbs
(2 882 kg) 25 sq ft
(2.32 sq m) 2,000 lbs
(907 kg) 200 lbs (91 kg)
3.6L/Manual 3.73 Two–Door Sahara
Model (4WD) 6,353 lbs
(2 882 kg) 25 sq ft
(2.32 sq m) 2,000 lbs
(907 kg) 200 lbs (91 kg)
3.6L/Automatic 3.21 Two–Door Sahara
Model (4WD) 6,383 lbs
(2 895 kg) 25 sq ft
(2.32 sq m) 2,000 lbs
(907 kg) 200 lbs (91 kg)
3.6L/Automatic 3.73 Two–Door Sahara
Model (4WD) 6,383 lbs
(2 895 kg) 25 sq ft
(2.32 sq m) 2,000 lbs
(907 kg) 200 lbs (91 kg)
3.6L/Manual 4.10 Two–Door Rubi-
con Model (4WD) 6,443 lbs
(2 922 kg) 25 sq ft
(2.32 sq m) 2,000 lbs
(907 kg) 200 lbs (91 kg)
3.6L/Automatic 3.73 T
wo–Door Rubi-
con Model (4WD) 6,473 lbs
(2 936 kg) 25 sq ft
(2.32 sq m) 2,000 lbs
(907 kg) 200 lbs (91 kg)
3.6L/Automatic 4.10 Two–Door Rubi-
con Model (4WD) 6,473 lbs
(2 936 kg) 25 sq ft
(2.32 sq m) 2,000 lbs
(907 kg) 200 lbs (91 kg)
3.6L/Manual 3.21 Four–Door Sport
Model (4WD) 6,751 lbs
(3 062 kg) 32 sq ft
(2.97 sq m) 2,000 lbs
(907 kg) 200 lbs (91 kg)
UTILITY
95
Page 98 of 148
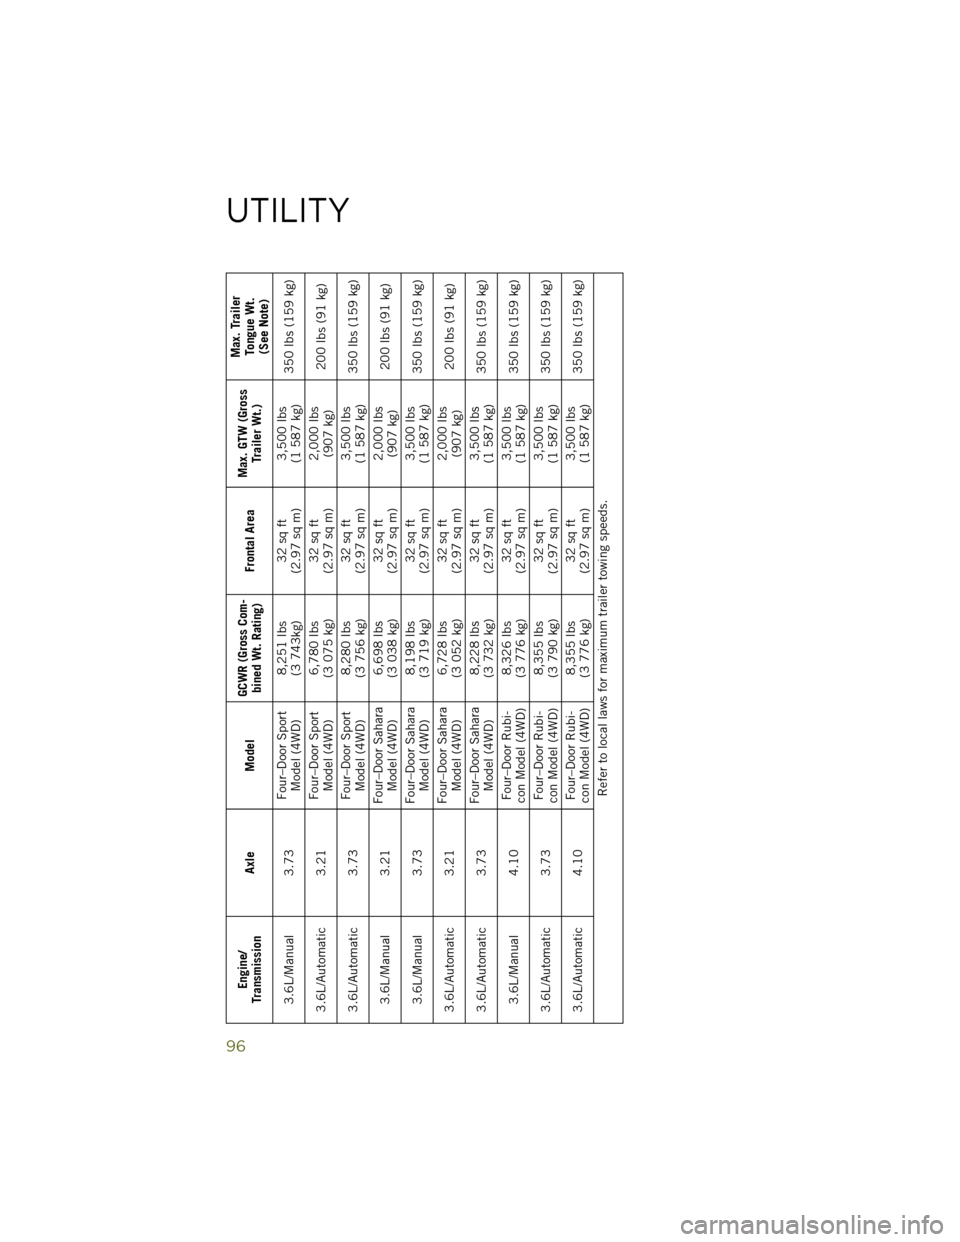
Engine/
Transmission Axle Model GCWR (Gross Com-
bined Wt. Rating) Frontal AreaMax. GTW (Gross
Trailer Wt.) Max. Trailer
Tongue Wt.(See Note)
3.6L/Manual 3.73 Four–Door Sport
Model (4WD) 8,251 lbs
(3 743kg) 32 sq ft
(2.97 sq m) 3,500 lbs
(1 587 kg) 350 lbs (159 kg)
3.6L/Automatic 3.21 Four–Door Sport
Model (4WD) 6,780 lbs
(3 075 kg) 32 sq ft
(2.97 sq m) 2,000 lbs
(907 kg) 200 lbs (91 kg)
3.6L/Automatic 3.73 Four–Door Sport
Model (4WD) 8,280 lbs
(3 756 kg) 32 sq ft
(2.97 sq m) 3,500 lbs
(1 587 kg) 350 lbs (159 kg)
3.6L/Manual 3.21 Four–Door Sahara
Model (4WD) 6,698 lbs
(3 038 kg) 32 sq ft
(2.97 sq m) 2,000 lbs
(907 kg) 200 lbs (91 kg)
3.6L/Manual 3.73 Four–Door Sahara
Model (4WD) 8,198 lbs
(3 719 kg) 32 sq ft
(2.97 sq m) 3,500 lbs
(1 587 kg) 350 lbs (159 kg)
3.6L/Automatic 3.21 Four–Door Sahara
Model (4WD) 6,728 lbs
(3 052 kg) 32 sq ft
(2.97 sq m) 2,000 lbs
(907 kg) 200 lbs (91 kg)
3.6L/Automatic 3.73 Four–Door Sahara
Model (4WD) 8,228 lbs
(3 732 kg) 32 sq ft
(2.97 sq m) 3,500 lbs
(1 587 kg) 350 lbs (159 kg)
3.6L/Manual 4.10 Four–Door Rubi-
con Model (4WD) 8,326 lbs
(3 776 kg) 32 sq ft
(2.97 sq m) 3,500 lbs
(1 587 kg) 350 lbs (159 kg)
3.6L/Automatic 3.73 Four–Door Rubi-
con Model (4WD) 8,355 lbs
(3 790 kg) 32 sq ft
(2.97 sq m) 3,500 lbs
(1 587 kg) 350 lbs (159 kg)
3.6L/Automatic 4.10 Four–Door
Rubi-
con Model (4WD) 8,355 lbs
(3 776 kg) 32 sq ft
(2.97 sq m) 3,500 lbs
(1 587 kg) 350 lbs (159 kg)
Refer to local laws for maximum trailer towing speeds.
UTILITY
96
Page 99 of 148
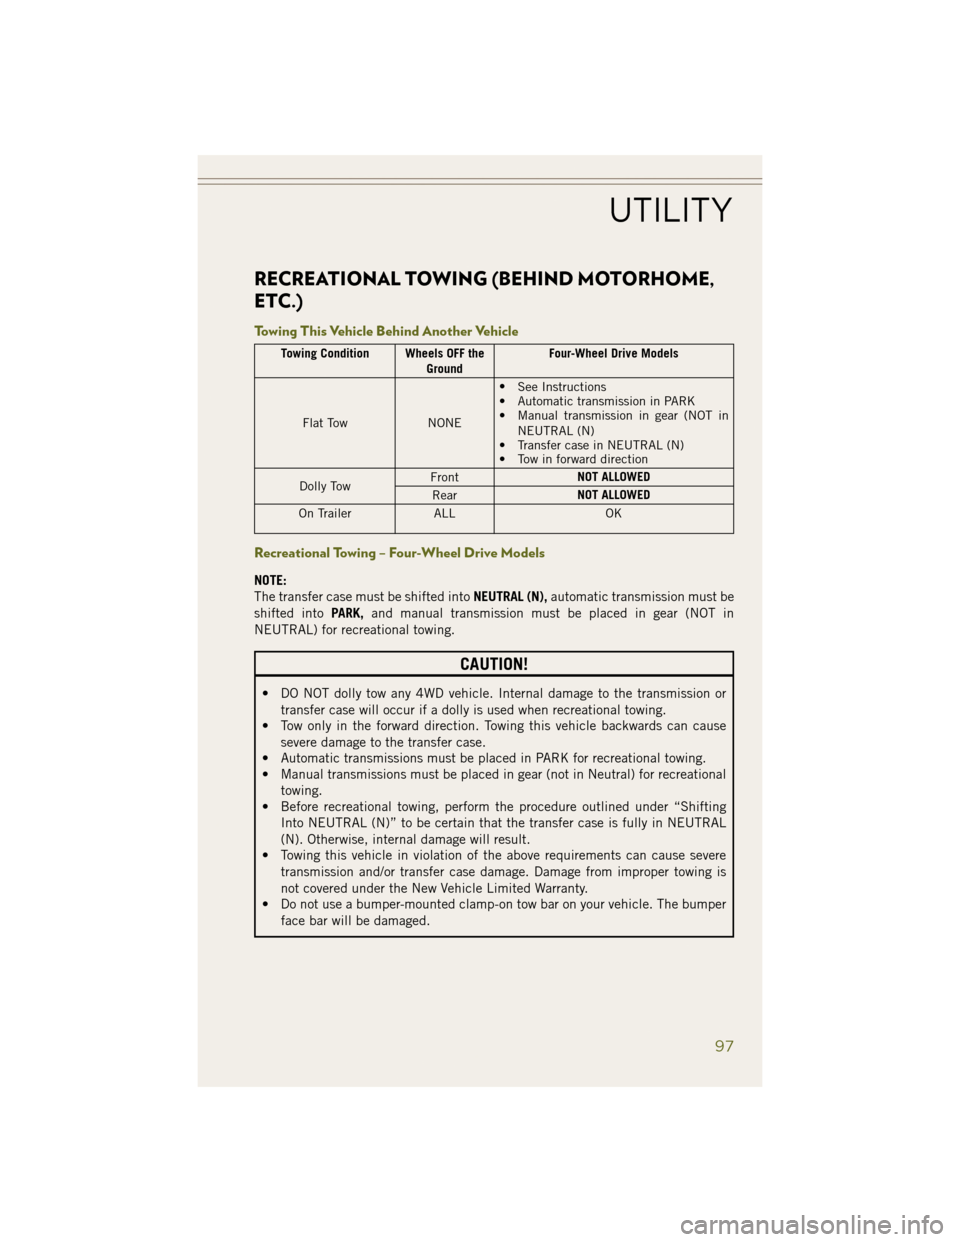
RECREATIONAL TOWING (BEHIND MOTORHOME,
ETC.)
Towing This Vehicle Behind Another Vehicle
Towing Condition Wheels OFF theGroundFour-Wheel Drive Models
Flat Tow NONE•
See Instructions
• Automatic transmission in PARK
• Manual transmission in gear (NOT in
NEUTRAL (N)
• Transfer case in NEUTRAL (N)
• Tow in forward direction
Dolly Tow Front
NOT ALLOWED
Rear NOT ALLOWED
On Trailer ALL OK
Recreational Towing – Four-Wheel Drive Models
NOTE:
The transfer case must be shifted into NEUTRAL (N),automatic transmission must be
shifted into PARK,and manual transmission must be placed in gear (NOT in
NEUTRAL) for recreational towing.
CAUTION!
• DO NOT dolly tow any 4WD vehicle. Internal damage to the transmission or transfer case will occur if a dolly is used when recreational towing.
• Tow only in the forward direction. Towing this vehicle backwards can cause
severe damage to the transfer case.
• Automatic transmissions must be placed in PARK for recreational towing.
• Manual transmissions must be placed in gear (not in Neutral) for recreational
towing.
• Before recreational towing, perform the procedure outlined under “Shifting
Into NEUTRAL (N)” to be certain that the transfer case is fully in NEUTRAL
(N). Otherwise, internal damage will result.
• Towing this vehicle in violation of the above requirements can cause severe
transmission and/or transfer case damage. Damage from improper towing is
not covered under the New Vehicle Limited Warranty.
• Do not use a bumper-mounted clamp-on tow bar on your vehicle. The bumper
face bar will be damaged.
UTILITY
97
Page 100 of 148
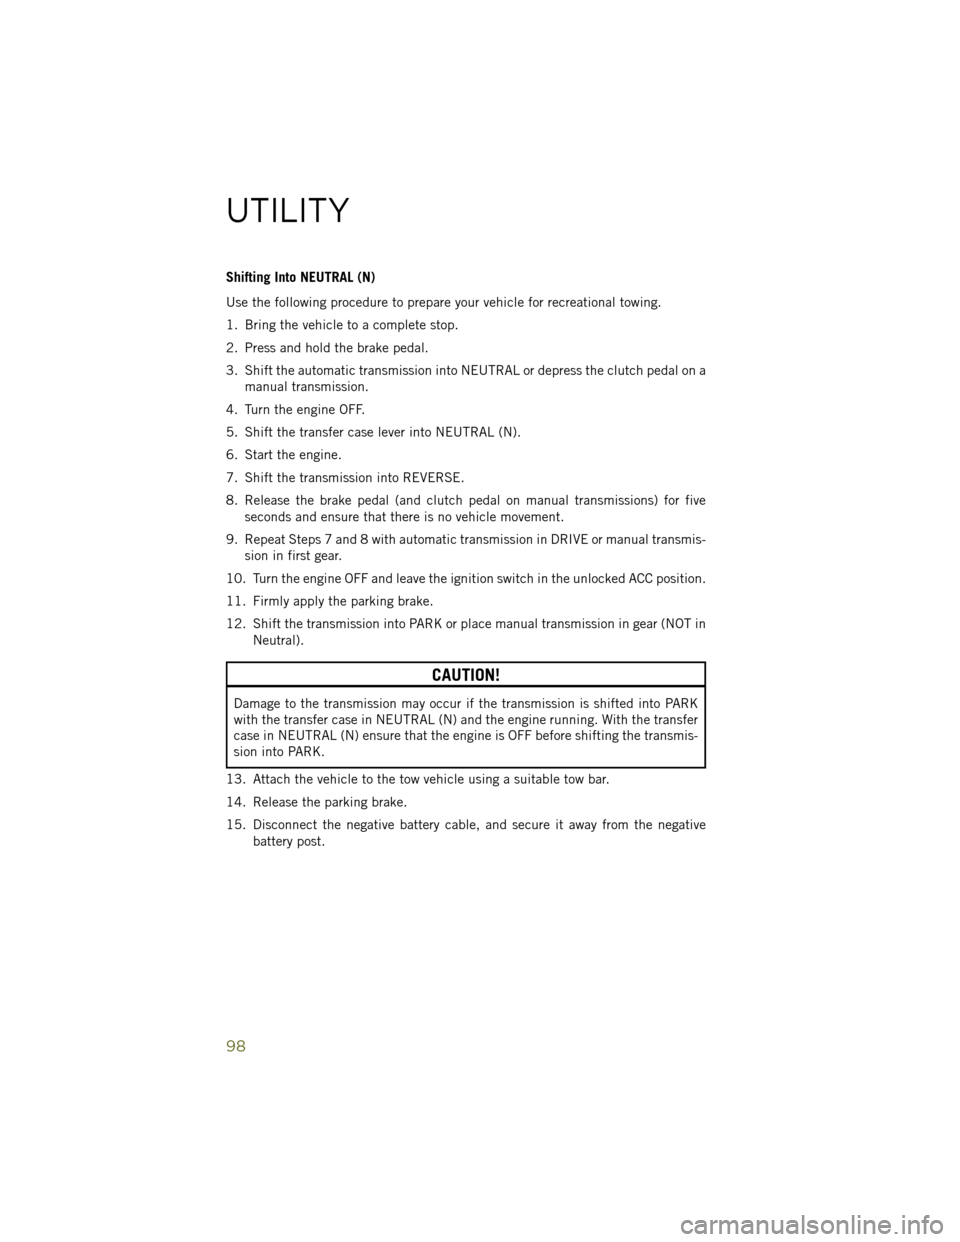
Shifting Into NEUTRAL (N)
Use the following procedure to prepare your vehicle for recreational towing.
1. Bring the vehicle to a complete stop.
2. Press and hold the brake pedal.
3. Shift the automatic transmission into NEUTRAL or depress the clutch pedal on amanual transmission.
4. Turn the engine OFF.
5. Shift the transfer case lever into NEUTRAL (N).
6. Start the engine.
7. Shift the transmission into REVERSE.
8. Release the brake pedal (and clutch pedal on manual transmissions) for five seconds and ensure that there is no vehicle movement.
9. Repeat Steps 7 and 8 with automatic transmission in DRIVE or manual transmis- sion in first gear.
10. Turn the engine OFF and leave the ignition switch in the unlocked ACC position.
11. Firmly apply the parking brake.
12. Shift the transmission into PARK or place manual transmission in gear (NOT in Neutral).
CAUTION!
Damage to the transmission may occur if the transmission is shifted into PARK
with the transfer case in NEUTRAL (N) and the engine running. With the transfer
case in NEUTRAL (N) ensure that the engine is OFF before shifting the transmis-
sion into PARK.
13. Attach the vehicle to the tow vehicle using a suitable tow bar.
14. Release the parking brake.
15. Disconnect the negative battery cable, and secure it away from the negative battery post.
UTILITY
98
Page 101 of 148
WARNING!
You or others could be injured or killed if you leave the vehicle unattended with the
transfer case in the NEUTRAL (N) position without first fully engaging the parking
brake. The transfer case NEUTRAL (N) position disengages both the front and rear
driveshafts from the powertrain and will allow the vehicle to move, even if the
transmission is in PARK. The parking brake should always be applied when the
driver is not in the vehicle.
CAUTION!
It is necessary to follow these steps to be certain that the transfer case is fully in
NEUTRAL (N) before recreational towing to prevent damage to internal parts.
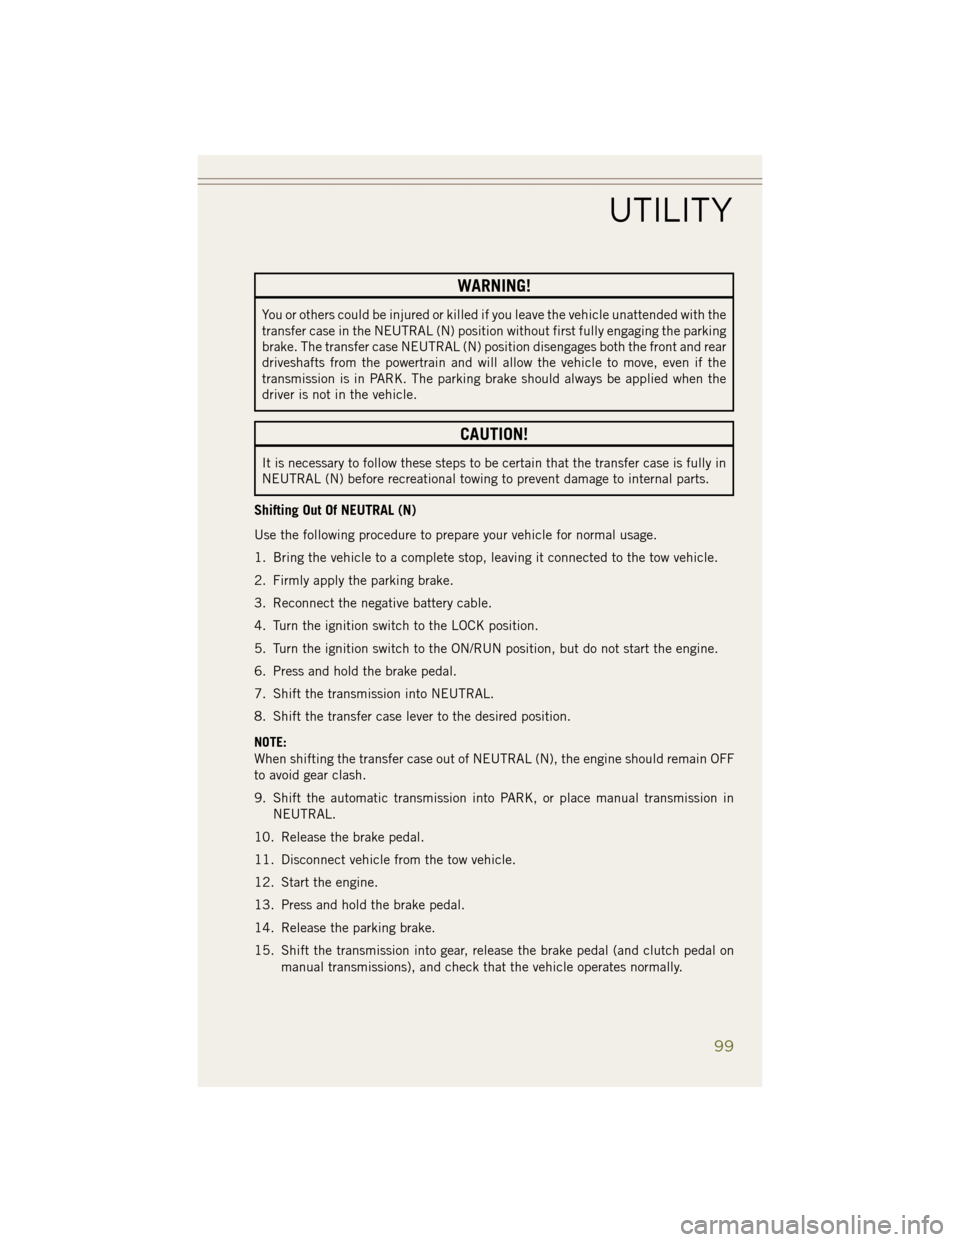
Shifting Out Of NEUTRAL (N)
Use the following procedure to prepare your vehicle for normal usage.
1. Bring the vehicle to a complete stop, leaving it connected to the tow vehicle.
2. Firmly apply the parking brake.
3. Reconnect the negative battery cable.
4. Turn the ignition switch to the LOCK position.
5. Turn the ignition switch to the ON/RUN position, but do not start the engine.
6. Press and hold the brake pedal.
7. Shift the transmission into NEUTRAL.
8. Shift the transfer case lever to the desired position.
NOTE:
When shifting the transfer case out of NEUTRAL (N), the engine should remain OFF
to avoid gear clash.
9. Shift the automatic transmission into PARK, or place manual transmission inNEUTRAL.
10. Release the brake pedal.
11. Disconnect vehicle from the tow vehicle.
12. Start the engine.
13. Press and hold the brake pedal.
14. Release the parking brake.
15. Shift the transmission into gear, release the brake pedal (and clutch pedal on manual transmissions), and check that the vehicle operates normally.
UTILITY
99
Page 109 of 148
Preparations For Jacking
1. Park on a firm, level surface. Avoid ice or slippery areas.
2. Turn on the Hazard Warning flasher.
3. Set the parking brake.
4. Shift the automatic transmission into PARK, or a manual transmission intoREVERSE.
5. Turn the ignition to LOCK.
Block both the front and rear of the wheel
diagonally opposite of the jacking posi-
tion. For example, if changing the right
front tire, block the left rear wheel.
NOTE:
Passengers should not remain in the ve-
hicle when the vehicle is being jacked.
Jacking Instructions
1. Remove the spare tire, jack and tools from the stored location.
2. Loosen (but do not remove) the wheel lug nuts by turning them to the left
one turn while the wheel is still on the
ground.
3. Assemble the jack and jacking tools. Connect the jack handle driver to the
extension, then to the lug wrench.
Wheel Blocked
WHAT TO DO IN EMERGENCIES
107
Page 112 of 148
WARNING!
• Do not attempt to change a tire on the side of the vehicle close to movingtraffic. Pull far enough off the road to avoid the danger of being hit when
operating the jack or changing the wheel.
• Being under a jacked-up vehicle is dangerous. The vehicle could slip off the
jack and fall on you. You could be crushed. Never put any part of your body
under a vehicle that is on a jack. If you need to get under a raised vehicle, take
it to a service center where it can be raised on a lift.
• Never start or run the engine while the vehicle is on a jack.
• The jack is designed to be used as a tool for changing tires only. The jack
should not be used to lift the vehicle for service purposes. The vehicle should
be jacked on a firm level surface only. Avoid ice or slippery areas.
• Carefully follow these tire changing warnings to help prevent personal injury or
damage to your vehicle:
• Always park on a firm, level surface as far from the edge of the roadwayas possible before raising the vehicle.
• Turn on the Hazard Warning flasher.
• Block the wheel diagonally opposite the wheel to be raised.
• Set the parking brake firmly and set an automatic transmission in PARK;
a manual transmission in REVERSE.
• Do not let anyone sit in the vehicle when it is on a jack.
• Do not get under the vehicle when it is on a jack.
• Only use the jack in the positions indicated and for lifting this vehicle
during a tire change.
• If working on or near a roadway, be extremely careful of motor traffic.
• To assure that spare tires, flat or inflated, are securely stowed, spares
must be stowed with the valve stem facing the ground.
• Raising the vehicle higher than necessary can make the vehicle less
stable and cause a collision. It could slip off the jack and hurt someone
near it. Raise the vehicle only enough to remove the tire.
• To avoid the risk of forcing the vehicle off the jack, do not tighten the
wheel nuts fully until the vehicle has been lowered.
• A loose tire or jack, thrown forward in a collision or hard stop, could en-
danger the occupants of the vehicle. Always stow the jack parts and the
spare tire in the places provided.
• To avoid the risk of forcing the vehicle off the jack, do not tighten the lug
nuts fully until the vehicle is lowered to the ground.
WHAT TO DO IN EMERGENCIES
110