instrument panel JEEP WRANGLER 2014 Owners Manual
[x] Cancel search | Manufacturer: JEEP, Model Year: 2014, Model line: WRANGLER, Model: JEEP WRANGLER 2014Pages: 674, PDF Size: 4.91 MB
Page 54 of 674
WARNING!(Continued)
•Being too close to the steering wheel or instrument
panel during Advanced Front Air Bag deployment
could cause serious injury, including death. Air
bags need room to inflate. Sit back, comfortably
extending your arms to reach the steering wheel or
instrument panel.
• Seat-Mounted Side Air Bags (SAB) also need room
to inflate. Do not lean against the door or window.
Sit upright in the center of the seat.
• In a collision, you and your passengers can suffer
much greater injuries if you are not properly buck-
led up. You can strike the interior of your vehicle or
other passengers, or you can be thrown out of the
vehicle. Always be sure you and others in your
vehicle are buckled up properly.
Buckle up even though you are an excellent driver, even
on short trips. Someone on the road may be a poor driver and cause a collision that includes you. This can happen
far away from home or on your own street.
Research has shown that seat belts save lives, and they
can reduce the seriousness of injuries in a collision. Some
of the worst injuries happen when people are thrown
from the vehicle. Seat belts reduce the possibility of
ejection and the risk of injury caused by striking the
inside of the vehicle. Everyone in a motor vehicle should
be belted at all times.
Lap/Shoulder Belts
All seating positions in your vehicle are equipped with
lap/shoulder belts. The belt webbing retractor is de-
signed to lock during very sudden stops or collisions.
This feature allows the shoulder part of the belt to move
freely with you under normal conditions. However, in a
collision the belt will lock and reduce the risk of you
striking the inside of the vehicle or being thrown out.
52 THINGS TO KNOW BEFORE STARTING YOUR VEHICLE
Page 160 of 674
controls for each seat are located on a switch bank near
the bottom center of the instrument panel.
You can choose from HIGH, LOW or OFF heat settings.
Amber indicator lights in each switch indicate the level of
heat in use. Two indicator lights will illuminate for
HIGH, one for LOW and none for OFF.Press the switch once to select HIGH-level
heating. Press the switch a second time to select
LOW-level heating. Press the switch a third
time to shut the heating elements OFF.
When the HIGH-level setting is selected, the heater will
provide a boosted heat level during the initial stages of
operation. Then, the heat output will drop to the normal
HIGH-level. If the HIGH-level setting is selected, the
system will automatically switch to LOW-level after
approximately 30 minutes of continuous operation. At
that time, the number of illuminated LEDs changes from two to one, indicating the change. The LOW-level setting
will turn OFF automatically after approximately 30 min-
utes.
NOTE:
When a heat setting is selected, heat will be felt
within two to five minutes.
Page 189 of 674
may have to be reset manually. To reset the inverter
manually press the power inverter button OFF and ON.
To avoid overloading the circuit, check the power ratings
on electrical devices prior to using the inverter.The power inverter switch is located
on the instrument panel below the
climate controls. To turn on the power
outlet, press the switch once. The indi-
cator light will illuminate. Press the
switch a second time to turn the power
inverter outlet off.
NOTE: When the power inverter switch is pressed, there
will be a delay of approximately one second before the
inverter indicator light turns ON.
3
UNDERSTANDING THE FEATURES OF YOUR VEHICLE 187
Page 305 of 674
4
UNDERSTANDING YOUR INSTRUMENT PANEL 303
Page 307 of 674
4
UNDERSTANDING YOUR INSTRUMENT PANEL 305
Page 309 of 674
WARNING!
Driving a vehicle with the red brake light on is
dangerous. Part of the brake system may have failed.
It will take longer to stop the vehicle. You could have
a collision. Have the vehicle checked immediately.
Vehicles equipped with the Anti-Lock Brake System
(ABS), are also equipped with Electronic Brake Force
Distribution (EBD). In the event of an EBD failure, the
Brake Warning Light will turn on along with the ABS
Light. Immediate repair to the ABS system is required.
Operation of the Brake Warning Light can be checked by
turning the ignition switch from the OFF position to the
ON/RUN position. The light should illuminate for ap-
proximately two seconds. The light should then turn off
unless the parking brake is applied or a brake fault is
detected. If the light does not illuminate, have the light
inspected by an authorized dealer. The light also will turn on when the parking brake is
applied with the ignition switch in the ON/RUN posi-
tion.
NOTE:
This light shows only that the parking brake is
applied. It does not show the degree of brake application.
12. Anti-Lock Brake (ABS) Light
After the ignition is turned on, the Anti-Lock
Brake System (ABS) light illuminates to indicate
function check at vehicle start-up. If the light remains on
after start-up or comes on and stays on at road speeds, it
may indicate that the ABS has detected a malfunction or
has become inoperative. The system reverts to standard
non-anti-lock brakes.
If both the Brake Warning Light and the ABS Warning
Light are on, see an authorized dealer immediately. Refer
to “Anti-Lock Brake System” in “Starting And
Operating”.
4
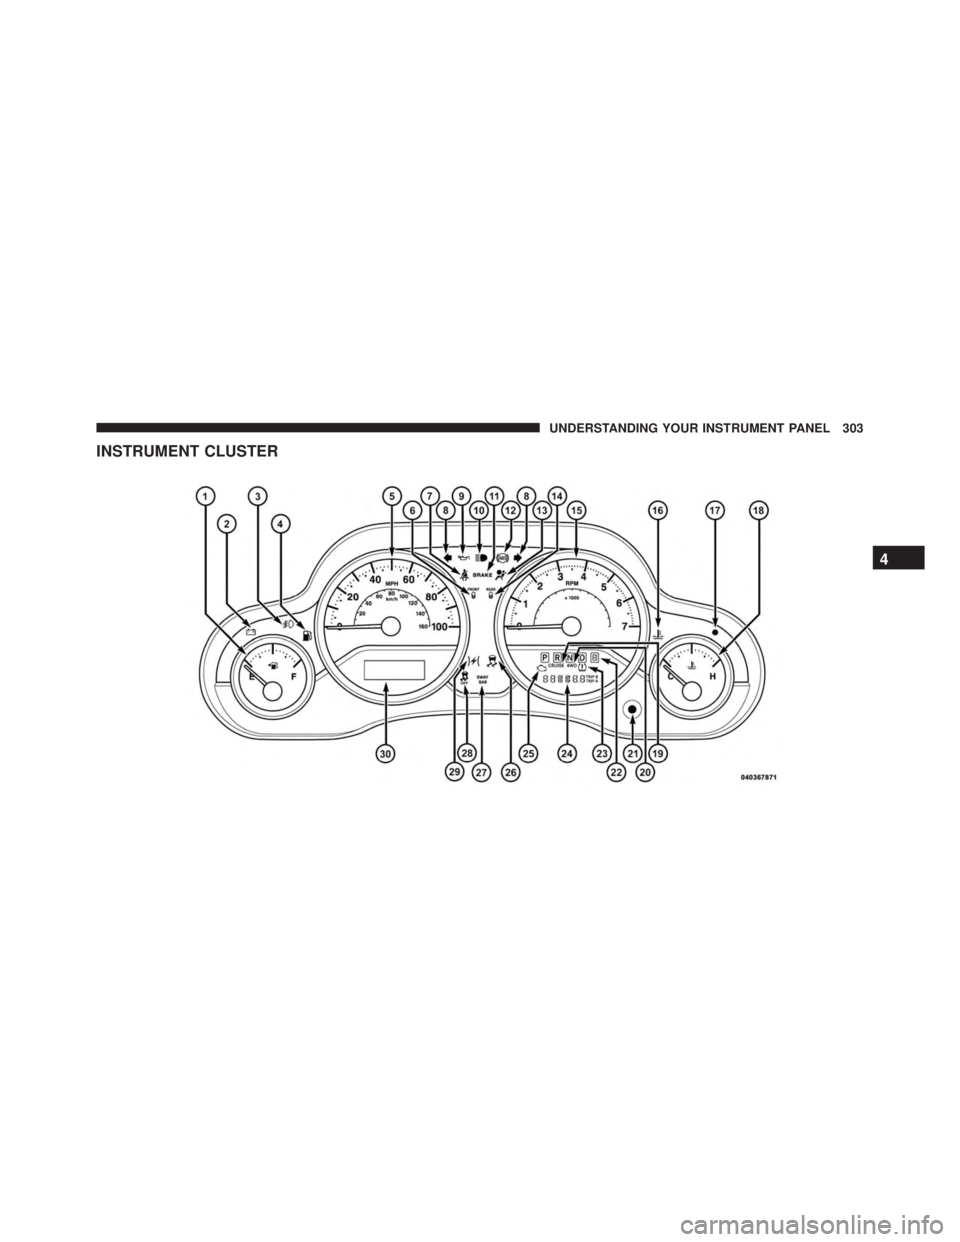
UNDERSTANDING YOUR INSTRUMENT PANEL 307
Page 311 of 674
17. Vehicle Security Light — If EquippedThis light will flash at a fast rate for approxi-
mately 15 seconds, when the vehicle security
alarm is arming, and then will flash slowly
until the vehicle is disarmed.
18. Temperature Gauge
The temperature gauge shows engine coolant tempera-
ture. Any reading within the normal range indicates that
the engine cooling system is operating satisfactorily.
The gauge pointer will likely indicate a higher tempera-
ture when driving in hot weather, up mountain grades,
or when towing a trailer. It should not be allowed to
exceed the upper limits of the normal operating range.
4
UNDERSTANDING YOUR INSTRUMENT PANEL 309
Page 317 of 674
4
UNDERSTANDING YOUR INSTRUMENT PANEL 315
Page 319 of 674
system. If this light remains on after several ignition
cycles, and the vehicle has been driven several miles
(kilometers) at speeds greater than 30 mph (48 km/h), see
your authorized dealer as soon as possible to have the
problem diagnosed and corrected.
NOTE:•The “ESC Off Indicator Light” and the “ESC
Activation/Malfunction Indicator Light” come on
momentarily each time the ignition switch is turned
to ON/RUN.
• Each time the ignition is turned to ON/RUN, the
ESC system will be ON, even if it was turned off
previously.
• The ESC system will make buzzing or clicking
sounds when it is active. This is normal; the sounds
will stop when ESC becomes inactive following the
maneuver that caused the ESC activation.
4
UNDERSTANDING YOUR INSTRUMENT PANEL 317
Page 329 of 674
4
UNDERSTANDING YOUR INSTRUMENT PANEL 327