lamp JEEP WRANGLER 2015 JK / 3.G Owners Manual
[x] Cancel search | Manufacturer: JEEP, Model Year: 2015, Model line: WRANGLER, Model: JEEP WRANGLER 2015 JK / 3.GPages: 695, PDF Size: 20.64 MB
Page 22 of 695
NOTE:Changes or modifications not expressly approved
by the party responsible for compliance could void the
user’s authority to operate the equipment.
VEHICLE SECURITY ALARM — IF EQUIPPED
The Vehicle Security Alarm monitors the vehicle doors,
swing gate, and ignition for unauthorized operation.
While the Vehicle Security Alarm is armed, interior
switches for door locks are disabled. The Vehicle Security
Alarm provides both audible and visible signals when
alarming. The horn will sound, the headlights will turn
on, the park lamps and/or turn signals will flash repeat-
edly for three minutes. If the disturbance is still present
(driver’s door, passenger door, other doors, ignition) after
three minutes, the headlights, park lamps and/or turn
signals will flash for an additional 15 minutes.
NOTE:The Panic Alarm and the Vehicle Security Alarm
are quite different. Please take a moment to activate the
Panic Alarm and the Vehicle Security Alarm to hear the
differences in the horn. In case one should go off in the
future, you will need to know which mode has been
activated in order to deactivate it.
Rearming The System
If something triggers the alarm, and no action is taken to
disarm it, the Vehicle Security Alarm will turn off the
horn after three minutes, turn off all of the visual signals
after 15 minutes, and then the Vehicle Security Alarm will
rearm itself.
To Arm The System
The Vehicle Security Alarm will set when you use the
Remote Keyless Entry (RKE) transmitter to lock the doors
and swing gate, or when you use the power door lock
switch while the door is open. After all the doors are
locked and closed, the Vehicle Security Light (located on
20 THINGS TO KNOW BEFORE STARTING YOUR VEHICLE
Page 33 of 695
To Enter Remote Start
Push and release the REMOTE START button
on the RKE transmitter twice within five sec-
onds. The vehicle doors will lock, the parking
lights will flash and the horn will chirp twice (if
programmed). Then, the engine will start and the vehicle
will remain in the Remote Start mode for a 15-minute
cycle.
NOTE:
•The park lamps will turn on and remain on during
Remote Start mode.
•For security, power window operation is disabled
when the vehicle is in the Remote Start mode.
•The engine can be started two consecutive times (two
15-minute cycles) with the RKE transmitter. However,
the ignition switch must be cycled to the ON/RUN
position before you can repeat the start sequence for a
third cycle.
Remote start will also cancel if any of the following occur:
•The engine stalls or RPM exceeds 2500
•Any engine warning lamps come on
•The hood is opened
•The hazard switch is pushed
•The transmission is moved out of PARK
•The brake pedal is pushed
2
THINGS TO KNOW BEFORE STARTING YOUR VEHICLE 31
Page 175 of 695
Cargo Lamp
The courtesy and dome lights will turn on when the front
doors are opened, by rotating the control for the dimmer
switch on the multifunction lever fully upward, or if
equipped, when the UNLOCK button is pressed on the
Remote Keyless Entry (RKE) transmitter.
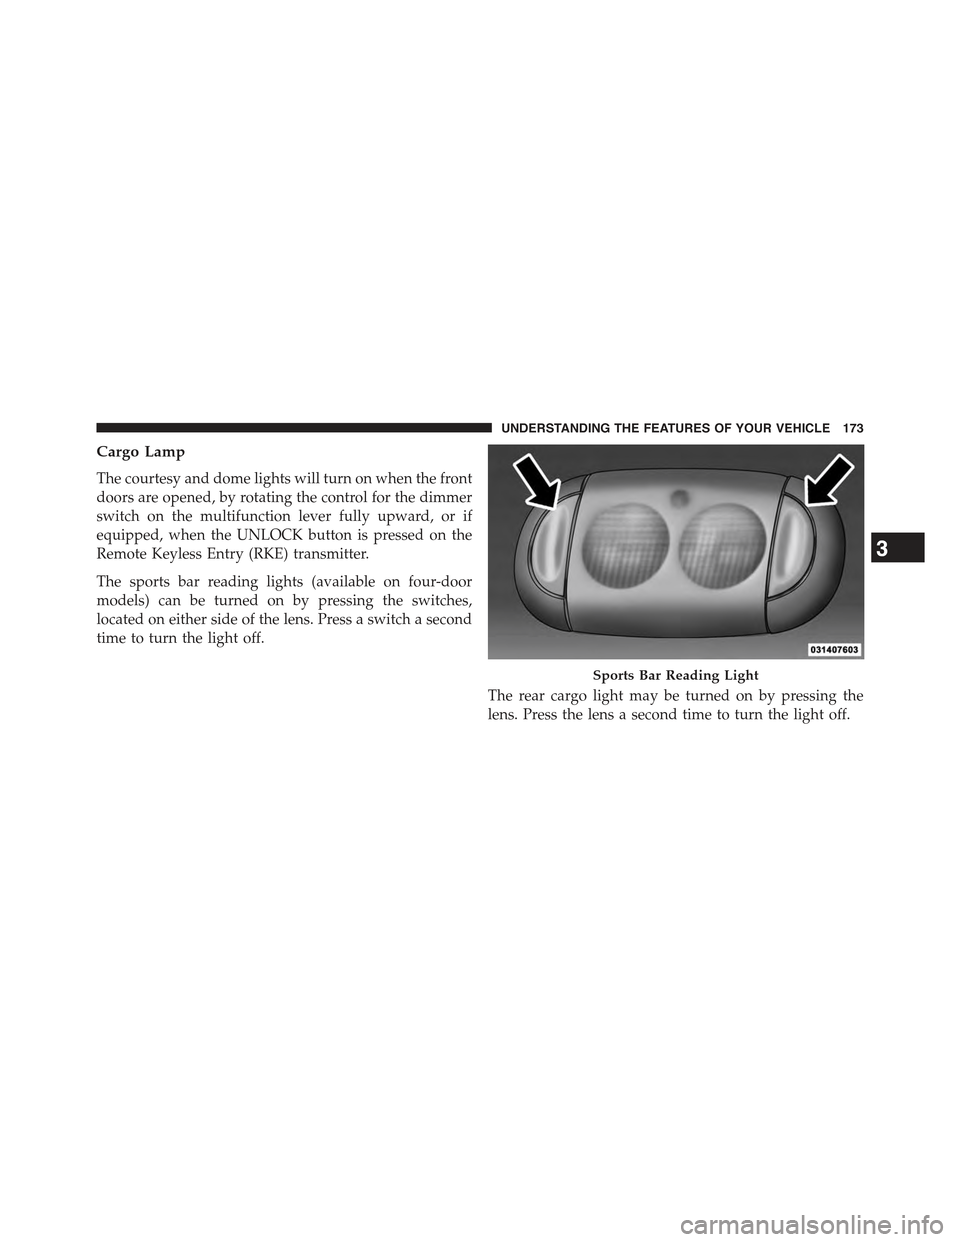
The sports bar reading lights (available on four-door
models) can be turned on by pressing the switches,
located on either side of the lens. Press a switch a second
time to turn the light off.
The rear cargo light may be turned on by pressing the
lens. Press the lens a second time to turn the light off.
Sports Bar Reading Light
3
UNDERSTANDING THE FEATURES OF YOUR VEHICLE 173
Page 226 of 695
CAUTION!(Continued)
•Refer to “Appearance Care For Fabric Top Models”
in “Maintaining Your Vehicle” for further informa-
tion. It contains important information on cleaning
and caring for your vehicle’s fabric top.
•Do not use any tools (screwdrivers, etc.) to pry or
force any of the clamps, clips, or retainers securing
the soft top. Do not force or pry the soft top
framework when opening or closing. Damage to
the top may result.
WARNING!
•Do not drive the vehicle with the rear window
curtain up unless the side curtains are also re-
moved. Dangerous exhaust gases could enter the
vehicle causing harm to the driver and passengers.
(Continued)
WARNING!(Continued)
•The fabric upper doors and fabric top are designed
only for protection against the elements. Do not
rely on them to contain occupants within the ve-
hicle or to protect against injury during an acci-
dent. Remember, always wear seat belts.
CAUTION!
Failure to follow these cautions may cause interior
water damage, stains or mildew on the top material:
•It is recommended that the top be free of water
prior to opening it. Operating the top, opening a
door or lowering a window while the top is wet
may allow water to drip into the vehicle’s interior.
(Continued)
224 UNDERSTANDING THE FEATURES OF YOUR VEHICLE
Page 258 of 695
Place the vehicle in a warm area. Pull steadily on the top
fabric. The vinyl will stretch back to its original size and
the top can then be snapped into place.If the tempera-
ture is 41°F (5°C) or below, do not attempt to put the top
down or roll the rear or side curtains.
CAUTION!
•Do not run a fabric top through an automatic car
wash. Window scratches and wax buildup may
result.
•Do not lower the top when the temperature is
below 41°F (5°C). Damage to the top may result.
•Do not lower the top when the windows are dirty.
Grit may scratch the window.
•Do not move your vehicle until the top has been
either fully attached to the windshield frame, or
fully lowered.
(Continued)
CAUTION!(Continued)
•Do not lower the top with the windows installed.
Window and top damage may occur.
•Refer to “Appearance Care for Fabric Top Models”
in “Maintaining Your Vehicle” for further informa-
tion. It contains important information on cleaning
and caring for your vehicle’s fabric top.
•Do not use any tools (screwdrivers, etc.) to pry or
force any of the clamps, clips, or retainers securing
the soft top. Do not force or pry the soft top
framework when opening or closing. Damage to
the top may result.
256 UNDERSTANDING THE FEATURES OF YOUR VEHICLE
Page 320 of 695
26. Hill Decent Indicator
This indicator shows when the Hill Descent
Control (HDC) feature is turned on. The lamp
will be on solid when HDC is armed. HDC can
only be armed when the transfer case is in the
“4WD LOW” position and the vehicle speed is less then
30 mph (48 km/h). If these conditions are not met while
attempting to use the HDC feature, the HDC indicator
light will flash on/off.
27. Cruise Indicator
This indicator shows when the electronic speed
control system is turned on.
28. Tire Pressure Monitoring Telltale Light
Each tire, including the spare (if provided),
should be checked monthly when cold and
inflated to the inflation pressure recommended
by the vehicle manufacturer on the vehicle
placard or tire inflation pressure label. (If your vehicle
has tires of a different size than the size indicated on the
vehicle placard or tire inflation pressure label, you should
determine the proper tire inflation pressure for those
tires.)
As an added safety feature, your vehicle has been
equipped with a Tire Pressure Monitoring System
(TPMS) that illuminates a low tire pressure telltale when
one or more of your tires is significantly under-inflated.
Accordingly, when the low tire pressure telltale illumi-
nates, you should stop and check your tires as soon as
possible, and inflate them to the proper pressure. Driving
on a significantly under-inflated tire causes the tire to
overheat and can lead to tire failure. Under-inflation also
reduces fuel efficiency and tire tread life, and may affect
the vehicle’s handling and stopping ability.
Please note that the TPMS is not a substitute for proper
tire maintenance, and it is the driver ’s responsibility to
318 UNDERSTANDING YOUR INSTRUMENT PANEL
Page 332 of 695
•SELECT Button
Push and release the SELECT button when
prompted by the EVIC to Reset Main Menu
features with a reset capability or to change
Personal Settings.
•DOWN Button
Push and release the DOWN button when
prompted by the EVIC to step through stored
system warning messages or Personal Settings
features.
Electronic Vehicle Information Center (EVIC)
Displays
When the appropriate conditions exist, the EVIC displays
the following messages:
•Low Tire Pressure
•Low Fuel
•Service TPM System (refer to#Tire Pressure Monitor-
ing System#in#Starting and Operating#)
•Premium TPM System Graphic Display
•Damaged Key
•Key in Ignition
•Turn Signal On (with a continuous warning chime)
•Left Front Turn Signal Lamp Out (with a single chime)
•Left Rear Turn Signal Lamp Out (with a single chime)
•Right Front Turn Signal Lamp Out (with a single
chime)
•Right Rear Turn Signal Lamp Out (with a single chime)
•Key Fob Battery Low (with a single chime)
•Personal Settings Not Avail. – Vehicle Not in Park —
automatic transmission
330 UNDERSTANDING YOUR INSTRUMENT PANEL
Page 341 of 695
RKE Unlock
WhenDriver Door 1st Pressis selected, only the driver’s
door will unlock on the first press of the Remote Keyless
Entry (RKE) transmitter UNLOCK button. When Driver
Door 1st Press is selected, you must press the RKE
transmitter UNLOCK button twice to unlock the passen-
ger’s doors. WhenAll Doors 1st Pressis selected, all of
the doors will unlock on the first press of the RKE
transmitter UNLOCK button. To make your selection,
press and release the SELECT button until “Driver Door
1st Press” or “All Doors 1st Press” appears.
Sound Horn With Lock
When on is selected, a short horn sound will occur when
the RKE transmitter LOCK button is pressed. This feature
may be selected with or without the Flash Lamp with
Lock feature. To make your selection, press and release
the SELECT button until “On” or “Off” appears.
Flash Lamp with Lock
When on is selected, the front and rear turn signals will
flash when the doors are locked or unlocked with the
RKE transmitter. This feature may be selected with or
without the Sound Horn with Lock feature selected. To
make your selection, press and release the SELECT
button until “On” or “Off” appears.
Headlamp Off Delay
When this feature is selected, the driver can choose to
have the headlights remain on for 0, 30, 60, or 90 seconds
when exiting the vehicle. To make your selection, press
and release the SELECT button until “0,” “30,” “60,” or
“90” appears.
4
UNDERSTANDING YOUR INSTRUMENT PANEL 339
Page 342 of 695
Headlamps with Wipers (Available with Auto
Headlights Only)
When on is selected, and the headlight switch is in the
AUTO position, the headlights will turn on approxi-
mately 10 seconds after the wipers are turned on. If the
headlights were turned on by this feature they will also
turn off when the wipers are turned off. To make your
selection, press and release the SELECT button until
“ON” or “OFF” appears.
NOTE:Turning the headlights on during the daytime
causes the instrument panel lights to dim. To increase the
brightness, refer to “Lights” in “Understanding The
Features Of Your Vehicle.”
Key Off Power Delay
When this feature is selected, the power window
switches, radio, hands–free system (if equipped), DVD
video system (if equipped), power sunroof (if equipped),
and power outlets will remain active for up to 10 minutes
after the ignition switch is turned to the LOCK position.
Opening either front vehicle door will cancel this feature.
To make your selection, press and release the SELECT
button until “Off,” “45 sec.,” “5 min.,” or “10 min.”
appears.
Illumin. Approach
When this feature is selected, the headlights will activate
and remain on for up to 90 seconds when the doors are
unlocked with the RKE transmitter. To make your selec-
tion, press and hold the SELECT button until “Off,” “30
sec,” “60 sec,” or “90 sec” appears.
Hill Start Assist (HSA) — If Equipped
When on is selected, the HSA system is active. Refer to
“Electronic Brake Control System” in “Starting And
Operating” for system function and operating informa-
tion. To make your selection, push and release the
SELECT button until “On” or “Off” appears.
340 UNDERSTANDING YOUR INSTRUMENT PANEL
Page 487 of 695
WARNING!
If TSC activates while driving, slow the vehicle
down, stop at the nearest safe location, and adjust the
trailer load to eliminate trailer sway.
Hill Descent Control (HDC) — If Equipped
HDC is only intended for low speed off-road driving.
HDC maintains vehicle speed while descending hills in
off-road driving conditions by applying the brakes when
necessary.
The symbol indicates the status of the Hill
Descent Control (HDC) feature. The lamp will
be on solid when HDC is armed. HDC can only
be armed when the transfer case is in the “4WD
LOW” position and the vehicle speed is less then 30 mph
(48 km/h). If these conditions are not met while attempt-
ing to use the HDC feature, the HDC indicator light will
flash on/off.
When enabled, HDC senses the terrain and activates
when the vehicle is descending a hill. HDC speed may be
adjusted by the driver to suit the driving conditions. The
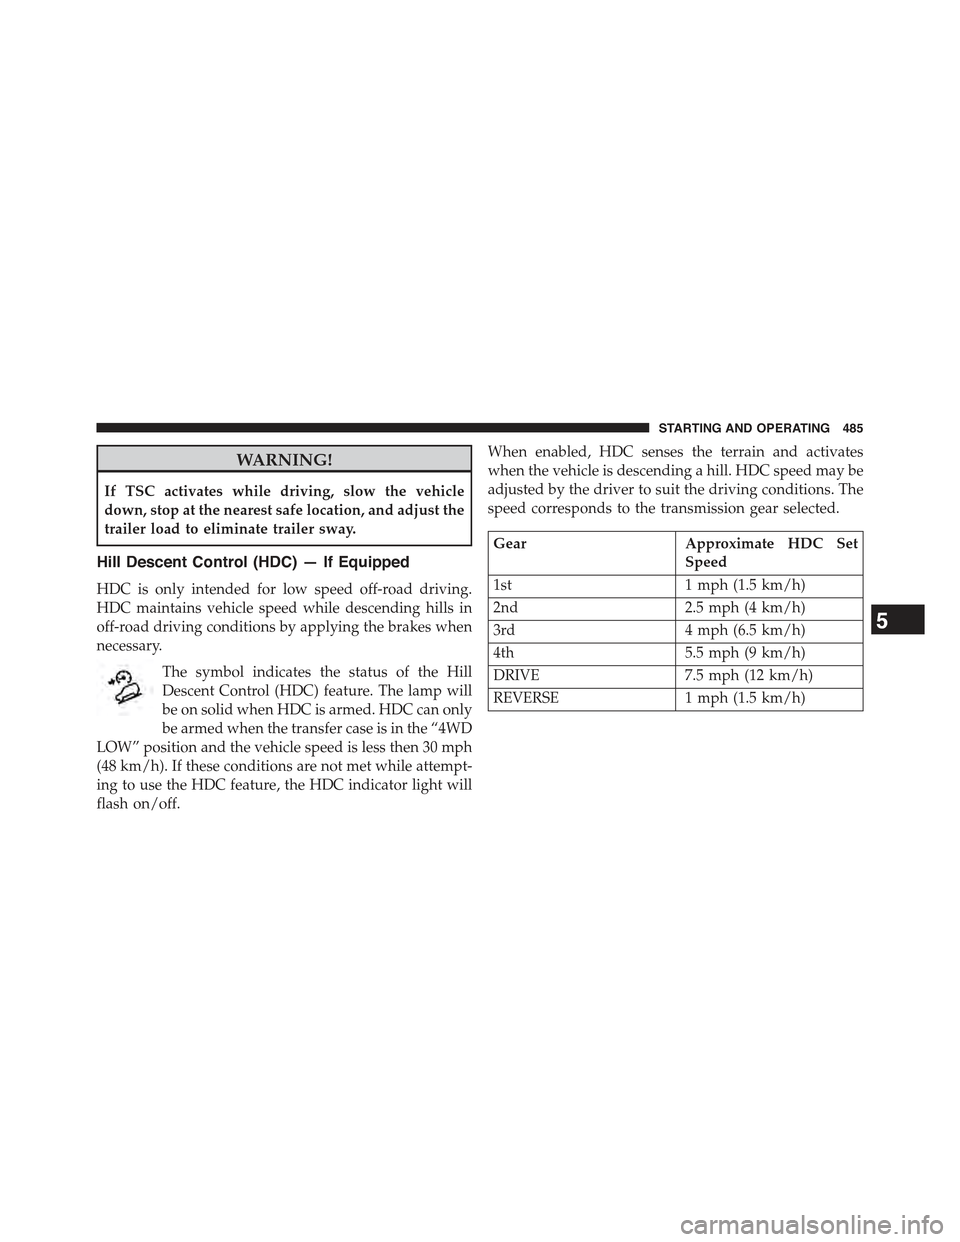
speed corresponds to the transmission gear selected.
GearApproximate HDC Set
Speed
1st1 mph (1.5 km/h)
2nd2.5 mph (4 km/h)
3rd4 mph (6.5 km/h)
4th5.5 mph (9 km/h)
DRIVE7.5 mph (12 km/h)
REVERSE1 mph (1.5 km/h)
5
STARTING AND OPERATING 485