window JEEP WRANGLER 2015 JK / 3.G Owner's Manual
[x] Cancel search | Manufacturer: JEEP, Model Year: 2015, Model line: WRANGLER, Model: JEEP WRANGLER 2015 JK / 3.GPages: 156, PDF Size: 23.54 MB
Page 41 of 156
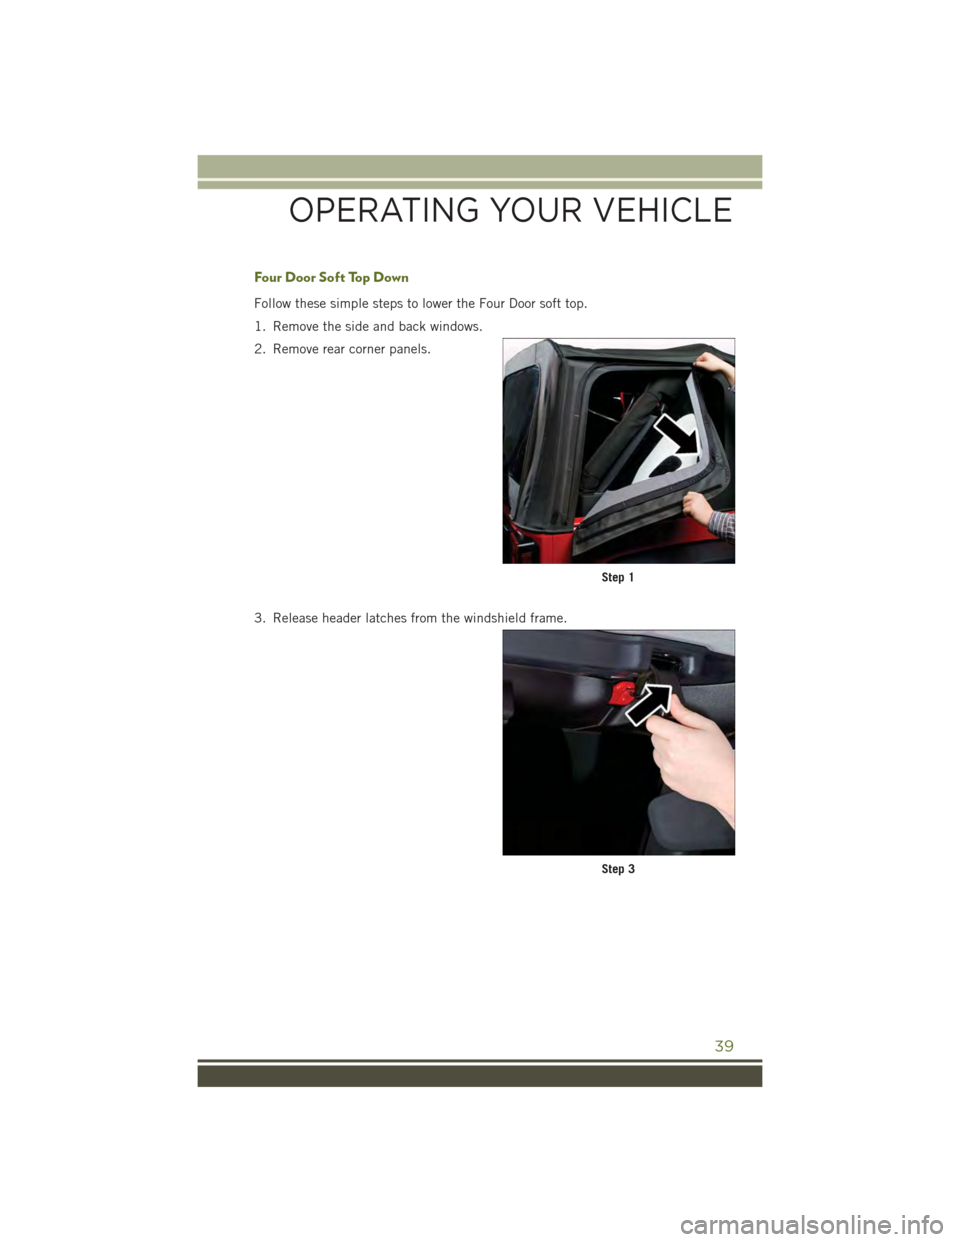
Four Door Soft Top Down
Follow these simple steps to lower the Four Door soft top.
1. Remove the side and back windows.
2. Remove rear corner panels.
3. Release header latches from the windshield frame.
Step 1
Step 3
OPERATING YOUR VEHICLE
39
Page 44 of 156
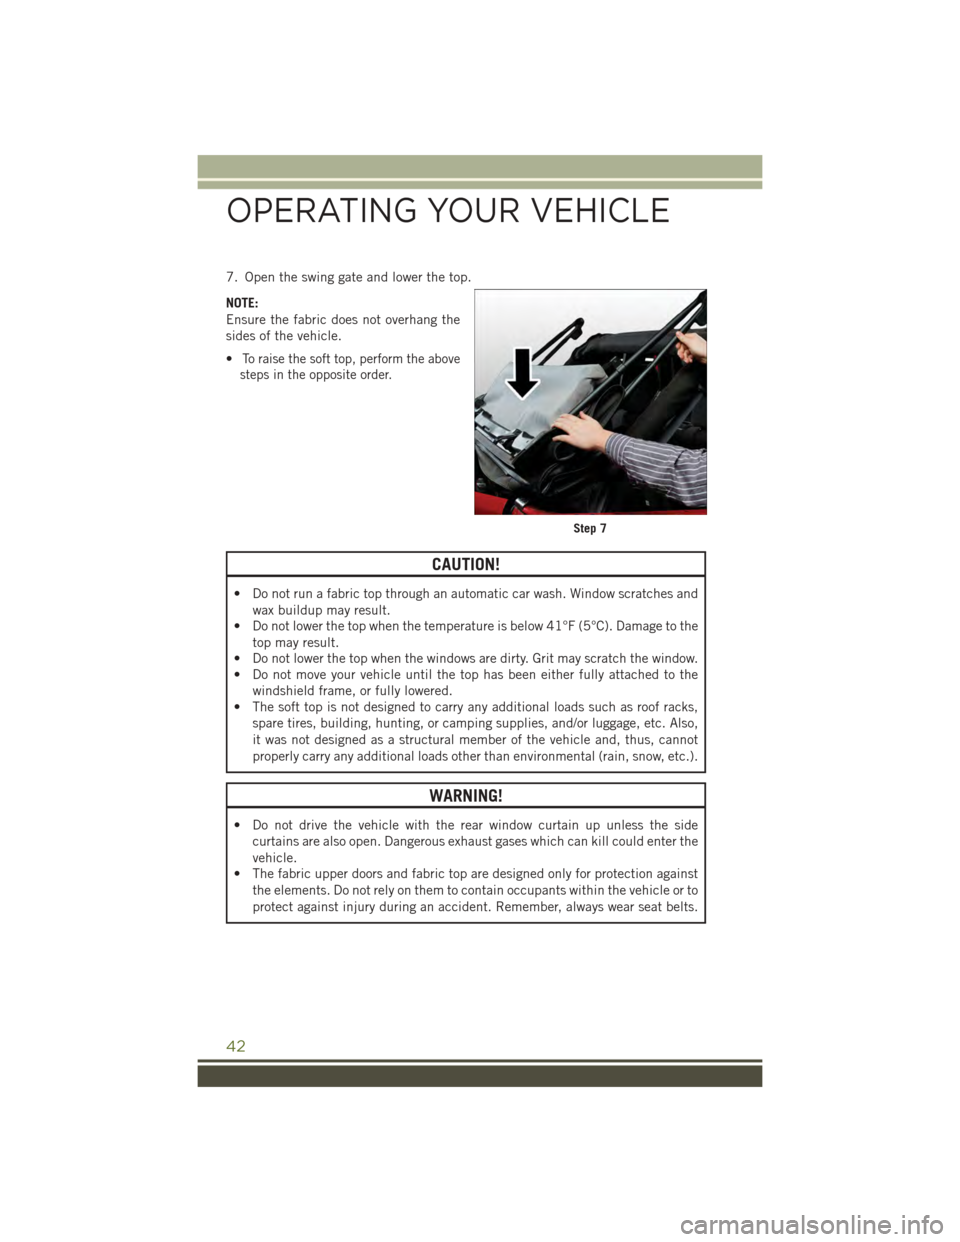
7. Open the swing gate and lower the top.
NOTE:
Ensure the fabric does not overhang the
sides of the vehicle.
•To raise the soft top, perform the above
steps in the opposite order.
CAUTION!
• Do not run a fabric top through an automatic car wash. Window scratches and
wax buildup may result.
• Do not lower the top when the temperature is below 41°F (5°C). Damage to the
top may result.
• Do not lower the top when the windows are dirty. Grit may scratch the window.
• Do not move your vehicle until the top has been either fully attached to the
windshield frame, or fully lowered.
• The soft top is not designed to carry any additional loads such as roof racks,
spare tires, building, hunting, or camping supplies, and/or luggage, etc. Also,
it was not designed as a structural member of the vehicle and, thus, cannot
properly carry any additional loads other than environmental (rain, snow, etc.).
WARNING!
• Do not drive the vehicle with the rear window curtain up unless the side
curtains are also open. Dangerous exhaust gases which can kill could enter the
vehicle.
• The fabric upper doors and fabric top are designed only for protection against
the elements. Do not rely on them to contain occupants within the vehicle or to
protect against injury during an accident. Remember, always wear seat belts.
Step 7
OPERATING YOUR VEHICLE
42
Page 47 of 156
Hard Top Removal
Follow these simple steps to remove the hard top.
1. Remove both front panels. Refer to “Front Panel(s) Removal” above.
2. Open both doors.
3. Remove the two Torx®head screws that secure the hard top at the B-pillar (near
the top of the door) using a #40 Torx®head driver (Four–Door Only).
4. Remove the six Torx®head screws that secure the hard top to the vehicle (along
the interior bodyside) using a #40 Torx®head driver.
5. Open the swing gate all the way to ensure clearance of the rear window glass.
Lift the rear window glass.
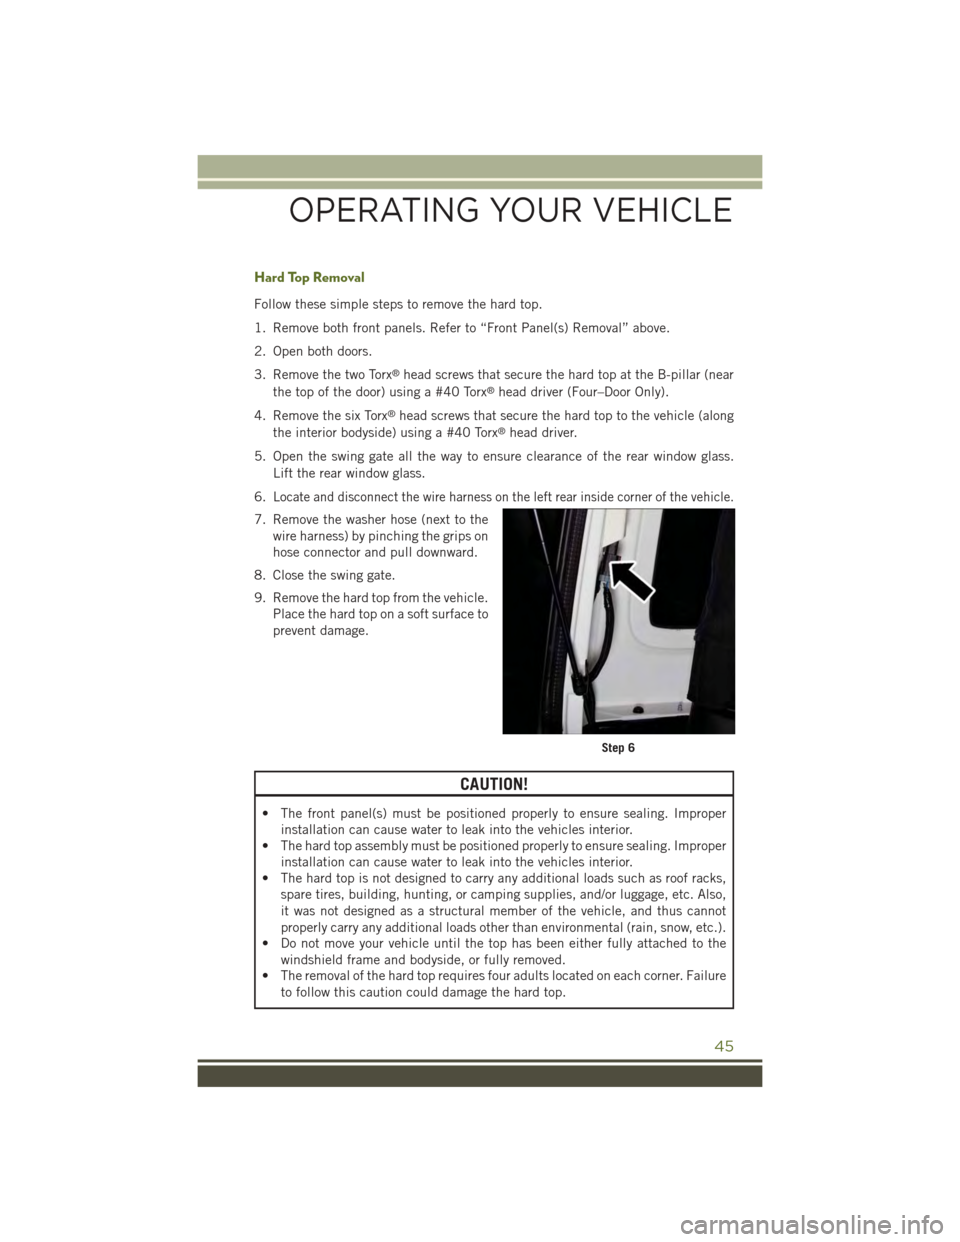
6.Locate and disconnect the wire harness on the left rear inside corner of the vehicle.
7. Remove the washer hose (next to the
wire harness) by pinching the grips on
hose connector and pull downward.
8. Close the swing gate.
9. Remove the hard top from the vehicle.
Place the hard top on a soft surface to
prevent damage.
CAUTION!
• The front panel(s) must be positioned properly to ensure sealing. Improper
installation can cause water to leak into the vehicles interior.
• The hard top assembly must be positioned properly to ensure sealing. Improper
installation can cause water to leak into the vehicles interior.
• The hard top is not designed to carry any additional loads such as roof racks,
spare tires, building, hunting, or camping supplies, and/or luggage, etc. Also,
it was not designed as a structural member of the vehicle, and thus cannot
properly carry any additional loads other than environmental (rain, snow, etc.).
• Do not move your vehicle until the top has been either fully attached to the
windshield frame and bodyside, or fully removed.
• The removal of the hard top requires four adults located on each corner. Failure
to follow this caution could damage the hard top.
Step 6
OPERATING YOUR VEHICLE
45
Page 49 of 156
WIND BUFFETING
Wind buffeting can be described as a helicopter-type percussion sound. If buffeting
occurs with the rear windows open, adjust the front and rear windows together.
OPERATING YOUR VEHICLE
47
Page 134 of 156
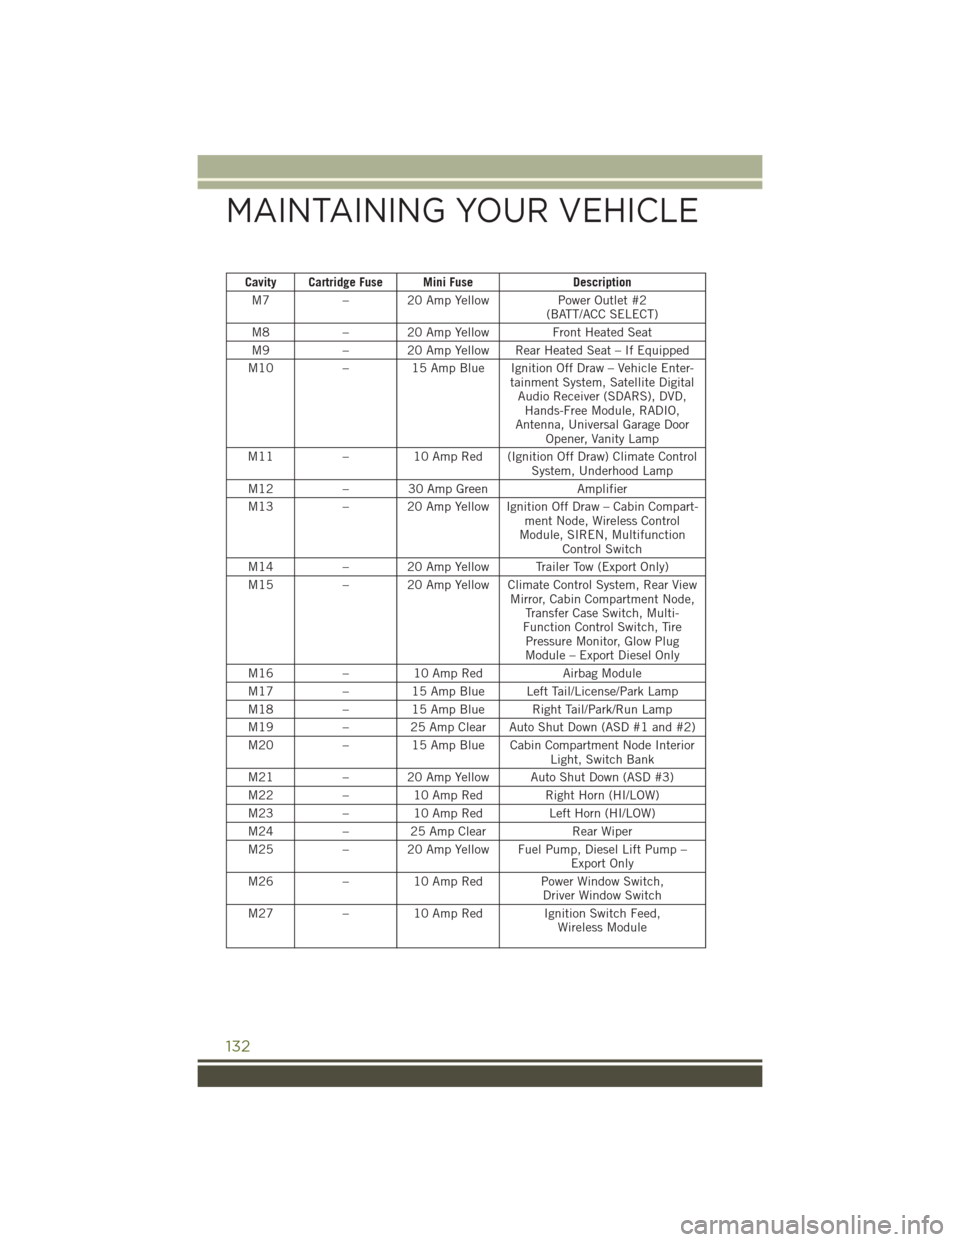
Cavity Cartridge Fuse Mini FuseDescription
M7–20AmpYellowPower Outlet #2(BATT/ACC SELECT)
M8– 20 Amp YellowFront Heated Seat
M9– 20 Amp Yellow Rear Heated Seat – If Equipped
M10–15 Amp Blue Ignition Off Draw – Vehicle Enter-tainment System, Satellite DigitalAudio Receiver (SDARS), DVD,Hands-Free Module, RADIO,Antenna, Universal Garage DoorOpener, Vanity Lamp
M11–10 Amp Red (Ignition Off Draw) Climate ControlSystem, Underhood Lamp
M12–30AmpGreenAmplifier
M13– 20 Amp Yellow Ignition Off Draw – Cabin Compart-ment Node, Wireless ControlModule, SIREN, MultifunctionControl Switch
M14– 20 Amp Yellow Trailer Tow (Export Only)
M15– 20 Amp Yellow Climate Control System, Rear ViewMirror, Cabin Compartment Node,Transfer Case Switch, Multi-Function Control Switch, TirePressure Monitor, Glow PlugModule – Export Diesel Only
M16–10 Amp RedAirbag Module
M17–15 Amp Blue Left Tail/License/Park Lamp
M18–15 Amp Blue Right Tail/Park/Run Lamp
M19–25AmpClearAutoShutDown(ASD#1and#2)
M20–15 Amp Blue Cabin Compartment Node InteriorLight, Switch Bank
M21–20AmpYellowAutoShutDown(ASD#3)
M22–10 Amp Red Right Horn (HI/LOW)
M23–10 Amp RedLeft Horn (HI/LOW)
M24–25AmpClearRear Wiper
M25–20AmpYellowFuelPump,DieselLiftPump–Export Only
M26–10 Amp Red Power Window Switch,Driver Window Switch
M27–10 Amp Red Ignition Switch Feed,Wireless Module
MAINTAINING YOUR VEHICLE
132
Page 139 of 156
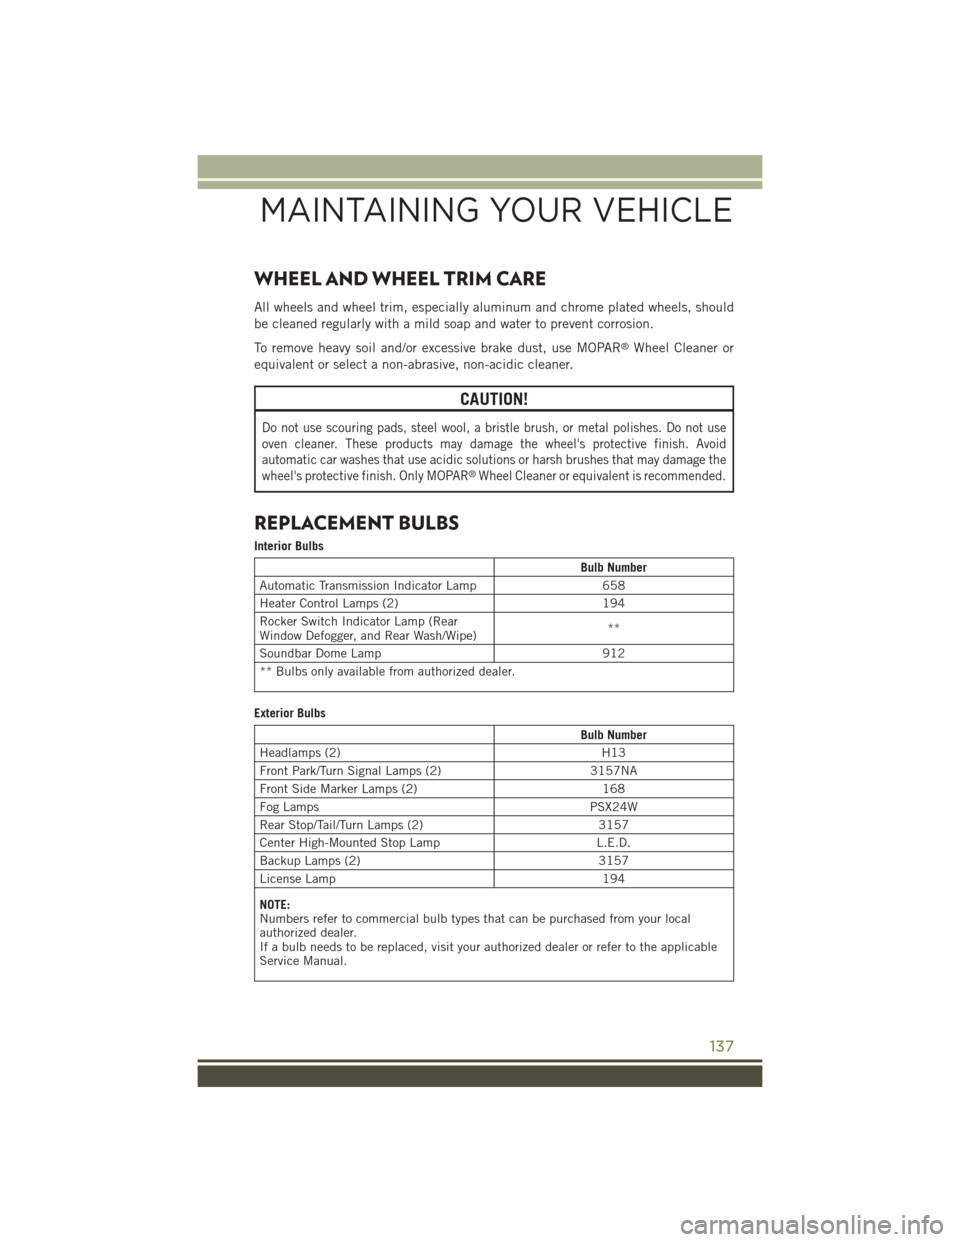
WHEEL AND WHEEL TRIM CARE
All wheels and wheel trim, especially aluminum and chrome plated wheels, should
be cleaned regularly with a mild soap and water to prevent corrosion.
To remove heavy soil and/or excessive brake dust, use MOPAR®Wheel Cleaner or
equivalent or select a non-abrasive, non-acidic cleaner.
CAUTION!
Do not use scouring pads, steel wool, a bristle brush, or metal polishes. Do not use
oven cleaner. These products may damage the wheel's protective finish. Avoid
automatic car washes that use acidic solutions or harsh brushes that may damage the
wheel's protective finish. Only MOPAR®Wheel Cleaner or equivalent is recommended.
REPLACEMENT BULBS
Interior Bulbs
Bulb Number
Automatic Transmission Indicator Lamp658
Heater Control Lamps (2)194
Rocker Switch Indicator Lamp (RearWindow Defogger, and Rear Wash/Wipe)**
Soundbar Dome Lamp912
** Bulbs only available from authorized dealer.
Exterior Bulbs
Bulb Number
Headlamps (2)H13
Front Park/Turn Signal Lamps (2)3157NA
Front Side Marker Lamps (2)168
Fog LampsPSX24W
Rear Stop/Tail/Turn Lamps (2)3157
Center High-Mounted Stop LampL.E.D.
Backup Lamps (2)3157
License Lamp194
NOTE:Numbers refer to commercial bulb types that can be purchased from your localauthorized dealer.If a bulb needs to be replaced, visit your authorized dealer or refer to the applicableService Manual.
MAINTAINING YOUR VEHICLE
137