ground clearance JEEP WRANGLER 2015 JK / 3.G User Guide
[x] Cancel search | Manufacturer: JEEP, Model Year: 2015, Model line: WRANGLER, Model: JEEP WRANGLER 2015 JK / 3.GPages: 156, PDF Size: 23.54 MB
Page 115 of 156

Jacking Instructions
1. Remove the spare tire, jack and tools
from the stored location.
2. Loosen (but do not remove) the wheel
lug nuts by turning them to the left
one turn while the wheel is still on the
ground.
3. Assemble the jack and jacking tools.
Connect the jack handle driver to the
extension, then to the lug wrench.
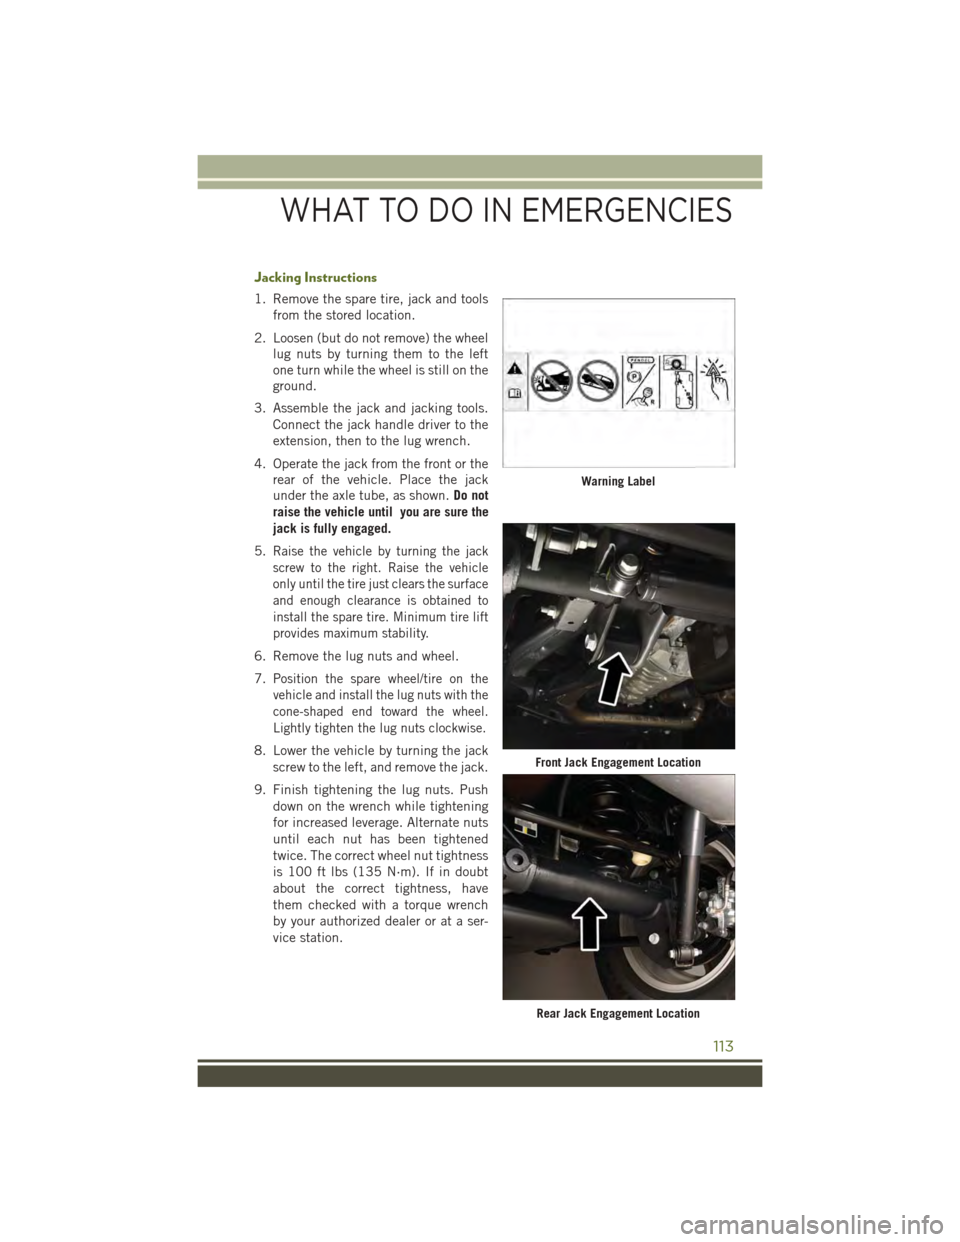
4. Operate the jack from the front or the
rear of the vehicle. Place the jack
under the axle tube, as shown.Do not
raise the vehicle until you are sure the
jack is fully engaged.
5.Raise the vehicle by turning the jack
screw to the right. Raise the vehicle
only until the tire just clears the surface
and enough clearance is obtained to
install the spare tire. Minimum tire lift
provides maximum stability.
6. Remove the lug nuts and wheel.
7.Position the spare wheel/tire on the
vehicle and install the lug nuts with the
cone-shaped end toward the wheel.
Lightly tighten the lug nuts clockwise.
8. Lower the vehicle by turning the jack
screw to the left, and remove the jack.
9. Finish tightening the lug nuts. Push
down on the wrench while tightening
for increased leverage. Alternate nuts
until each nut has been tightened
twice. The correct wheel nut tightness
is 100 ft lbs (135 N·m). If in doubt
about the correct tightness, have
them checked with a torque wrench
by your authorized dealer or at a ser-
vice station.
Warning Label
Front Jack Engagement Location
Rear Jack Engagement Location
WHAT TO DO IN EMERGENCIES
113
Page 137 of 156

WARNING!
• Overloading of your tires is dangerous. Overloading can cause tire failure,
affect vehicle handling, and increase your stopping distance. Use tires of the
recommended load capacity for your vehicle. Never overload them.
•Improperly inflated tires are dangerous and can cause collisions. Under-inflation
is the leading cause of tire failure and may result in severe cracking, component
separation, or “blow out”. Over-inflation reduces a tire’s ability to cushion shock.
Objects on the road and chuck holes can cause damage that results in tire failure.
Unequal tire pressures can cause steering problems. You could lose control of
your vehicle. Over-inflated or under-inflated tires can affect vehicle handling and
can fail suddenly, resulting in loss of vehicle control.
SPARE TIRES — IF EQUIPPED
NOTE:
For vehicles equipped with Tire Service Kit instead of a spare tire, please refer to “Tire
Service Kit” in “What To Do In Emergencies” on your DVD for further information.
CAUTION!
Because of the reduced ground clearance, do not take your vehicle through an
automatic car wash with a compact or limited-use temporary spare installed.
Damage to the vehicle may result.
Spare Tire Matching Original Equipped Tire And Wheel — If Equipped
Your vehicle may be equipped with a spare tire and wheel equivalent in look and
function to the original equipment tire and wheel found on the front or rear axle of
your vehicle. This spare tire may be used in the tire rotation for your vehicle. If your
vehicle has this option, refer to an authorized tire dealer for the recommended tire
rotation pattern.
Compact Spare Tire — If Equipped
The compact spare is for temporary emergency use only. You can identify if your
vehicle is equipped with a compact spare by looking at the spare tire description on
the Tire and Loading Information Placard located on the driver’s side door opening or
on the sidewall of the tire. Compact spare tire descriptions begin with the letter “T”
or “S” preceding the size designation. Example: T145/80D18 103M.
T, S = Temporary Spare Tire
Since this tire has limited tread life, the original equipment tire should be repaired
(or replaced) and reinstalled on your vehicle at the first opportunity.
MAINTAINING YOUR VEHICLE
135