wheel JEEP WRANGLER 2016 JK / 3.G Owner's Manual
[x] Cancel search | Manufacturer: JEEP, Model Year: 2016, Model line: WRANGLER, Model: JEEP WRANGLER 2016 JK / 3.GPages: 156, PDF Size: 8.82 MB
Page 113 of 156
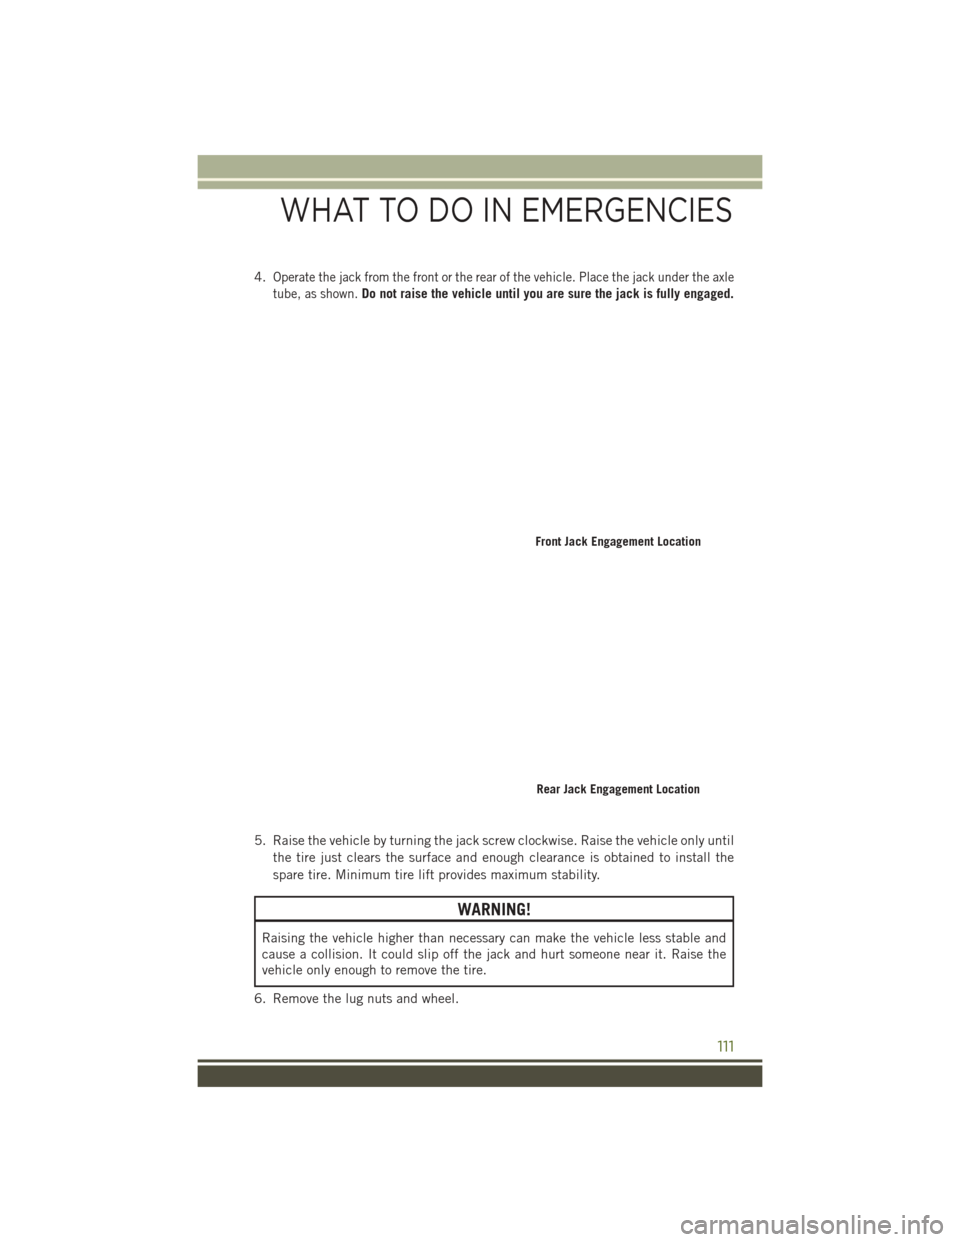
4.Operate the jack from the front or the rear of the vehicle. Place the jack under the axle
tube, as shown.
Do not raise the vehicle until you are sure the jack is fully engaged.
5. Raise the vehicle by turning the jack screw clockwise. Raise the vehicle only until the tire just clears the surface and enough clearance is obtained to install the
spare tire. Minimum tire lift provides maximum stability.
WARNING!
Raising the vehicle higher than necessary can make the vehicle less stable and
cause a collision. It could slip off the jack and hurt someone near it. Raise the
vehicle only enough to remove the tire.
6. Remove the lug nuts and wheel.
Front Jack Engagement Location
Rear Jack Engagement Location
WHAT TO DO IN EMERGENCIES
111
Page 114 of 156
7. Position the spare wheel/tire on the vehicle and install the lug nuts with thecone-shaped end toward the wheel. Lightly tighten the lug nuts clockwise.
WARNING!
To avoid the risk of forcing the vehicle off the jack, do not tighten the lug nuts fully
until the vehicle has been lowered. Failure to follow this warning may result in
serious injury.
8. Lower the vehicle by turning the jack screw to the left, and remove the jack.
9. Finish tightening the lug nuts. Push down on the wrench while tightening for increased leverage. Alternate nuts until each nut has been tightened twice. The
correct wheel nut tightness is 100 ft lbs (135 N·m). If in doubt about the correct
tightness, have them checked with a torque wrench by your authorized dealer or
at a service station.
10. Remove the jack assembly and wheel blocks.
11. Secure the tire, jack, and tools in their proper locations.
WARNING!
A loose tire or jack thrown forward in a collision or hard stop, could endanger the
occupants of the vehicle. Always stow the jack parts and the spare tire in the
places provided.
Road Tire Installation
1. Mount the road tire on the axle.
2. Install the remaining lug nuts with the cone shaped end of the nut toward the wheel. Lightly tighten the lug nuts.
WARNING!
To avoid the risk of forcing the vehicle off the jack, do not tighten the lug nuts fully
until the vehicle has been lowered. Failure to follow this warning may result in
serious injury.
3. Lower the vehicle to the ground by turning the jack handle counterclockwise.
4. Finish tightening the lug nuts. Push down on the wrench while tightening for increased leverage. Alternate nuts until each nut has been tightened twice. The
correct wheel nut tightness is 100 ft lbs (135 N·m). If in doubt about the correct
tightness, have them checked with a torque wrench by your authorized dealer or
at a service station.
5. After 25 miles (40 km) check the lug nut torque with a torque wrench to ensure that all lug nuts are properly seated against the wheel.
WHAT TO DO IN EMERGENCIES
112
Page 119 of 156
TOWING A DISABLED VEHICLE
This section describes procedures for towing a disabled vehicle using a commercial
towing service. If the transmission and drivetrain are operable, disabled vehicles may
also be towed as described under “Recreational Towing” in the “Starting And
Operating” section of the Owners Manual on your DVD.
Towing Condition Wheels OFF the Ground4WD MODELS
Flat Tow NONESee instructions under “Recreational
Towing” in the Owners Manual on your DVD
• Automatic Transmission in PARK
• Manual Transmission in gear (NOT in Neutral)
• Transfer Case in NEUTRAL
• Tow in forwarddirection
Wheel Lift or Dolly To w Front
NOT ALLOWED
Rear NOT ALLOWED
Flatbed ALL
BEST METHOD
Proper towing or lifting equipment is required to prevent damage to your vehicle. Use
only tow bars and other equipment designed for this purpose, following equipment
manufacturer’s instructions. Use of safety chains is mandatory. Attach a tow bar or
other towing device to main structural members of the vehicle, not to bumpers or
associated brackets. State and local laws regarding vehicles under tow must be
observed.
If you must use the accessories (wipers, defrosters, etc.) while being towed, the
ignition must be in the ON/RUN position, not the ACC position.
If the vehicle's battery is discharged, refer to “Shift Lever Override” in this section for
instructions on shifting the automatic transmission out of PARK for towing.
CAUTION!
• Do not use sling type equipment when towing. Vehicle damage may occur.
• When securing the vehicle to a flatbed truck, do not attach to front or rear
suspension components. Damage to your vehicle may result from improper
towing.
WHAT TO DO IN EMERGENCIES
117
Page 120 of 156
Without The Ignition Key
Special care must be taken when the vehicle is towed with the ignition in the LOCK
position. The only approved method of towing without the ignition key is with a
flatbed truck. Proper towing equipment is necessary to prevent damage to the
vehicle.
Four–Wheel Drive Models
The manufacturer recommends towing with all wheelsOFFthe ground. Acceptable
methods are to tow the vehicle on a flatbed or with one end of the vehicle raised and
the opposite end on a towing dolly.
If flatbed equipment is not available and the transfer case is operable, the vehicle
may be towed (in the forward direction, with ALLwheels on the ground), IFthe transfer
case is in NEUTRAL(N) and the transmission is in PARK(for automatic transmissions)
or in gear ( NOTinNEUTRAL, for manual transmissions). Refer to “Recreational
Towing” in “Starting And Operating” in the Owners Manual on the DVD for detailed
instructions.
CAUTION!
• Front or rear wheel lifts must not be used. Internal damage to the transmission or transfer case will occur if a front or rear wheel lift is used when towing.
• Towing this vehicle in violation of the above requirements can cause severe
transmission and/or transfer case damage. Damage from improper towing is
not covered under the New Vehicle Limited Warranty.
WHAT TO DO IN EMERGENCIES
118
Page 121 of 156
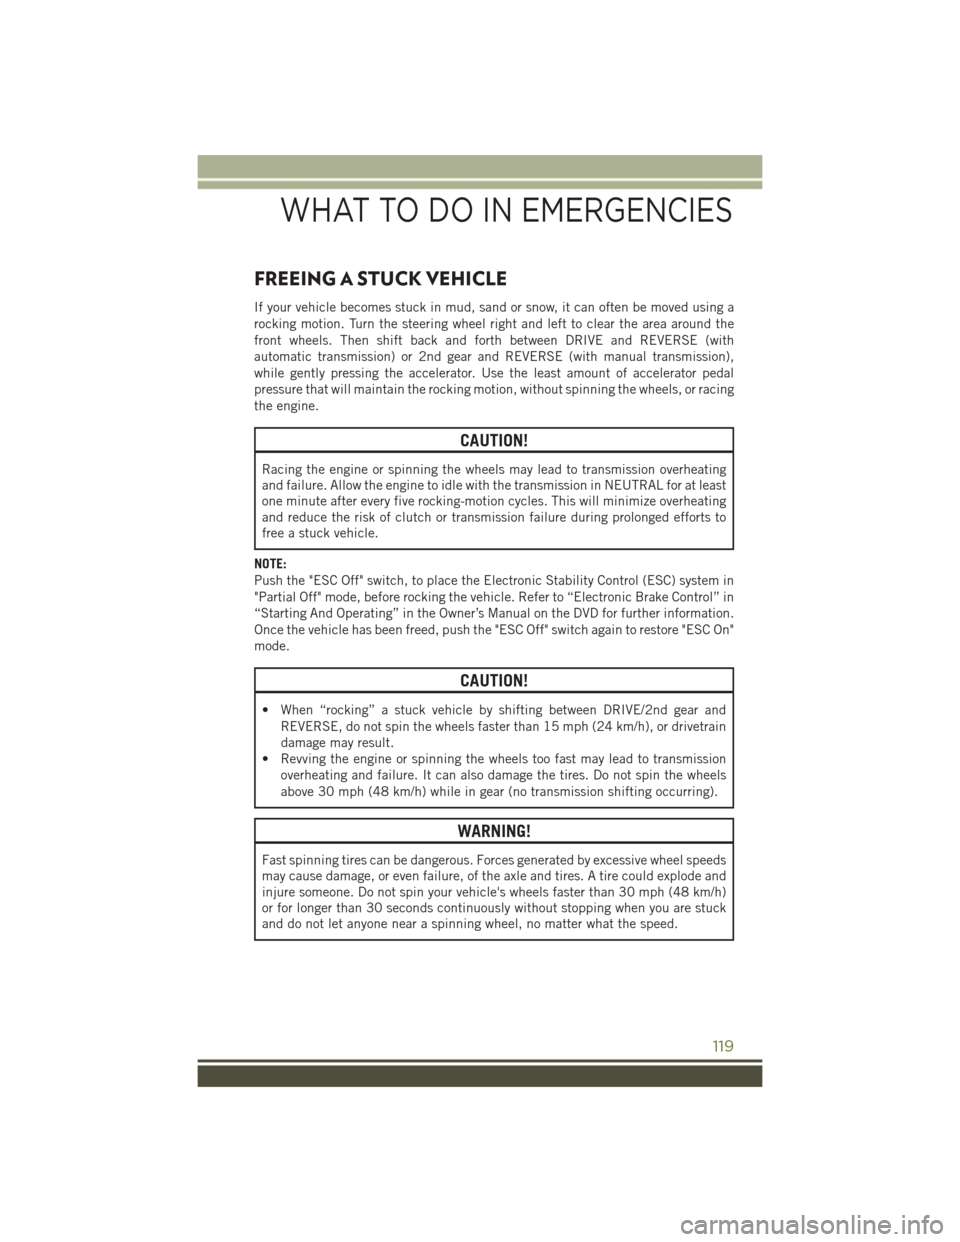
FREEING A STUCK VEHICLE
If your vehicle becomes stuck in mud, sand or snow, it can often be moved using a
rocking motion. Turn the steering wheel right and left to clear the area around the
front wheels. Then shift back and forth between DRIVE and REVERSE (with
automatic transmission) or 2nd gear and REVERSE (with manual transmission),
while gently pressing the accelerator. Use the least amount of accelerator pedal
pressure that will maintain the rocking motion, without spinning the wheels, or racing
the engine.
CAUTION!
Racing the engine or spinning the wheels may lead to transmission overheating
and failure. Allow the engine to idle with the transmission in NEUTRAL for at least
one minute after every five rocking-motion cycles. This will minimize overheating
and reduce the risk of clutch or transmission failure during prolonged efforts to
free a stuck vehicle.
NOTE:
Push the "ESC Off" switch, to place the Electronic Stability Control (ESC) system in
"Partial Off" mode, before rocking the vehicle. Refer to “Electronic Brake Control” in
“Starting And Operating” in the Owner’s Manual on the DVD for further information.
Once the vehicle has been freed, push the "ESC Off" switch again to restore "ESC On"
mode.
CAUTION!
• When “rocking” a stuck vehicle by shifting between DRIVE/2nd gear and REVERSE, do not spin the wheels faster than 15 mph (24 km/h), or drivetrain
damage may result.
• Revving the engine or spinning the wheels too fast may lead to transmission
overheating and failure. It can also damage the tires. Do not spin the wheels
above 30 mph (48 km/h) while in gear (no transmission shifting occurring).
WARNING!
Fast spinning tires can be dangerous. Forces generated by excessive wheel speeds
may cause damage, or even failure, of the axle and tires. A tire could explode and
injure someone. Do not spin your vehicle's wheels faster than 30 mph (48 km/h)
or for longer than 30 seconds continuously without stopping when you are stuck
and do not let anyone near a spinning wheel, no matter what the speed.
WHAT TO DO IN EMERGENCIES
119
Page 130 of 156
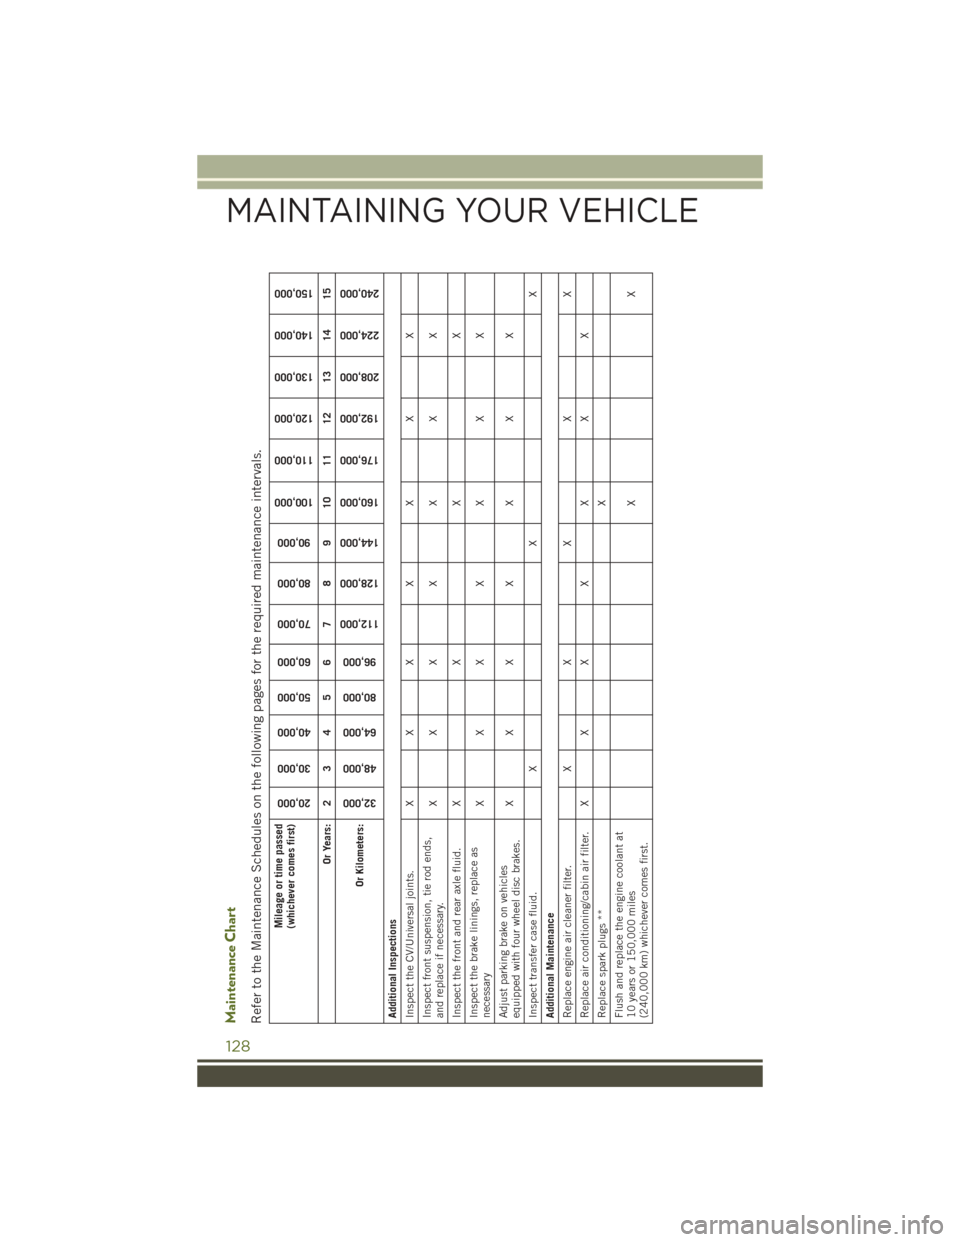
Maintenance ChartRefer to the Maintenance Schedules on the following pages for the required maintenance intervals.
Mileage or time passed
(whichever comes first)
20,000
30,000
40,000
50,000
60,000
70,000
80,000
90,000
100,000
110,000
120,000
130,000
140,000
150,000
Or Years: 2 3 4 5 6 7 8 9 10 11 12 13 14 15
Or Kilometers:
32,000
48,000
64,000
80,000
96,000
112,000
128,000
144,000
160,000
176,000
192,000
208,000
224,000
240,000
Additional Inspections
Inspect the CV/Universal joints. X X X X X X X
Inspect front suspension, tie rod ends,
and replace if necessary. XXX X X X X
Inspect the front and rear axle fluid. X X X X
Inspect the brake linings, replace as
necessary XXX X X X X
Adjust parking brake on vehicles
equipped with four wheel disc brakes. XXX X X X X
Inspect transfer case fluid. X X X
Additional Maintenance
Replace engine air cleaner filter. X X X X X
Replace air conditioning/cabin air filter. X X X X X X X
Replace spark plugs ** X
Flush and replace the engine coolant at
10 years or 150,000 miles
(240,000 km) whichever comes first. XX
MAINTAINING YOUR VEHICLE
128
Page 138 of 156
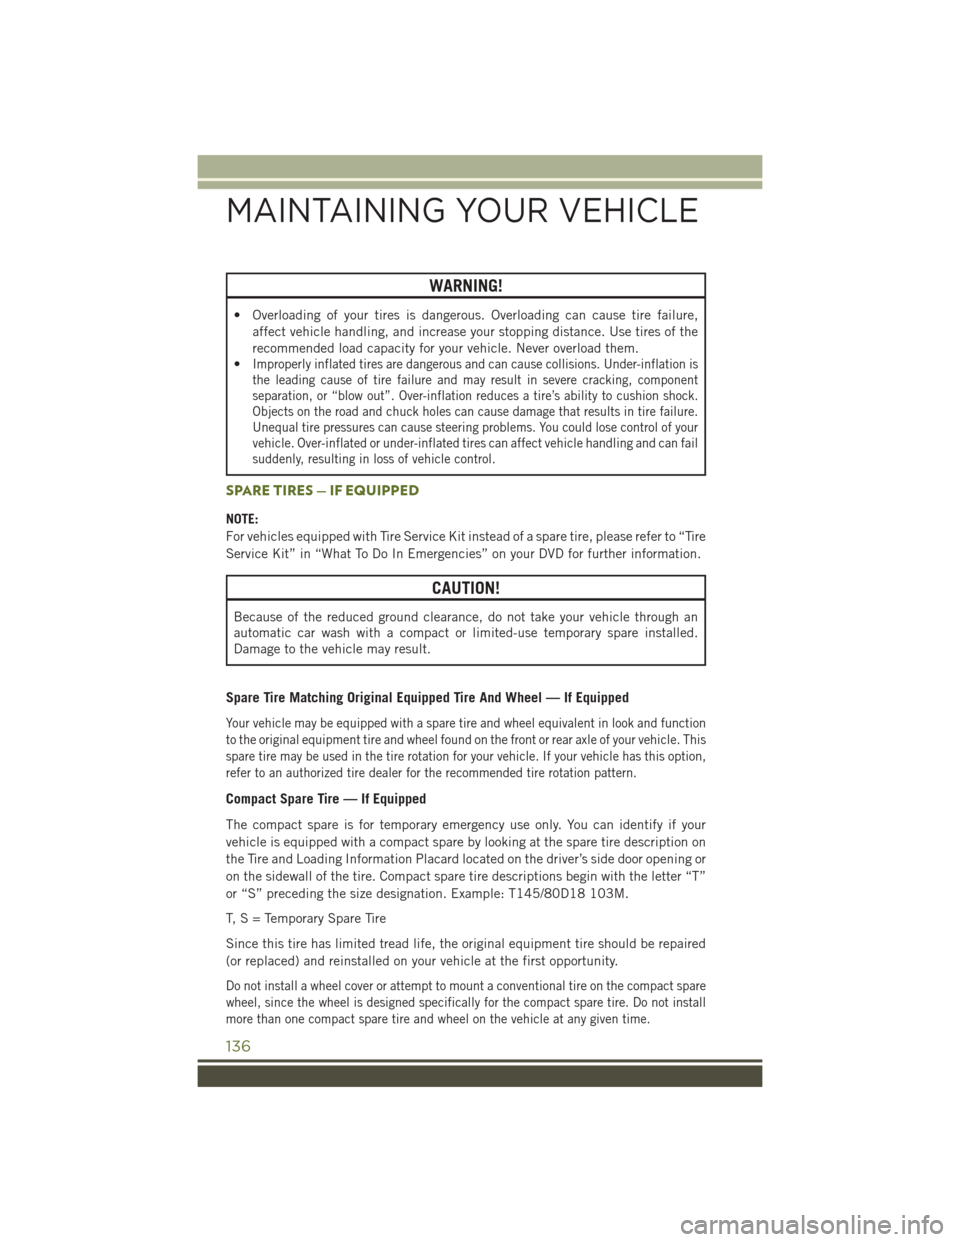
WARNING!
• Overloading of your tires is dangerous. Overloading can cause tire failure,affect vehicle handling, and increase your stopping distance. Use tires of the
recommended load capacity for your vehicle. Never overload them.
•
Improperly inflated tires are dangerous and can cause collisions. Under-inflation is
the leading cause of tire failure and may result in severe cracking, component
separation, or “blow out”. Over-inflation reduces a tire’s ability to cushion shock.
Objects on the road and chuck holes can cause damage that results in tire failure.
Unequal tire pressures can cause steering problems. You could lose control of your
vehicle. Over-inflated or under-inflated tires can affect vehicle handling and can fail
suddenly, resulting in loss of vehicle control.
SPARE TIRES — IF EQUIPPED
NOTE:
For vehicles equipped with Tire Service Kit instead of a spare tire, please refer to “Tire
Service Kit” in “What To Do In Emergencies” on your DVD for further information.
CAUTION!
Because of the reduced ground clearance, do not take your vehicle through an
automatic car wash with a compact or limited-use temporary spare installed.
Damage to the vehicle may result.
Spare Tire Matching Original Equipped Tire And Wheel — If Equipped
Your vehicle may be equipped with a spare tire and wheel equivalent in look and function
to the original equipment tire and wheel found on the front or rear axle of your vehicle. This
spare tire may be used in the tire rotation for your vehicle. If your vehicle has this option,
refer to an authorized tire dealer for the recommended tire rotation pattern.
Compact Spare Tire — If Equipped
The compact spare is for temporary emergency use only. You can identify if your
vehicle is equipped with a compact spare by looking at the spare tire description on
the Tire and Loading Information Placard located on the driver’s side door opening or
on the sidewall of the tire. Compact spare tire descriptions begin with the letter “T”
or “S” preceding the size designation. Example: T145/80D18 103M.
T,S=T emporary Spare Tire
Since this tire has limited tread life, the original equipment tire should be repaired
(or replaced) and reinstalled on your vehicle at the first opportunity.
Do not install a wheel cover or attempt to mount a conventional tire on the compact spare
wheel, since the wheel is designed specifically for the compact spare tire. Do not install
more than one compact spare tire and wheel on the vehicle at any given time.
MAINTAINING YOUR VEHICLE
136
Page 139 of 156
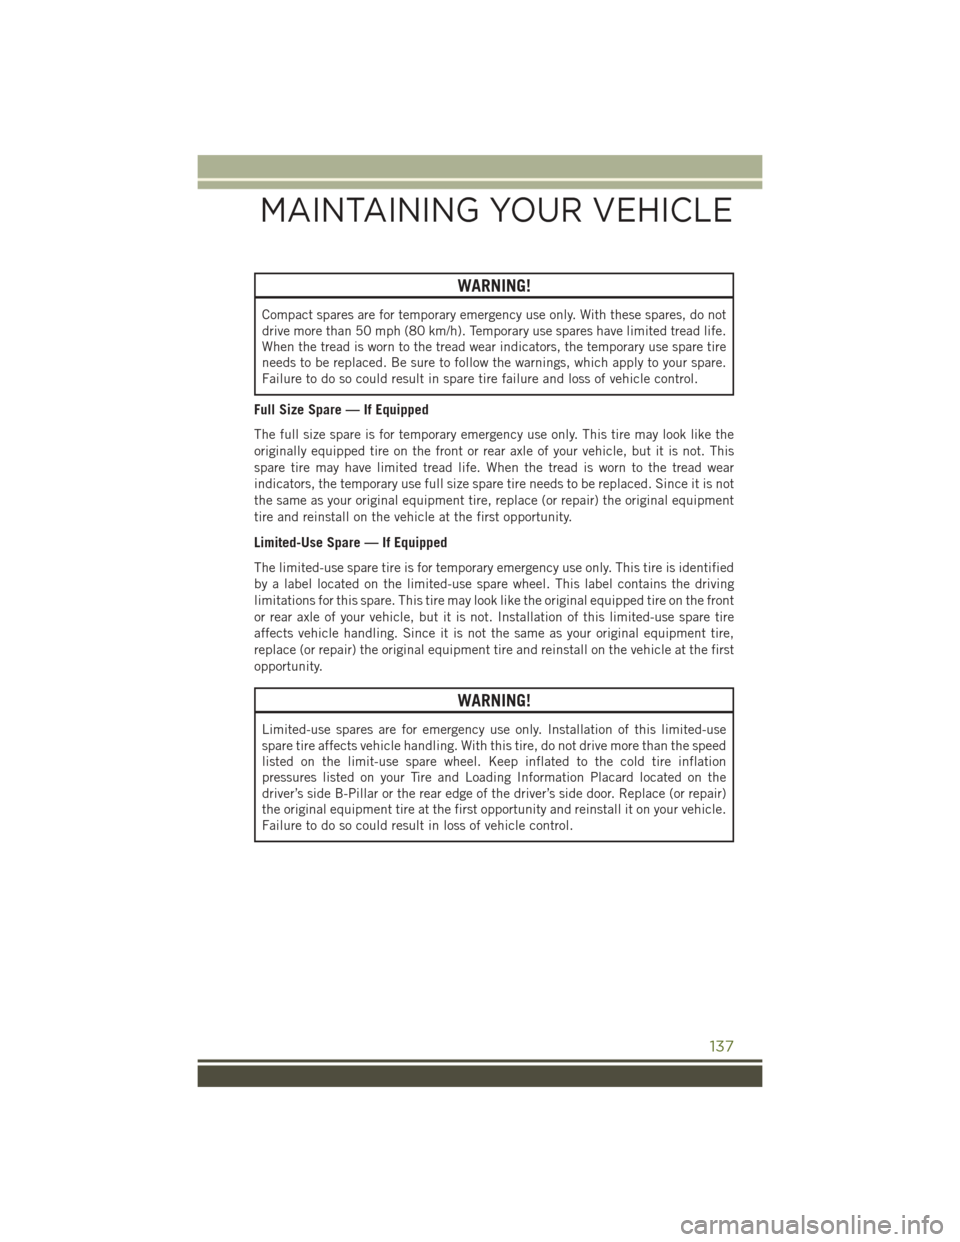
WARNING!
Compact spares are for temporary emergency use only. With these spares, do not
drive more than 50 mph (80 km/h). Temporary use spares have limited tread life.
When the tread is worn to the tread wear indicators, the temporary use spare tire
needs to be replaced. Be sure to follow the warnings, which apply to your spare.
Failure to do so could result in spare tire failure and loss of vehicle control.
Full Size Spare — If Equipped
The full size spare is for temporary emergency use only. This tire may look like the
originally equipped tire on the front or rear axle of your vehicle, but it is not. This
spare tire may have limited tread life. When the tread is worn to the tread wear
indicators, the temporary use full size spare tire needs to be replaced. Since it is not
the same as your original equipment tire, replace (or repair) the original equipment
tire and reinstall on the vehicle at the first opportunity.
Limited-Use Spare — If Equipped
The limited-use spare tire is for temporary emergency use only. This tire is identified
by a label located on the limited-use spare wheel. This label contains the driving
limitations for this spare. This tire may look like the original equipped tire on the front
or rear axle of your vehicle, but it is not. Installation of this limited-use spare tire
affects vehicle handling. Since it is not the same as your original equipment tire,
replace (or repair) the original equipment tire and reinstall on the vehicle at the first
opportunity.
WARNING!
Limited-use spares are for emergency use only. Installation of this limited-use
spare tire affects vehicle handling. With this tire, do not drive more than the speed
listed on the limit-use spare wheel. Keep inflated to the cold tire inflation
pressures listed on your Tire and Loading Information Placard located on the
driver’s side B-Pillar or the rear edge of the driver’s side door. Replace (or repair)
the original equipment tire at the first opportunity and reinstall it on your vehicle.
Failure to do so could result in loss of vehicle control.
MAINTAINING YOUR VEHICLE
137
Page 140 of 156
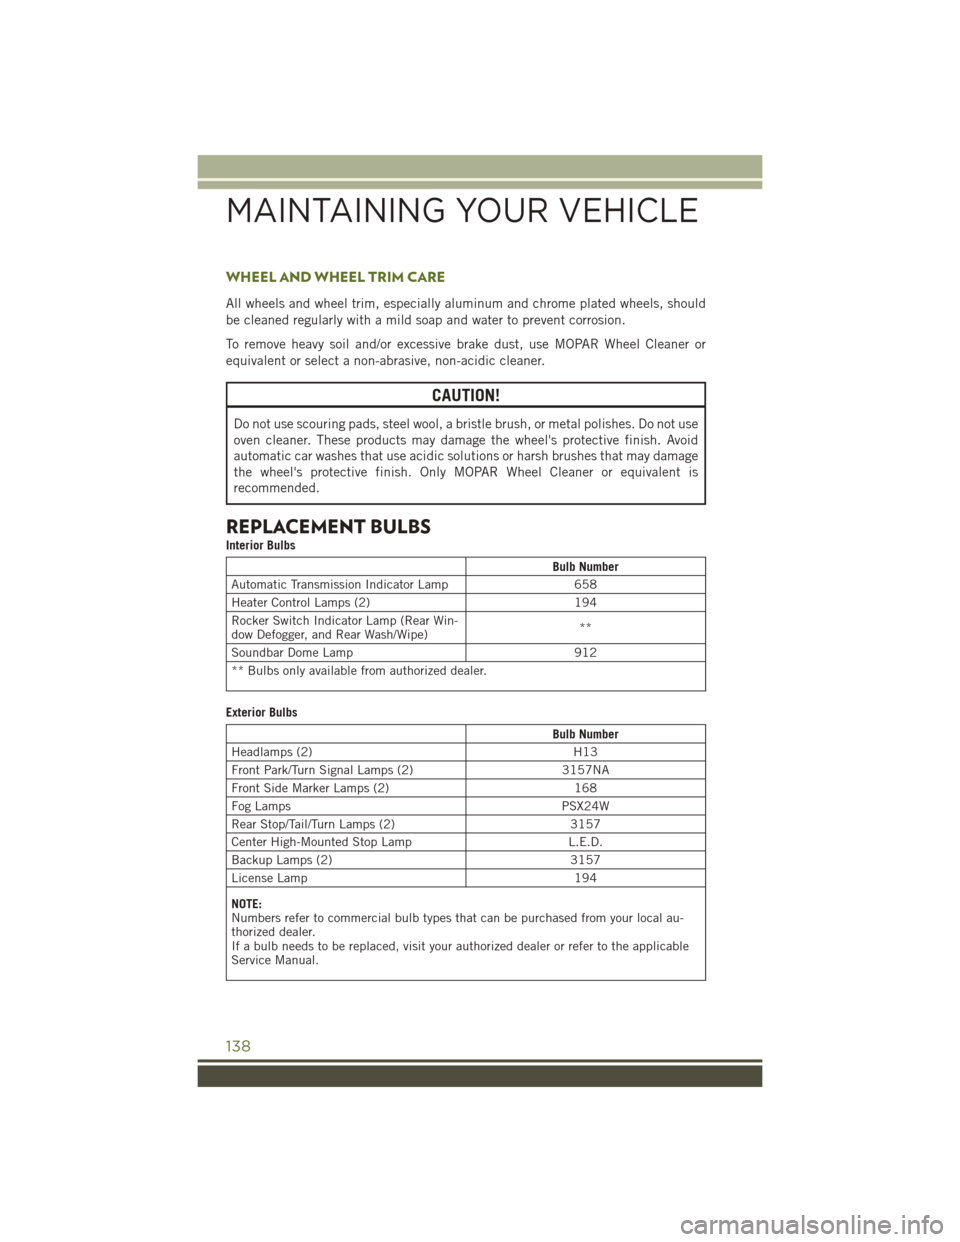
WHEEL AND WHEEL TRIM CARE
All wheels and wheel trim, especially aluminum and chrome plated wheels, should
be cleaned regularly with a mild soap and water to prevent corrosion.
To remove heavy soil and/or excessive brake dust, use MOPAR Wheel Cleaner or
equivalent or select a non-abrasive, non-acidic cleaner.
CAUTION!
Do not use scouring pads, steel wool, a bristle brush, or metal polishes. Do not use
oven cleaner. These products may damage the wheel's protective finish. Avoid
automatic car washes that use acidic solutions or harsh brushes that may damage
the wheel's protective finish. Only MOPAR Wheel Cleaner or equivalent is
recommended.
REPLACEMENT BULBS
Interior Bulbs
Bulb Number
Automatic Transmission Indicator Lamp 658
Heater Control Lamps (2) 194
Rocker Switch Indicator Lamp (Rear Win-
dow Defogger, and Rear Wash/Wipe) **
Soundbar Dome Lamp 912
** Bulbs only available from authorized dealer.
Exterior Bulbs
Bulb Number
Headlamps (2) H13
Front Park/Turn Signal Lamps (2) 3157NA
Front Side Marker Lamps (2) 168
Fog Lamps PSX24W
Rear Stop/Tail/Turn Lamps (2) 3157
Center High-Mounted Stop Lamp L.E.D.
Backup Lamps (2) 3157
License Lamp 194
NOTE:
Numbers refer to commercial bulb types that can be purchased from your local au-
thorized dealer.
If a bulb needs to be replaced, visit your authorized dealer or refer to the applicable
Service Manual.
MAINTAINING YOUR VEHICLE
138
Page 143 of 156
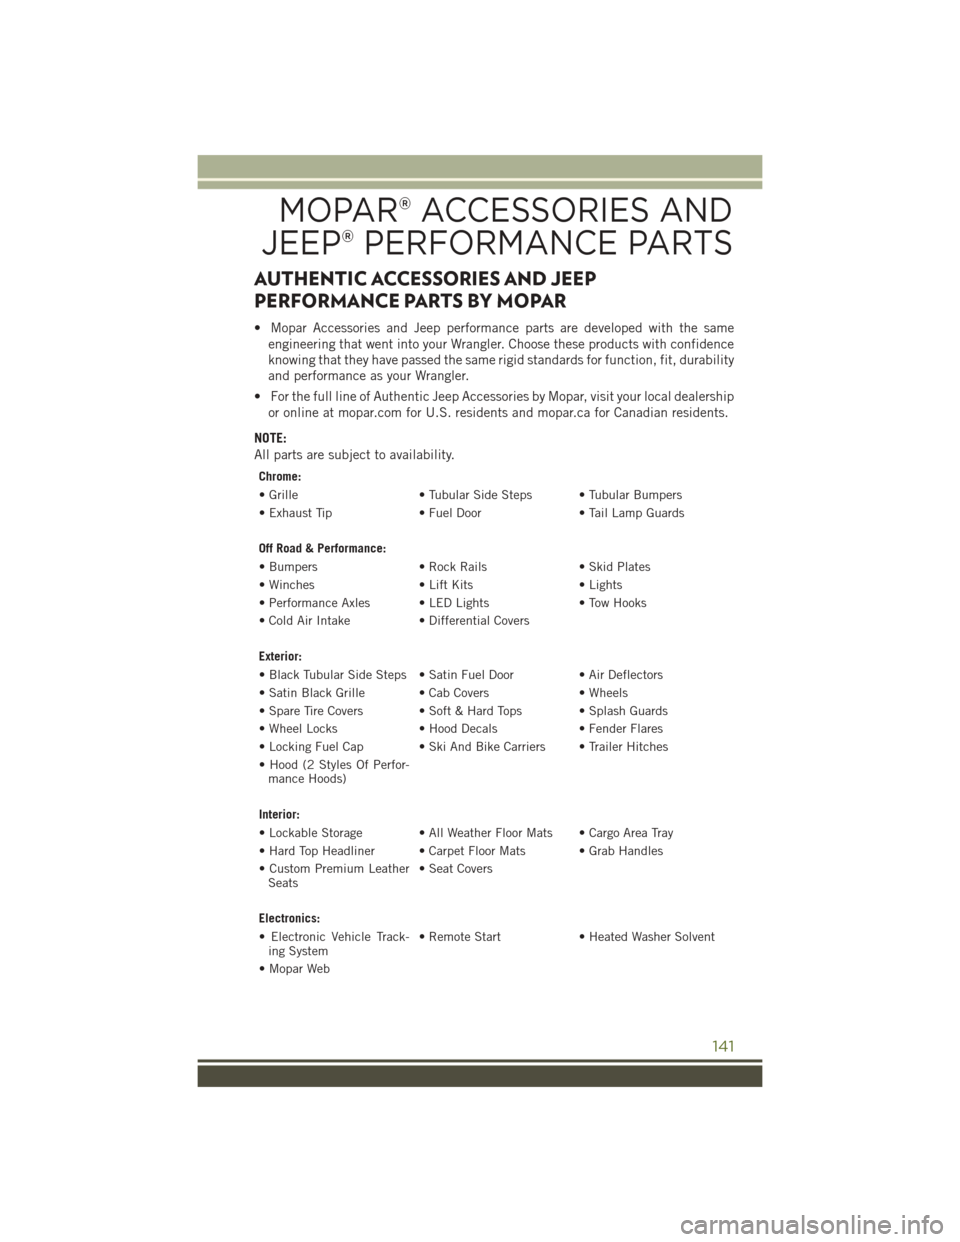
AUTHENTIC ACCESSORIES AND JEEP
PERFORMANCE PARTS BY MOPAR
• Mopar Accessories and Jeep performance parts are developed with the sameengineering that went into your Wrangler. Choose these products with confidence
knowing that they have passed the same rigid standards for function, fit, durability
and performance as your Wrangler.
• For the full line of Authentic Jeep Accessories by Mopar, visit your local dealership or online at mopar.com for U.S. residents and mopar.ca for Canadian residents.
NOTE:
All parts are subject to availability.
Chrome:
• Grille • Tubular Side Steps • Tubular Bumpers
• Exhaust Tip • Fuel Door• Tail Lamp Guards
Off Road & Performance:
• Bumpers • Rock Rails• Skid Plates
• Winches • Lift Kits• Lights
• Performance Axles • LED Lights • Tow Hooks
• Cold Air Intake • Differential Covers
Exterior:
• Black Tubular Side Steps • Satin Fuel Door • Air Deflectors
• Satin Black Grille • Cab Covers • Wheels
• Spare Tire Covers • Soft & Hard Tops • Splash Guards
• Wheel Locks • Hood Decals• Fender Flares
• Locking Fuel Cap • Ski And Bike Carriers • Trailer Hitches
• Hood (2 Styles Of Perfor- mance Hoods)
Interior:
• Lockable Storage • All Weather Floor Mats • Cargo Area Tray
• Hard Top Headliner • Carpet Floor Mats • Grab Handles
• Custom Premium Leather Seats • Seat Covers
Electronics:
• Electronic Vehicle Track- ing System • Remote Start
• Heated Washer Solvent
• Mopar Web
MOPAR® ACCESSORIES AND
JEEP® PERFORMANCE PARTS
141