park assist JEEP WRANGLER 2016 JK / 3.G User Guide
[x] Cancel search | Manufacturer: JEEP, Model Year: 2016, Model line: WRANGLER, Model: JEEP WRANGLER 2016 JK / 3.GPages: 156, PDF Size: 8.82 MB
Page 31 of 156

• Rotate the center portion of the lever upward to the next detent position tobrighten the odometer and radio controls when the parking lights or headlights are
on.
• Rotate the center portion of the lever upward to the last detent to turn on the interior lighting.
Flash-To-Pass
You can signal another vehicle with your headlights by lightly pulling the multifunc-
tion lever toward you. This will turn on the high beams headlights until the lever is
released.
High/Low Beam Switch
Push the multifunction lever away from you to switch the headlights to high beam.
Pull the lever toward you, to switch the headlights back to low beam.
Front Fog Lights
The front fog light switch is located on the multifunction lever. To activate the front
fog lights, turn on the parking or low beam headlights and pull out the end of the
lever.
NOTE:
The fog lights will only operate with the parking lights or the headlights on low beam.
Selecting high beam headlights will turn off the fog lights.
Turn Signals
Move the multifunction lever up or down and the arrows on each side of the
instrument cluster flash to show proper operation of the front and rear turn signal
lights.
NOTE:
• If either light remains on and does not flash, or there is a very fast flash rate, checkfor a defective outside light bulb. If an indicator fails to light when the lever is
moved, it would suggest that the indicator bulb is defective.
• A tone will chime if the turn signals are left on for more than 1 mile (2 km).
Lane Change Assist
Tap the lever up or down once, without moving beyond the detent, and the turn signal
(right or left) will flash three times then automatically turn off.
OPERATING YOUR VEHICLE
29
Page 136 of 156

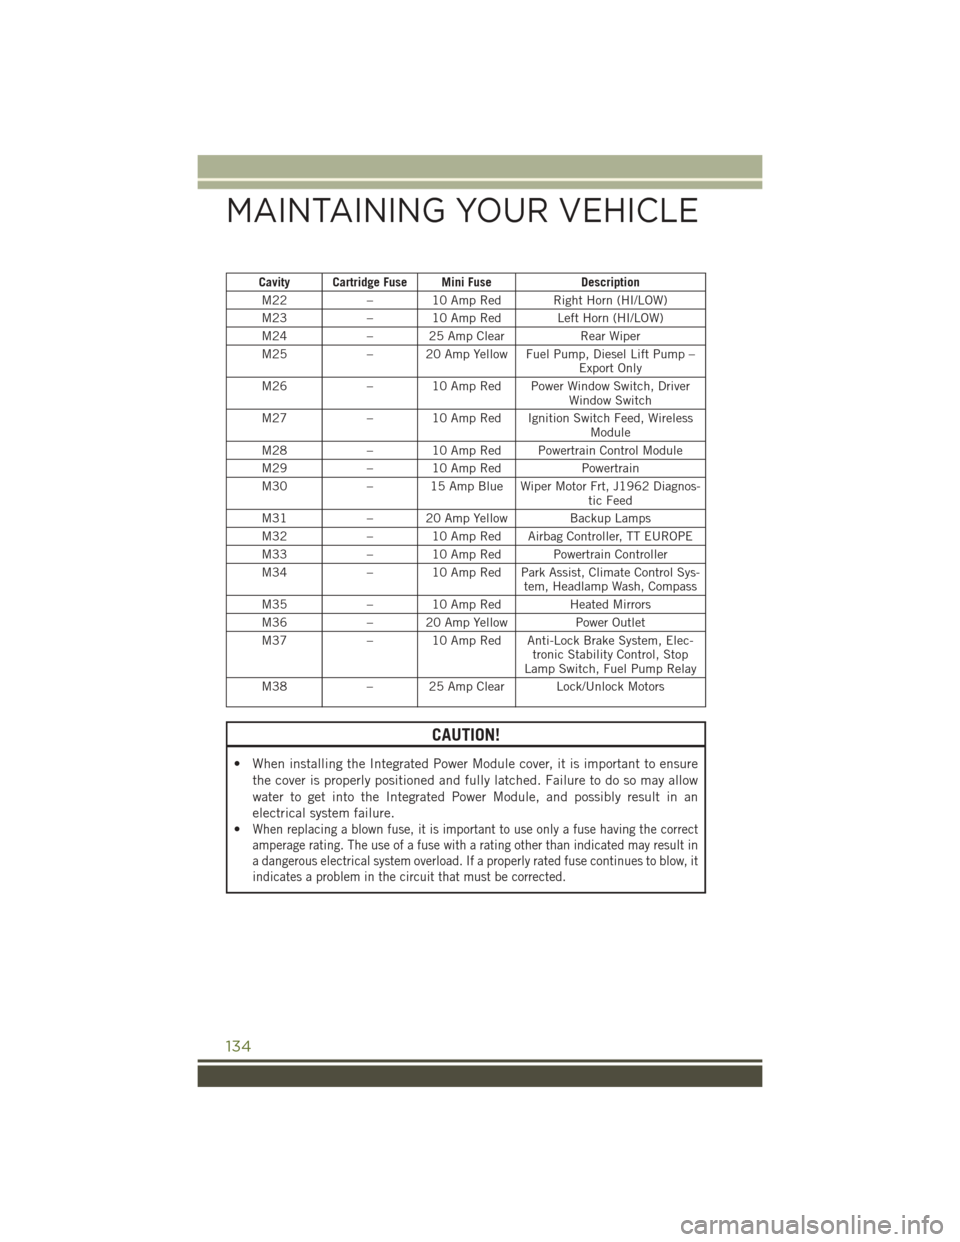
Cavity Cartridge Fuse Mini FuseDescription
M22 – 10 Amp Red Right Horn (HI/LOW)
M23 – 10 Amp Red Left Horn (HI/LOW)
M24 – 25 Amp Clear Rear Wiper
M25 – 20 Amp Yellow Fuel Pump, Diesel Lift Pump –
Export Only
M26 – 10 Amp Red Power Window Switch, Driver
Window Switch
M27 – 10 Amp Red Ignition Switch Feed, Wireless
Module
M28 – 10 Amp Red Powertrain Control Module
M29 – 10 Amp Red Powertrain
M30 – 15 Amp Blue Wiper Motor Frt, J1962 Diagnos-
tic Feed
M31 – 20 Amp Yellow Backup Lamps
M32 – 10 Amp Red Airbag Controller, TT EUROPE
M33 – 10 Amp Red Powertrain Controller
M34 – 10 Amp Red Park Assist, Climate Control Sys-
tem, Headlamp Wash, Compass
M35 – 10 Amp Red Heated Mirrors
M36 – 20 Amp Yellow Power Outlet
M37 – 10 Amp Red Anti-Lock Brake System, Elec-
tronic Stability Control, Stop
Lamp Switch, Fuel Pump Relay
M38 – 25 Amp Clear Lock/Unlock Motors
CAUTION!
• When installing the Integrated Power Module cover, it is important to ensure
the cover is properly positioned and fully latched. Failure to do so may allow
water to get into the Integrated Power Module, and possibly result in an
electrical system failure.
•
When replacing a blown fuse, it is important to use only a fuse having the correct
amperage rating. The use of a fuse with a rating other than indicated may result in
a dangerous electrical system overload. If a properly rated fuse continues to blow, it
indicates a problem in the circuit that must be corrected.
MAINTAINING YOUR VEHICLE
134