sport mode JEEP WRANGLER 2017 JK / 3.G Owners Manual
[x] Cancel search | Manufacturer: JEEP, Model Year: 2017, Model line: WRANGLER, Model: JEEP WRANGLER 2017 JK / 3.GPages: 527, PDF Size: 5.34 MB
Page 58 of 527
Cargo Lamp
The courtesy and dome lights will turn on when the front
doors are opened, by rotating the control for the dimmer
switch on the multifunction lever fully upward, or if
equipped, when the unlock button is pushed on the
Remote Keyless Entry key fob.
The sports bar reading lights (available on four-door
models) can be turned on by pushing the switches, located
on either side of the lens. Push a switch a second time to
turn the light off.The rear cargo light may be turned on by pushing the lens.
Push the lens a second time to turn the light off.
When a door is open and the interior lights are on, rotating
the dimmer control to the extreme bottom position will
cause all the interior lights to turn off. This is also known
as the “Party” mode because it allows the doors to stay
open for extended periods of time without discharging the
vehicle’s battery.
Sports Bar Reading Light
Rear Cargo Light
56 GETTING TO KNOW YOUR VEHICLE
Page 74 of 527
Four-Door Models
The lower left switch controls the left rear passenger
window, and the lower right switch controls the right rear
passenger window.
Wind Buffeting
Wind buffeting can be described as the perception of
pressure on the ears or a helicopter-type sound in the ears.
Your vehicle may exhibit wind buffeting with the windows
down in certain open or partially open positions. This is a
normal occurrence and can be minimized by adjusting the
window opening.
DUAL TOP — TWO-DOOR MODELS —
IF EQUIPPED
Please visit
http://www.jeep.com/en/wrangler-rooftop-instructions/
for instructional videos.
If your vehicle is equipped with a Dual Top,you must
remove one of the tops from the vehicle. If the soft top is
removed, the pivot brackets must also be removed from
the sport bar. The soft top was installed at the factory for
shipping purposes only. The soft top and the hard top are
to be used independently. Removal is mandatory to prevent any possible wear and tear on the soft top. Your
vehicle warranty will not cover damage resulting from
both tops remaining on the vehicle at the same time for
extended periods of time.
Removing The Soft Top — Two-Door Models
1. Locate and remove the two boxes that contain the
following items:
• Right and left door frames
• Four door frame attachment knobs
• Right and left quarter windows
• Rear window
• Two rear window roll up straps
• Two Sunrider secure straps (if equipped)
• Two rear swing gate brackets
2. Remove the hard top. Refer to “Freedom Top Three- Piece Modular Hard Top — Front/Rear Panel Removal”
in this section.
72 GETTING TO KNOW YOUR VEHICLE
Page 76 of 527
5. Unzip the zipper on the sport bar cover to expose thepivot brackets. Remove the brackets using a #T30 Torx
head driver. Recover and re-zip the sports bar cover.
Store the pivot brackets and screws in a safe place.
6. Reinstall the hard top. Refer to “Freedom Top Three- Piece Modular Hard Top — Front/Rear Panel Installa-
tion” in this section.Installing The Soft Top — Two-Door Models
NOTE: The following procedures are for first time set up
only. For future soft top procedures, refer to “Soft Top” in
this section.
1. Locate and remove the following items prior to hard top removal:
• Right and left door frames
• Door frame attachment knobs (four for two-door mod-
els, six for four-door models)
• Right and left quarter windows
• Rear window
2. Remove the hard top. Refer to “Freedom Top Three- Piece Modular Hard Top — Front/Rear Panel Removal”
in this section.
3. Install the door frames. Refer to “Door Frame” in this section.
74 GETTING TO KNOW YOUR VEHICLE
Page 78 of 527
CAUTION!
Do not overtighten the screws. You can strip the screws
if they are overtightened.
5. Remove the swing gate bar (black metal bar for bottom of rear window) and set aside.
NOTE: Be sure the wire harness in the left rear corner is
not tangled in the soft top bows before you lift the top. 6. Unsnap and remove the black boot cover. This cover
should be discarded. It was intended as a protective
cover for shipping only.
NOTE: A visual instruction sheet is enclosed in the dual
top wrap.
7. Put up the soft top. Refer to “Soft Top — Putting Up The Soft Top” in this section.
DUAL TOP — FOUR-DOOR MODELS —
IF EQUIPPED
Please visit
http://www.jeep.com/en/wrangler-rooftop-instructions/
for instructional videos.
If your vehicle is equipped with a Dual Top, you must
remove one of the tops from the vehicle. If the soft top is
removed, the pivot brackets must also be removed from
the sport bar. The soft top was installed at the factory for
shipping purposes only. The soft top and the hard top are
to be used independently. Removal is mandatory to
prevent any possible wear and tear on the soft top. Your
vehicle warranty will not cover damage resulting from
both tops remaining on the vehicle at the same time for
extended periods of time.
Step Four
76 GETTING TO KNOW YOUR VEHICLE
Page 82 of 527
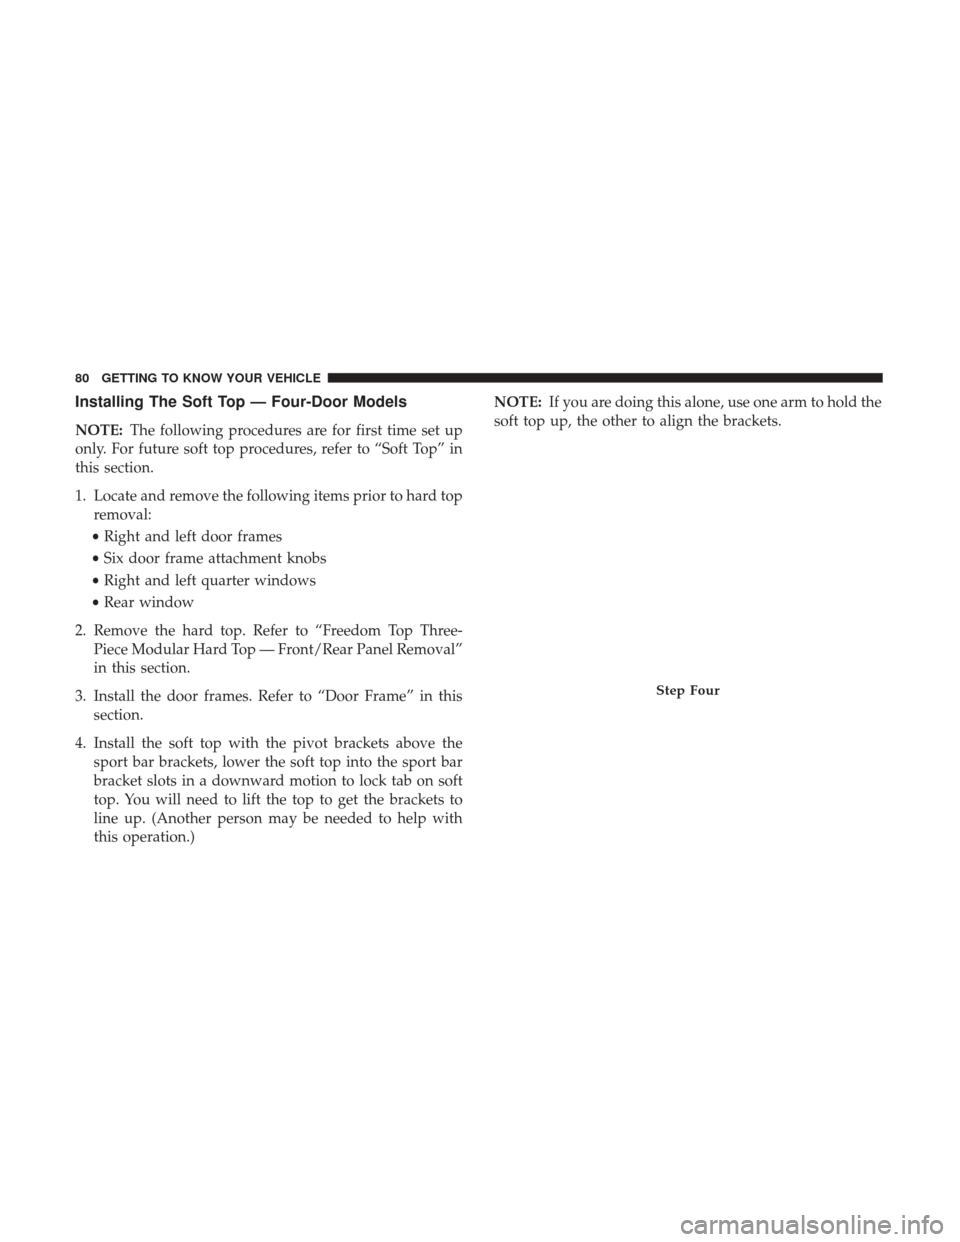
Installing The Soft Top — Four-Door Models
NOTE:The following procedures are for first time set up
only. For future soft top procedures, refer to “Soft Top” in
this section.
1. Locate and remove the following items prior to hard top removal:
• Right and left door frames
• Six door frame attachment knobs
• Right and left quarter windows
• Rear window
2. Remove the hard top. Refer to “Freedom Top Three- Piece Modular Hard Top — Front/Rear Panel Removal”
in this section.
3. Install the door frames. Refer to “Door Frame” in this section.
4. Install the soft top with the pivot brackets above the sport bar brackets, lower the soft top into the sport bar
bracket slots in a downward motion to lock tab on soft
top. You will need to lift the top to get the brackets to
line up. (Another person may be needed to help with
this operation.) NOTE:
If you are doing this alone, use one arm to hold the
soft top up, the other to align the brackets.
Step Four
80 GETTING TO KNOW YOUR VEHICLE
Page 100 of 527
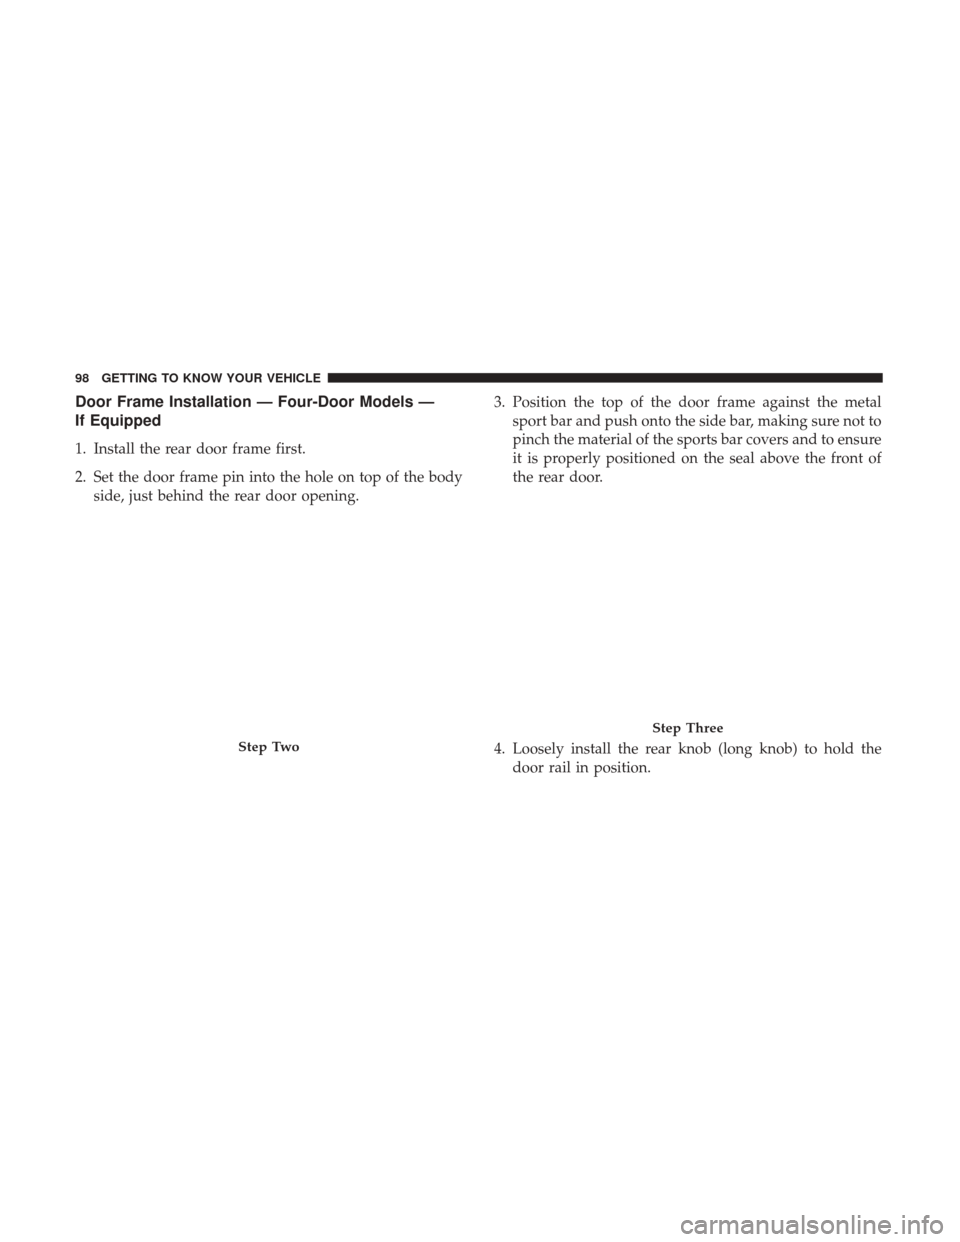
Door Frame Installation — Four-Door Models —
If Equipped
1. Install the rear door frame first.
2. Set the door frame pin into the hole on top of the bodyside, just behind the rear door opening. 3. Position the top of the door frame against the metal
sport bar and push onto the side bar, making sure not to
pinch the material of the sports bar covers and to ensure
it is properly positioned on the seal above the front of
the rear door.
4. Loosely install the rear knob (long knob) to hold the door rail in position.
Step Two
Step Three
98 GETTING TO KNOW YOUR VEHICLE
Page 122 of 527
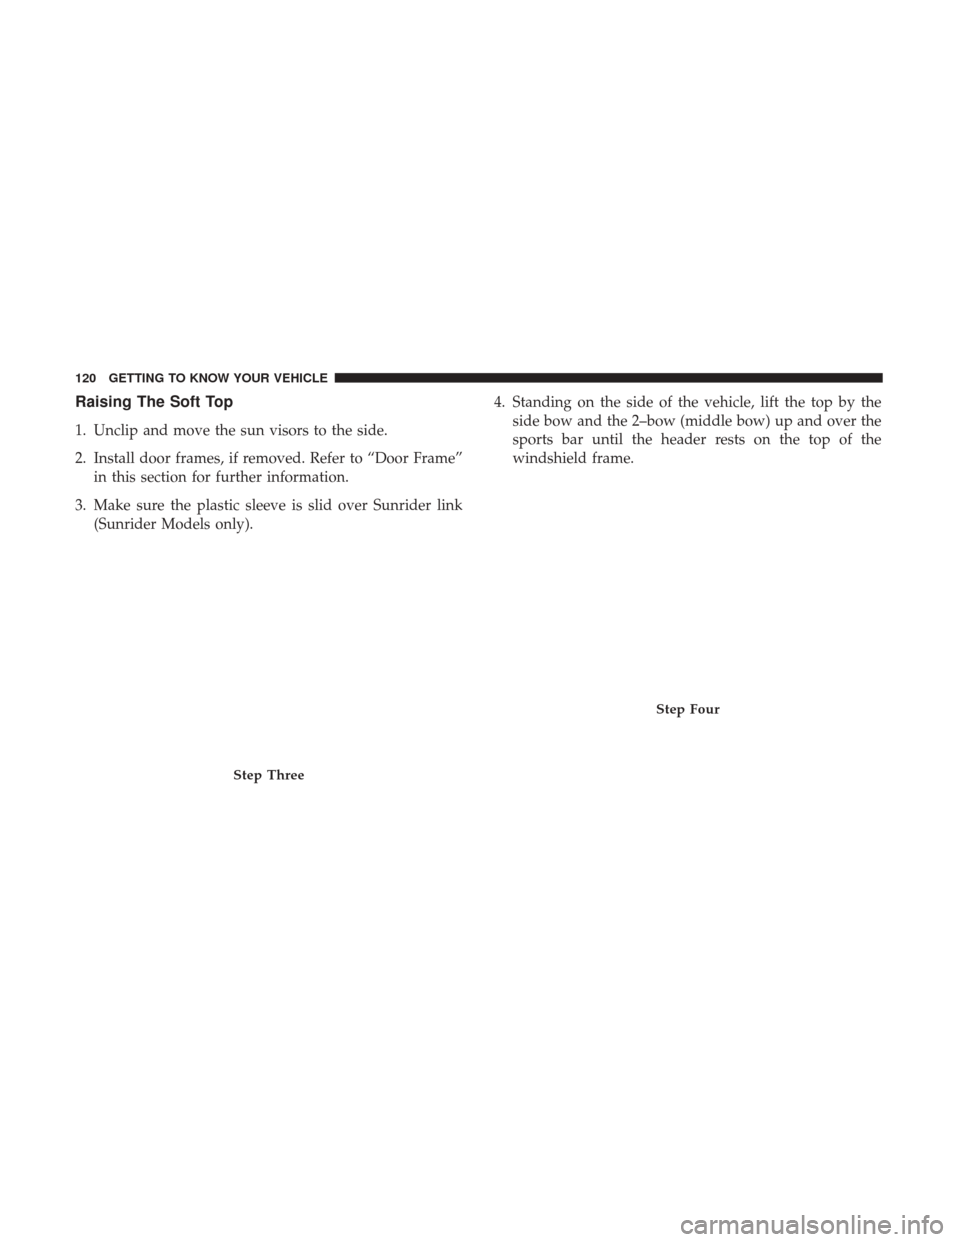
Raising The Soft Top
1. Unclip and move the sun visors to the side.
2. Install door frames, if removed. Refer to “Door Frame”in this section for further information.
3. Make sure the plastic sleeve is slid over Sunrider link (Sunrider Models only). 4. Standing on the side of the vehicle, lift the top by the
side bow and the 2–bow (middle bow) up and over the
sports bar until the header rests on the top of the
windshield frame.
Step Three
Step Four
120 GETTING TO KNOW YOUR VEHICLE
Page 280 of 527
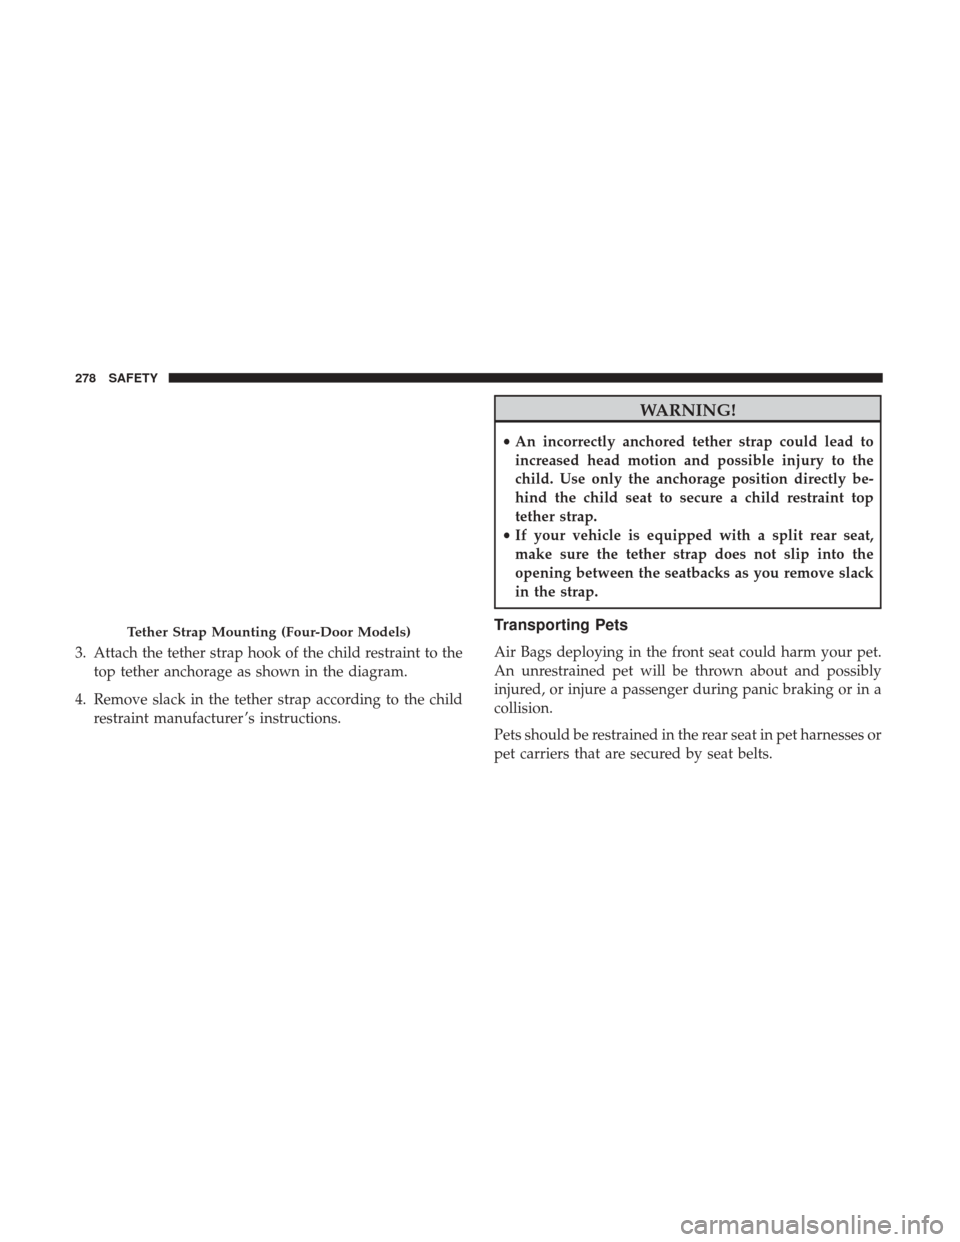
3. Attach the tether strap hook of the child restraint to thetop tether anchorage as shown in the diagram.
4. Remove slack in the tether strap according to the child restraint manufacturer ’s instructions.
WARNING!
•An incorrectly anchored tether strap could lead to
increased head motion and possible injury to the
child. Use only the anchorage position directly be-
hind the child seat to secure a child restraint top
tether strap.
• If your vehicle is equipped with a split rear seat,
make sure the tether strap does not slip into the
opening between the seatbacks as you remove slack
in the strap.
Transporting Pets
Air Bags deploying in the front seat could harm your pet.
An unrestrained pet will be thrown about and possibly
injured, or injure a passenger during panic braking or in a
collision.
Pets should be restrained in the rear seat in pet harnesses or
pet carriers that are secured by seat belts.
Tether Strap Mounting (Four-Door Models)
278 SAFETY
Page 281 of 527
SAFETY TIPS
Transporting Passengers
NEVER TRANSPORT PASSENGERS IN THE CARGO
AREA.
WARNING!
•Do not leave children or animals inside parked
vehicles in hot weather. Interior heat build-up may
cause serious injury or death.
• It is extremely dangerous to ride in a cargo area,
inside or outside of a vehicle. In a collision, people
riding in these areas are more likely to be seriously
injured or killed.
• Do not allow people to ride in any area of your
vehicle that is not equipped with seats and seat belts.
• Be sure everyone in your vehicle is in a seat and
using a seat belt properly.
Exhaust Gas
WARNING!
Exhaust gases can injure or kill. They contain carbon
monoxide (CO), which is colorless and odorless.
Breathing it can make you unconscious and can even-
tually poison you. To avoid breathing (CO), follow
these safety tips since vehicle equipped with a gas
engine the following applies:
• Do not run the engine in a closed garage or in
confined areas any longer than needed to move your
vehicle in or out of the area.
• If you are required to drive with the trunk/liftgate/
rear doors open, make sure that all windows are
closed and the climate control BLOWER switch is set
at high speed. DO NOT use the recirculation mode.
• If it is necessary to sit in a parked vehicle with the
engine running, adjust your heating or cooling con-
trols to force outside air into the vehicle. Set the
blower at high speed.
The best protection against carbon monoxide entry into the
vehicle body is a properly maintained engine exhaust
system.
5
SAFETY 279
Page 321 of 527
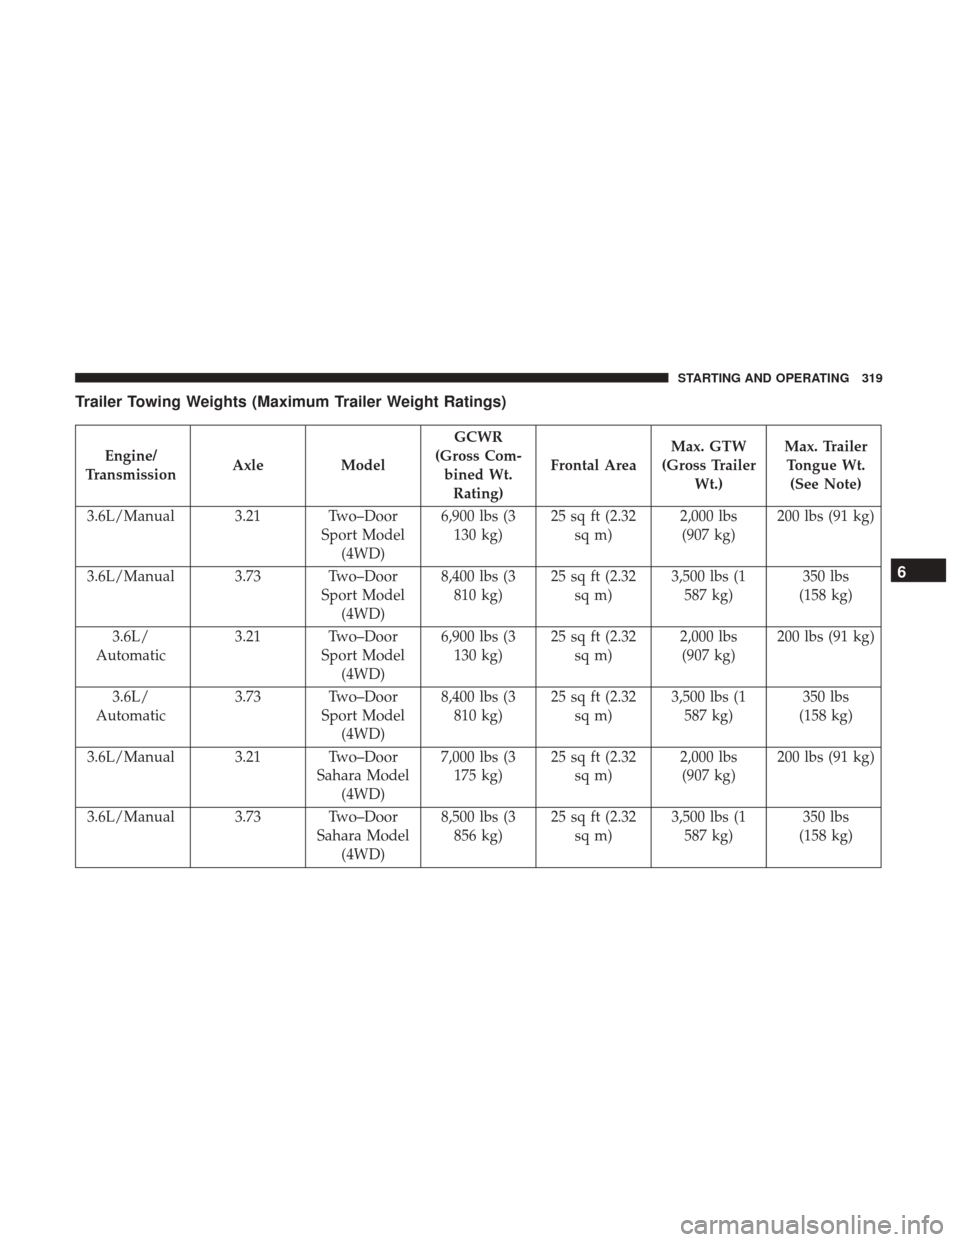
Trailer Towing Weights (Maximum Trailer Weight Ratings)
Engine/
Transmission Axle
Model GCWR
(Gross Com- bined Wt.Rating) Frontal Area
Max. GTW
(Gross Trailer Wt.) Max. Trailer
Tongue Wt. (See Note)
3.6L/Manual 3.21 Two–Door Sport Model(4WD) 6,900 lbs (3
130 kg) 25 sq ft (2.32
sq m) 2,000 lbs
(907 kg) 200 lbs (91 kg)
3.6L/Manual 3.73 Two–Door Sport Model(4WD) 8,400 lbs (3
810 kg) 25 sq ft (2.32
sq m) 3,500 lbs (1
587 kg) 350 lbs
(158 kg)
3.6L/
Automatic 3.21 Two–Door
Sport Model(4WD) 6,900 lbs (3
130 kg) 25 sq ft (2.32
sq m) 2,000 lbs
(907 kg) 200 lbs (91 kg)
3.6L/
Automatic 3.73 Two–Door
Sport Model(4WD) 8,400 lbs (3
810 kg) 25 sq ft (2.32
sq m) 3,500 lbs (1
587 kg) 350 lbs
(158 kg)
3.6L/Manual 3.21 Two–Door Sahara Model(4WD) 7,000 lbs (3
175 kg) 25 sq ft (2.32
sq m) 2,000 lbs
(907 kg) 200 lbs (91 kg)
3.6L/Manual 3.73 Two–Door Sahara Model(4WD) 8,500 lbs (3
856 kg) 25 sq ft (2.32
sq m) 3,500 lbs (1
587 kg) 350 lbs
(158 kg)
6
STARTING AND OPERATING 319