ECU JEEP WRANGLER 2020 Owner handbook (in English)
[x] Cancel search | Manufacturer: JEEP, Model Year: 2020, Model line: WRANGLER, Model: JEEP WRANGLER 2020Pages: 276, PDF Size: 4.47 MB
Page 46 of 276
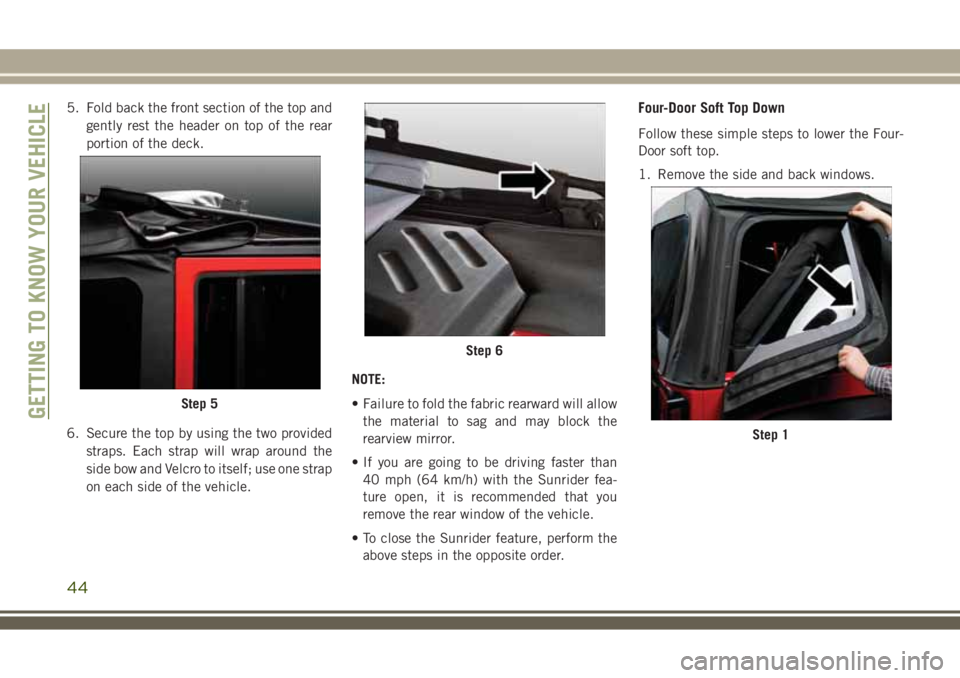
5. Fold back the front section of the top and
gently rest the header on top of the rear
portion of the deck.
6. Secure the top by using the two provided
straps. Each strap will wrap around the
side bow and Velcro to itself; use one strap
on each side of the vehicle.NOTE:
• Failure to fold the fabric rearward will allow
the material to sag and may block the
rearview mirror.
• If you are going to be driving faster than
40 mph (64 km/h) with the Sunrider fea-
ture open, it is recommended that you
remove the rear window of the vehicle.
• To close the Sunrider feature, perform the
above steps in the opposite order.Four-Door Soft Top Down
Follow these simple steps to lower the Four-
Door soft top.
1. Remove the side and back windows.
Step 5
Step 6
Step 1
GETTING TO KNOW YOUR VEHICLE
44
Page 51 of 276
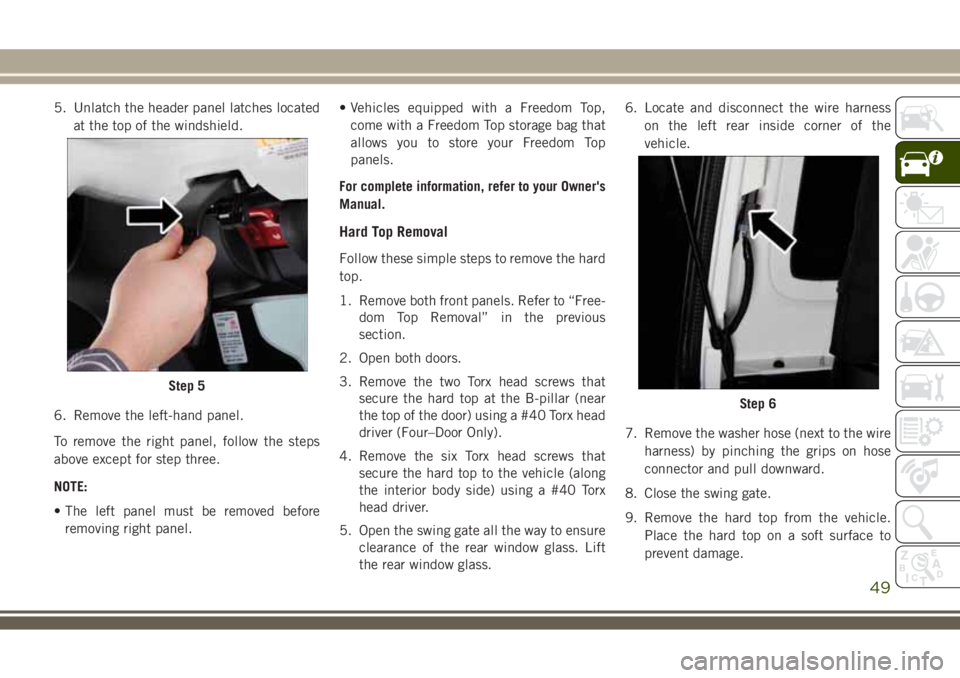
5. Unlatch the header panel latches located
at the top of the windshield.
6. Remove the left-hand panel.
To remove the right panel, follow the steps
above except for step three.
NOTE:
• The left panel must be removed before
removing right panel.• Vehicles equipped with a Freedom Top,
come with a Freedom Top storage bag that
allows you to store your Freedom Top
panels.
For complete information, refer to your Owner's
Manual.
Hard Top Removal
Follow these simple steps to remove the hard
top.
1. Remove both front panels. Refer to “Free-
dom Top Removal” in the previous
section.
2. Open both doors.
3. Remove the two Torx head screws that
secure the hard top at the B-pillar (near
the top of the door) using a #40 Torx head
driver (Four–Door Only).
4. Remove the six Torx head screws that
secure the hard top to the vehicle (along
the interior body side) using a #40 Torx
head driver.
5. Open the swing gate all the way to ensure
clearance of the rear window glass. Lift
the rear window glass.6. Locate and disconnect the wire harness
on the left rear inside corner of the
vehicle.
7. Remove the washer hose (next to the wire
harness) by pinching the grips on hose
connector and pull downward.
8. Close the swing gate.
9. Remove the hard top from the vehicle.
Place the hard top on a soft surface to
prevent damage.
Step 5
Step 6
49
Page 53 of 276
Wind Buffeting
Wind buffeting can be described as a
helicopter-type percussion sound. If buffet-
ing occurs with the rear windows open, adjust
the front and rear windows together.
HOOD
Opening The Hood
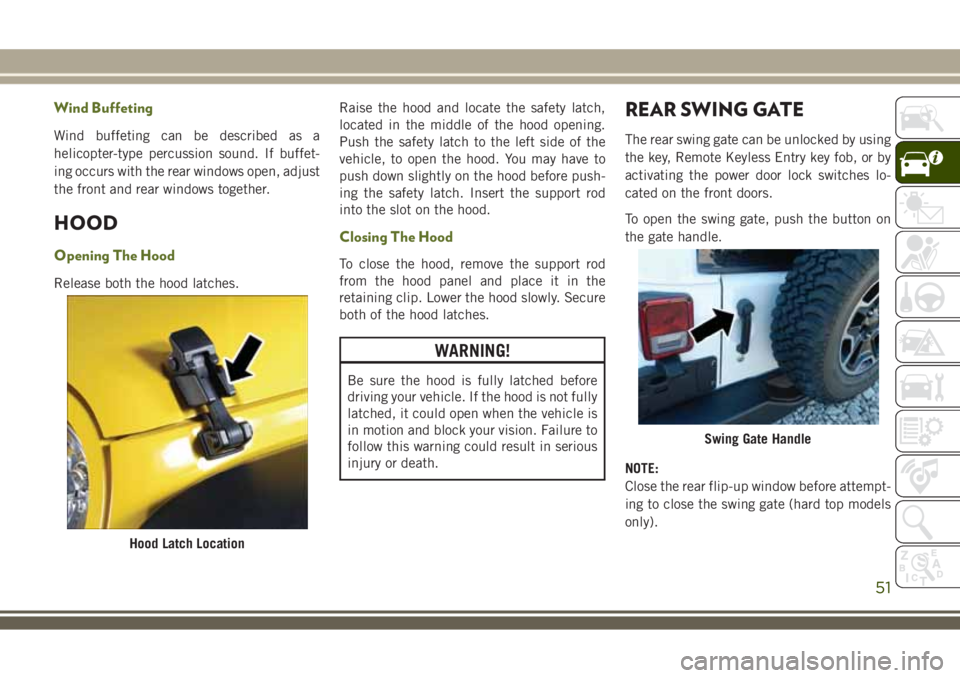
Release both the hood latches.Raise the hood and locate the safety latch,
located in the middle of the hood opening.
Push the safety latch to the left side of the
vehicle, to open the hood. You may have to
push down slightly on the hood before push-
ing the safety latch. Insert the support rod
into the slot on the hood.
Closing The Hood
To close the hood, remove the support rod
from the hood panel and place it in the
retaining clip. Lower the hood slowly. Secure
both of the hood latches.
WARNING!
Be sure the hood is fully latched before
driving your vehicle. If the hood is not fully
latched, it could open when the vehicle is
in motion and block your vision. Failure to
follow this warning could result in serious
injury or death.
REAR SWING GATE
The rear swing gate can be unlocked by using
the key, Remote Keyless Entry key fob, or by
activating the power door lock switches lo-
cated on the front doors.
To open the swing gate, push the button on
the gate handle.
NOTE:
Close the rear flip-up window before attempt-
ing to close the swing gate (hard top models
only).
Hood Latch Location
Swing Gate Handle
51
Page 57 of 276
GETTING TO KNOW YOUR INSTRUMENT PANEL
INSTRUMENT CLUSTER DISPLAY —
IF EQUIPPED................56
Instrument Cluster Display Location And
Controls.....................56
Instrument Cluster Display Messages . . .57
Gear Shift Indicator (GSI) — If
Equipped....................58
Oil Change Required.............58
WARNING LIGHTS AND MES-
SAGES ....................58
Red Warning Lights..............58
Yellow Warning Lights............61
Yellow Indicator Lights............63
Green Indicator Lights............64
White Indicator Lights............64
Blue Indicator Lights.............64
ONBOARD DIAGNOSTIC SYSTEM —
OBDII ....................64
Onboard Diagnostic System (OBD II)
Cybersecurity.................65
Loose Fuel Filler Cap Message.......65
GETTING TO KNOW YOUR INSTRUMENT PANEL
55
Page 63 of 276
remain on continuously and a chime will
sound. Refer to “Occupant Restraints Sys-
tems” in “Safety” for further information.
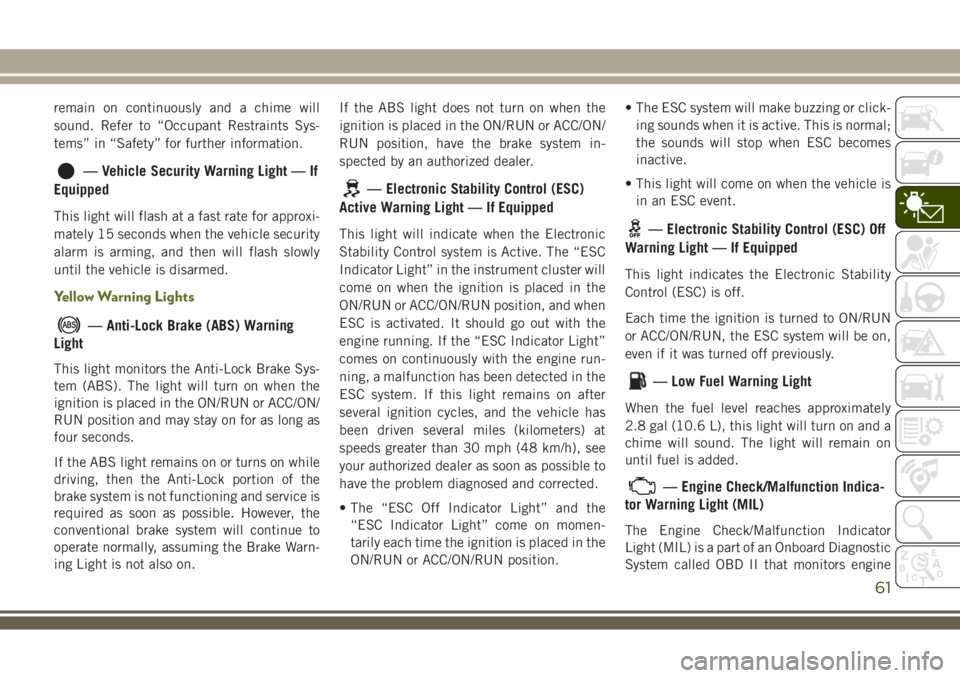
— Vehicle Security Warning Light — If
Equipped
This light will flash at a fast rate for approxi-
mately 15 seconds when the vehicle security
alarm is arming, and then will flash slowly
until the vehicle is disarmed.
Yellow Warning Lights
— Anti-Lock Brake (ABS) Warning
Light
This light monitors the Anti-Lock Brake Sys-
tem (ABS). The light will turn on when the
ignition is placed in the ON/RUN or ACC/ON/
RUN position and may stay on for as long as
four seconds.
If the ABS light remains on or turns on while
driving, then the Anti-Lock portion of the
brake system is not functioning and service is
required as soon as possible. However, the
conventional brake system will continue to
operate normally, assuming the Brake Warn-
ing Light is not also on.If the ABS light does not turn on when the
ignition is placed in the ON/RUN or ACC/ON/
RUN position, have the brake system in-
spected by an authorized dealer.
— Electronic Stability Control (ESC)
Active Warning Light — If Equipped
This light will indicate when the Electronic
Stability Control system is Active. The “ESC
Indicator Light” in the instrument cluster will
come on when the ignition is placed in the
ON/RUN or ACC/ON/RUN position, and when
ESC is activated. It should go out with the
engine running. If the “ESC Indicator Light”
comes on continuously with the engine run-
ning, a malfunction has been detected in the
ESC system. If this light remains on after
several ignition cycles, and the vehicle has
been driven several miles (kilometers) at
speeds greater than 30 mph (48 km/h), see
your authorized dealer as soon as possible to
have the problem diagnosed and corrected.
• The “ESC Off Indicator Light” and the
“ESC Indicator Light” come on momen-
tarily each time the ignition is placed in the
ON/RUN or ACC/ON/RUN position.• The ESC system will make buzzing or click-
ing sounds when it is active. This is normal;
the sounds will stop when ESC becomes
inactive.
• This light will come on when the vehicle is
in an ESC event.— Electronic Stability Control (ESC) Off
Warning Light — If Equipped
This light indicates the Electronic Stability
Control (ESC) is off.
Each time the ignition is turned to ON/RUN
or ACC/ON/RUN, the ESC system will be on,
even if it was turned off previously.
— Low Fuel Warning Light
When the fuel level reaches approximately
2.8 gal (10.6 L), this light will turn on and a
chime will sound. The light will remain on
until fuel is added.
— Engine Check/Malfunction Indica-
tor Warning Light (MIL)
The Engine Check/Malfunction Indicator
Light (MIL) is a part of an Onboard Diagnostic
System called OBD II that monitors engine
61
Page 67 of 276
If any of these systems require service, the
OBD II system will turn on the Malfunction
Indicator Light (MIL). It will also store diag-
nostic codes and other information to assist
your service technician in making repairs.
Although your vehicle will usually be drivable
and not need towing, see your authorized
dealer for service as soon as possible.
CAUTION!
• Prolonged driving with the MIL on could
cause further damage to the emission
control system. It could also affect fuel
economy and driveability. The vehicle
must be serviced before any emissions
tests can be performed.
• If the MIL is flashing while the vehicle is
running, severe catalytic converter dam-
age and power loss will soon occur. Im-
mediate service is required.
Onboard Diagnostic System (OBD II)
Cybersecurity
Your vehicle is required to have an Onboard
Diagnostic system (OBD II) and a connection
port to allow access to information related tothe performance of your emissions controls.
Authorized service technicians may need to
access this information to assist with the
diagnosis and service of your vehicle and
emissions system.
WARNING!
• ONLY an authorized service technician
should connect equipment to the OBD II
connection port in order to diagnose or
service your vehicle.
• If unauthorized equipment is connected
to the OBD II connection port, such as a
driver-behavior tracking device, it may:
• Be possible that vehicle systems,
including safety related systems,
could be impaired or a loss of ve-
hicle control could occur that may
result in an accident involving seri-
ous injury or death.
• Access, or allow others to access,
information stored in your vehicle
systems, including personal infor-
mation.For further information, refer to “Cybersecu-
rity” in “Multimedia” in your Owner's
Manual.
Loose Fuel Filler Cap Message
After fuel is added, the vehicle diagnostic
system can determine if the fuel filler cap is
possibly loose, improperly installed, or dam-
aged. A “gASCAP” message will be displayed
in the odometer. Tighten the gas cap until a
"clicking" sound is heard. This is an indica-
tion that the gas cap is properly tightened.
Push the odometer reset button to turn the
message off. If the problem persists, the
message will appear the next time the vehicle
is started. This might indicate a damaged
cap. If the problem is detected twice in a row,
the system will turn on the MIL. Resolving the
problem will turn the MIL off.
65
Page 86 of 276
OCCUPANT RESTRAINT
SYSTEMS
Some of the most important safety features in
your vehicle are the restraint systems:
Occupant Restraint Systems
• Seat Belt Systems
• Supplemental Restraint Systems (SRS) Air
Bags
• Child Restraints
Some of the safety features described in this
section may be standard equipment on some
models, or may be optional equipment on
others. If you are not sure, ask your autho-
rized dealer.
Important Safety Precautions
Please pay close attention to the information
in this section. It tells you how to use your
restraint system properly, to keep you and
your passengers as safe as possible.Here are some simple steps you can take to
minimize the risk of harm from a deploying
air bag:
1. Children 12 years old and under should
always ride buckled up in a vehicle with a
rear seat.
2. If a child from 2 to 12 years old (not in a
rear-facing child restraint) must ride in
the front passenger seat, move the seat asfar back as possible and use the proper
child restraint (refer to “Child Restraints”
in this section for further information).
3. Children that are not big enough to wear
the vehicle seat belt properly (refer to
“Child Restraints” in this section for fur-
ther information) should be secured in a
vehicle with a rear seat in child restraints
or belt-positioning booster seats. Older
children who do not use child restraints or
belt-positioning booster seats should ride
properly buckled up in a vehicle with a
rear seat.
4. Never allow children to slide the shoulder
belt behind them or under their arm.
5. You should read the instructions provided
with your child restraint to make sure that
you are using it properly.
6. All occupants should always wear their lap
and shoulder belts properly.
7. The driver and front passenger seats
should be moved back as far as practical
to allow the front air bags room to inflate.
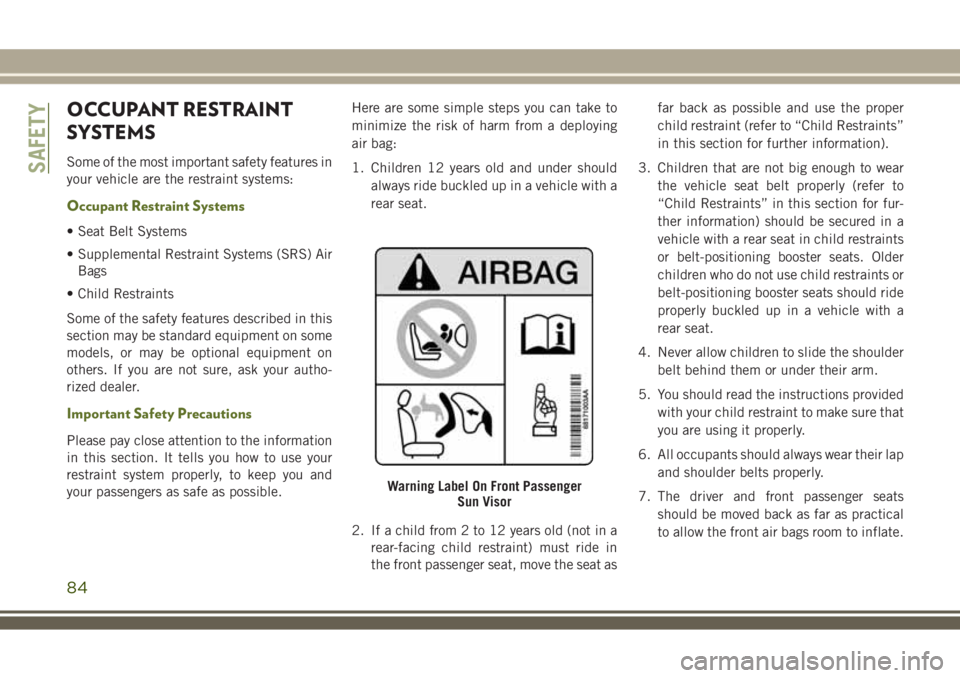
Warning Label On Front Passenger
Sun Visor
SAFETY
84
Page 88 of 276
Belt Reminder Light will remain on until the
seat belts are buckled. The BeltAlert warning
sequence may repeat based on vehicle speed
until the driver and occupied outboard front
seat passenger seat belts are buckled. The
driver should instruct all occupants to buckle
their seat belts.
Change of Status
If the driver or outboard front seat passenger
(if equipped with outboard front passenger
seat BeltAlert) unbuckles their seat belt
while the vehicle is traveling, the BeltAlert
warning sequence will begin until the seat
belts are buckled again.
The outboard front passenger seat BeltAlert
is not active when the outboard front passen-
ger seat is unoccupied. BeltAlert may be
triggered when an animal or other items are
placed on the outboard front passenger seat
or when the seat is folded flat (if equipped). It
is recommended that pets be restrained in
the rear seat (if equipped) in pet harnesses or
pet carriers that are secured by seat belts,
and cargo is properly stowed.BeltAlert can be activated or deactivated by
your authorized dealer. FCA US LLC does not
recommend deactivating BeltAlert.
NOTE:
If BeltAlert has been deactivated and the
driver or outboard front seat passenger (if
equipped with outboard front passenger seat
BeltAlert) is unbuckled the Seat Belt Re-
minder Light will turn on and remain on until
the driver and outboard front seat passenger
seat belts are buckled.
Lap/Shoulder Belts
All seating positions in your vehicle are
equipped with lap/shoulder belts.
The seat belt webbing retractor will lock only
during very sudden stops or collisions. This
feature allows the shoulder part of the seat
belt to move freely with you under normal
conditions. However, in a collision the seat
belt will lock and reduce your risk of striking
the inside of the vehicle or being thrown out
of the vehicle.
WARNING!
• Relying on the air bags alone could lead
to more severe injuries in a collision. The
air bags work with your seat belt to
restrain you properly. In some collisions,
the air bags won’t deploy at all. Always
wear your seat belt even though you have
air bags.
• In a collision, you and your passengers
can suffer much greater injuries if you
are not properly buckled up. You can
strike the interior of your vehicle or other
passengers, or you can be thrown out of
the vehicle. Always be sure you and
others in your vehicle are buckled up
properly.
• It is dangerous to ride in a cargo area,
inside or outside of a vehicle. In a colli-
sion, people riding in these areas are
more likely to be seriously injured or
killed.
• Do not allow people to ride in any area of
your vehicle that is not equipped with
seats and seat belts.
SAFETY
86
Page 92 of 276
WARNING!
resting on your neck. The retractor will
withdraw any slack in the shoulder belt.
• Misadjustment of the seat belt could
reduce the effectiveness of the safety
belt in a crash.
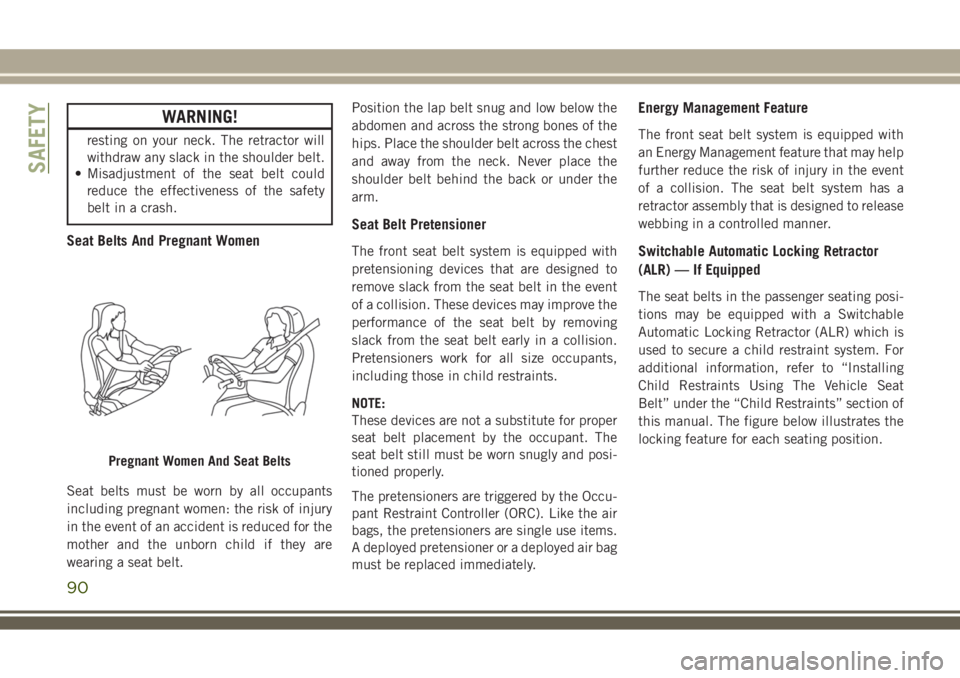
Seat Belts And Pregnant Women
Seat belts must be worn by all occupants
including pregnant women: the risk of injury
in the event of an accident is reduced for the
mother and the unborn child if they are
wearing a seat belt.Position the lap belt snug and low below the
abdomen and across the strong bones of the
hips. Place the shoulder belt across the chest
and away from the neck. Never place the
shoulder belt behind the back or under the
arm.
Seat Belt Pretensioner
The front seat belt system is equipped with
pretensioning devices that are designed to
remove slack from the seat belt in the event
of a collision. These devices may improve the
performance of the seat belt by removing
slack from the seat belt early in a collision.
Pretensioners work for all size occupants,
including those in child restraints.
NOTE:
These devices are not a substitute for proper
seat belt placement by the occupant. The
seat belt still must be worn snugly and posi-
tioned properly.
The pretensioners are triggered by the Occu-
pant Restraint Controller (ORC). Like the air
bags, the pretensioners are single use items.
A deployed pretensioner or a deployed air bag
must be replaced immediately.
Energy Management Feature
The front seat belt system is equipped with
an Energy Management feature that may help
further reduce the risk of injury in the event
of a collision. The seat belt system has a
retractor assembly that is designed to release
webbing in a controlled manner.
Switchable Automatic Locking Retractor
(ALR) — If Equipped
The seat belts in the passenger seating posi-
tions may be equipped with a Switchable
Automatic Locking Retractor (ALR) which is
used to secure a child restraint system. For
additional information, refer to “Installing
Child Restraints Using The Vehicle Seat
Belt” under the “Child Restraints” section of
this manual. The figure below illustrates the
locking feature for each seating position.
Pregnant Women And Seat Belts
SAFETY
90
Page 104 of 276
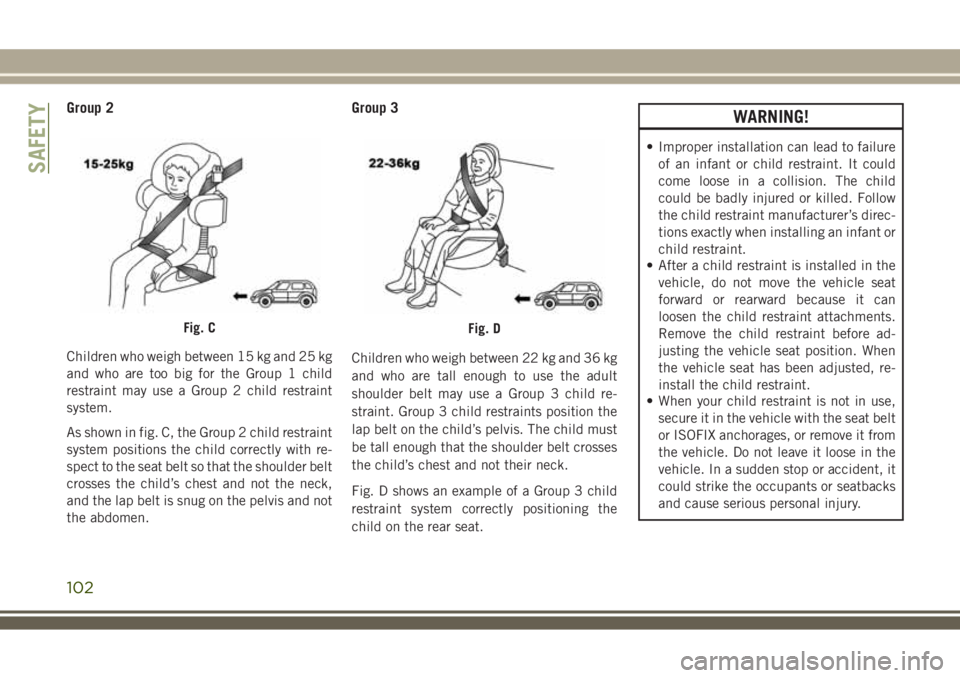
Group 2
Children who weigh between 15 kg and 25 kg
and who are too big for the Group 1 child
restraint may use a Group 2 child restraint
system.
As shown in fig. C, the Group 2 child restraint
system positions the child correctly with re-
spect to the seat belt so that the shoulder belt
crosses the child’s chest and not the neck,
and the lap belt is snug on the pelvis and not
the abdomen.
Group 3
Children who weigh between 22 kg and 36 kg
and who are tall enough to use the adult
shoulder belt may use a Group 3 child re-
straint. Group 3 child restraints position the
lap belt on the child’s pelvis. The child must
be tall enough that the shoulder belt crosses
the child’s chest and not their neck.
Fig. D shows an example of a Group 3 child
restraint system correctly positioning the
child on the rear seat.
WARNING!
• Improper installation can lead to failure
of an infant or child restraint. It could
come loose in a collision. The child
could be badly injured or killed. Follow
the child restraint manufacturer’s direc-
tions exactly when installing an infant or
child restraint.
• After a child restraint is installed in the
vehicle, do not move the vehicle seat
forward or rearward because it can
loosen the child restraint attachments.
Remove the child restraint before ad-
justing the vehicle seat position. When
the vehicle seat has been adjusted, re-
install the child restraint.
• When your child restraint is not in use,
secure it in the vehicle with the seat belt
or ISOFIX anchorages, or remove it from
the vehicle. Do not leave it loose in the
vehicle. In a sudden stop or accident, it
could strike the occupants or seatbacks
and cause serious personal injury.
Fig. CFig. D
SAFETY
102