diagram JEEP WRANGLER 2020 Owner handbook (in English)
[x] Cancel search | Manufacturer: JEEP, Model Year: 2020, Model line: WRANGLER, Model: JEEP WRANGLER 2020Pages: 276, PDF Size: 4.47 MB
Page 111 of 276

vehicle, you may wish to move it to its
rear-most position to make room for the
child seat. You may also move the front
seat forward to allow more room for the
child seat.
3. Attach the connectors of the child re-
straint to the lower anchorages in the
selected seating position.
4. If the child restraint has a tether strap,
connect it to the top tether anchorage.
See the section “Installing Child Re-
straints Using the Top Tether Anchorage”
for directions to attach a tether anchor.
5. Tighten all of the straps as you push the
child restraint rearward and downward
into the seat. Remove slack in the straps
according to the child restraint manufac-
turer’s instructions.
6. Test that the child restraint is installed
tightly by pulling back and forth on the
child seat at the belt path. It should not
move more than 25 mm in any direction.WARNING!
• Improper installation of a child restraint
to the ISOFIX anchorages can lead to
failure of the restraint. The child could
be badly injured or killed. Follow the
child restraint manufacturer’s directions
exactly when installing an infant or child
restraint.
• Child restraint anchorages are designed
to withstand only those loads imposed
by correctly-fitted child restraints. Un-
der no circumstances are they to be used
for adult seat belts, harnesses, or for
attaching other items or equipment to
the vehicle.
• Install the child restraint system when
the vehicle is stationary. The ISOFIX
child restraint system is correctly fixed
to the brackets when you hear the click.
Installing Child Restraints Using The Top
Tether Anchorage:
1. Look behind the seating position where
you plan to install the child restraint to
find the tether anchorage. You may need
to move the seat forward to provide better
access to the tether anchorage. If there is
no top tether anchorage for that seating
position, move the child restraint to an-
other position in the vehicle if one is
available.
2. Route the tether strap to provide the most
direct path for the strap between the an-
chor and the child seat. If your vehicle is
equipped with adjustable rear head re-
straints, raise the head restraint, and
where possible, route the tether strap un-
der the head restraint and between the
two posts. If not possible, lower the head
restraint and pass the tether strap around
the outboard side of the head restraint.
3. Attach the tether strap hook of the child
restraint to the top tether anchorage as
shown in the diagram.
109
Page 203 of 276

CAUTION!
pension components, it is important
that only traction devices in good condi-
tion are used. Broken devices can cause
serious damage. Stop the vehicle imme-
diately if noise occurs that could indi-
cate device breakage. Remove the dam-
aged parts of the device before further
use.
• Install device as tightly as possible and
then retighten after driving about ½ mile
(0.8 km).
• Do not exceed 30 mph (48 km/h).
• Drive cautiously and avoid severe turns
and large bumps, especially with a
loaded vehicle.
• Do not drive for a prolonged period on
dry pavement.
• Observe the traction device manufactur-
er’s instructions on the method of instal-
lation, operating speed, and conditions
for use. Always use the suggested oper-
ating speed of the device manufacturer’s
if it is less than 30 mph (48 km/h).
• Do not use traction devices on a com-
pact spare tire.
Tire Rotation Recommendations
The tires on the front and rear of your vehicle
operate at different loads and perform differ-
ent steering, handling, and braking func-
tions. For these reasons, they wear at unequal
rates.
These effects can be reduced by timely rota-
tion of tires. The benefits of rotation are
especially worthwhile with aggressive tread
designs such as those on On/Off Road type
tires. Rotation will increase tread life, help to
maintain mud, snow, and wet traction levels,
and contribute to a smooth, quiet ride.
Refer to the “Maintenance Plan” for the
proper maintenance intervals. The reasons
for any rapid or unusual wear should be
corrected prior to rotation being performed.
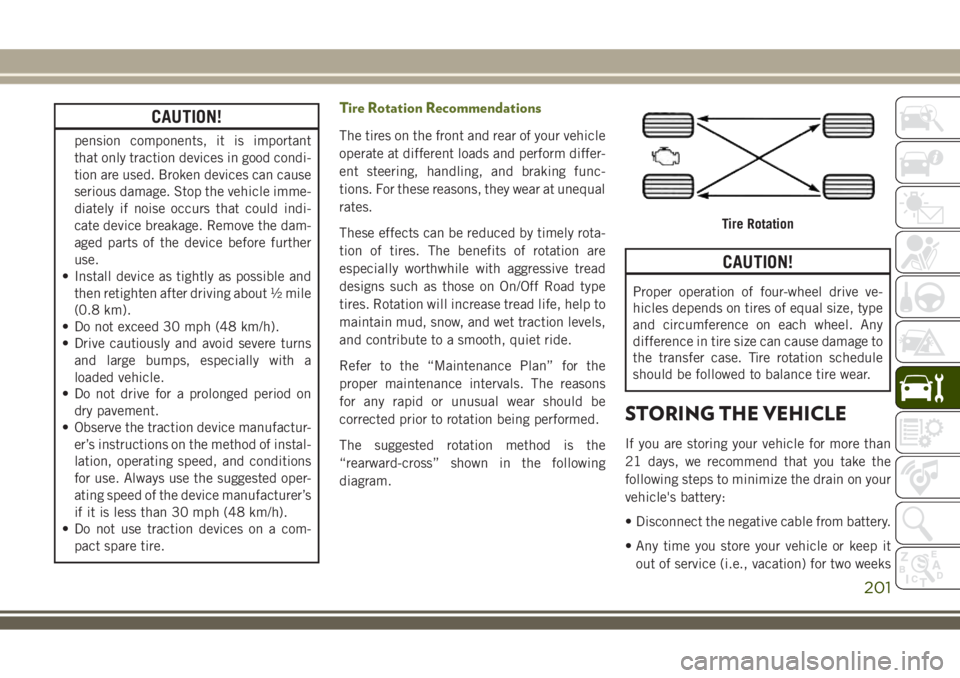
The suggested rotation method is the
“rearward-cross” shown in the following
diagram.
CAUTION!
Proper operation of four-wheel drive ve-
hicles depends on tires of equal size, type
and circumference on each wheel. Any
difference in tire size can cause damage to
the transfer case. Tire rotation schedule
should be followed to balance tire wear.
STORING THE VEHICLE
If you are storing your vehicle for more than
21 days, we recommend that you take the
following steps to minimize the drain on your
vehicle's battery:
• Disconnect the negative cable from battery.
• Any time you store your vehicle or keep it
out of service (i.e., vacation) for two weeks
Tire Rotation
201