ECO mode JEEP WRANGLER 2021 Owner handbook (in English)
[x] Cancel search | Manufacturer: JEEP, Model Year: 2021, Model line: WRANGLER, Model: JEEP WRANGLER 2021Pages: 276, PDF Size: 4.47 MB
Page 184 of 276
Checking Oil Level — Gasoline Engine
To ensure proper lubrication of your vehicle's
engine, the engine oil must be maintained at
the correct level. The engine oil level should
be checked five minutes after a warmed up
engine has been shut off.
Checking the oil while the vehicle is on level
ground will improve the accuracy of the oil
level readings. Always maintain the oil level
within the SAFE zone on the dipstick. Adding
1 quart (0.95 liters) of oil when the reading is
at the bottom of the crosshatch zone will
result in a reading at the top of the cross-
hatch zone on these engines.
CAUTION!
Overfilling or underfilling the crankcase
will cause aeration or loss of oil pressure.
This could damage your engine.
Checking Oil Level — Diesel Engine
To assure proper engine lubrication, the en-
gine oil must be maintained at the correct
level. Check the oil level at regular intervals,
such as every fuel stop.For vehicles equipped with a Diesel Particu-
late Filter (DPF), it is acceptable to have an
oil level up to 3/8 inch (10 mm) above the
MAX line. Beyond 3/8 inch (10 mm) it is
recommended to change the oil.
The best time to check the engine oil level is
about five minutes after a fully warmed en-
gine is shut off.
Checking the oil while the vehicle is on level
ground will improve the accuracy of the oil
level readings. Maintain the oil level between
the MIN and MAX markings on the dipstick.
Adding 1 U.S. Quart (0.95 L) of oil when the
reading is at the MIN mark will result in a
MAX reading on these engines.
Cooling System
WARNING!
• You or others can be badly burned by hot
engine coolant (antifreeze) or steam
from your radiator. If you see or hear
steam coming from under the hood, do
not open the hood until the radiator has
had time to cool. Never open a cooling
WARNING!
system pressure cap when the radiator
or coolant bottle is hot.
• Keep hands, tools, clothing, and jewelry
away from the radiator cooling fan when
the hood is raised. The fan starts auto-
matically and may start at any time,
whether the engine is running or not.
• When working near the radiator cooling
fan, disconnect the fan motor lead or
turn the ignition to the OFF mode. The
fan is temperature controlled and can
start at any time the ignition is in the ON
mode.
Engine Coolant Checks
Check the engine coolant (antifreeze) protec-
tion every 12 months (before the onset of
freezing weather, where applicable). If the
engine coolant (antifreeze) is dirty or rusty in
appearance, the system should be drained,
flushed and refilled with fresh engine coolant
(antifreeze). Check the front of the A/C con-
denser (if equipped) or radiator for any accu-
mulation of bugs, leaves, etc. If dirty, clean
SERVICING AND MAINTENANCE
182
Page 189 of 276
WARNING!
requiring lines to be disconnected
should be done by an experienced tech-
nician.
CAUTION!
Do not use chemical flushes in your air
conditioning system as the chemicals can
damage your air conditioning components.
Such damage is not covered by the New
Vehicle Limited Warranty.
Refrigerant Recovery And Recycling R-134a
— If Equipped
R-134a Air Conditioning Refrigerant is a
hydrofluorocarbon (HFC) that is an ozone-
friendly substance. The manufacturer recom-
mends that air conditioning service be per-
formed by an authorized dealer or other
service facilities using recovery and recycling
equipment.NOTE:
Use only manufacturer approved A/C system
PAG compressor oil and refrigerants.
Refrigerant Recovery And Recycling —
R–1234yf
R–1234yf Air Conditioning Refrigerant is a
hydrofluoroolefin (HFO) that is endorsed by
the Environmental Protection Agency and is
an ozone-friendly substance with a low
global-warming potential. The manufacturer
recommends that air conditioning service be
performed by an authorized dealer using re-
covery and recycling equipment.
NOTE:
Use only manufacturer approved A/C system
PAG compressor oil, and refrigerants.
Air Conditioning Filter Replacement (A/C Air
Filter)
WARNING!
Do not remove the cabin air filter while the
vehicle is running, or while the ignition is
in the ACC or ON/RUN mode. With the
cabin air filter removed and the blower
operating, the blower can contact hands
and may propel dirt and debris into your
eyes, resulting in personal injury.
The A/C air filter is located in the fresh air
inlet behind the glove compartment. Perform
the following procedure to replace the filter:
1. Open the glove compartment and remove
all contents.
2. Push in on the sides of the glove compart-
ment and lower the door.
187
Page 197 of 276
Tire Repair
If your tire becomes damaged, it may be
repaired if it meets the following criteria:
• The tire has not been driven on when flat.
• The damage is only on the tread section of
your tire (sidewall damage is not repair-
able).
• The puncture is no greater thana¼ofan
inch (6 mm).
Consult an authorized tire dealer for tire re-
pairs and additional information.
Damaged Run Flat tires, or Run Flat tires that
have experienced a loss of pressure should be
replaced immediately with another Run Flat
tire of identical size and service description
(Load Index and Speed Symbol).
Run Flat Tires — If Equipped
Run Flat tires allow you the capability to drive
50 miles (80 km) at 50 mph (80 km/h) after
a rapid loss of inflation pressure. This rapid
loss of inflation is referred to as the Run Flat
mode. A Run Flat mode occurs when the tire
inflation pressure is of/or below 14 psi
(96 kPa). Once a Run Flat tire reaches therun flat mode it has limited driving capabili-
ties and needs to be replaced immediately. A
Run Flat tire is not repairable.
It is not recommended driving a vehicle
loaded at full capacity or to tow a trailer while
a tire is in the run flat mode.
See the tire pressure monitoring section for
more information.
Tire Spinning
When stuck in mud, sand, snow, or ice con-
ditions, do not spin your vehicle's wheels
above 30 mph (48 km/h) or for longer than
30 seconds continuously without stopping.
Refer to “Freeing A Stuck Vehicle” in “In
Case Of Emergency” for further information.
WARNING!
Fast spinning tires can be dangerous.
Forces generated by excessive wheel
speeds may cause tire damage or failure. A
tire could explode and injure someone. Do
not spin your vehicle's wheels faster than
30 mph (48 km/h) for more than 30 sec-
WARNING!
onds continuously when you are stuck, and
do not let anyone near a spinning wheel,
no matter what the speed.
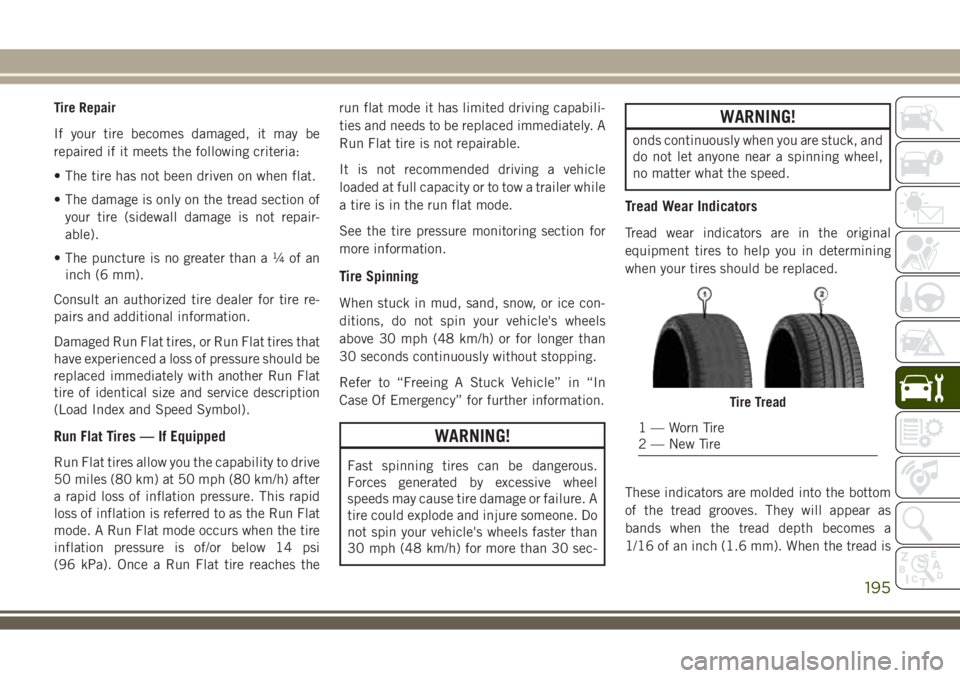
Tread Wear Indicators
Tread wear indicators are in the original
equipment tires to help you in determining
when your tires should be replaced.
These indicators are molded into the bottom
of the tread grooves. They will appear as
bands when the tread depth becomes a
1/16 of an inch (1.6 mm). When the tread is
Tire Tread
1 — Worn Tire
2 — New Tire
195
Page 205 of 276
• An authorized dealer has touch up paint to
match the color of your vehicle.
Appearance Care For Fabric Top Models
To maintain the appearance of your vehicle's
interior trim and top, follow these precau-
tions:
• Avoid leaving your vehicle unattended with
the top down, as exposure to sun or rain
may damage interior trim.
• Do not use harsh cleaners or bleaching
agents on top material, as damage may
result.
• Do not allow any vinyl cleaner to run down
and dry on the paint, leaving a streak.
• After cleaning your vehicle's fabric top,
always make sure it is completely dry before
lowering.
• Be especially careful when washing the
windows by following the directions for
“Care of Fabric Top Windows.”Washing –Use mild soap suds, lukewarm
water, and a brush with soft bristles. If extra
cleaning is required, use a mild foaming
cleaner on the entire top, but support the top
from underneath.
Rinsing –Be sure to remove all traces of
cleaner by rinsing the top thoroughly with
clean water. Remember to allow the top to dry
before lowering it.
CAUTION!
Failure to follow these cautions may cause
interior water damage, stains or mildew on
the top material:
• Avoid high-pressure car washes, as they
can damage the top material. Also, in-
creased water pressure may force past
the weather strips.
• It is recommended that the top be free of
water prior to opening it. Operating the
top, opening a door or lowering a window
while the top is wet may allow water to
drip into the vehicle's interior.
• Use care when washing the vehicle, wa-
ter pressure directed at the weather strip
CAUTION!
seals may cause water to leak into the
vehicle's interior.
• Careless handling and storage of the
removable roof panels may damage the
seals, causing water to leak into the
vehicle's interior.
• The front panel(s) must be positioned
properly to ensure sealing. Improper in-
stallation can cause water to leak into
the vehicle's interior.
Some parts of the vehicle may be painted
with a matte paintwork which requires spe-
cial care for its preservation.
CAUTION!
• Avoid washing with rollers and/or
brushes in washing stations. Wash the
vehicle only by hand using neutral pH
detergents; dry it with a wet chamois
leather. Abrasive products and/or pol-
ishes should not be used for cleaning the
car. Bird droppings must be washed off
203
Page 212 of 276
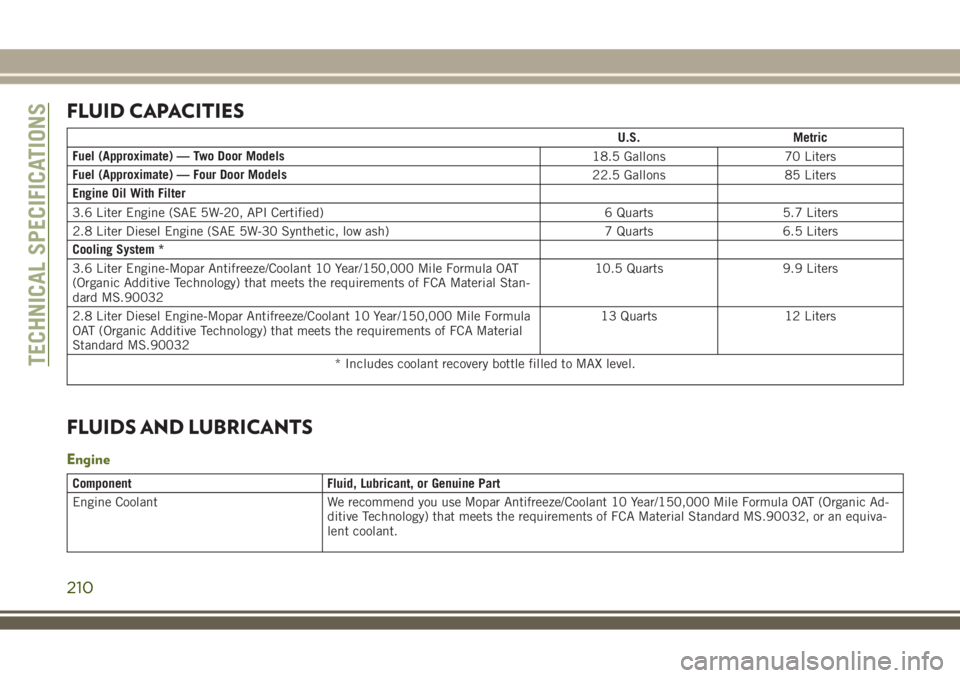
FLUID CAPACITIES
U.S. Metric
Fuel (Approximate) — Two Door Models
18.5 Gallons 70 Liters
Fuel (Approximate) — Four Door Models
22.5 Gallons 85 Liters
Engine Oil With Filter
3.6 Liter Engine (SAE 5W-20, API Certified) 6 Quarts 5.7 Liters
2.8 Liter Diesel Engine (SAE 5W-30 Synthetic, low ash) 7 Quarts 6.5 Liters
Cooling System *
3.6 Liter Engine-Mopar Antifreeze/Coolant 10 Year/150,000 Mile Formula OAT
(Organic Additive Technology) that meets the requirements of FCA Material Stan-
dard MS.9003210.5 Quarts 9.9 Liters
2.8 Liter Diesel Engine-Mopar Antifreeze/Coolant 10 Year/150,000 Mile Formula
OAT (Organic Additive Technology) that meets the requirements of FCA Material
Standard MS.9003213 Quarts 12 Liters
* Includes coolant recovery bottle filled to MAX level.
FLUIDS AND LUBRICANTS
Engine
Component Fluid, Lubricant, or Genuine Part
Engine Coolant We recommend you use Mopar Antifreeze/Coolant 10 Year/150,000 Mile Formula OAT (Organic Ad-
ditive Technology) that meets the requirements of FCA Material Standard MS.90032, or an equiva-
lent coolant.
TECHNICAL SPECIFICATIONS
210
Page 213 of 276
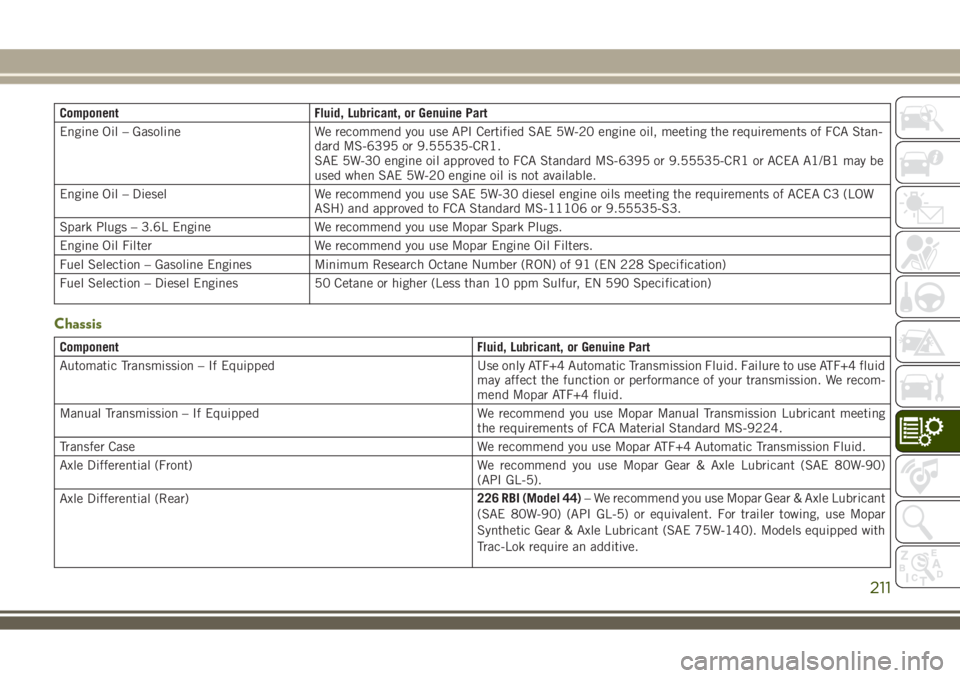
Component Fluid, Lubricant, or Genuine Part
Engine Oil – Gasoline We recommend you use API Certified SAE 5W-20 engine oil, meeting the requirements of FCA Stan-
dard MS-6395 or 9.55535-CR1.
SAE 5W-30 engine oil approved to FCA Standard MS-6395 or 9.55535-CR1 or ACEA A1/B1 may be
used when SAE 5W-20 engine oil is not available.
Engine Oil – Diesel We recommend you use SAE 5W-30 diesel engine oils meeting the requirements of ACEA C3 (LOW
ASH) and approved to FCA Standard MS-11106 or 9.55535-S3.
Spark Plugs – 3.6L Engine We recommend you use Mopar Spark Plugs.
Engine Oil Filter We recommend you use Mopar Engine Oil Filters.
Fuel Selection – Gasoline Engines Minimum Research Octane Number (RON) of 91 (EN 228 Specification)
Fuel Selection – Diesel Engines 50 Cetane or higher (Less than 10 ppm Sulfur, EN 590 Specification)
Chassis
Component Fluid, Lubricant, or Genuine Part
Automatic Transmission – If Equipped Use only ATF+4 Automatic Transmission Fluid. Failure to use ATF+4 fluid
may affect the function or performance of your transmission. We recom-
mend Mopar ATF+4 fluid.
Manual Transmission – If Equipped We recommend you use Mopar Manual Transmission Lubricant meeting
the requirements of FCA Material Standard MS-9224.
Transfer Case We recommend you use Mopar ATF+4 Automatic Transmission Fluid.
Axle Differential (Front) We recommend you use Mopar Gear & Axle Lubricant (SAE 80W-90)
(API GL-5).
Axle Differential (Rear)226 RBI (Model 44)– We recommend you use Mopar Gear & Axle Lubricant
(SAE 80W-90) (API GL-5) or equivalent. For trailer towing, use Mopar
Synthetic Gear & Axle Lubricant (SAE 75W-140). Models equipped with
Trac-Lok require an additive.
211
Page 228 of 276
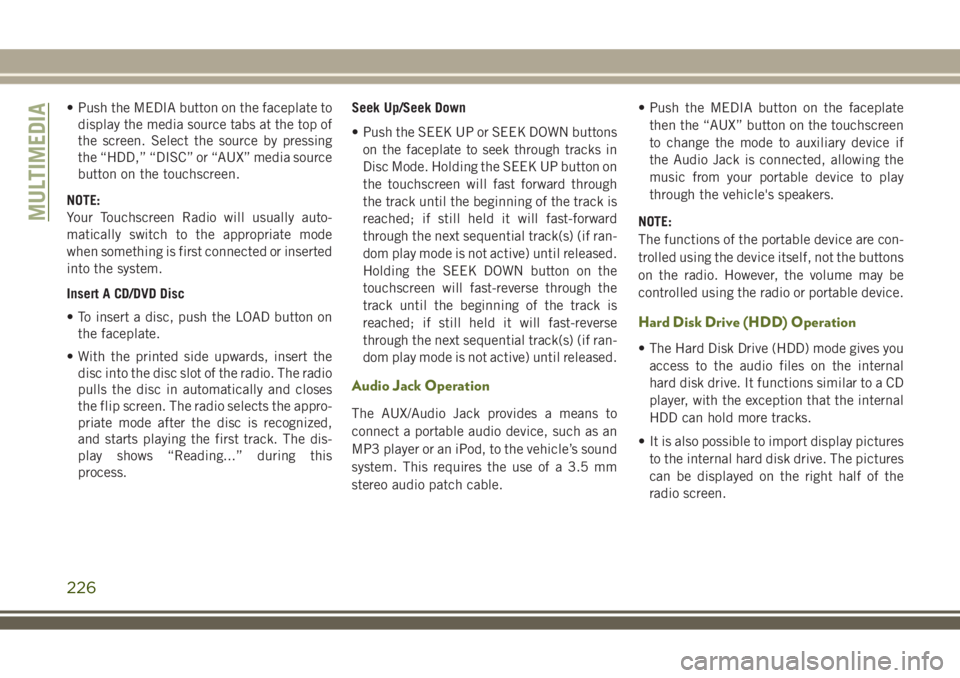
• Push the MEDIA button on the faceplate to
display the media source tabs at the top of
the screen. Select the source by pressing
the “HDD,” “DISC” or “AUX” media source
button on the touchscreen.
NOTE:
Your Touchscreen Radio will usually auto-
matically switch to the appropriate mode
when something is first connected or inserted
into the system.
Insert A CD/DVD Disc
• To insert a disc, push the LOAD button on
the faceplate.
• With the printed side upwards, insert the
disc into the disc slot of the radio. The radio
pulls the disc in automatically and closes
the flip screen. The radio selects the appro-
priate mode after the disc is recognized,
and starts playing the first track. The dis-
play shows “Reading...” during this
process.Seek Up/Seek Down
• Push the SEEK UP or SEEK DOWN buttons
on the faceplate to seek through tracks in
Disc Mode. Holding the SEEK UP button on
the touchscreen will fast forward through
the track until the beginning of the track is
reached; if still held it will fast-forward
through the next sequential track(s) (if ran-
dom play mode is not active) until released.
Holding the SEEK DOWN button on the
touchscreen will fast-reverse through the
track until the beginning of the track is
reached; if still held it will fast-reverse
through the next sequential track(s) (if ran-
dom play mode is not active) until released.
Audio Jack Operation
The AUX/Audio Jack provides a means to
connect a portable audio device, such as an
MP3 player or an iPod, to the vehicle’s sound
system. This requires the use of a 3.5 mm
stereo audio patch cable.• Push the MEDIA button on the faceplate
then the “AUX” button on the touchscreen
to change the mode to auxiliary device if
the Audio Jack is connected, allowing the
music from your portable device to play
through the vehicle's speakers.
NOTE:
The functions of the portable device are con-
trolled using the device itself, not the buttons
on the radio. However, the volume may be
controlled using the radio or portable device.
Hard Disk Drive (HDD) Operation
• The Hard Disk Drive (HDD) mode gives you
access to the audio files on the internal
hard disk drive. It functions similar to a CD
player, with the exception that the internal
HDD can hold more tracks.
• It is also possible to import display pictures
to the internal hard disk drive. The pictures
can be displayed on the right half of the
radio screen.
MULTIMEDIA
226
Page 239 of 276
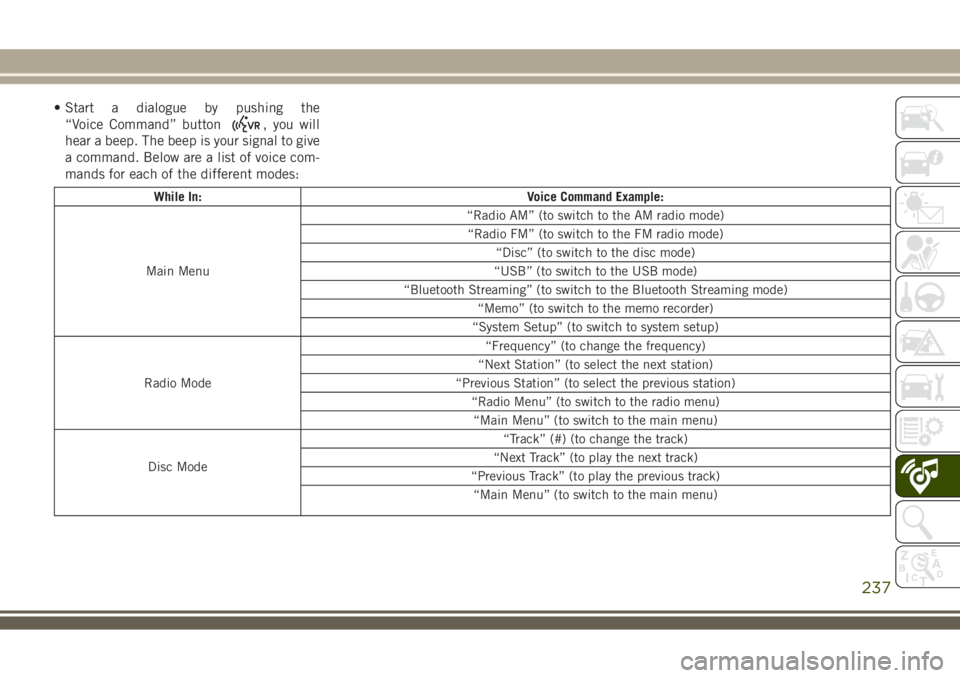
• Start a dialogue by pushing the
“Voice Command” button
, you will
hear a beep. The beep is your signal to give
a command. Below are a list of voice com-
mands for each of the different modes:
While In: Voice Command Example:
Main Menu“Radio AM” (to switch to the AM radio mode)
“Radio FM” (to switch to the FM radio mode)
“Disc” (to switch to the disc mode)
“USB” (to switch to the USB mode)
“Bluetooth Streaming” (to switch to the Bluetooth Streaming mode)
“Memo” (to switch to the memo recorder)
“System Setup” (to switch to system setup)
Radio Mode“Frequency” (to change the frequency)
“Next Station” (to select the next station)
“Previous Station” (to select the previous station)
“Radio Menu” (to switch to the radio menu)
“Main Menu” (to switch to the main menu)
Disc Mode“Track” (#) (to change the track)
“Next Track” (to play the next track)
“Previous Track” (to play the previous track)
“Main Menu” (to switch to the main menu)
237
Page 240 of 276
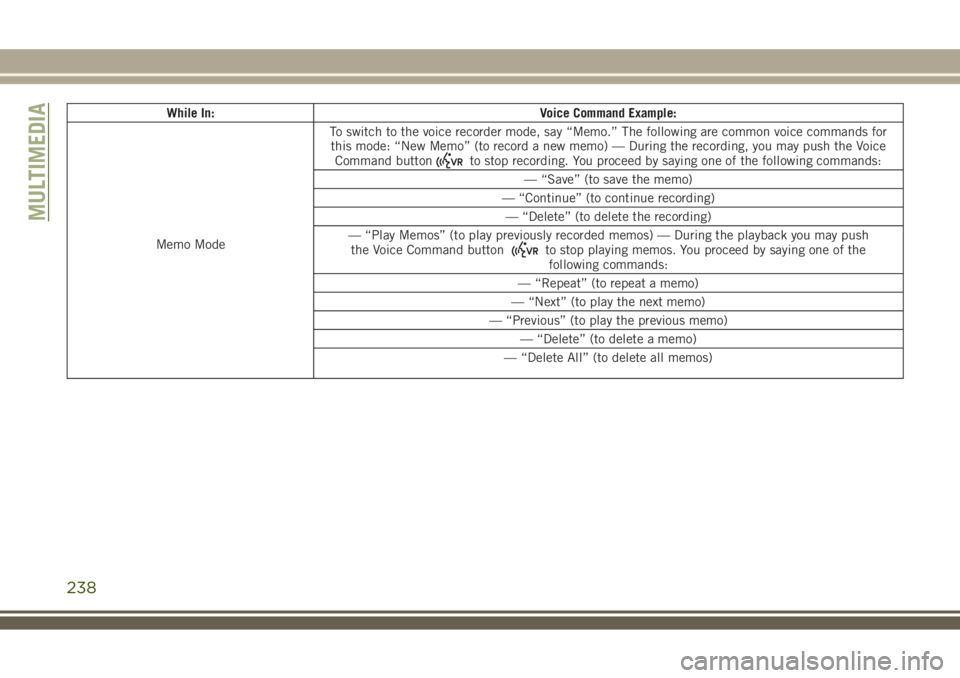
While In: Voice Command Example:
Memo ModeTo switch to the voice recorder mode, say “Memo.” The following are common voice commands for
this mode: “New Memo” (to record a new memo) — During the recording, you may push the Voice
Command button
to stop recording. You proceed by saying one of the following commands:
— “Save” (to save the memo)
— “Continue” (to continue recording)
— “Delete” (to delete the recording)
— “Play Memos” (to play previously recorded memos) — During the playback you may push
the Voice Command button
to stop playing memos. You proceed by saying one of the
following commands:
— “Repeat” (to repeat a memo)
— “Next” (to play the next memo)
— “Previous” (to play the previous memo)
— “Delete” (to delete a memo)
— “Delete All” (to delete all memos)
MULTIMEDIA
238